
F-RSIN 1/144 DC-7C
| KIT #: | FRP 4001 |
| PRICE: | $35.00 from www.coopersmodels.com |
| DECALS: | Several options |
| REVIEWER: | Scott Van Aken |
| NOTES: | Short run kit |
| HISTORY |
The DC-7 was the last of the Douglas propeller-powered transports. Introduced in May 1953, it entered service with American Airlines in November 1953. It was the first commercial transport able to fly nonstop westbound across the United States against the prevailing winds.
The DC-7C, or the "Seven Seas," lived up to its name because it could fly 110 passengers anywhere in the world. It was a direct competitor to the Lockheed L.1069 Super Constellation. The DC-7C entered service with Pan Am a year earlier (June 1956) than the Lockheed plane with TWA and was faster. Only the Super Connie and DC-7C had the range to fly non-stop both directions across the Atlantic; the only propliners capable of that feat. The DC-7B and standard Connie could fly nonstop eastward (thanks to the west to east winds), but had to stop on the way back in Iceland or Newfoundland to refuel. 121 DC-7C aircraft were built
Douglas built 338 DC-7s and delivered the last in 1958. Most DC-7s were modified as freighters or scrapped. Some were kept for air racing, aerial firefighting and satellite tracking.
| THE KIT |
 I
have heard of F-RSIN and they do make some very interesting kits. Most are, as
the name implies, cast in resin. However, they have recently started producing
kits using injected styrene. These are not Tamiya or Hasegawa quality kits, but
they are not bad.
I
have heard of F-RSIN and they do make some very interesting kits. Most are, as
the name implies, cast in resin. However, they have recently started producing
kits using injected styrene. These are not Tamiya or Hasegawa quality kits, but
they are not bad.
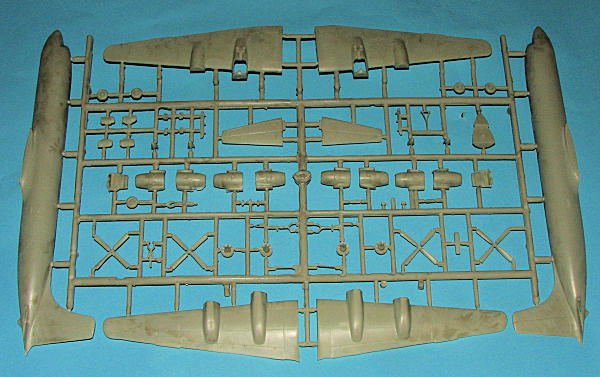
The kit itself is on a single, large sprue. There are no clear parts with decals being provided for windows. Personally, this is just fine as I tend to blend in and paint over clear bits when building airliners. The overall feel of the plastic is a bit on the rough side, a norm for many short run manufacturers. The greyish plastic looks to be very mottled, but this is probably some sort of mold release agent as the mottling will wash off with plain soap and water. The 'inside' of most large parts have large ejector towers that will need to be removed by the modeler. I noticed that the inside trailing edge of one wing appears to be slightly short shot and there are depressions on both sides of both horizontal stabs and on on one upper wing engine nacelle that will require filling. Most edges are a bit rough and will need sanding down. None of this is unusual for short run kits and those of us who build a lot of these will take this into stride.
The general detail level of the kit is good with engraved panel lines as one expects. The lines themselves are a bit on the 'soft' side in the the edges are more rounded than on high pressure injection molded kits you get from Hasegawa or Revell. The plastic is a bit on the brittle side as one area where the fuselage has broken away from the sprue has splintered a bit. Again. no problem repairing it, but one should use a razor saw to remove parts.
There are only so many ways to engineer a DC-6/7 and this one looks very much like the Minicraft kits in that regard. Nacelles are molded left and right halves with reasonable engine discs trapped in between them. In this kit, the prop blades are all in one assembly instead of separate. This kit also has the lower fuselage intake as a separate piece. Though there is no interior, there is a section to be installed there so that there is an upper wheel well. Sections are also supplied for the main gear well. Landing gear will, like all the parts, require some cleanup before use. Wheels and gear doors are all provided without any sink areas. I'm not sure how well this will build wheels up as the gear doors all have tabs. Were I to build this 'in flight', I think I'd just fill the wells with epoxy filler and sand the area smooth.
 This is
one of at least three boxings of this kit and it comes with BOAC decals. The
decal sheet is well printed and provides several airliner options plus a pair of
cargo conversions. The kit has cargo doors and hinges molded in place so I
believe that some filler and sanding will be required for an all passenger
plane. The kit's decal sheet is well printed and there is an addendum sheet for
the cargo doors should you wish to build one of those. One can do either the
blue tail version that was in vogue starting in 1962 or the white tail version
which was the livery with which the DC-7C entered BOAC service. Both schemes are
overall unpainted aluminum with white upper fuselage. Instructions are basically
an exploded view, which is fine for a kit like this. A nice addition is a sheet
of window and door arrangements. Airliner fans know that rarely will a full
production run of an aircraft have the same window and door placements, so
F-RSIN provided some welcome guidance. The color and markings placement guide is
in full color and has lots of helpful notes. I should mention that all the
instructions are in both French and English.
This is
one of at least three boxings of this kit and it comes with BOAC decals. The
decal sheet is well printed and provides several airliner options plus a pair of
cargo conversions. The kit has cargo doors and hinges molded in place so I
believe that some filler and sanding will be required for an all passenger
plane. The kit's decal sheet is well printed and there is an addendum sheet for
the cargo doors should you wish to build one of those. One can do either the
blue tail version that was in vogue starting in 1962 or the white tail version
which was the livery with which the DC-7C entered BOAC service. Both schemes are
overall unpainted aluminum with white upper fuselage. Instructions are basically
an exploded view, which is fine for a kit like this. A nice addition is a sheet
of window and door arrangements. Airliner fans know that rarely will a full
production run of an aircraft have the same window and door placements, so
F-RSIN provided some welcome guidance. The color and markings placement guide is
in full color and has lots of helpful notes. I should mention that all the
instructions are in both French and English.
| CONCLUSIONS |
It is logical for one to compare this kit with the new Roden DC-7C. Both are similar in layout, with the Roden kit having the better surface detail, but only by a small margin. The F-RSIN kit dispenses with the needless clear bits and does not have individual prop blades (a personal dislike). It also has a more comprehensive decal sheet with multiple options. It will also be a bit more time consuming to build thanks to being a short run kit. Both are priced about the same thanks to the Cooper's Models discount.
| REFERENCES |
www.boeing.com
Kit instructions January 2011 Thanks to
www.coopersmodels.com
for the preview kit. This and a bunch of other neat stuff is available there, so
check it out If you would like your product reviewed fairly and quickly, please
contact
me or see other details in the
Note to
Contributors.