F-RSIN 1/144 Latecoere 631
| KIT #: | FR14093 |
| PRICE: | $93.00 on sale for $75.00 |
| DECALS: | One option |
| REVIEWER: | Scott Van Aken |
| NOTES: | Resin kit |
| HISTORY |
The Latécoère 631 was a civil transatlantic flying boat built by Latécoère, the largest ever built up to its time. The type was not a success, being unreliable and uneconomic to operate. Five of the eleven aircraft built were written off in accidents and one was lost lost during World War II.
The Latécoère 631 was the result of a specification issued in 1936 by the Direction Générale de l'Aviation Civile for a 40-passenger airliner with a range of 4,000 kilometres (2,500 mi). The aircraft was ordered in 1938. It was intended that it would be powered by six Gnome et Rhône P.18 engines of 1,650 horsepower (1,230 kW) each. A competitor for this specification was the SNCASE SE.200 Amphitrite.
 Construction of the aircraft was stopped due to the outbreak of World War II
and was not resumed until after the signing of the Franco-German Armistice. The
prototype, registered F-BAHG, first flew on 11 November 1942. It was
subsequently confiscated by the Germans, and passed to the Luftwaffe, who
allocated the codes 61+11. The aircraft was flown to Lake Constance, where it
was destroyed in an attack by two Royal Air Force de Havilland Mosquito aircraft
on 17 April 1944. SNCASE SE.200 Amphitrite 20+01 was destroyed in the same
attack.
Construction of the aircraft was stopped due to the outbreak of World War II
and was not resumed until after the signing of the Franco-German Armistice. The
prototype, registered F-BAHG, first flew on 11 November 1942. It was
subsequently confiscated by the Germans, and passed to the Luftwaffe, who
allocated the codes 61+11. The aircraft was flown to Lake Constance, where it
was destroyed in an attack by two Royal Air Force de Havilland Mosquito aircraft
on 17 April 1944. SNCASE SE.200 Amphitrite 20+01 was destroyed in the same
attack.
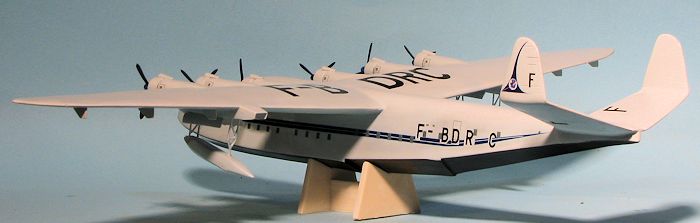
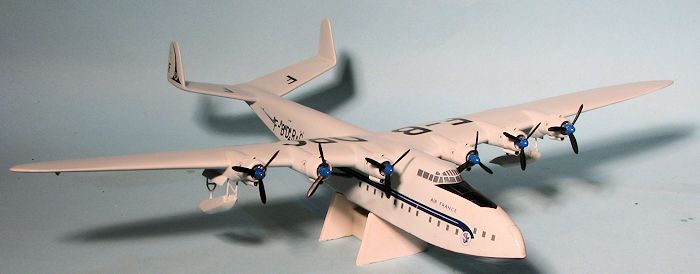
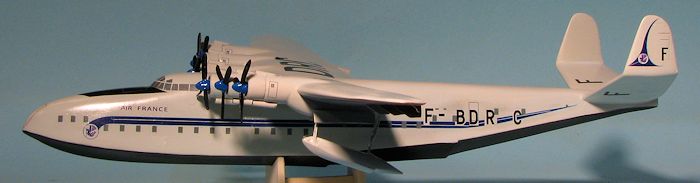
The second aircraft, F-BANT, first flew on 7 March 1945. It was powered by six Wright Cyclone engines of 1,600 horsepower (1,200 kW) each. Four aircraft were purchased by Air France, and entered service on the Biscarosse-Port-Étienne-Fort de France route in July 1947. The aircraft were withdrawn from service in August 1948 following the loss of F-BDRC. SEMAF operated two aircraft until 1950, when the survivor was withdrawn following the loss of F-BANU. The Société France Hydro operated one aircraft until it was lost on 10 September 1955. This was the last flying aircraft, with the remaining four survivors being scrapped. The Latécoère 631 was not a success due to it being unreliable and uneconomic to operate.
| THE KIT |
This is the first actual resin kit I've built from F-RSIN. I did their DC-7 short run kit a few years back and found it to be a bit of a challenge to build, but the end result was a very nice model. This one is quite nicely molded with a solid fuselage, solid one piece wings and tail planes with the fins molded in place. This should make alignment a lot easier. There are pegs on the flight surfaces that will fit into holes in the fuselage. I should mention that there is some flash on all the parts, and the smaller bits are embedded in resin wafers, but clean-up should be minimal at best.
 Each of the wings has engine cylinders molded in place and
there are additional cylinders in with the rest of the parts, which I assume one
will put into each of the resin cowlings and attach to the extant engines. Other
bits in resin are the floats, float braces (which will be a challenge to remove
from the resin wafers), carb and oil cooler intakes, float doors, flap hingesand
some bits that I couldn't identify. A resin display stand is also included with
the kit.
Each of the wings has engine cylinders molded in place and
there are additional cylinders in with the rest of the parts, which I assume one
will put into each of the resin cowlings and attach to the extant engines. Other
bits in resin are the floats, float braces (which will be a challenge to remove
from the resin wafers), carb and oil cooler intakes, float doors, flap hingesand
some bits that I couldn't identify. A resin display stand is also included with
the kit.
There are cast metal props and spinners. The casting is fairly well done, but on each prop assembly, one blade appears to have suffered from major mold shift. All the props were slightly bent from banging around during shipping. Speaking of which, when I got this kit, the fuselage was firmly wrapped in foam wrap while the wings and tail pieces were loose in the box. All the resin bits were in their separate bags according to the piece and these were all in another bag. The metal props were also in their own bag. Nothing appears to have broken, though there was a lot of large flash detritus in the bottom of the box.
 Instructions are rather minimalist, consisting of a full page with two color
three views (top, front and left side). Obviously one is for decal placement
with the other the 'construction' page. It is not always clear what is what,
but with some sleuthing you can figure out what goes where. There is no
color information
provided, though it appears the aircraft is a light grey with a black lower
fuselage. The decals include cockpit and cabin windows as well as a black
anti-glare panel. None of these features are engraved on the resin fuselage
so no worries about not having it all line up. Decals are nicely printed and
appear to be ALPS printed as there is no visible carrier film. My experience
with F-RSIN decals on the DC-7 was fairly positive, though I found them to be
very thin and prone to tearing, especially on the long bits. I recommend precoating
them with your favorite clear prior to cutting them off the sheet.
Instructions are rather minimalist, consisting of a full page with two color
three views (top, front and left side). Obviously one is for decal placement
with the other the 'construction' page. It is not always clear what is what,
but with some sleuthing you can figure out what goes where. There is no
color information
provided, though it appears the aircraft is a light grey with a black lower
fuselage. The decals include cockpit and cabin windows as well as a black
anti-glare panel. None of these features are engraved on the resin fuselage
so no worries about not having it all line up. Decals are nicely printed and
appear to be ALPS printed as there is no visible carrier film. My experience
with F-RSIN decals on the DC-7 was fairly positive, though I found them to be
very thin and prone to tearing, especially on the long bits. I recommend precoating
them with your favorite clear prior to cutting them off the sheet. | CONSTRUCTION |
First step was the remove all the mol attachment points and flash from the major parts. During the removal of the large and thick pour attachment point on the right wing, several large air holes appeared in the trailing edge. The largest were repaired using plastic card. I also had the misfortune of breaking one of the wing attachment tabs while test fitting the wing. These tabs on all parts need to be sanded down before attaching. I also found that there was a rather deep seam running the length of the underside of the fuselage piece that required considerable sanding to remove.
Once these parts were cleaned up, I started work on the
smaller bits. I'd like to say they are as nicely done as the major portions, but
that is not the case. When cleaning up the engine cowlings, I found the resin
thicker on one side than the other. As a result, getting the openings nice and
clean was a
 challenge and I was not entirely successful. The metal props are the
poorest castings in the kit. The very soft metal makes clean up a lot of work
and I'd say it took me a good 40-45 minutes to get them all to a semi-acceptable
level. The holes for the prop shafts also had to be drilled out.
challenge and I was not entirely successful. The metal props are the
poorest castings in the kit. The very soft metal makes clean up a lot of work
and I'd say it took me a good 40-45 minutes to get them all to a semi-acceptable
level. The holes for the prop shafts also had to be drilled out.
While this was going on I cemented the tail planes into the fuselage and filled the seams with super glue. I then started to glue on the wings. All of the mounting lugs needed to be reduced in diameter to fit into the holes in the fuselage. I found that the right wing was warped so had to do the very hot water treatment to straighten it out.
The wings were then glued on and naturally, I still broke off a mounting lug in the process. The gaps in the wing to fuselage join were rather large and needed filled, super glue taking care of this. I did not bother with the ones on the underside. I then attached the engine cowlings. Fit here is fair with not all of them fitting as well as I'd have liked. I also glued on the float fairing extensions and found they needed a lot of work, particularly as they were not exactly the same size. They are supposedly handed, but I did not find that to be the case.
 Next up were the fitting of the upper carb intakes and lower
oil coolers. This turned out to be quite a chore. You see, the base of the
pieces are flat and they have to fit curved surfaces. Add to it that they also
had to bridge the gap between the engine cowlings and the nacelles. It would be
nice if these lined up straight, but they did not. I decided to use my motor
tool and grind flat spots on the cowlings and nacelles to more easily
accommodate the pieces. Not the most elegant, but it works.
Next up were the fitting of the upper carb intakes and lower
oil coolers. This turned out to be quite a chore. You see, the base of the
pieces are flat and they have to fit curved surfaces. Add to it that they also
had to bridge the gap between the engine cowlings and the nacelles. It would be
nice if these lined up straight, but they did not. I decided to use my motor
tool and grind flat spots on the cowlings and nacelles to more easily
accommodate the pieces. Not the most elegant, but it works.
The next time consuming job was sanding the resin backing away from the float struts. This took an age to do and as I feared, on the last one I broke it. In between all this, I filled a few air pockets on the top of the floats and cleaned them up. Meanwhile, the aileron hinges were glued in place as were the float bay doors. With these in place, I then attached the floats. This was somewhat time consuming and required, among other things, drilling a hole in the top of the floats for the rear float strut. I also enlarged the front ones. With the kit pretty well done, I figured it would be a good time to paint it.
| COLORS & MARKINGS |
Doing some google work, I came across several possible colors for the aircraft. There were no period color photos and those who did art work or other models of the plane could not decided on the color. Some were a medium grey, some light grey and some aluminum. One thing that photos of this plane showed was that it was a light color. It very much looked to be aluminum paint vice the light grey that the kit instructions would have you paint it. I fear this is one of those situations that no matter what I choose, someone will inform me that I'm wrong.
 First thing I did was to prime it with Tamiya primer. This
showed up areas of pin holes and small voids on the edges of things that I'd
missed. Deciding to blow off filling these in hopes that the paint would help
out, I sprayed the aircraft overall with 36495 light grey. It didn't look right
so I added a touch of dark blue to it and it looked a lot better to my eyes. The
underside was painted black and masked before going back over the overspray
areas. As so often happens (to me), removing the Tamiya tape also removed
sections of the black. Rather than paint it right away, I sprayed the kit with
gloss clear acrylic and started applying decals.
First thing I did was to prime it with Tamiya primer. This
showed up areas of pin holes and small voids on the edges of things that I'd
missed. Deciding to blow off filling these in hopes that the paint would help
out, I sprayed the aircraft overall with 36495 light grey. It didn't look right
so I added a touch of dark blue to it and it looked a lot better to my eyes. The
underside was painted black and masked before going back over the overspray
areas. As so often happens (to me), removing the Tamiya tape also removed
sections of the black. Rather than paint it right away, I sprayed the kit with
gloss clear acrylic and started applying decals.
The kit decals are ALPS printed and VERY thin. One issue I had was that when the decal folded, it also cracked and these were quite visible on the decal. Of course I should have clear coated these and about half way through I did just that for the long fuselage decals. I used Solvaset on the decals that that seemed to work the best.
| FINAL CONSTRUCTION |
Once all the decals were on, I went back and did damage
control. The cracked decals were touched up with paint an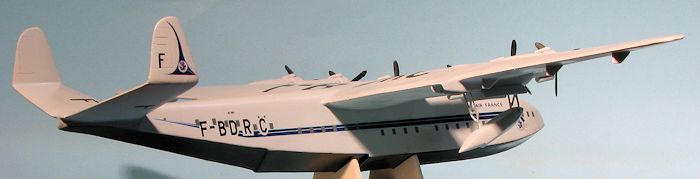 d
the underside was brush painted using Tamiya semi-gloss black. Not the greatest,
but it is at least all one, unchipped, color. The last items to install were the
props. These had the blades painted black and I used French blue for the
spinners. I have seen profiles where the spinners were red, but frankly, I think
that either dark blue or perhaps even black would be more appropriate. I then
trimmed the prop shafts and installed these into the engines. Most of them were
press fit and thanks to the soft metal, I was able to get them fairly well
aligned. Seemed like a good time to call it done so I did.
d
the underside was brush painted using Tamiya semi-gloss black. Not the greatest,
but it is at least all one, unchipped, color. The last items to install were the
props. These had the blades painted black and I used French blue for the
spinners. I have seen profiles where the spinners were red, but frankly, I think
that either dark blue or perhaps even black would be more appropriate. I then
trimmed the prop shafts and installed these into the engines. Most of them were
press fit and thanks to the soft metal, I was able to get them fairly well
aligned. Seemed like a good time to call it done so I did.
| CONCLUSIONS |
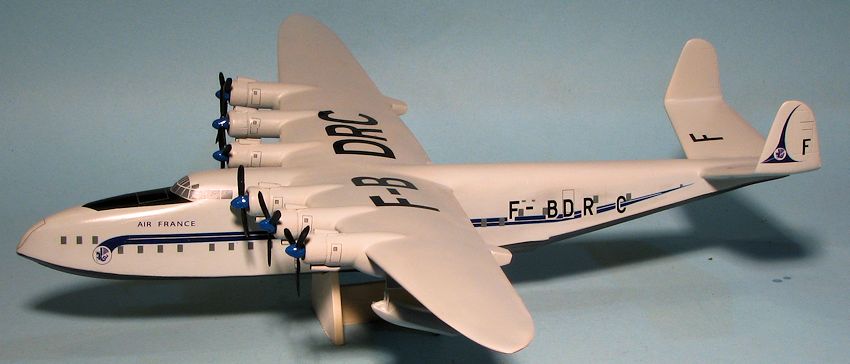
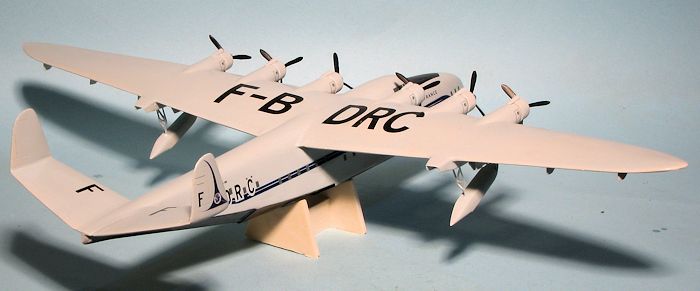
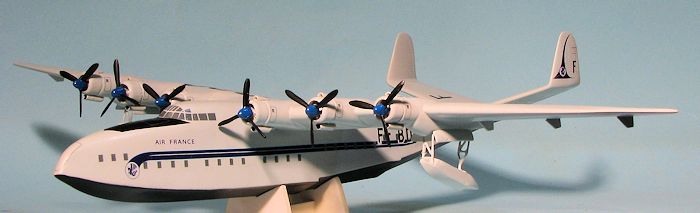
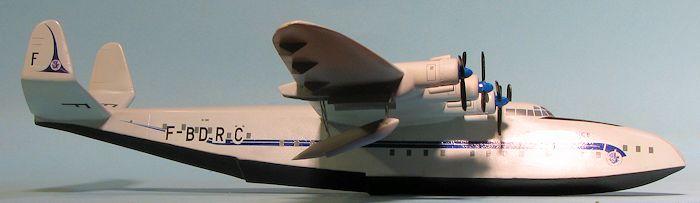
I have to say that the finished model looks very nice and I'm glad I had a chance to build it. I also feel that the props are the worst part of the kit. Perhaps resin ones would be a better option, though F-RSIN would need to provide a decent mold for them. Unfortunately, I know of no replacements for them so the builder will have to suffer with what is provided. I also found the decals very nice but overly thin and the wise move would be to clear coat them to add a bit more strenght to them. Little things like this would have been nice to have brought to one's attention in the instructions, but there really were none in the normal sense of the word. Such as it is, I'll relegate it to the 'standard French short run kit' category and recommend this one to the most experienced modelers out there.
| REFERENCES |
http://en.wikipedia.org/wiki/Lat%C3%A9co%C3%A8re_631
December 2013 Thanks to DMC/Cooper's
Models
for the preview kit. You can find this kit at
this
link. If you would like your product reviewed fairly and fairly quickly, please
contact
the editor or see other details in the
Note to
Contributors.