Minicraft 1/144 B.757
|
KIT # |
14451 |
|
PRICE: |
$6.00 from the dead kit table |
|
DECALS: |
One aircraft |
|
REVIEW : |
|
|
NOTES: |
|
HISTORY |
A few years ago, it was decided to look for a replacement for
the then long-serving VC-137 executive transports. These aircraft had been in
service for 30 or more years, and despite their relatively low airframe hours
(compared to equivalent commercial airliners), they were in need of replacement.
What was 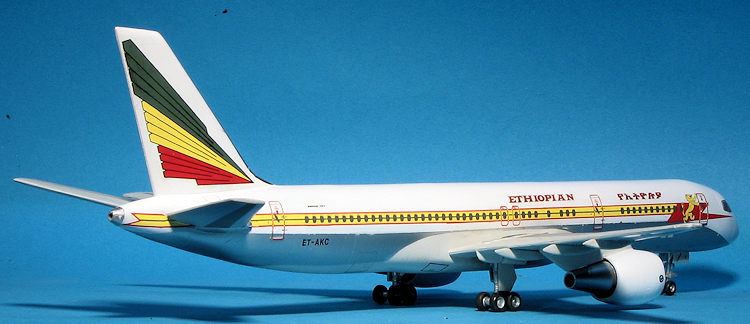 needed was an equivalent type that was more modern, fuel efficient and
could be bought basically off the shelf. The choice was made to buy the Boeing
757-200.
needed was an equivalent type that was more modern, fuel efficient and
could be bought basically off the shelf. The choice was made to buy the Boeing
757-200.
These aircraft are almost identical to those flying with the airlines with the exception of secure voice and data transmission and reception equipment. The interiors are a bit more upscale than the standard airliner, but are again, items that are offered by Boeing to any customer. Like other USAF Executive transports, they are operated by the 89th AW based at Andrews AFB near Washington DC.
There are four C-32s in service, the first being the subject of this kit, serial number 98-0001. All four of them are powered by P&W 2040 turbofans, providing 40,000 lbs of thrust and able to travel at speeds of up to 590 mph.
|
THE KIT |
Minicraft has gotten into the airliner business in a rather big way. In fact,
most of their recent releases have been airliners. While the subjects of those
kits have been long awaited by airliner kit builders, the actual kits themselves
have been a mixed blessing. To put it bluntly, they have not been what one
has expected in terms of detail and ease of construction. In fact, some of the
early propliners are a real bear to
What has become
a Minicraft hallmark is the way the cockpit transparency is done. It is included
as part of the fuselage, giving room to smooth it in with the surrounding
fuselage. There are no cabin windows or depressions built into the fuselage,
those windows being part of the decal sheet. This makes one wonder why there is
a cockpit transparency as there is nothing to see through the windows. Most of
us would rather have that part solid and have the cockpit windows as a decal as
well. It just makes things look better overall and would cut down on the need to
add in a separate part. Something that Minicraft may wish to consider for its
next release. Detailing
on this kit is much better than on the B.377, but is still a bit 'soft'. By
that, I mean that the corners of the engraved panel lines are not as razor sharp
as with Tamiya and Hasegawa kits,the industry standards. Take a look at the
image to the left, which is from the tail section, and you'll see what I mean.
While it really isn't bad, it can use some improvement. Now I know this sounds
like I am dumping on
The
sheet offered in this kit is by Scalemaster. Unlike those in ProModeler kits,
this one is in perfect register and very well done. What you get are all the
windows and door as well as the striping. You will have to paint the dark blue
areas yourself, but this should not be that much of a problem. I would recommend
making a 1/1 copy of the decal sheet and then use the copy to make a painting
mask. That way you will be sure to get the blue area in the right place to match
up with the stripes. The instruction sheet is more than adequate
for building the kit, offering color callouts throughout the construction
process where needed. The decal
placement diagram also has a good color diagram. All colors except the blue are
given as generic names. I suspect that the light grey is really Boeing Aircraft
Grey, which you can get in the Xtracolor range or you can use Testor's Canadian
Voodoo grey which is a close match. CONSTRUCTION This is a kit from the late, lamented CRM Hobbies' dead kit
table. It had been started in that the horizontal stabs had been glued and the
engine fans were cemented to the exhaust section. Looking through the bag, I
also found it was missing a flap actuator fairing. An e-mail was sent to
Minicraft in hopes they could help. The kit was also without decals, but no
worries as I've several 757-200 airliner sheets that can be used. In the meanwhile, I glued together the wing halves and put 15
grams of weight in the forward fuselage. The fuselage halves were then glued
shut. This was done in stages to reduce the amount of sanding and filler needed.
When that was pretty good, I attached the clear windscreen section. This also
required a I then attached the tailplanes. I had to remove some flash
from around the openings, trim the mounting tabs in both length and dept and
then installed them. More filler was needed to take care of the gaps. I should
mention that the engraved lines are pretty soft and they don't always meet from
side to side so when rescribing lost detail, one has to keep that in mind. Attaching the wings also resulted in some major gaps. Face it,
the kit is not one that fits all that well so resign yourself to filler.
Speaking of which, I also filled in the doors after reading in the decal sheet
I'll be using, that they are not in exactly the correct spot. This brings up
another issue that I really did not anticipate. You see, the original
aftermarket sheet I was going to use was for US Airways. Well, it turns out that
the kit has the wrong engines. They are wrong in a major way that anyone can
easily see. Fortunately, of the three 757 sheets I have, one was for the engines
provided in the kit, even though it is an airline I have done before. There are
replacement engines, of course, but I wasn't willing to fork out the gelt
for them. Something to keep in mind when doing airliners. Anyway, once the wings were provided their multiple
applications of filler and sanding, I decided to do s Back at the engines, these were a bit of a mess. The
fan/exhaust section does not fit at all well and it took a lot of cement and
propping things in place to get them together. It's engines like this that make
me wish airliners used engine covers as it left me with two very large seams on
the inside to try to deal with. Those resin replacement engines were starting to
look good. build. This is
Minicraft's C-32 boxing so that is what the history section and the rest
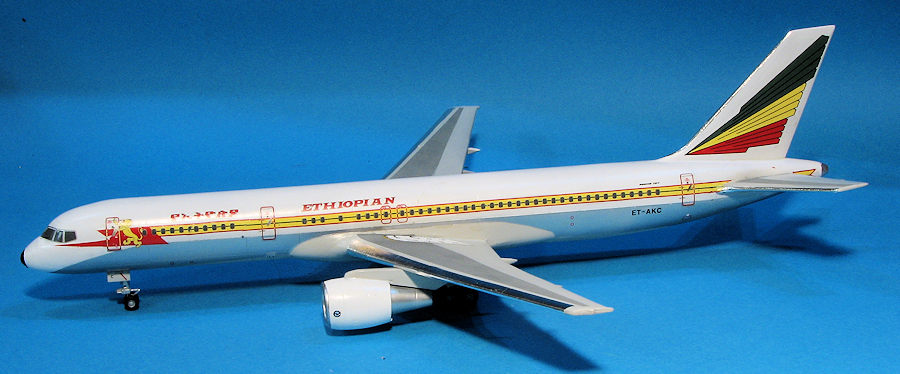
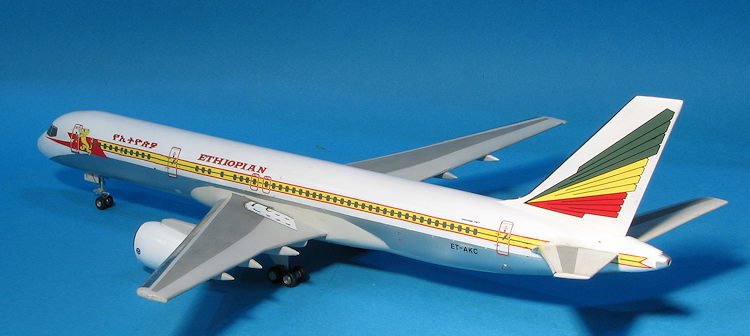
of the kit description will cover, but it is basically a 757-200. Let's take a look at what you get. As you can see by
the image to the right, you get quite a bit of plastic. The fuselage itself is
quite large and fills the length of the sturdy box it is shipped in. You get all
you need to build a very nice airliner kit.
build. This is
Minicraft's C-32 boxing so that is what the history section and the rest
of the kit description will cover, but it is basically a 757-200. Let's take a look at what you get. As you can see by
the image to the right, you get quite a bit of plastic. The fuselage itself is
quite large and fills the length of the sturdy box it is shipped in. You get all
you need to build a very nice airliner kit. 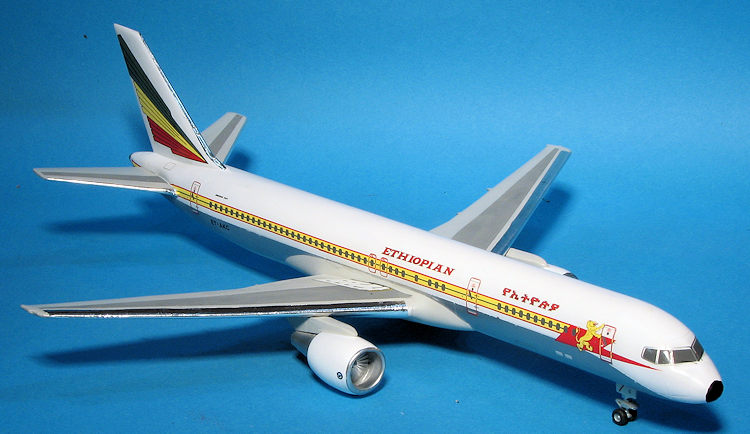 Minicraft, but really, they have improved quite a bit and
are getting better with each release. Take the decal sheet for example.
Minicraft, but really, they have improved quite a bit and
are getting better with each release. Take the decal sheet for example.
 considerable amount of filler and I went over what I'd missed on the
fuselage as well. Since the decals included cockpit windows, I wasn't concerned
about sanding them down.
considerable amount of filler and I went over what I'd missed on the
fuselage as well. Since the decals included cockpit windows, I wasn't concerned
about sanding them down. 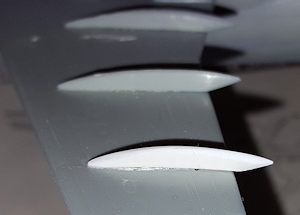 omething
about the missing flap fairing. Taking an appropriately thick piece of plastic
card, I set it beside the one that I still had. Using a red felt tip, I traced
around the extant hinge onto the plastic card. This gave me a general basis.
Then, after a bit of sanding and trimming, I had a pretty good copy, which was
then glued into place. I did try to contact Minicraft about a replacement, but
got the usual crickets chirping in the night for a response. I should mention
that thanks to the photo you see, I flattened out the hinge to better match the
rest. Photos do help!
omething
about the missing flap fairing. Taking an appropriately thick piece of plastic
card, I set it beside the one that I still had. Using a red felt tip, I traced
around the extant hinge onto the plastic card. This gave me a general basis.
Then, after a bit of sanding and trimming, I had a pretty good copy, which was
then glued into place. I did try to contact Minicraft about a replacement, but
got the usual crickets chirping in the night for a response. I should mention
that thanks to the photo you see, I flattened out the hinge to better match the
rest. Photos do help!
|
COLORS and MARKINGS |
Eventually I got things to where painting could commence.
Airliners generally do not require a lot of colors. They do, however, require a
lot of masking. I started by an overall coat of grey primer to show major
screw-ups. Once those were fixed (generally more filler), I started with the
light grey. The i nstructions on the Ethiopian Air Lines sheet I had stated this
light grey is Boeing Grey. The only people who make this shade is Xtracolor.
Unfortunately, at the time I started painting, this shade was out of stock
everywhere. It has since become available. So I used Canadian Voodoo Grey, which
is very close. This is also a paint that is unavailable since Testor
discontinued it a few years back. I should mention that Xtracolor makes a proper
Boeing Grey, but it is impossible to get it from England. I asked about shipping
from a shop in the Netherlands and to send me two tinlets would cost over $25.
nstructions on the Ethiopian Air Lines sheet I had stated this
light grey is Boeing Grey. The only people who make this shade is Xtracolor.
Unfortunately, at the time I started painting, this shade was out of stock
everywhere. It has since become available. So I used Canadian Voodoo Grey, which
is very close. This is also a paint that is unavailable since Testor
discontinued it a few years back. I should mention that Xtracolor makes a proper
Boeing Grey, but it is impossible to get it from England. I asked about shipping
from a shop in the Netherlands and to send me two tinlets would cost over $25.
Once that was sprayed and dry, it was masked so I could paint the wing and tailplane Corogard surfaces. There have been decals made for this, but they are quite difficult to find as the decal maker (who also made the livery sheet) is out of business. I used neutral grey for this. Then that was masked and the aluminum areas were painted using Alclad II. Then that was masked (sounds like a broken record, eh?) and the remaining airframe was painted gloss white.
After removing all the masking and touching up the inevitable goofs, I used Chrome Bare Metal Foil for the leading edges as I was REALLY fed up with masking. I should mention that the engine nacelle rims and exhaust were also painted with Alclad II aluminum as were the landing gear and wheels as well as the inside of the gear doors. Outside of gear doors were painted with the Canadian Voodoo Grey.
Then it was time to apply markings. Right from the start I had
issues. You see, the cheat line goes right through the tailplane area. That had
already been glued in place and the large gaps filled. It meant cutting and
pasting little pieced to get it to look right. This was exacerbated on the left
side by the cheat line decal breaking into sections, some of them quite sm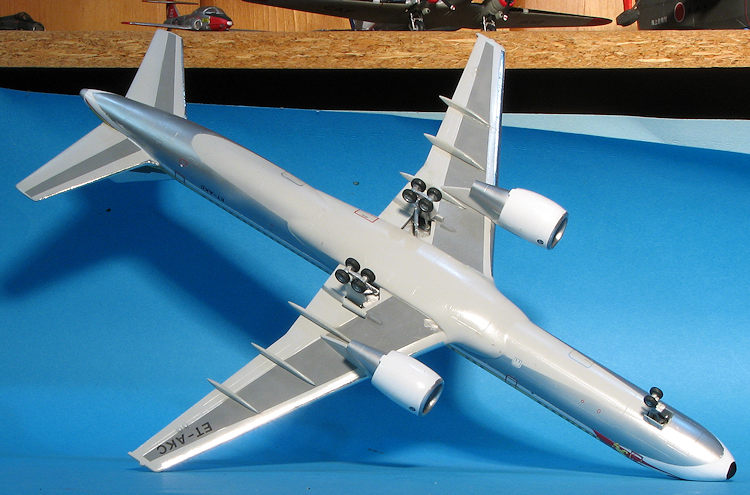 all,
when applying. This was really odd as I did not have this issue with the other
markings. The sheet was printed in 2000 so was 16 years old, but I've used older
decals without any issues that were older.
all,
when applying. This was really odd as I did not have this issue with the other
markings. The sheet was printed in 2000 so was 16 years old, but I've used older
decals without any issues that were older.
Decaling continued and is actually quite time consuming thanks to all the multiple layer markings that are required. I had no issues with other decals aside from those printed with large areas of metallic silver, which broke when trying to apply them over curved surfaces.
While all this was going on, I installed the landing gear. These are not a very good fit when it comes to the support bracing. The one in the nose is too long to reach the mounting hole. The ones on the main gear are anyone's guess as to where they fit. They seem to be far too short and though there is a pin on the upper part, there is no corresponding hole for them in the gear leg. I simply attached them where they seemed to fit as they are needed for strength. The main gear doors fit 'sorta in there somewhere', and I had to remove the aft hinge from the nose gear doors to get them to fit. The last thing I did in terms of gluing were to attach the long, skinny main gear doors and put on the wheels. I love painting airliner wheels as much as I do armor road wheels, but at least these had nice raised lines around each hub. I then hand painted the black radome. There were no extant panel lines for this so I guessed.
|
CONCLUSIONS |
There are not many kits that I won't recommend to some level, however, I have to say that this is not one of the best I've ever built. The fit was generally poor. I also need to warn modelers that if building airliners using aftermarket decals, study the instructions and the decals to see if decals need to be install before attaching pieces. With this kit, it would have made cleaning up the stab joins a real challenge if the decals had been in place before, but then one has to leave them off to keep the decals straight. So there you have it. Not a kit I'd recommend to anyone other than those who MUST have a 757. This one is definitely a 6 footer.
28 October 2016
Copyright
ModelingMadness.com. All rights reserved. Review kit courtesy of me and my wallet! If you would like your product reviewed fairly and fairly quickly, please contact
the editor or see other details in the Note to
Contributors.