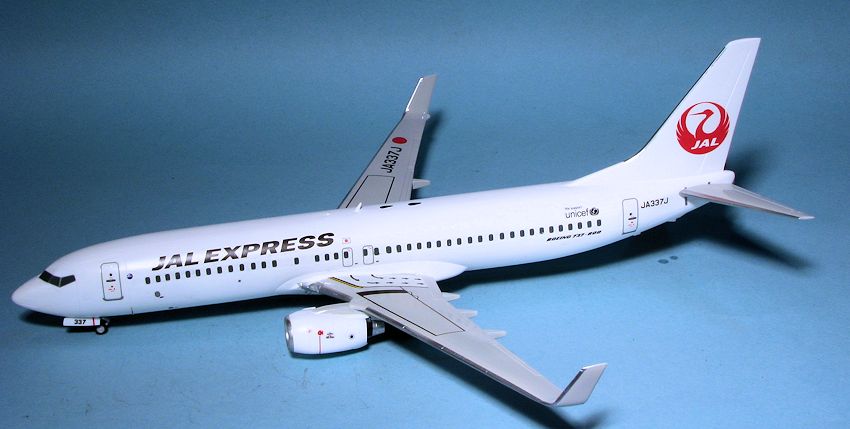
Hasegawa/Revell 1/144 B.737-800
| KIT #: | 10690 |
| PRICE: | 3040 yen from Hobby Link Japan |
| DECALS: | One option - multiple registrations |
| REVIEWER: | Scott Van Aken |
| NOTES: | Reboxed Revell kit |
| HISTORY |
The Boeing 737-800 is a short and medium range passenger aircraft. Also called the 737NG, it is a second-generation successor to the 737-300, -400 and -500 series with thoroughly upgraded avionics.
The cockpit is full glass with six CRTs, in the same layout as
the Boeing 777. Main wing and tail surfaces have been increased, with special
design attention given to a
 revamping of the main wing structure. The wingtips
are now capable of optional fitting with blended winglets -- features designed
to improve fuel efficiency and takeoff lift.
revamping of the main wing structure. The wingtips
are now capable of optional fitting with blended winglets -- features designed
to improve fuel efficiency and takeoff lift.
The engines are the CFM56 standard for the 737 series, but upgraded for improved fuel efficiency. The 737NG series includes the 120 seat class -600 type, the standard -700, and the stretch body -800 and -900. There are special "ER" extended range variants for the -700 and -900.
When the 737 made its debut, it had a reputation as a strictly short range passenger plane, but with variants like the -700ER, it has evolved into an aircraft capable of ferrying passengers non-stop across the Pacific Ocean. Thanks in large part to its constant improvements and upgrades, the 737 is the best selling short and mid range passenger aircraft in the airline industry.
| THE KIT |
When I first requested this kit, I thought it was 1/200. Imagine my surprise when I got the kit and discovered it was 1/144. Opening the box, I found a white plastic kit in a bag sealed by tape and a slip in it that said "Made in Poland". This tells me that it is a reboxing of the Revell AG kit, but with Japanese livery markings. A look on the HLJ web site shows several similar boxings, each with a different airline.
 The kit itself is very nicely done and follows the usual
Revell airliner moldings, which means it has open holes for the cabin windows
and a clear plastic cockpit windscreen piece that also includes a portion of the
surrounding airframe. The only clear bits provided are the cockpit piece and
some wing leading edge landing light lenses. The kit has no cockpit interior and
will require a whopping 20 grams in that space to keep it from tail sitting if
one builds it on its gear.
The kit itself is very nicely done and follows the usual
Revell airliner moldings, which means it has open holes for the cabin windows
and a clear plastic cockpit windscreen piece that also includes a portion of the
surrounding airframe. The only clear bits provided are the cockpit piece and
some wing leading edge landing light lenses. The kit has no cockpit interior and
will require a whopping 20 grams in that space to keep it from tail sitting if
one builds it on its gear.
The only pieces to install prior to cementing the fuselage halves together are the nose gear well and a main gear well piece. Hasegawa provides the option to fill in all the cabin windows and use decals. This is how many airliner modelers prefer their kit, but doing so on this one will require the use of a lot of filler and time as there are no clear cabin windows to help fill in the holes. I would use epoxy filler as it does not shrink but will be harder to sand when it is dry.
The wings have separate wing tips and for this boxing, the
winglets will be the ones to use. The flap actuators are also separate items.
Engines are in several pieces with a 'hot' section that, once glued together,
along with the engine fan, are trapped between two cowling/pylon halves. The
little winglet on
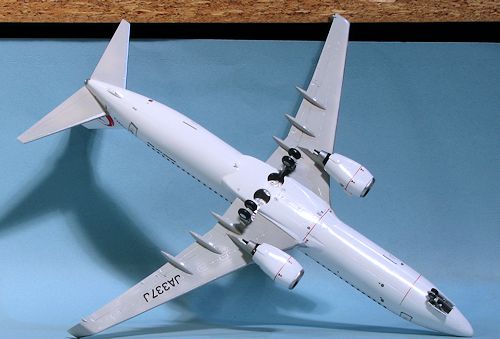 each engine is separate and I'm pleased to see that there is a
one-piece forward cowling part as 'split' cowling lips are a bear to fill and
smooth.
each engine is separate and I'm pleased to see that there is a
one-piece forward cowling part as 'split' cowling lips are a bear to fill and
smooth.
Though no stand is provided, the kit can be built with the gear up and there are options for that. If doing gear up, sections of the main landing gear need to be modified and installed before gluing the wing upper and lower sections together. The landing gear includes separate oleo scissors and retraction struts for both main and nose gear.
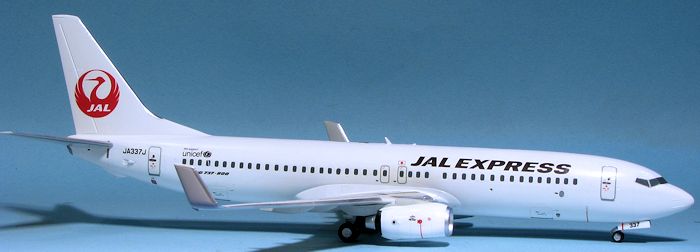
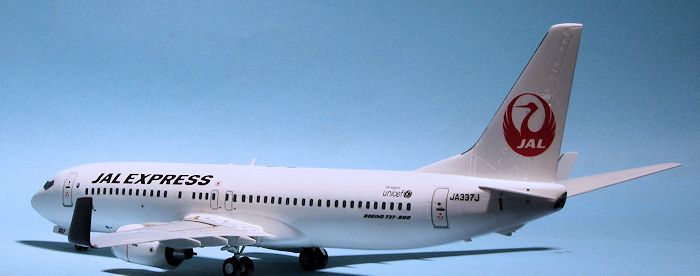
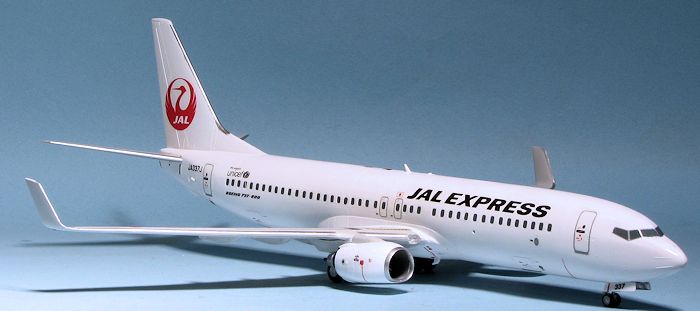
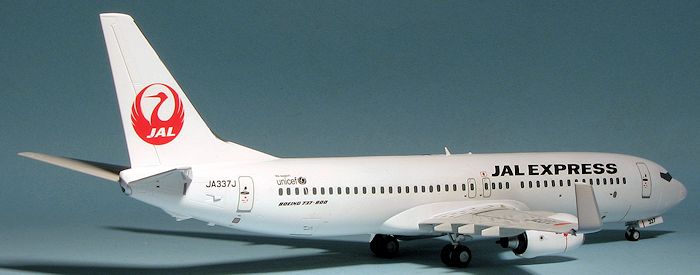
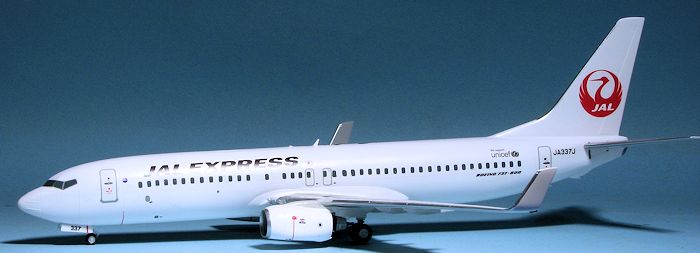
Instructions are typical of current Hasegawa offerings and have Gunze paint references. There is but one livery option, but a multitude of registration options. Four are provided along with enough numbers to do pretty much any of the fleet. The decals are very well done and include cockpit and cabin windows as mentioned earlier.
| CONSTRUCTION |
Even before gluing anything, I had to make a decision on how I wanted the markings. Hasegawa supplies decals for the windows and the kit has them open. Since I prefer my airliner kits to have decal windows, I had to fill in the extant ones. The first step of this was to take some Evergreen strip (I used the 0.5 x 4.0 mm size), and glue it to
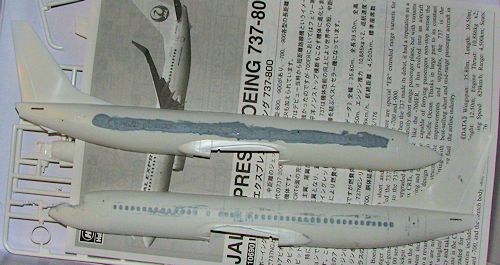 the inside of the fuselage
behind the windows. I then used standard filler to fill in all the windows.
This left a bit of a mess, but once dry, it was relatively easy to sand
away. As one never get them all the first time, I went back over the ones
with small holes, using super glue. This was then sanded away and smoothed
out. You can see the before and after images here.
the inside of the fuselage
behind the windows. I then used standard filler to fill in all the windows.
This left a bit of a mess, but once dry, it was relatively easy to sand
away. As one never get them all the first time, I went back over the ones
with small holes, using super glue. This was then sanded away and smoothed
out. You can see the before and after images here. While this was going on, I assembled the wings, including the winglets and the flap actuator housings. Fit here was really quite good. If you are using aftermarket decals for a plane with standard wing tips, those are also included. The fit of the winglets is fair. I also glued in the main gear well piece. Back at the fuselage, I glued in the nose gear well to one fuselage half and when dry, glued the fuselage halves together. The kit needs nose weight and this was added through the cockpit opening. I should mention that the kit comes with all the antennas molded onto one fuselage half. I wish they would not do this as you'll only end up breaking most of them away and it makes it more difficult to fill and sand the fuselage seam. I have no trouble opening up holes and adding them later.
 With the
fuselage halves together, I attached the cockpit transparency and then
installed the wings. It was a real chore to get the wings in place. You see,
there are two small posts in the fuselage at the rear wing/fuselage join
that is meant to keep the rear wing section at fuselage level. A great idea.
However, there is also a swept back blade antenna right at the the forward
join. Cut it off and save it as there is no way that will survive the wing
installation. Even then, the depth of the forward wing join made getting it
in place a struggle. Not sure how I'd have engineered that, but there has to
be an easier way. Even with all that, you'll use filler on the joins. The
front one will be particularly difficult as the join goes right through a
long NACA duct. I did not even try to fill that one.
With the
fuselage halves together, I attached the cockpit transparency and then
installed the wings. It was a real chore to get the wings in place. You see,
there are two small posts in the fuselage at the rear wing/fuselage join
that is meant to keep the rear wing section at fuselage level. A great idea.
However, there is also a swept back blade antenna right at the the forward
join. Cut it off and save it as there is no way that will survive the wing
installation. Even then, the depth of the forward wing join made getting it
in place a struggle. Not sure how I'd have engineered that, but there has to
be an easier way. Even with all that, you'll use filler on the joins. The
front one will be particularly difficult as the join goes right through a
long NACA duct. I did not even try to fill that one. | COLORS & MARKINGS |
With the wings on and the fuselage puttied and smoothed, it was time to paint. This one is relatively easy as airliners go. The fuselage is White while the wings and stabs are Boeing Grey. The instructions would have you do the grey parts with FS 16440, Light Gull Grey, but I have a tinlet of Xtracolor Boeing Grey so I used that. Note that some of the wheels and all of the landing gear are this shade as well. I painted the
 stabs
off the aircraft to make it easier. There will be more painting using
these colors later in the build as one has to assemble and mask the
engines. I painted the wings first and then masked them before painting
the rest of the airframe with Tamiya Gloss White. Note that there are
several small antennas, scoops and vents that have to installed on the
airframe prior to painting so be sure to do that. All of the leading
edges of the flight surfaces had to be masked and then painted Alclad II
Aluminum.
stabs
off the aircraft to make it easier. There will be more painting using
these colors later in the build as one has to assemble and mask the
engines. I painted the wings first and then masked them before painting
the rest of the airframe with Tamiya Gloss White. Note that there are
several small antennas, scoops and vents that have to installed on the
airframe prior to painting so be sure to do that. All of the leading
edges of the flight surfaces had to be masked and then painted Alclad II
Aluminum. With that done, I started on the decals. These are quite thin and take a while to come off the backing. I am not good at all on doing long decals like the windows so made a bit of a mess of them. Fortunately, Hasegawa has some extras on the sheet in case you goober some up. The rest of the markings, and there are quite a few data markings and such, went on without any issues. I used a bit of Solvaset to help things snuggle down.
| FINAL BITS |
While all that decaling was going on, I cleaned up, painted and assembled the landing gear. Both the nose and main gear assemblies are relatively complex. The main gear simply sits in troughs in the wheel well section while the nose gear is four pieces and requires some careful construction. Once the main gear was installed and glued, I let things dry and then used a bit of super glue to help keep th
 ings
solid. The hubs on the outer main wheels need to be white to match that
part of the fuselage when the gear is raised. Thankfully, Hasegawa does
the wheel rims in raised plastic, which makes painting these tiny donuts
so much easier. These were glued in place.
ings
solid. The hubs on the outer main wheels need to be white to match that
part of the fuselage when the gear is raised. Thankfully, Hasegawa does
the wheel rims in raised plastic, which makes painting these tiny donuts
so much easier. These were glued in place.The gear doors were also a bit of a challenge. The outer main gear doors are supposed to fit on little hinges to the inside of the outer wells. Good luck getting that to work. I had to cut off those hinges to get them to fit. Also note that the inner gear doors are painted two colors as part of them are on the wing and part of them on the fuselage when the gear is retracted.
The engines are not complex to assemble, but take some planning when it comes to painting them. A nice touch is that the inlet ring is a separate piece so that can be prepainted before installation and saves on what is often a difficult masking job. However, the engine nacelles are white and the pylons are grey so you still have to mask the inlets and the hot section.
Eventually the engines were installed as were the stabs and that was it.
| CONCLUSIONS |
 This
is the first Revell airliner I have built in a very long time. Actually,
it is the first one I've done since the 1970s. Initial impression is
fairly good. It builds like an Italeri kit, which means that it has all
the right bits, but takes work getting a properly finished product. Not
short run, but not Tamiya either. I was pleased with the Hasegawa decals
as they were thin, in register and didn't freak out when setting
solution was used. Overall, I am pleased with the result and can
recommend this one to airliner fans or those who want to do something
more than the usual run of kits.
This
is the first Revell airliner I have built in a very long time. Actually,
it is the first one I've done since the 1970s. Initial impression is
fairly good. It builds like an Italeri kit, which means that it has all
the right bits, but takes work getting a properly finished product. Not
short run, but not Tamiya either. I was pleased with the Hasegawa decals
as they were thin, in register and didn't freak out when setting
solution was used. Overall, I am pleased with the result and can
recommend this one to airliner fans or those who want to do something
more than the usual run of kits.
| REFERENCES |
Kit instructions
October 2014 Thanks to Hobby Link Japan for the review kit. You can find
this kit at this link. If you would like your product reviewed fairly and fairly quickly, please
contact
the editor or see other details in the
Note to
Contributors.