Hasegawa 1/200 Boeing 737-400 'Solaseed Air'
| KIT #: | 10694 |
| PRICE: | 960 yen on sale from Hobby Link Japan (3200 yen SRP) |
| DECALS: | Two options |
| REVIEWER: | Scott Van Aken |
| NOTES: | Two complete kits |
| HISTORY |
I have gone over the history of the 737 in earlier articles, so for more info, read those. Needless to say, the 737 is the world's most built jet airliner and if you don't consider converted C-47s as true airliners, no airliner has been produced more. Continuously manufactured by Boeing since 1967 with over 8,000 ordered and over 5,800 delivered as of 2008, its production numbers will be very hard to beat.
 Solaseed Air
(ソラシド
エア Sorashido Ea),
incorporated as Skynet Asia
Airways (スカイネットアジア航空株式会社
Sukainetto Ajia Kōkū Kabushiki-gaisha,
SNA)
is a low-cost airline headquartered on the property of Miyazaki Airport in
Miyazaki, Miyazaki Prefecture, Japan.
Solaseed Air
(ソラシド
エア Sorashido Ea),
incorporated as Skynet Asia
Airways (スカイネットアジア航空株式会社
Sukainetto Ajia Kōkū Kabushiki-gaisha,
SNA)
is a low-cost airline headquartered on the property of Miyazaki Airport in
Miyazaki, Miyazaki Prefecture, Japan.
It operates services mainly between Miyazaki/Kumamoto/Nagasaki (Kyushu Island) and Tokyo. Beginning September 2007, flights to Kagoshima were scheduled to be introduced. Recently, the airline has announced it will offer discounts for foreign tourists that are up to 65% lower than regular fares. It is the first time a Japanese airline has offered a discount fare aimed only at tourists from abroad. The airline changed its branding to Solaseed Air in July 2011.
| THE KIT |
Hasegawa first issued its 'Loveliner' series of 1/200 airliners back in the late 1970s. At the time, the aircraft had raised panel detail, open cabin windows, and landing gear that could only be modeled in the 'down' position. This latter feature required the modeler to expend considerable effort to do a wheels up display, as often times main gear doors folded into each other when the gear was down. As cabin window configuration was not always the same, it would require the modeler to fill in those not needed. However, this was not a problem for a number of modelers who liked this feature.
This latest in the series has no cabin windows,
no cockpit window,
optional 'wheels up' landing gear door parts, and fully engraved detailing.
Things that are not changed are the in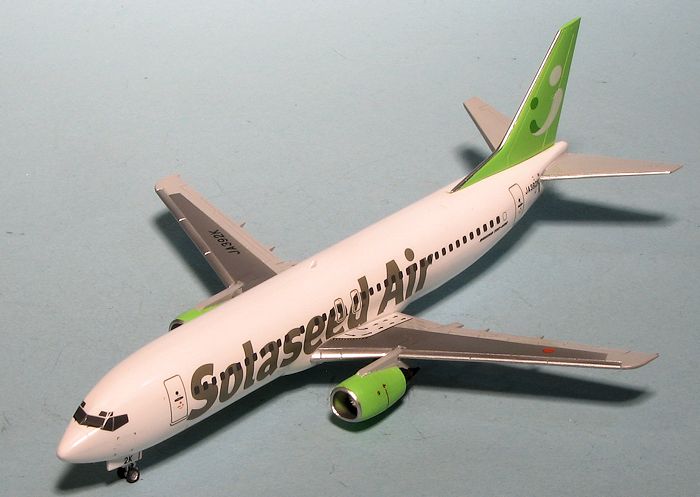 clusion of a display stand and a hefty weight for those building the kit with wheels down. In fact, the kit is designed
to be put on the stand as there is a large hole in the bottom of the fuselage
for the attachment point. For display on the ground, this will need to be filled
in. The main gear legs have the doors molded as part of the assembly. I also
like that this particular boxing has one piece engine/pylon combinations. No
need to be concerned
about filling an intake seam. The front fan pieces simply plug in as the exhaust
is molded in with the engine.
clusion of a display stand and a hefty weight for those building the kit with wheels down. In fact, the kit is designed
to be put on the stand as there is a large hole in the bottom of the fuselage
for the attachment point. For display on the ground, this will need to be filled
in. The main gear legs have the doors molded as part of the assembly. I also
like that this particular boxing has one piece engine/pylon combinations. No
need to be concerned
about filling an intake seam. The front fan pieces simply plug in as the exhaust
is molded in with the engine.
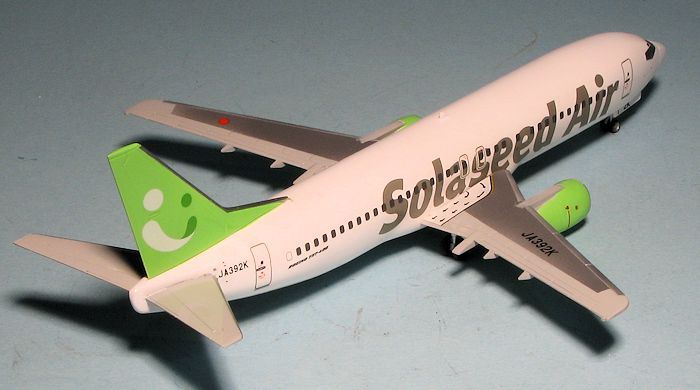
Tail planes are one piece as are the wings on this version because they are so short. Thanks to the option for wheels up, one can build this in flight, something that many airliner fans can appreciate. Probably the biggest difference from 'standard' airliner kits is that this one has the fuselage split horizontally. Not sure how much that will change things, but it does move the seam to where it will be under the window and cheat-line decals.
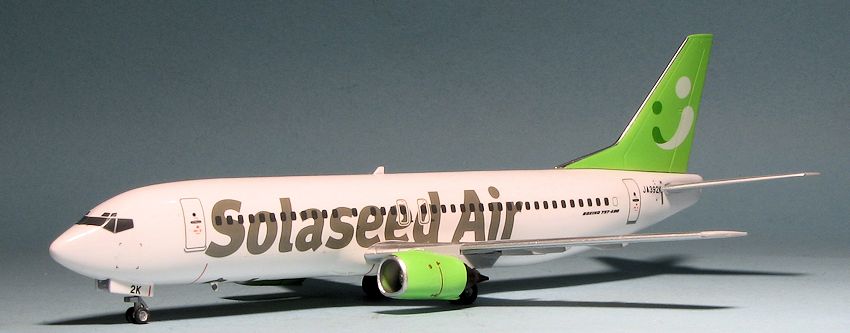
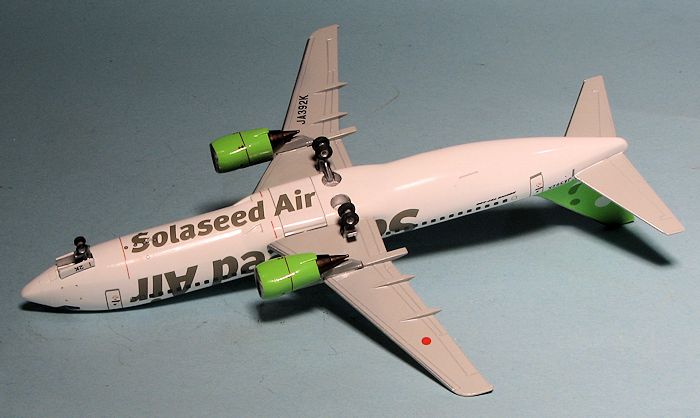
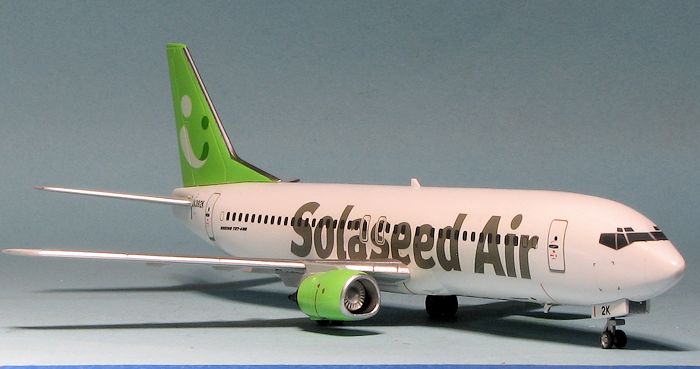
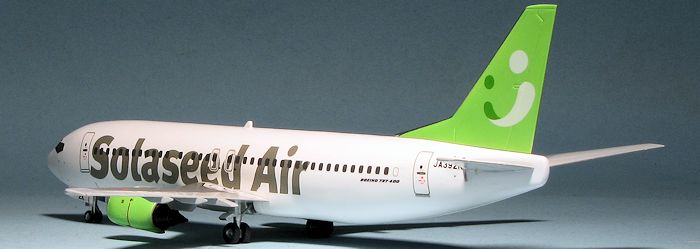
Instructions are standard Hasegawa and use Gunze paint references. The planes are basically overall white with medium grey wings, tailplanes and engines. The decals are very nicely printed and allow two different schemes with Solaseed Air. Each option has two registration numbers available. You will have to mix the green on the engine cowlings of one of the two options, but the other shades are white and light gull grey with unpainted leading edges to the flying surfaces and engine inlets. Of course, cabin and cockpit windows are included. The decals are the latest new wave type and should react favorably to setting solutions. The simple livery would make this an ideal first airliner for someone
| CONSTRUCTION |
This is the second of two kits provided in the double
boxing. The initial build was done as a stand model so I decided to do this one
on its landing gear. This one also has the simpler of th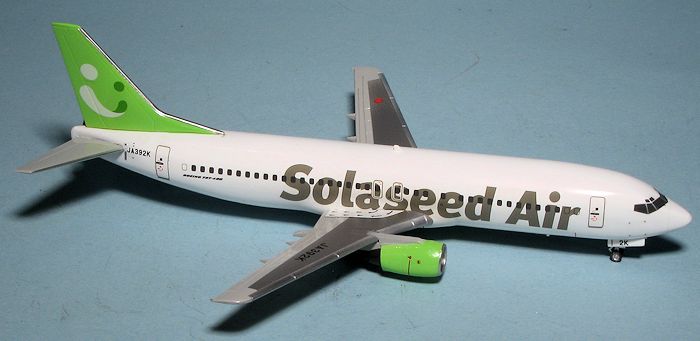 e two decal options as I
tend to really hose up airliner decals, so am expecting a better result.
Since this is on its wheels, the very large weight was placed in the fuselage
before the two halves were glued together. This also required a blanking plate
to be installed where the stand mount would fit in the lower fuselage.
e two decal options as I
tend to really hose up airliner decals, so am expecting a better result.
Since this is on its wheels, the very large weight was placed in the fuselage
before the two halves were glued together. This also required a blanking plate
to be installed where the stand mount would fit in the lower fuselage.
The fuselage halves fit together horizontally rather than vertically as in most airline kits. The fit is fair and one will need to use filler along the seam to ensure a smooth fuselage. When all that is done, I installed the horizontal stabilizer piece and the fin. The stab slots through the body and is held in place by the fin. Once the fin is installed, you'll need to wiggle it around to get it properly aligned, I know I did. Then apply some cement to the stab. Now is a good time to glue in the nose gear door piece as it will ensure it is the same color as the rest of the lower fuselage.
| COLORS & MARKINGS |
What I did after all the filler stuff was done was to
primer the fuselage assembly as well as the main wings, engines and other bits.
The wings and horizontal stabs are Boeing Grey and a good substitute for that is
Model Master Voodoo Grey. The kit recommends Light Gull Grey, but I think that
is a bit too light. For the
 wings, the center insert is a darker grey so
find something that looks nice to use. Instructions recommend Aircraft Grey. The
fuselage on this one is overall white. I know it seems a tad early to do
painting, but with some airliners, it is much better to paint these bits ahead
of time as it is easier to mask if that is required.
wings, the center insert is a darker grey so
find something that looks nice to use. Instructions recommend Aircraft Grey. The
fuselage on this one is overall white. I know it seems a tad early to do
painting, but with some airliners, it is much better to paint these bits ahead
of time as it is easier to mask if that is required.
So that is what I did. I first gave all the bits a coating of Tamiya white primer. Then painted the Voodoo Grey bits and when dry, masked the upper wing for the darker grey. I may have gone a bit too dark, but it looks OK. More masking was needed to do the aluminum leading edges and this took a while. A typical 'half hour of masking for 15 seconds of painting. The engines and pylons also had to be painted and masked. All of the leading edges of the flight surfaces and the engine intakes were painted using Alclad II Aluminum.
Hasegawa offers the opportunity to paint the fin
rather than try to match the fin decal for the engine cowlings. I used Tamiya
white and light green, starting with white and adding a few drops of the light
green into it until I got what I thought was close to the right shade. This was
then sprayed on the fin and engine cowlings after more masking. It turned out a
bit darker than I would have liked, but is satisfactory. If you
 have not
already guessed, building airliner models means a lot of masking.
have not
already guessed, building airliner models means a lot of masking.
With that done, I thought it would be a good time to start putting on decals. This way the wing wouldn't get in the way. Fortunately, I could do that as there is only one set of markings to go across the lower wing insert piece. When just about all the markings were applied, I attached the wing and insert section. Then the final decal was applied. This one does not take into account the radio antenna on the bottom of the plane so you'll need to cut it once it is applied. I then washed off the model and continued the build.
| FINAL CONSTRUCTION |
 The last
bits were the engines and the landing gear. The wheel wells were painted silver
and the gear legs installed. These are a very tight fit. Painting the wheels was
a bit of a pain because they are so small, but eventually I got something
reasonable and these were glued on. I then sanded the bottom of them when dry to
get a more even sit. Last things to glue on were the engine pods. These don't
fit all the best as the rear section doesn't seem to want to slot into the
recesses far enough. Results in the front of the engine being a bit too high.
The last
bits were the engines and the landing gear. The wheel wells were painted silver
and the gear legs installed. These are a very tight fit. Painting the wheels was
a bit of a pain because they are so small, but eventually I got something
reasonable and these were glued on. I then sanded the bottom of them when dry to
get a more even sit. Last things to glue on were the engine pods. These don't
fit all the best as the rear section doesn't seem to want to slot into the
recesses far enough. Results in the front of the engine being a bit too high.
| CONCLUSIONS |
Despite the few issues, these are nice kits. They build quickly, but I seemed to spend the majority of the time painting. I appreciate that Hasegawa provided separate tail markings as matching decals can be quite a challenge. It is a simple but colorful scheme and one that doesn't strain one's abilities when it comes to putting on large decals, which I also like.
| REFERENCES |
http://en.wikipedia.org/wiki/Solaseed_Air
July 2014
My thanks to Hobby Link Japan for the review kit. You can purchase yours at this link. Get yours today.
If you would like your product reviewed fairly and fairly quickly, please contact the editor or see other details in the Note to Contributors.