| KIT #: | 0-3173 |
| PRICE: | $3.00 in a bag with bad decals and no instructions |
| DECALS: | Lufthansa |
| REVIEWER: | Scott Van Aken |
| NOTES: | Aftermarket livery |
| HISTORY |
 The first Boeing 727-100 (N7001U) flew on February 9, 1963 and FAA type
approval was awarded on December 24 of that year, with initial delivery to
United Airlines on October 29, 1963, to allow pilot training to commence. The
first 727 passenger service was flown by Eastern Air Lines on February 1, 1964,
between Miami, Florida, Washington, D.C., and Philadelphia, Pennsylvania.
The first Boeing 727-100 (N7001U) flew on February 9, 1963 and FAA type
approval was awarded on December 24 of that year, with initial delivery to
United Airlines on October 29, 1963, to allow pilot training to commence. The
first 727 passenger service was flown by Eastern Air Lines on February 1, 1964,
between Miami, Florida, Washington, D.C., and Philadelphia, Pennsylvania.
A total of 571 Boeing 727-00/100 series aircraft were delivered (407 -100s, 53 -100Cs, and 111 -100QCs), the last in October 1972. One 727-100 was retained by Boeing, bringing total production to 572.
The −100 designation is a retroactive one to distinguish the original short-body version. Aircraft for United Airlines were delivered as 727-22, for American Airlines as 727-23 and so on — not -122 and -123 — and retained these designations even after the advent of the 727-200.
| THE KIT |
This particular kit was initially
released by Airfix in 1973 and had gone through a number of additional
boxings with different livery. This one was produced in 1979 as part of
their Sky Kings series. The kit c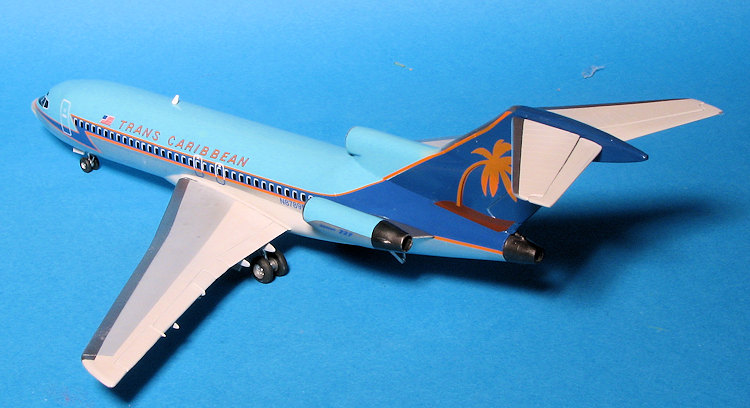 onsists of open windows on the fuselage as
well as separate cabin doors and rear air stairs. Many of the parts have
sink areas on them, typical of the time and the detailing is raised. There
are clear windows for both the cockpit and the cabit. No cockpit detail is
provided, though there is a bulkhead to add stiffness.
onsists of open windows on the fuselage as
well as separate cabin doors and rear air stairs. Many of the parts have
sink areas on them, typical of the time and the detailing is raised. There
are clear windows for both the cockpit and the cabit. No cockpit detail is
provided, though there is a bulkhead to add stiffness.
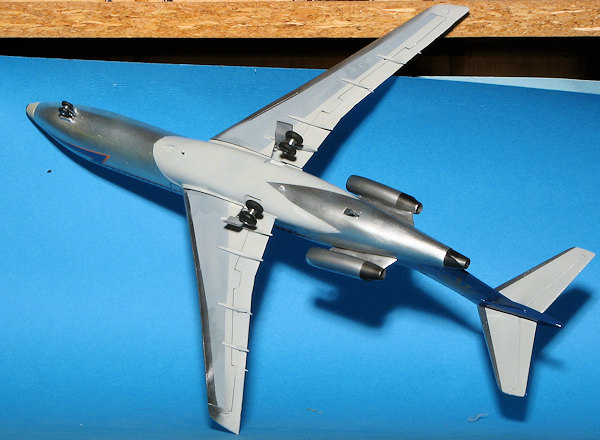
Wings are an upper and lower half with separate flap hinge fairlings. Engines are in upper and lower sections with separate compressor intake pieces. There is no compressor face for the middle engine, but there is a two piece exhaust cone. A rather nicely detailed landing gear is provided for both the nose and main gear. One can build this with the gear up, though there is no flight stand supplied.
I seem to recall the instructions being pretty good. One was supposed to paint the fuselage at the start of construction then apply the decals and use the supplied punch to punch out the side decals where the windows are to be located. This boxing came with Lufthansa markings.
| CONSTRUCTION |
Another dead kit purchase as I'd forgotten that Airfix did a -100. The molds have since been altered to do the later -200 version and that gets released from time to time. Besides Airfix, Revell also produced a -100 version of the 727, but never did the later version.
 The previous owner had glued in the cockpit bulkhead and that is about it.
There were no instructions and while the decal sheet is there, it has gotten wet
so is basically unusable. Fortunately, aftermarket decals are not difficult to
locate. I've always liked the 727 as it was considered a real 'hot rod' by
pilots thanks to the three engines. Back when I was still using the airlines to
get around, I would ask for this type when flying something other than Ozark.
Most of my airliner flying from San Diego to St. Louis for leave was either with
TWA, which flew 727s or later with Ozark which had DC-9s. These were the only
airlines that flew non-stop on that route.
The previous owner had glued in the cockpit bulkhead and that is about it.
There were no instructions and while the decal sheet is there, it has gotten wet
so is basically unusable. Fortunately, aftermarket decals are not difficult to
locate. I've always liked the 727 as it was considered a real 'hot rod' by
pilots thanks to the three engines. Back when I was still using the airlines to
get around, I would ask for this type when flying something other than Ozark.
Most of my airliner flying from San Diego to St. Louis for leave was either with
TWA, which flew 727s or later with Ozark which had DC-9s. These were the only
airlines that flew non-stop on that route.
Anyway, my first steps after ensuring that all the bits were there, were to glue on the doors. These are quite poor fitting pieces as they are smaller than the openings into which they fit. One has to be cautious not to allow them to sink all the way in! Next was to install the cabin windows. Several of the sections had individual window plugs that were larger than the opening so I had to use a motor tool to enlarge these so the piece would fit. I like my airliners to be smooth sided for decal windows. I know that an equal number of airliner fans like having windows. Fortunately, with this kit we can have our choice. Since the decals were toast, it also gave me an opportunity to go through my airliner decal stash to see if I still had any viable markings.
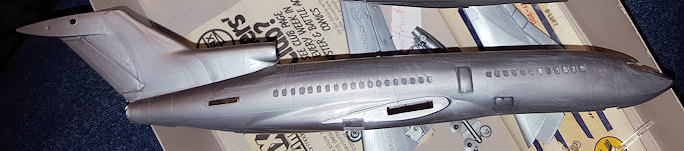 Getting the fuselage smooth
by filling the windows and sink areas with super glue took multiple
applications, but it was finally done. I sprayed silver on the fuselage halves
to be sure that all the areas were smooth. I wasn't sure how much weight would
be needed to prevent tail sitting so I installed 10 grams behind the cockpit
bulkhead.
Getting the fuselage smooth
by filling the windows and sink areas with super glue took multiple
applications, but it was finally done. I sprayed silver on the fuselage halves
to be sure that all the areas were smooth. I wasn't sure how much weight would
be needed to prevent tail sitting so I installed 10 grams behind the cockpit
bulkhead.
Then I started gluing the fuselage halves. These two parts were rather badly warped so the only way to deal with this was to start at one end and glue in sections. I began in the back, installing the rear air stairs prior to this. I was able to glue from the back to the rear intake on the top and to the back of the air stairs first. This was clamped with tape. Once dry, I did a few more inches. It ended up taking three sessions to get it all glued and then I dealt with the seams. This included filling the slot in the bottom designed for a display stand.
With the fuselage together, the usual filler was used to take care of seams. The cockpit transparency does not fit all that well so needed filler as well. I also assembled the wings. The flap actuator hinges were a mixed bag. The large ones fit well. The smaller ones seemed to have the pegs too far apart for the holes and the holes were huge and impossible to completely cover up. I also found the engine pods to be not the best fit. Were this a more expensive kit, I'd probably opt for aftermarket resin ones. At this point I glued on the nose gear doors as I knew they'd all be the same color.
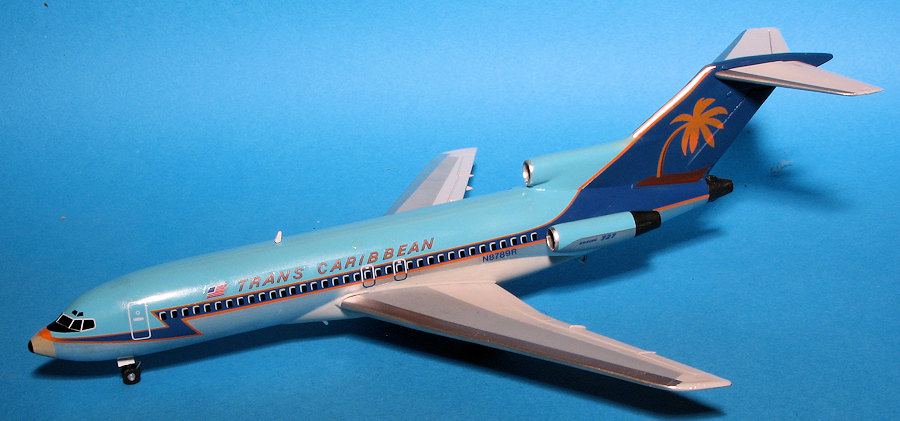
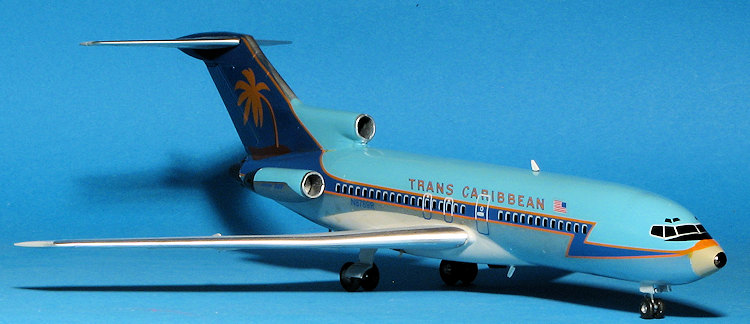
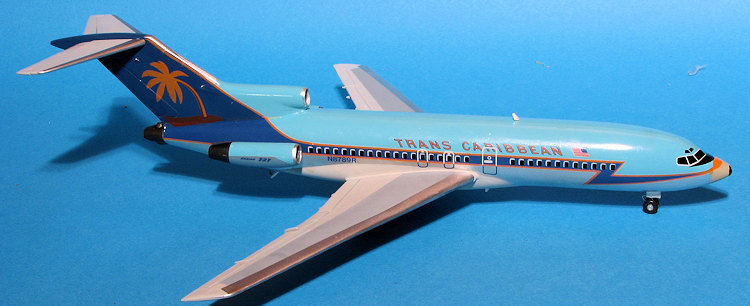
| COLORS & MARKINGS |
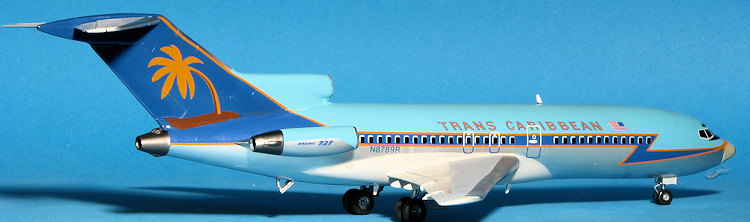 When it
comes to airliners, generally you spend a lot of time masking and painting. This
one was no exception. I first sprayed the fuselage with white to check for major
goofs. Not finding any of note, I mixed as best I could, the upper color. It is
really too dark, but I'm going with it anyway. This was then sprayed on. When
dry, that was masked and the tail color painted on. For this I used Testors True
Blue which was happily an exact match for the cheatline decal. That was masked
and the lower central fuselage as well as the wings and tailplanes were painted
Voodoo Grey, a now discontinued Model Master paint. This was masked on both the
wings and fuselage. The rest of the fuselage was painted using Alclad II
Aluminum as was the front of the wings and the front of the tailplane. This was
also done to the engine nacelles that were not to remain the upper fuselage
color. The upper and lower wings were then masked and the center of them painted
with FS 36320. Engine exhaust areas were painted steel.
When it
comes to airliners, generally you spend a lot of time masking and painting. This
one was no exception. I first sprayed the fuselage with white to check for major
goofs. Not finding any of note, I mixed as best I could, the upper color. It is
really too dark, but I'm going with it anyway. This was then sprayed on. When
dry, that was masked and the tail color painted on. For this I used Testors True
Blue which was happily an exact match for the cheatline decal. That was masked
and the lower central fuselage as well as the wings and tailplanes were painted
Voodoo Grey, a now discontinued Model Master paint. This was masked on both the
wings and fuselage. The rest of the fuselage was painted using Alclad II
Aluminum as was the front of the wings and the front of the tailplane. This was
also done to the engine nacelles that were not to remain the upper fuselage
color. The upper and lower wings were then masked and the center of them painted
with FS 36320. Engine exhaust areas were painted steel.
The cheatline has a zig-zag in it that needs the builder to mask it. What I did was to place the decal sheet under a piece of clear plastic sheet that comes with a variety of packaging. Laying a piece of Tamiya tape over it, I simply cut an outline of it to use as a guide. It works fairly well and doesn't have to be perfect. The nose was painted tan and the tip dipped in a pool of black paint.
 I then
assembled the wings and tailplanes. The fit of the wings is really not good and
since I didn't want to screw up any of the paint, I left the gaps. The landing
gear legs were then installed. This gave me something for the plane to sit on
while decalling.
I then
assembled the wings and tailplanes. The fit of the wings is really not good and
since I didn't want to screw up any of the paint, I left the gaps. The landing
gear legs were then installed. This gave me something for the plane to sit on
while decalling.
Using really old decals is always touch and go. One never knows if they will work well and since these were 30 years old or so, caution had to be taken. The first marking I used from the decal sheet was the cockpit window one. I figured if this was still good, then so were the rest. It was and they were. Here is where I admit to being totally bad at doing anything with a cheat line. I just cannot seem to get them straight so don't worry about it and do the best I can. I found that the two piece cheatlines were not all that bad a fit. I also noticed that the orange stripes were not backed with white so dull considerably on the background. One side at the fin join was off register and part of the orange peers through. This will need a bit of brush work. The forward orange fin stripe is too short and too wide compared to the area where it joins.
Since the sheet does not come with cabin windows, I used an ancient ATP window sheet. Basically, one has to count windows from the images on the instruction sheet to determine where to place everything. This is particularly true for the right side. I was fortunate in that this equally ancient sheet worked fairly well, though the clear carrier on it is excessive and needs trimmed. The sheet also had the glue turn milky as often happens with old decals.
After painting the wheels, those were installed. I then attached the main gear doors as well as the rear engine exhaust section (which did not fit well either). The various antennas were glued on and the rear engines attached along with the tail bumper. This was followed by some touchup painting and that was it.
| CONCLUSIONS |
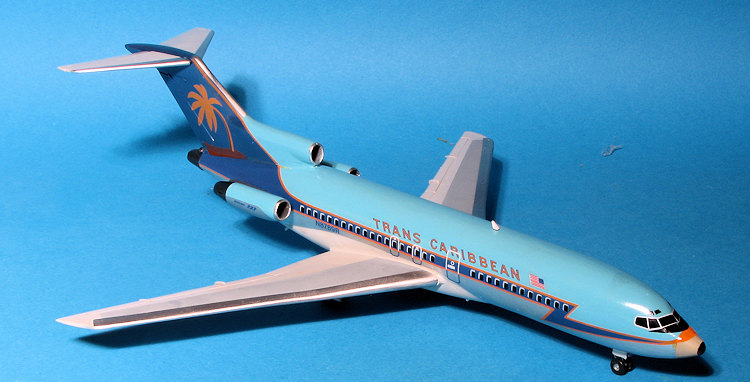 Let me begin
by saying that were this not a $3 kit using 30 year old decals, I would have
probably taken more care during its building. However, I cut some corners and
still ended up with a fairly nice airliner model. I really cannot recommend the
Airfix kit if one has a more modern option. However, for the -100 727, there
doesn't seem to be much else out there besides the equally ancient Revell kit.
The Minicraft kit is the most recent to my knowledge and is the longer -200.
Decals have come a long way since then as well and again, I cannot recommend any
of the old Rareliners sheets if you can find what you want with something newer.
This was very much a case of using what was at hand and there it is. Despite all
this, it was a build that I found enjoyable. It did not take all that long and
offered some challenges which I don't normally have. It also adds a 1/144 727 to
my collection, a plane not yet in there.
Let me begin
by saying that were this not a $3 kit using 30 year old decals, I would have
probably taken more care during its building. However, I cut some corners and
still ended up with a fairly nice airliner model. I really cannot recommend the
Airfix kit if one has a more modern option. However, for the -100 727, there
doesn't seem to be much else out there besides the equally ancient Revell kit.
The Minicraft kit is the most recent to my knowledge and is the longer -200.
Decals have come a long way since then as well and again, I cannot recommend any
of the old Rareliners sheets if you can find what you want with something newer.
This was very much a case of using what was at hand and there it is. Despite all
this, it was a build that I found enjoyable. It did not take all that long and
offered some challenges which I don't normally have. It also adds a 1/144 727 to
my collection, a plane not yet in there.
| REFERENCES |
https://en.wikipedia.org/wiki/Boeing_727#727-100
August 2016
Copyright ModelingMadness.com Thanks to me
for the review kit and decals. If you would like your product reviewed fairly and fairly quickly, please
contact
the editor or see other details in the
Note to
Contributors.