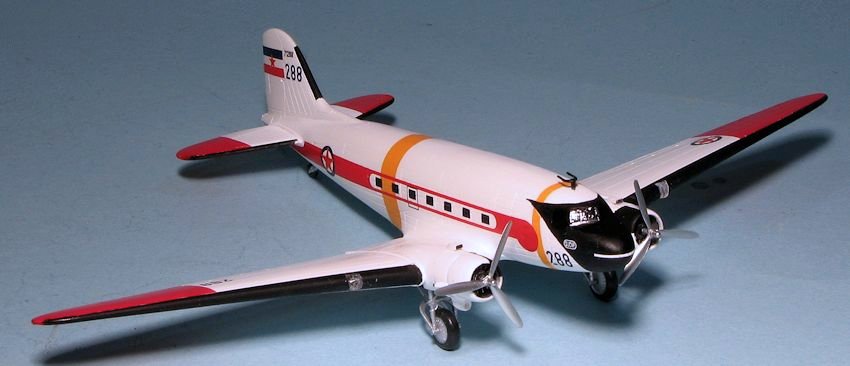
Minicraft 1/144 DC-3
| KIT #: | ? |
| PRICE: | $5.00 |
| DECALS: | One option |
| REVIEWER: | Scott Van Aken |
| NOTES: | Kit came in a bag with no instructions |
| HISTORY |
The C-47 was vital to the success of many Allied campaigns, in particular those at Guadalcanal and in the jungles of New Guinea and Burma where the C-47 (and its naval version, the R4D) made it possible for Allied troops to counter the mobility of the light-traveling Japanese army. Additionally, C-47s were used to airlift supplies to the embattled American forces during the Battle of Bastogne. Possibly its most influential role in military aviation, however, was flying "The Hump" from India into China. The expertise gained flying "The Hump" was later be used in the Berlin Airlift, in which the C-47 played a major role, until the aircraft were replaced by Douglas C-54 Skymasters.
 In Europe, the C-47 and a specialized paratroop variant, the
C-53 Skytrooper, were used in vast numbers in the later stages of the war,
particularly to tow gliders and drop paratroops. In the Pacific, with careful
use of the island landing strips of the Pacific Ocean, C-47s were even used for
ferrying soldiers serving in the Pacific theater back to the United States.
In Europe, the C-47 and a specialized paratroop variant, the
C-53 Skytrooper, were used in vast numbers in the later stages of the war,
particularly to tow gliders and drop paratroops. In the Pacific, with careful
use of the island landing strips of the Pacific Ocean, C-47s were even used for
ferrying soldiers serving in the Pacific theater back to the United States.
C-47s (approx. 2,000 received under lend-lease) in British and Commonwealth service took the name Dakota, from the acronym "DACoTA" for Douglas Aircraft Company Transport Aircraft. The C-47 also earned the informal nickname Gooney Bird in the European theater of operations.
Other sources (C-47/R4D Skytrain Units of the Pacific and CBI, David Isby, Osprey Combat Aircraft #66, Osprey Publishing Limited, 2007) attribute this name to the first plane, a USMC R2D - the military version of the DC-2 - being the first plane to land on Midway Island, previously home to the native long-winged albatross known as the Gooney Bird which was native to Midway.
The United States Air Force's Strategic Air Command had Skytrains in service from 1946 through 1967.
With all of the aircraft and pilots having been part of the Indian Air Force prior to Independence, both the Indian Air Force and Pakistan Air Force used C-47s to transport supplies to their soldiers fighting in the Indo-Pakistan War of 1947.
 Several C-47 variations were used in the Vietnam War by the
United States Air Force, including three advanced electronic warfare variations,
which sometimes were called "Electric Gooneys" designated EC-47N, EC-47P, or
EC-47Qs depending on the engine used. EC-47s were also operated by the
Vietnamese, Laotian and Cambodian Air Forces. A gunship variation, using three
7.62mm miniguns, designated AC-47 "Spooky" often nicknamed "Puff the Magic
Dragon" also was deployed.
Several C-47 variations were used in the Vietnam War by the
United States Air Force, including three advanced electronic warfare variations,
which sometimes were called "Electric Gooneys" designated EC-47N, EC-47P, or
EC-47Qs depending on the engine used. EC-47s were also operated by the
Vietnamese, Laotian and Cambodian Air Forces. A gunship variation, using three
7.62mm miniguns, designated AC-47 "Spooky" often nicknamed "Puff the Magic
Dragon" also was deployed.
The Royal Canadian Air Force and later, the Canadian Armed Forces employed the C-47 for transportation, navigation, and radar training, as well as for search and rescue operations from the 1940s to the 1980s.
After World War II thousands of surplus C-47s were converted to civil airline use, some remaining in operation in 2012 as well as being used as private aircraft.
| THE KIT |
This kit was reviewed back in 1996 and here is what I said about it at the time.
There are nicely engraved panel lines that don't look too bad and are a lot finer than you'll find on the Hasegawa 1/200 airliners, which is good. They are flash free and devoid of ejector pin marks in any embarrassing places where it would be difficult to remove them. It has clear bits for the windscreen and landing lights.
There is no interior as frankly, it would be tough to see
anything. Cabin windows are represented on the decal sheet. If I had a concern,
it would be the tail section. The top is a bit more rounded than I'd like and
 the area at the rear is just not shaped properly, ending squared off instead of
a point. The rudder hinge line looks to be too straight as well.
the area at the rear is just not shaped properly, ending squared off instead of
a point. The rudder hinge line looks to be too straight as well.
The instruction sheet is typical giving six construction steps in the usual manner of drawings for each step. With minimal parts and a simple paint scheme, the kit should be up and running in no time. The decal sheet offers three examples, two of them Pre-WW2 and one post war.
First is a Pan American aircraft from 1941. This one is undoubtedly what most will choose here in the US as it has a pleasing scheme and nice big US flags on it to keep it from being shot down by the baddies in Europe.
Next is a super orange KLM version from 1939. For those of you who are terrified of natural metal finished, this will be the one for you.
Finally, a Swiss Air version from 1946. This one has a nice red tail tip to give it some color.
 While the sheet offers great examples, the sheet itself is a bit
of a problem. Made by Necomisa in Mexico, it is very well done, but suffers from
yellowing of the carrier film. This can be a real problem as this yellow film
will not look good against natural metal and cutting out each letter is a real
pain. Fortunately there are aftermarket sheets available for this kit. Should
you get a good sheet, you will notice that the windows are included on each
marking variation. I have used Necomisa decals before and found them to be very
good indeed, except for the aforementioned yellowing problem.
While the sheet offers great examples, the sheet itself is a bit
of a problem. Made by Necomisa in Mexico, it is very well done, but suffers from
yellowing of the carrier film. This can be a real problem as this yellow film
will not look good against natural metal and cutting out each letter is a real
pain. Fortunately there are aftermarket sheets available for this kit. Should
you get a good sheet, you will notice that the windows are included on each
marking variation. I have used Necomisa decals before and found them to be very
good indeed, except for the aforementioned yellowing problem.
2014: The kit I am using was bagged with no instructions or decals so I have no idea what boxing it came from as Minicraft had done at least a half dozen boxings since that 1996 review. I also had a problem on this kit with the rear of the lower wing being short shot in several places. I should also add that the kit is molded as a DC-3, which means that it has no cargo doors. Those kitted as cargo door versions, have this represented by a decal.
| CONSTRUCTION |
First steps on this one, after painting the cockpit area black, was to cement the fuselage halves together and to glue the upper wing halves to the lower wing. I then took the time to fill in the short shot sections of the lower wing. It was then that I realized I'd be using a decal for the cockpit windows so painting the cockpit was a bit of a waste of time.
Once the fuselage seams had been taken care of, the lower
wing had the forward engine nacelle bits glued in place. Let me just state that
the Minicraft kit is not the best molding on the planet. Not bad, just not
Tamiya quality. There was quite a bit of flash on the forward nacelles and after
gluing those on, I had to
 use a bit of filler to get them to look good. The
engine pieces were painted black and dry brushed silver.
use a bit of filler to get them to look good. The
engine pieces were painted black and dry brushed silver.
Next the wing was installed. The aft lower section does not fit well and this is not helped by having an open lower fuselage with no real area to attach the rear section to. When/if I do another, I'll glue in some plastic strip to the lower fuselage opening as that might help some. There were also some rather large gaps in the upper wing/fuselage join and the fit in the front wasn't the best either. Eventually all was smoothed out and the tailplanes were glued in place.
I then attached the cowlings after using some rolled up sandpaper to take care of the flash on the cowling face. The tail wheel was then glued on and the cowlings filled with tissue in preparation for painting. This aircraft uses the short carb intakes and those were also glued in place.
| COLORS & MARKINGS |
 t is matte black and the windows are gloss, they would not be
visible at all. Seems like a dark grey would have been a better choice.
t is matte black and the windows are gloss, they would not be
visible at all. Seems like a dark grey would have been a better choice.
| CONCLUSIONS |
Overall it was a fairly pleasant experience, though it did requite some modeling skills in terms of cleaning up parts and filling gaps. Those wanting a proper C-47 would be best advised to seek out the Roden kit. While it also has its issues (such as not offering a DC-3 type fuselage without the cargo door), in my opinion, it is a better overall representation and doesn't seem to have the shape issues prevalent with the Minicraft kit. Doesn't mean that the Minicraft kit is a toss out, just that it has been superseded.
| REFERENCES |
August 2014 Thanks to me for
providing the kit and decals. If you would like your product reviewed fairly and fairly quickly, please contact the editor or see other details in the
Note to
Contributors.