
A-Model 1/72 Yak-53
| KIT #: | 72129 |
| PRICE: | $12.95 MSRP |
| DECALS: | Two options |
| REVIEWER: | Scott Van Aken |
| NOTES: |
| HISTORY |
While OKB Yakovlev is well known for its superb fighters during the Great Patriotic War, and its long range interceptors that operated in the 50's and the 60's, Yak has also been dabbling in civil and aerobatic aircraft for quite a long time as well. Post war, the Yak-18 was widely used as were others based on the Yak-3 fighter.
 In the early 1970s, a fully aerobatic single seat
sports aircraft, the Yak-50 was developed. This was later enlarged to a two seat
trainer, the Yak-52. The two major differences between the Yak-50 and 52 were
the twin seats and the tricycle landing gear of the Ya-52. This offered much
easier ground handling than a tail wheel so it was logical to incorporate this
feature into the Yak-50 single seat aircraft and the Yak-53 was born.
In the early 1970s, a fully aerobatic single seat
sports aircraft, the Yak-50 was developed. This was later enlarged to a two seat
trainer, the Yak-52. The two major differences between the Yak-50 and 52 were
the twin seats and the tricycle landing gear of the Ya-52. This offered much
easier ground handling than a tail wheel so it was logical to incorporate this
feature into the Yak-50 single seat aircraft and the Yak-53 was born.
Though most construction took place in Romania, the Yak-53 has been widely used in Soviet bloc countries and has been exported to other countries around the world. One of the more unusual aspects of the aircraft is that the wheels are not totally retractable, so if a pilot has landing gear trouble or forgets to lower them, it minimizes damage to the airframe.
| THE KIT |
A-Model has the distinction of providing some very nice subjects, especially if one is into things Russian and unusual. Though not quite what one would call ultra-odd, the truth is that there are few others doing models of sports/acrobatic aircraft so the enthusiast should take what they can get and be happy.
As are so many kits today, this on is in the hated
'letter box' container, so it behooves the modeler to only open one end of the
shrink wrap to keep parts from disappearing. Once open, it is immediately
apparent that a box half the size could have easily been used as the small bag
with three white and one clear sprue emerges into the light. A set of
instructions and a decal sheet also comes tumbling out.
The white sprues are quite thick, though the attachment points are commendably small. There is considerable flash on some of the parts and little or none on other. Even on thick parts I found no sink areas and no ejector pin marks.
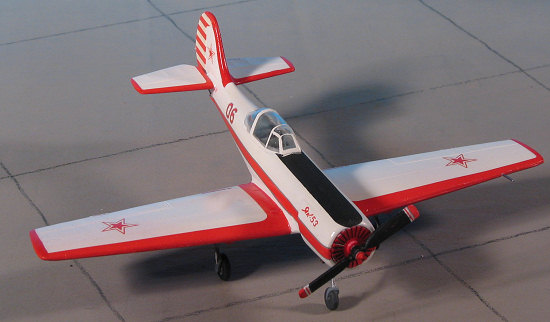
It is obvious that there are two sprues used for most of the different Yak-50/52/53 variants; that of the fuselage (with the most flash), and upper wings/tail plane. The lower wing and landing gear sprue is peculiar to the Yak 52/53. I noticed that the cockpit is a bit Spartan with but a stick and seat and instrument panel. There are two props provided with only one being for this particular version. These Yaks have a cooling fan in front of the engine so no engine detail is provided at all. This aircraft will be a major tail sitter without nose weight so it behooves the builder to pack in as much as he can. There are no optional parts and no condescension to building it with gear up.
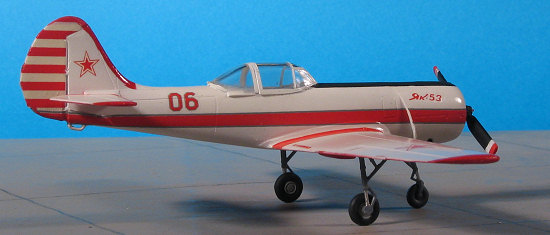
The small, but well done instructions are in both English and Russian with three well drawn construction steps. There is color info given with Humbrol and generic references. One basically paints the interior in Medium Grey with the outside in white and red with light grey landing gear. The good sized decal sheet provides markings for two planes; one during the Soviet years and one after the fall of communism in Russia. Both planes are basically white with red lower wings and tail planes. Though decals are given for the upper wing/tailplane leading edges, it would be in the builder's best interests to paint those. The anti-glare panel is provided as a decal, but again, paint may be the best option until one knows how well the decals work. Fuselage stripes and tail markings are well done with only a touch of mis-registration, but nothing really major. The decal sheet also provides an instrument panel and stencils. It is quite matte and with considerable carrier around the markings so one needs to trim this back a bit.
| CONSTRUCTION |
 Though I have bought several A-Model kits, I've never
really built one so it seemed about time to do so. I have built kits similar to
this, that being those done by low pressure molding, so I didn't think it would
be too difficult. The soft plastic makes it much easier to trim and clean things
up, though one does have to be careful not to do too much. It also means that
glue spills will make a major impact on the area it hits.
Though I have bought several A-Model kits, I've never
really built one so it seemed about time to do so. I have built kits similar to
this, that being those done by low pressure molding, so I didn't think it would
be too difficult. The soft plastic makes it much easier to trim and clean things
up, though one does have to be careful not to do too much. It also means that
glue spills will make a major impact on the area it hits.
First thing I did was to clean up as many of the parts I'd be using while they were still on the sprues. With soft plastic it is a good idea as that puts less stress on the bits and makes them easier to handle. Next, I assembled the very basic interior pieces. These were then sprayed FS 36237. This is the shade that the Humbrol reference crossed to. The instrument panel was also sprayed this color as was the interior of the fuselage. Then the interior and the exhaust plate were glued into one fuselage half. The exhaust bulkhead required the holes in the fuselage for the exhaust to be drilled out larger. I also drilled the ends of the exhaust to provide an indentation. Next, the instrument panel decal was put on the panel piece. This was then given a dab of Solvaset and it snuggled right on down. A good sign for the rest of the markings.
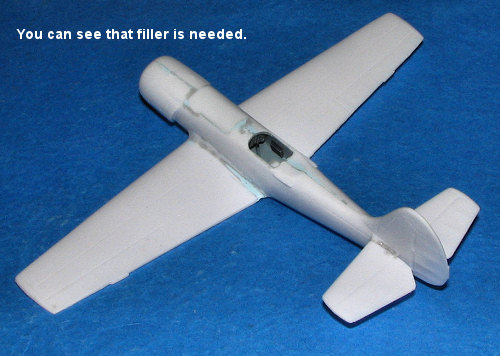
The instrument panel was then glued in place. There is an alignment pin on the top of this (a great idea) that fits into a hole in the upper fuselage. This hole needs enlarged with a needle file and then the panel can be glued in. At this time, I cemented the fuselage halves together. There is an upper blanking plate to cover the forward cockpit. It doesn't fit too well, being a bit too long and a bit too narrow. Trimming and filler will fix this, however.
 Meanwhile, the wings were cleaned up and the upper wing
halves were glued to the single lower piece. Both the wings and fuselage were
sanded and then had the usual gaps taken care of with filler. Several
applications, I might add. The next step was to add the horizontal stabs. These
have large alignment pins, but the holes on the fuselage are too far to the
rear. I 'ovaled' the holes and glued in the stabs.
Meanwhile, the wings were cleaned up and the upper wing
halves were glued to the single lower piece. Both the wings and fuselage were
sanded and then had the usual gaps taken care of with filler. Several
applications, I might add. The next step was to add the horizontal stabs. These
have large alignment pins, but the holes on the fuselage are too far to the
rear. I 'ovaled' the holes and glued in the stabs.
 Then the wing was attached. This meant sanding back the
wing roots on the fuselage to get them to fit. Some trimming was needed at the
rear as well. Fortunately, the soft plastic does allow some adjustment to be
made when the glue is applied. I then applied filler to all the joins. It took
several applications to get everything smoothed out, during which I broke the
horizontal stabs off at least twice. I then masked the canopy (not an easy task
as the frame lines are rather indistinct) and glued it in place. The canopy is a
rather odd affair with the windscreen and canopy itself as one piece while the
backlight is separate. Makes for a rather poor fit and it seems to me it would
have been better to have this as one piece.
Then the wing was attached. This meant sanding back the
wing roots on the fuselage to get them to fit. Some trimming was needed at the
rear as well. Fortunately, the soft plastic does allow some adjustment to be
made when the glue is applied. I then applied filler to all the joins. It took
several applications to get everything smoothed out, during which I broke the
horizontal stabs off at least twice. I then masked the canopy (not an easy task
as the frame lines are rather indistinct) and glued it in place. The canopy is a
rather odd affair with the windscreen and canopy itself as one piece while the
backlight is separate. Makes for a rather poor fit and it seems to me it would
have been better to have this as one piece.
| COLORS & MARKINGS |
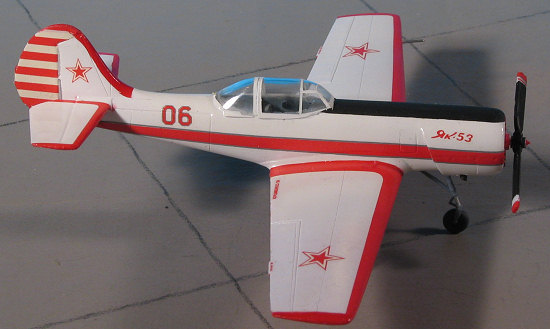 With all that done, it was time for paint. Basically,
the airframe is white with large areas of red. Those of the underside of the
wing and horizontal stabs and the fin leading edge have to be painted, while the
rest of the markings are part of the decal. I certainly hope the decals work as
all that additional masking will be quite a chore. Anyway, I painted the
airframe with Floquil Reefer White to provide a primer to spot anything I missed
(and I did). Then nearly the entire airframe was masked off, leaving only the
red parts. Though the instructions call for Humbrol #3, I didn't have any so
used some Gunze Red acrylic instead. This dried to the touch in a very short
time and allowed me to remove the masking to see how much bleed-under I had to
deal with. Actually, not as much as I feared. Just a bit near the wing root,
easily scraped off. Red did turn out a bit darker than I'd have liked, but oh
well.
With all that done, it was time for paint. Basically,
the airframe is white with large areas of red. Those of the underside of the
wing and horizontal stabs and the fin leading edge have to be painted, while the
rest of the markings are part of the decal. I certainly hope the decals work as
all that additional masking will be quite a chore. Anyway, I painted the
airframe with Floquil Reefer White to provide a primer to spot anything I missed
(and I did). Then nearly the entire airframe was masked off, leaving only the
red parts. Though the instructions call for Humbrol #3, I didn't have any so
used some Gunze Red acrylic instead. This dried to the touch in a very short
time and allowed me to remove the masking to see how much bleed-under I had to
deal with. Actually, not as much as I feared. Just a bit near the wing root,
easily scraped off. Red did turn out a bit darker than I'd have liked, but oh
well.
I then painted the upper surface white with clear
acrylic gloss in preparation for the decals. But before putting on decals,
I glued on the main gear legs so that the model could stand on its own. Much to
my disgust, it was a major tail sitter. However, with the gear in place, I could
not worry about mussing up a marking.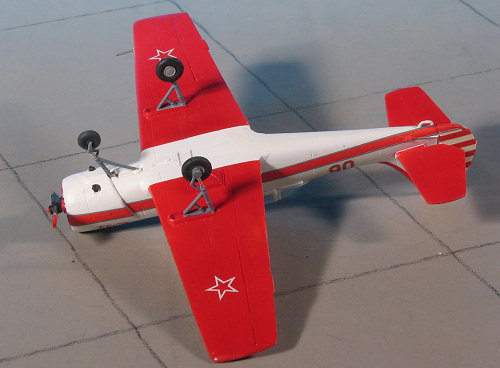
Well, how do I put this. The kit decals are not optimal. They are fairly well printed. They are quite matte. They are rather brittle. They sorta work with setting solutions, but not as well as one would like. They also have large clear carrier areas around all the markings.
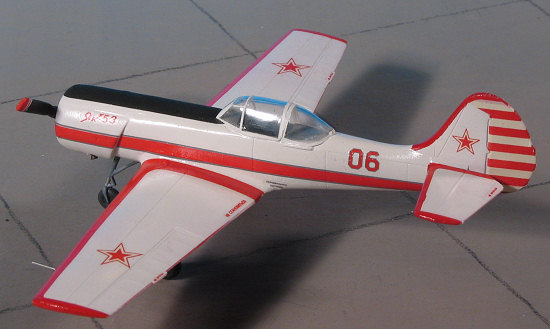
And the markings are not perfect fits. The wing/stab red areas are a bit too large and don't like to conform over the wing tips or leading edges. The fuselage band is far too long, but that is better than too short. I didn't want to drown these in Future as I did on the last build as they weren't that bad. I did lose one of the stripes for the prop, but no matter. I found that Vallejo Vermillion was a near perfect match for the red markings so did what touch-up was needed with that. It is a bit less brilliant than the underside red, but it doesn't really make that much difference. I eventually got them all in place and quickly sprayed clear acrylic gloss on them to hold them in place and cut down on the matte appearance. The upper cowling anti-glare panel is a decal as well and that worked out quite well.
| FINAL CONSTRUCTION |
This consisted of attaching the main wheels first. Then
I had to decide what to do about the tail sitting. Fortunately, with no engine
and a fan to cover the front opening, I had an area that could be used. And use
it I did. I crammed as much weight as I could into
 that opening before attaching the
cooling fan. In fact, the fan is just pressed into the opening as it is a tight
fit. Same for the prop, as it fit quite tightly as well. The only other addition
was a piece of tubing for the pitot tube as I broke the one that came in the kit
and it would have been flat anyway as there was some mold slippage.
that opening before attaching the
cooling fan. In fact, the fan is just pressed into the opening as it is a tight
fit. Same for the prop, as it fit quite tightly as well. The only other addition
was a piece of tubing for the pitot tube as I broke the one that came in the kit
and it would have been flat anyway as there was some mold slippage.
As a finishing note, I have been using one of those silver paint pens you can get at craft stores. Those are quite shiny and I simply transfer a bit of paint from the tip to a paint brush for use on oleos and other places I need bright chrome-like silver. A lot easier to use than Bare Metal Foil, though not quite as shiny.
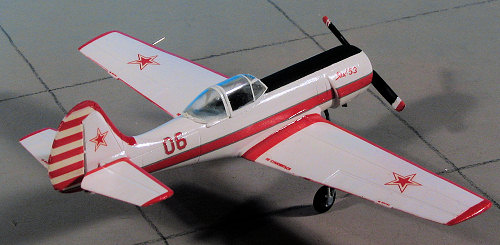
Anyway, a bit of touch-up painting and the model was done. It does look a bit stalky, but that is what they really look like.
| CONCLUSIONS |
Now I can say that I've built an A-Model kit. I was anticipating a really horrid build, but in fact, it was no more difficult than a KP kit from the 1970s. In many cases, the fit was even better. Sure, you need some skills to ensure proper fit and the decals do leave something to be desired, but I have to tell you that no-one else does some of the subjects that A-model produces; which is why I bought this one.
Thanks to me and my fondness for anything different from the norm for this one.
December 2006
#1443 in a series
Copyright ModelingMadness.com. All rights reserved. No reproduction without express permission.
If you would like your product reviewed fairly and fairly quickly, please contact the editor or see other details in the Note to Contributors.