Heller 1/43 Alpine A310
| KIT #: | 146 |
| PRICE: | $5.00 (started) |
| DECALS: | One option |
| REVIEWER: | Scott Van Aken |
| NOTES: |
| HISTORY |
Dieppe-based Alpine, once an independent company specialising in faster
Renaults, later a Renault subsidiary, established a fine competition history
with the Alpine A110 winning the 1973 Monte Carlo Rally and World Rally
Championship. The successor was the Alpine A310, initially powered by tuned
17TS/Gordini four-cylinder engine, still rear-mounted. The maximum power reaches
127 PS (93 kW; 125 hp), thanks to the use of two twin-barrel 45 DCOE Weber
carburetorsThe first model of the A310, built 1971-1976, was a car with a
four-cylinder engine and six headlights. Being larger, heavier, and no more
powerful than its predecessor, the A310 was generally considered
underpowered. The car was first shown at the 1971 Geneva Motor Show. The
prototype A310 had louvres across the rear windscreen; these were not carried
over to the production model. Early models had a NACA duct mounted near the
window atop  the left front fender, later four-cylinder cars received two,
mounted closer to the front of the car. In 1976, to help flagging sales, the
lower-cost A310 SX was presented. This model has a 95 PS (70 kW) version of the
Renault 16/17's 1647 cc inline-four and simplified equipment.
the left front fender, later four-cylinder cars received two,
mounted closer to the front of the car. In 1976, to help flagging sales, the
lower-cost A310 SX was presented. This model has a 95 PS (70 kW) version of the
Renault 16/17's 1647 cc inline-four and simplified equipment.
The basis of the A310 was a hefty tubular steel backbone chassis, clothed in a fiberglass shell. As for the previous A110 the entire body was molded in a single piece. Like the ill-fated De Lorean DMC-12, which used the same PRV powertrain, the engine was mounted longitudinally in the rear, driving forward to the wheels through a manual five-speed gearbox. The driving position was low and sporty, although the front wheelwells encroached on the occupants' feet, pointing them towards the centre of the car. The A310 was labor-intensive, having been developed for small-scale artisanal production - a car took 130 hours to build from start to finish. The front axle also came in for some criticism, although in 1974 the balljoint mountings were replaced by rubber/steel bushings (silent-blocs) which somewhat improved durability. While many bits of the A310 came from the Renault parts shelf as expected, others are more surprising - the steering rack is from the Peugeot 504, while the turn signals are Simca 1301 units.
 In 1976 the A310 was restyled by Robert Opron and fitted with the more powerful
and newly developed 90-degree 2664 cc V6 PRV engine, as used in
some Renaults, Volvos and Peugeots. The later V6 received a black plastic rear
spoiler as well, useful for keeping the tail planted but somewhat marring the
purity of the original's lines. With 150 PS (110 kW) on tap, the A310 PRV V6 was
Renault's performance flagship capable of 220 km/h (137 mph) and acceptable
acceleration. The tail-heavy weight distribution gave handling characteristics
similar to the contemporary Porsche 911. Beginning with model year 1981 (in late
1980), the rear suspension was shared with the mid-engined Renault 5 Turbo.
Rather than the previous three-lug wheels, the A310 also received the alloys
used for the 5 Turbo, albeit without the painted elements.
In 1976 the A310 was restyled by Robert Opron and fitted with the more powerful
and newly developed 90-degree 2664 cc V6 PRV engine, as used in
some Renaults, Volvos and Peugeots. The later V6 received a black plastic rear
spoiler as well, useful for keeping the tail planted but somewhat marring the
purity of the original's lines. With 150 PS (110 kW) on tap, the A310 PRV V6 was
Renault's performance flagship capable of 220 km/h (137 mph) and acceptable
acceleration. The tail-heavy weight distribution gave handling characteristics
similar to the contemporary Porsche 911. Beginning with model year 1981 (in late
1980), the rear suspension was shared with the mid-engined Renault 5 Turbo.
Rather than the previous three-lug wheels, the A310 also received the alloys
used for the 5 Turbo, albeit without the painted elements.
In the later models (1983-1984) of the A310 a "Pack GT" which was inspired from the Group 4 A310 racing cars would be developed, it gained wheel arches and larger spoilers front and rear. A few Alpine A310 V6 Pack GT Kit Boulogne were built (27 examples), here the PRV V6 was bored out to 2.9 litres and was then further modified by Alpine, fitted with triple Weber 42DCNF carburetors that pushed power to 193 PS (142 kW).
| THE KIT |
1/43 scale is very popular among those who like die-cast models and those who are fond of resin and metal based kits. While the die cast can be quite inexpensive, and perfect for those who don't have the time or talent to build a kit, many 'real modelers' eschew this format for their kits. However, it also means forking out some major money as many of the modern multi-media kits in this scale are over $50.00.
Many years back, Heller decided that it would see if there was a market for 1/43 plastic car kits. They produced a range of both civilian and racing cars. Not surprisingly, the civilian cars were aimed at the home market so you see a lot of French brands in the mix. A quick search shows that these were being produced for quite a while and so are not that difficult to find though some people are asking stupid prices for them.
 This kit was purchased a couple of years ago when I had an
LHS. It was on their sale table and had been started. In this regard, the
previous owner had glued together all the interior bits. He also removed all the
parts from the sprue and put them in a bag. Not a big deal for a low parts count
car like this, but a disaster for something like a Dragon armor kit.
This kit was purchased a couple of years ago when I had an
LHS. It was on their sale table and had been started. In this regard, the
previous owner had glued together all the interior bits. He also removed all the
parts from the sprue and put them in a bag. Not a big deal for a low parts count
car like this, but a disaster for something like a Dragon armor kit.
The brown plastic is superbly molded with crisp detail. This is a curbside, as are most 1/43 kits, so has a flat, pan chassis on which is molded a rudimentary rear transaxle. Axles are plastic, fitting onto blocks on the pan and held in place by upper blocks. The interior is a tub into which you place front seats, gear shift and a dash assembly that includes the dash, panel cover and steering wheel.
The body has separate front and rear underpinnings. The clear bits all fit from the inside save the headlight covers and tail lights. Wheels are plastic halves with the inner section being solid so that the axles can be installed. The only chrome bits are the wheel covers. There is a small decal sheet which contains license plates and is of doubtful viability.
Instructions are two exploded diagrams that will be familiar to people who have built Heller kits with Heller paint colors provided.
| CONSTRUCTION |
Since this kit had been started, I would have expected it to be a rather smooth building experience, and for the most part it was. The previous owner had glued the seats into the interior and had also glued the lower front and lower rear body sections. This would cause some issue later in the process.
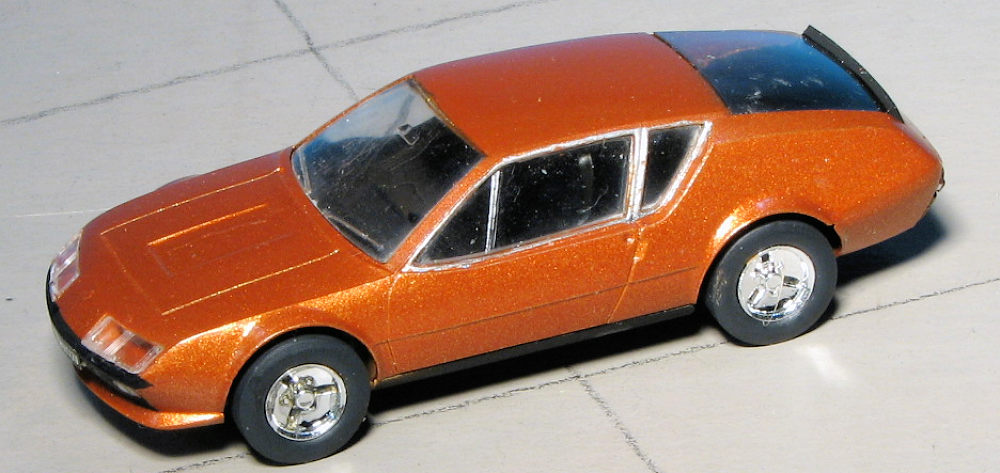
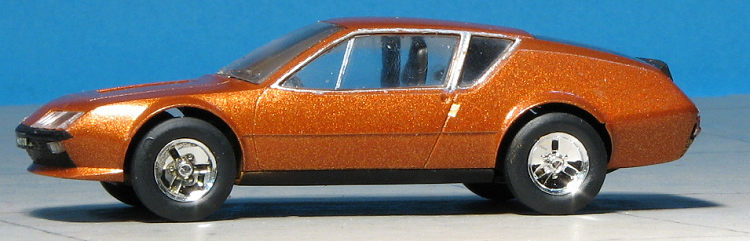
So I started this out by cleaning up the body seams and gluing the wheels together. The body was then painted semi-gloss black on the interior along with the car's interior. Then I painted the exterior in a sort of bronze colored metallic from one of the many Testors lacquer colors that I have used on slot cars. It seems to match some shades seen in photos of the real deal.
 Meanwhile, I
painted and glued on the steering wheel as well as the anti-glare section over
the instruments. These had been dry brushed, but frankly, you cannot see much of
them anyway. Decals would have been nice, though. With the body paint dry, I
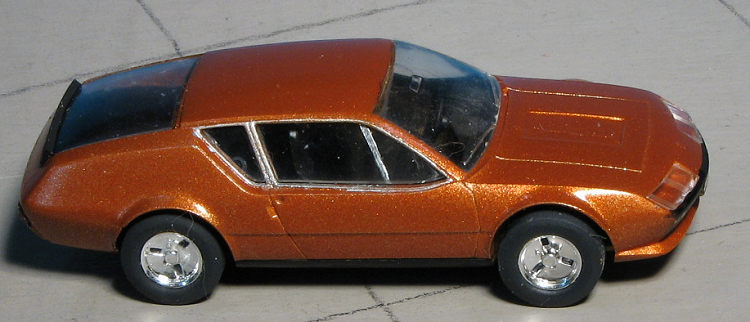
masked off the front as well as the spoiler section of the rear glass and
painted those black. This was also done to the area of the body under the rear
glass.
Meanwhile, I
painted and glued on the steering wheel as well as the anti-glare section over
the instruments. These had been dry brushed, but frankly, you cannot see much of
them anyway. Decals would have been nice, though. With the body paint dry, I
masked off the front as well as the spoiler section of the rear glass and
painted those black. This was also done to the area of the body under the rear
glass.
I then painted the tires with Tamiya tire black and the rear wheel area with gloss black. The axles are held in place with small blocks so I attached the axles and then glued the blocks over them, making sure I got no cement on the axles. Then the wheels were attached and glued from inside the wheel. The chrome wheel covers are a pretty tight fit so were not cemented in place.
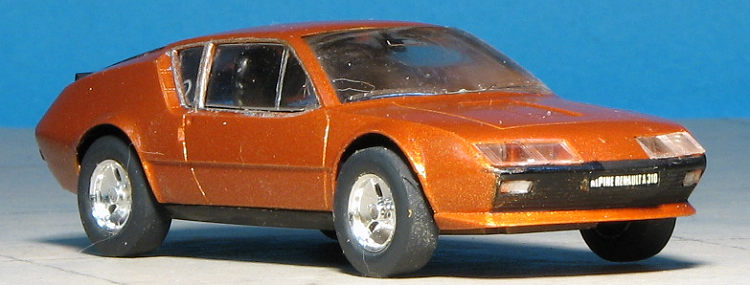
Back at the body, I painted the inside of the turn signals and tail lights using an orange and red Sharpie. When dry, this was backed up using a Liquid Chrome pen. I also used this pen on the back of the headlights. When dry, all these lights were installed using clear gloss paint. I also attached the headlight covers using this paint.
 The last bits
to be glued on were the windows. The windscreen was a fairly good fit, though
there is no solid attachment other than at the top. I did not try to paint the
rear view mirror or wiper blades that are molded in place as I KNOW I'd make a
mess of it. The side windows were a real pain. No matter how I tried, I
could not get the rear sections to fit flush. No trouble with the rear window as
it simply falls into the grooves back there for it. Last construction step was
to glue the body in place. The only decals that came with the kit were license
plates. Surprisingly, they were still viable.
The last bits
to be glued on were the windows. The windscreen was a fairly good fit, though
there is no solid attachment other than at the top. I did not try to paint the
rear view mirror or wiper blades that are molded in place as I KNOW I'd make a
mess of it. The side windows were a real pain. No matter how I tried, I
could not get the rear sections to fit flush. No trouble with the rear window as
it simply falls into the grooves back there for it. Last construction step was
to glue the body in place. The only decals that came with the kit were license
plates. Surprisingly, they were still viable.
| CONCLUSIONS |
Really, the only difficult part was the installation of the side windows. Doing the headlights was a bit of a challenge as they are recessed pretty far back, but otherwise worked out just fine. I'm fairly pleased with the result and it will fit in well with the rest of my 1/43 car collection.
| REFERENCES |
https://en.wikipedia.org/wiki/Alpine_A310
6 April 2018 Copyright ModelingMadness.com. All rights
reserved. If you would like your product reviewed fairly and fairly quickly, please contact the editor or see other details in the
Note to
Contributors. Back to the Main Page
Back to the Review
Index Page
Back to the Previews Index Page