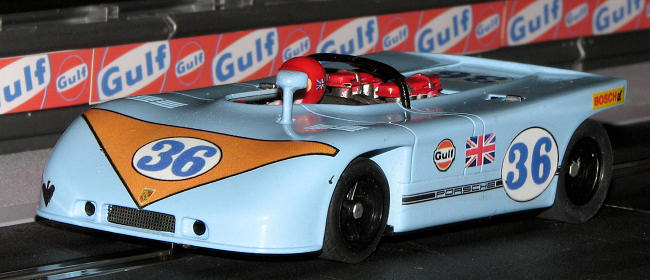
Fly Porsche 908/3 rebuild
This time, my efforts went into a Fly Porsche 908/3. This was a #8
Fast Kit car had been heavily raced and so was missing a few bits like the roll
bar and many of the bits that fit in the back. Those bits in the back are still
missing as I cannot find a way to order new ones.
However, the rest of it was pretty intact, though quite grungy and banged up.
First step was to remove all the bits and pieces from the body. This owner had
heated the pins just like the factory, but not as carefully so care needed to be
taken to retain something on which to return the parts.
If you have tried to strip paint on a Fly car using 90% alcohol, you know that
you are pretty much wasting your time. So I used sandpaper, starting with 320
grit to 400 to 600 to 1200 and finishing up with an old terry cloth towel.
Fortunately, the car has few dips and bumps so it was one of the easier jobs.
During all this, the mold seams were pretty well removed, making for a rather
smooth finish. I also removed the rear fins as the car I wanted to model was
flat in the rear. This left some areas that needed body filler and sanding down.
I generally don't get too bothered about glass like smoothness as I know the car
will be r
un and it will get dinged up a bit in the process. But I get it as
smooth as I can.
The car was painted an overall gloss white in preparation for the next color and
to check for any spots I missed. There were a few, but those were easily filled
in again and more paint applied after it had been sanded down once again.
For the car, I wanted to do the Gulf #36 car that ran in the Targa Florio.
Pattos does a decal sheet for this so I ordered it. When it arrived, I saw that
there were some differences between the sheet and the pho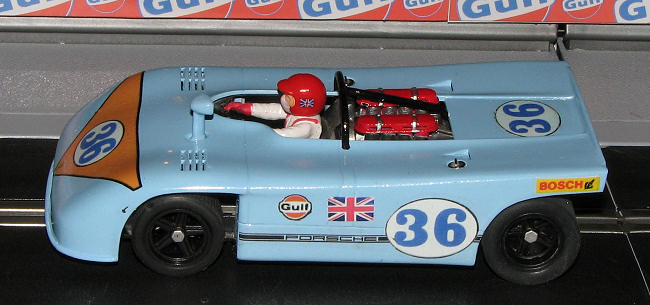 tos.
Not unusual for Pattos as I've yet to get a totally accurate sheet from him for
a specific project and these cars did change from race to race.
tos.
Not unusual for Pattos as I've yet to get a totally accurate sheet from him for
a specific project and these cars did change from race to race.
Back at the car, I mixed white with little bits of Chrysler engine blue until I
got a shade that matched a couple of Gulf blue cars I already have. This was
then sprayed on the entire car after thinning it with lacquer thinner. I should
mention that the color did darken once applied so when I was mixing, I'd test
each time I added blue to see how it matched. It never gets the right shade
first time so it took several mixes to get it right. I also masked off the
engine area and sprayed the carb air cleaner covers with white and then red.
While all that was curing, I scanned the Pattos sheet at 1200 dpi and did a bit
of alteration to the color of the number in the roundels as the Pattos sheet had
these far too dark. I also intensified the orange in the nose markings and Gulf
logos. Then after some test printings and careful measurement to be sure the
markings were the same size, I printed the sheet out on white decal paper using
the 'photo quality' setting on my inkjet. Then the sheet was sprayed with
several light coats of Testors Metallizer sealer to keep the colors from
dissolving.
Now the down side of using white decal paper is that you cannot duplicate
markings that have clear areas in them and you have to cut very closely to the
edge of the markings you will be using. Though the Pattos decals are also made
on a printer and sealed, the sealer he uses will not allow close cutting without
the edges splintering. Besides, his colors are not very intense, which is why I
duplicate his sheets and reprint them on white.
So I use the Pattos sheet for the first layer and then add a second layer of my
own decal atop it. It really makes the markings more colorful. I had to grab a
Union Jack from the internet as the Pattos sheet did not include one. I gave up
on the fine pinstriping on the nose after several tries! I used Microscale
Microsol to help the decals stick and then gave the car several coats of clear
lacquer from the Testors line of rattle can spray paints.
I let that cure and went to work making a roll bar from 1/16th brass tubing. It
isn't exactly the same as the Fly roll bar, but it looks the part. It was
sprayed with black lacquer.
 I then
reassembled the car, replacing the gears, axles and bearings with Slot.it items
and the installing rear wheels and inserts with BWA parts. Tires are Indy Grips.
The wheels were then brush painted with black lacquer to match the front. I did
have to cut the very front from the interior. I installed a straight axle for
the front wheels in place of the wobbly stub axles, and the interior interfered
with the axle.
I then
reassembled the car, replacing the gears, axles and bearings with Slot.it items
and the installing rear wheels and inserts with BWA parts. Tires are Indy Grips.
The wheels were then brush painted with black lacquer to match the front. I did
have to cut the very front from the interior. I installed a straight axle for
the front wheels in place of the wobbly stub axles, and the interior interfered
with the axle.
And that was it. Now, I'm sure that Fly has done this scheme and would be
surprised if they did not, but when you think that I got the car for $20, the
decals for about $10 and even with the slot.it, Indy Grip, and BWA bits, adding
$25, the car still costs less than a new RTR and a LOT less than people would be
asking for an out of production Fly original (assuming again, that one exists).
Best of things is that it handles a lot better than a stock Fly and adds one
more interesting scheme to the collection.
March 2009
Those wishing to know more about the subject or who just want to chat about slot cars in general, feel free to plunk a posting on the Forum and toss me an e-mail.