
RMS Resins 1/32 McKee Mk 6
| KIT #: | ? |
| PRICE: | $80.00 by the time I was done |
| DECALS: | none supplied with the body |
| REVIEWER: | Scott Van Aken |
| NOTES: | Resin body slot car |
| HISTORY |
 As his reputation developed he was commissioned to build specials to order
and by late 1965 had produced 5 such cars, all different, including the
Chevettes of Dick Doane and Jerry Hansen featuring Chevy power. He also produced
the LMD, powered by a Ford 427 stock car engine, and a Plymouth hemi special.
All of the cars featured tube frames and aluminum bodies.
As his reputation developed he was commissioned to build specials to order
and by late 1965 had produced 5 such cars, all different, including the
Chevettes of Dick Doane and Jerry Hansen featuring Chevy power. He also produced
the LMD, powered by a Ford 427 stock car engine, and a Plymouth hemi special.
All of the cars featured tube frames and aluminum bodies.
Beginning with the sixth car McKee switched to fibreglass bodywork and series production, embarking on a run of three cars, of which this car is the first. The McKee Mk VI was introduced at the 1966 SCCA National Convention.
The cars were known in their time for a very high quality of craftsmanship and extensive use of domestically sourced parts, to minimize the problem of foreign parts replacement. The only non-U.S. source parts on the car are the steering rack, dampers, and hydraulic master cylinders.
There were only four marques which won points in the 1966 USRRC series, two British; McLaren and Lola, and two American, Genie and McKee. Only three of the Mk VI cars were built with their best showing being a win at the 1966 June Sprints at Road America. They just were not up to the task of winning in the Can Am.
| THE KIT |
 This RMS Resins body comes with a flat interior, a driver's head, a roll bar,
an engine intake piece, a rear insert that includes the
This RMS Resins body comes with a flat interior, a driver's head, a roll bar,
an engine intake piece, a rear insert that includes the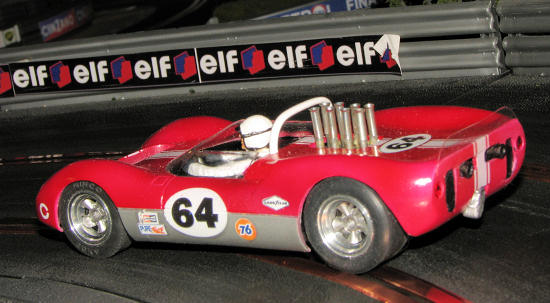 tail lights and exhaust
and nine metal ferrules (I appreciate the extra one). Molding of the body is
first rate with no air bubbles or other molding glitches. It is quite thin and
provides the forward screw post. The rear insert includes a block for the rear
attachment point. Two nicely molded vacuform windscreens are also included.
tail lights and exhaust
and nine metal ferrules (I appreciate the extra one). Molding of the body is
first rate with no air bubbles or other molding glitches. It is quite thin and
provides the forward screw post. The rear insert includes a block for the rear
attachment point. Two nicely molded vacuform windscreens are also included.
The chassis, motor and guide were gleaned from the Monogram 1/32 Ferrari GTO LM kit. Nothing else is really needed from that source. BWA supplied the aluminum wheels and the Cragar mag wheel inserts. I turned to Slot.it for the green crown gear and cut axles from 3/32 piano wire to the proper length needed. No need to spend money on expensive aftermarket axles as the piano wire holds up well. I've never bent one. Front tires are from Ninco and a set of Indy Grip IG 1009 silicone tires makes up the rear. I also bought a pair of MV Products #129 red lenses for the tail lights. For decals, I went with Slotcars4U's sheet on the McKee Mk VI that includes all three of the cars.
| COLORS & MARKINGS |
 First thing to do is to look for photos of the car. This isn't always as easy
as one might think and finding color images of cars from 40 plus years ago is
quite a challenge. This is especially true if they were not the most successful.
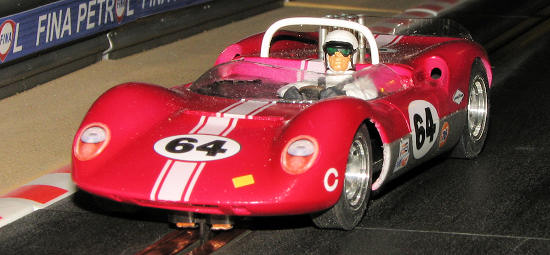
However, I did find a color photo of the car as it has been restored and while
I'd rather not use those as a basis, since it seems to be owned by the guy who
made it, I'll accept that he knows quite a bit about it. The decal instructions
state it is a bright red, but the restored car looks to be more of a burgundy
shade. As such, I'll use that as a basis for the paint scheme. After cleaning
the body and sanding the small mold seams (mostly in the wheel wells), I sprayed
it with white. Then, I used Humbrol burgundy and tried to get a solid, but light
coat on it, something I wasn't totally successful in doing. However, it does
look quite good and I saw no reason to repaint.
First thing to do is to look for photos of the car. This isn't always as easy
as one might think and finding color images of cars from 40 plus years ago is
quite a challenge. This is especially true if they were not the most successful.
However, I did find a color photo of the car as it has been restored and while
I'd rather not use those as a basis, since it seems to be owned by the guy who
made it, I'll accept that he knows quite a bit about it. The decal instructions
state it is a bright red, but the restored car looks to be more of a burgundy
shade. As such, I'll use that as a basis for the paint scheme. After cleaning
the body and sanding the small mold seams (mostly in the wheel wells), I sprayed
it with white. Then, I used Humbrol burgundy and tried to get a solid, but light
coat on it, something I wasn't totally successful in doing. However, it does
look quite good and I saw no reason to repaint.
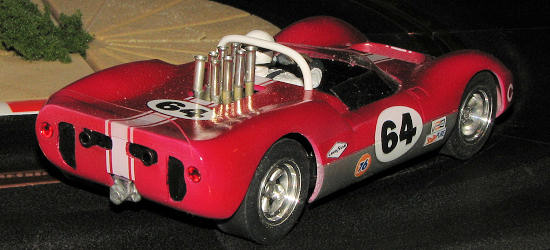
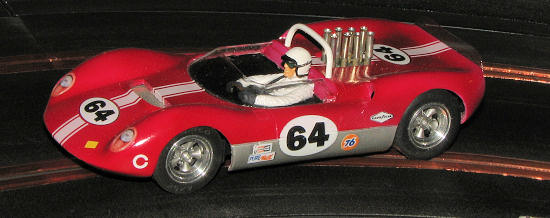
Next I masked off the lower body panels and painted those with Alclad II Aluminum. This works a TON better than using foil so I'll keep that as my primary method of doing these areas. While at it, I painted the injector piece as well. The interior and the rear panel section were painted matte black. I cut off where the MV lenses would eventually go so that area would be recessed. Then the roll bar was cleaned up and painted gloss white as was the driver's head.
Much detail painting was then done as I painted the rest of the driver and the rear section. I know it is a bit odd to do painting prior to construction, but with these sorts of projects, it is actually more of the norm.
| CONSTRUCTION |
Let me back up a bit to start this section. It is always important to get the
chassis properly positioned in the body. The Ferrari chassis I used is pretty
much exactly the right size, though the wheelbase is a bit long. Unfortunately,
though the chassis is adjustable, it is adjustable in steps so cannot be made
exactly the right wheelbase. Nonetheless, it isn't off by much so most probably
won't notice. I positioned the chassis and drilled the holes for the attachment
screws before I got down to painting the body. Once
 done, I made sure the screws
I was going to use would fit. I may end up using the larger ones supplied with
the Ferrari kit, but I'll wait until these smaller one strip out first.
done, I made sure the screws
I was going to use would fit. I may end up using the larger ones supplied with
the Ferrari kit, but I'll wait until these smaller one strip out first.
Anyway, the rest of the build was pretty quick as the mechanicals really take little time. First step was to rewire the guide as Monogram wires it in reverse for some odd reason. Then I installed brass bearings on all four corners. These can be bought from a variety of sources. Axles were cut from piano wire using the cutting disc on a Dremel motor tool. Be sure to wear a face shield when doing this or you may be in for a nasty surprise. The benefit of this is that you can cut the axles to the exact length needed. I then slid on a green Slot.it gear (because I had one) and attached BWA aluminum wheels. I left the plastic pinion on the motor. In the front, I used narrower wheels and had to use spacers to keep the side to side play to a minimum. I slipped on the Indy Grip silicones to the rear, the Ninco tires on the front and added a spacer under the guide for the maximum slot depth. Weight was added to the front while in place of the magnets on the chassis, I put in the small weight blocks the kit supplies.
| FINAL CONSTRUCTION |
The chassis was then run for several laps to be sure all worked well. Back at
the body, I started applying the decals. These decals are ALPS printed so are a
bit thinner than most. It means that the white markings need to be doubled up to
prevent the underlying color from showing through. Thankfully Slotcars4U
provided a double set of all markings. Unfortunately, there are only two sets of
white stripes for the two markings options that uses them. Meanwhile a blue set
of markings is doubled up where they are not really need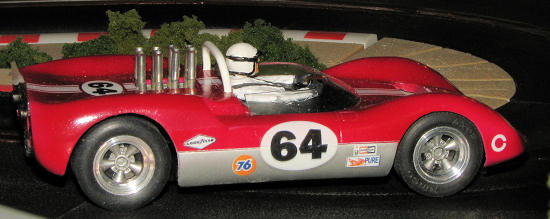 ed. Though the decals
work very well, it means that if I want to do all three cars with equal markings
opacity, I need to buy a second sheet for the additional white stripes. This I
won't do so the stripes on this one are a bit 'weak' compared to the rest of the
markings, which have been doubled up.
ed. Though the decals
work very well, it means that if I want to do all three cars with equal markings
opacity, I need to buy a second sheet for the additional white stripes. This I
won't do so the stripes on this one are a bit 'weak' compared to the rest of the
markings, which have been doubled up.
With the markings in place, I sprayed a gloss clear coat using Testors one-step clear gloss lacquer. Then the rest of the resin bits were attached to the body. I had to open the holes a bit more to fit the rolls bar and had trouble keeping all 8 injector stacks even with each other. The real trial for me is the vacuformed windscreen. This needs to be cut out and dry fitted many, many times to where I could finally attach it permanently. For this, I used clear gloss paint and worked it in sections letting one section fully dry before moving on to the next. It is quite tedious work, but turned out tons better than the last time I did one of these. The MV red lenses fit into the tail light holes perfectly, again, using clear gloss paint to hold them in place. I then screwed on the chassis. The inside of the wheels was painted flat black using lacquer paint. Then, once the inserts arrived from BWA, I painted them a Dark Aluminum using Alcad II paint, color and glued them into the wheels using a drop of super glue.
The radiator exhaust area had a piece of mesh screen attached using superglue. It doesn't eliminate the see-through effect, but looks a lot better than staring at lead wires! The very last step was to make a clear rear spoiler as shown on the photos of the car. This was also held in place with clear gloss paint.
| CONCLUSIONS |
 This one
is just as quick as the McLaren M1B I did a while back and looks better because
I didn't use Bare Metal foil on it. I truly enjoy building these cars, despite
the price, and this one is pretty much the same overall cost as the McLaren. I
have enough bits for a couple of more and once I get the loot together, I'll be
ordering more bodies as I've enough decals for two more of these.
This one
is just as quick as the McLaren M1B I did a while back and looks better because
I didn't use Bare Metal foil on it. I truly enjoy building these cars, despite
the price, and this one is pretty much the same overall cost as the McLaren. I
have enough bits for a couple of more and once I get the loot together, I'll be
ordering more bodies as I've enough decals for two more of these.
May 2010
If you would like your product reviewed fairly and quickly, please contact me or see other details in the Note to Contributors.