
Monogram 1/32 Lola T-70
| KIT #: | 85482600140 |
| PRICE: | $35.00 for the car alone when new |
| DECALS: | Already applied |
| REVIEWER: | Scott Van Aken |
| NOTES: | Upgrade/conversion of a slot car |
| HISTORY |
The Lola T70 was developed by Lola Cars in 1965 in Great Britain for sports car racing. Lola built the chassis, which were typically powered by large American .
The T70 was quite popular in the mid to late 1960s, with more than 100 examples being built in three versions: an open-roofed Mk II spyder, followed by a Mk III coupé, and finally a slightly updated Mk IIIB. The T70 was replaced in the Can-Am series by the lighter Lola T160.
Early success for the Lola T70 in the US came when Walt Hansgen won the Monterey Grand Prix, at Laguna Seca Raceway, on 17 October 1965, driving John Mecom's Lola T70-Ford. The type had done well in UK sports car racing in the hands of David Hobbs, winning two races and having three other podium finishes during 1965 races.
In 1966, the hot setup for the Can-Am was a T70 Chevrolet, winning five of six races during the year. John Surtees was the champion and Dan Gurney drove the only Ford powered car ever to win a Can-Am race. In 1967, no one could compete with the new M6 McLaren.
 When the FIA changed the rules for sports car racing for the 1968 season,
limiting engine size of prototypes to three liters, sportscars with up to five
liter engines were allowed if at least fifty were made. This homologation rule
allowed the popular yet outdated Ford GT40 and Lola T70s to continue racing. The
Fords won Le Mans again in 1968 and 1969, while the T70's only big endurance win
was a one–two finish in the 1969 24 Hours of Daytona behind the Sunoco Lola
T70-Chevrolet of Mark Donohue and Chuck Parsons. When the minimum number was
lowered to twenty five for 1969, the more modern Porsche 917 and Ferrari
512 were homologated and outran the older Lolas and Fords.
When the FIA changed the rules for sports car racing for the 1968 season,
limiting engine size of prototypes to three liters, sportscars with up to five
liter engines were allowed if at least fifty were made. This homologation rule
allowed the popular yet outdated Ford GT40 and Lola T70s to continue racing. The
Fords won Le Mans again in 1968 and 1969, while the T70's only big endurance win
was a one–two finish in the 1969 24 Hours of Daytona behind the Sunoco Lola
T70-Chevrolet of Mark Donohue and Chuck Parsons. When the minimum number was
lowered to twenty five for 1969, the more modern Porsche 917 and Ferrari
512 were homologated and outran the older Lolas and Fords.
Chevrolet powered coupes tended to suffer reliability problems when racing in Europe, in part due to the grade of fuel allowed. When forced to run on commercially available "pump fuel", with a lower octane rating than the "Avgas" permitted under American rules, engine failures were common. In modern historic racing, these engines show much improved reliability due to parts unavailable in the 1960s and better fuel quality than the historically poor petrol supplied by the ACO.
An Aston Martin powered coupe was entered by Lola for Le Mans in 1967. Even with drivers such as John Surtees, it was a disaster. The Aston Martin V8 engine failed after short runs, attributed to inadequate developmental funds.
During the filming of Steve McQueen's Le Mans, Lola chassis were disguised as the Porsche 917 and Ferrari 512s that crashed in the film. It is claimed chassis T76/141 originally campaigned by Ulf Norinder and Jo Bonnier was used for the wrecked Gulf Porsche. A T70 coupe also appears as a car of the future in George Lucas' first commercial film, THX 1138.
| THE PROCESS |
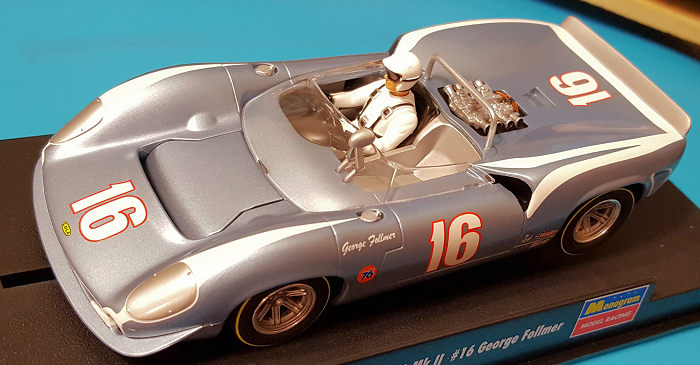
I started with the Revell-Monogram car as driven by George Follmer. Back in 2009 when this was released, it was one of five different liveries offered. Most have four dual side-draft Weber carburetors while at least one has down-draft versions with velocity stacks. This car has the side-draft version, which was the most popular arrangement for those powered by Chevrolets.
 As a slot car it is one that
would be put into the fair category. It is fairly quick and with the installed
magnet, handles fairly well. It is, however, rather noisy as these things go and
the pneumatic tires do not provide all that much grip. I like to run my cars
without the magnet so that is the first thing I remove. Without the magnet,
traction is extremely low so a pair of silicone tires are generally installed.
They are fun to run in this manner, but they could be better.
As a slot car it is one that
would be put into the fair category. It is fairly quick and with the installed
magnet, handles fairly well. It is, however, rather noisy as these things go and
the pneumatic tires do not provide all that much grip. I like to run my cars
without the magnet so that is the first thing I remove. Without the magnet,
traction is extremely low so a pair of silicone tires are generally installed.
They are fun to run in this manner, but they could be better.
What I wanted to do with this car was to duplicate, as closely as I could, the second chassis that was built. It was, as you have read in the opening, the car of David Hobbs and performed well. However, the Monogram car has some differences over the original car Hobbs drove.
For one thing, the original had to meet what was known as Group 7 rules. This required a full size spare tire and that was placed in front of the driver making for a slightly vee shaped bulge in the back of the radiator exhaust area. This car is the later variety without that bulge. The original car also had functioning headlights while the ones that ran later had those covered over as they were not required. This car was retrofit with the later hood with the smoother air flow. It also was fit with the down-draft carburetors and that is the way this one is to be built.
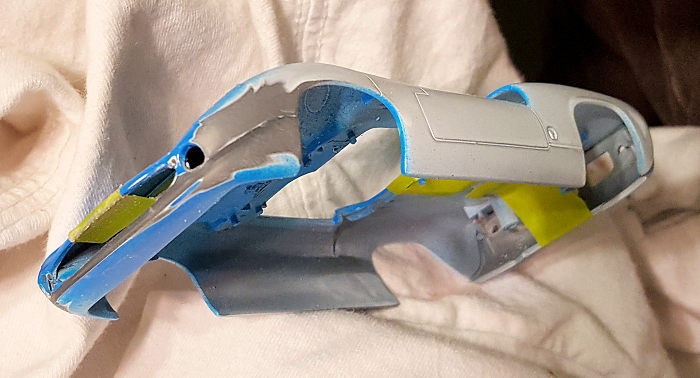
The first step is to remove all the bits that can be taken off. Slot cars have their detail parts attached by heating the parts tabs with a soldering iron. This means no glue. Removing them is fairly straight-forward and simply grinding away as the melted tips will allow the part to come free. They are then just pushed out. Later, they will be glued back in place.
The lower front end and the rear section are separate pieces. The front is held in place when the chassis is mated to the body. This front piece was glued in place and when I sanded the body to remove as much of the old markings as I could and the mold seams, I also filled the seam where the lower piece attached. When that was done, the body parts were given a coat of Tamiya grey primer from the rattle can, then a rattle can coat of Tamiya gloss white. At this stage, I still wasn't sure what livery was going to be used.
 After
deciding on Hobbs' car, I looked for photos. About all I could find was the car
after it had been restored. It showed no chin spoiler, which would have been
appropriate. I painted the body center section with a light blue, again from the
Tamiya spray selection, taped up the center stripe, and cut away the spoiler.
This was followed by more filling and sanding and another shot of primer.
After
deciding on Hobbs' car, I looked for photos. About all I could find was the car
after it had been restored. It showed no chin spoiler, which would have been
appropriate. I painted the body center section with a light blue, again from the
Tamiya spray selection, taped up the center stripe, and cut away the spoiler.
This was followed by more filling and sanding and another shot of primer.
While all that was going on, I gathered together the rest of the parts for the build. While I could have easily just used the chassis that came with the car, I wanted something that was faster and handled better.
The first thing I bought was a new chassis from Shapeways. This is a 3d printed chassis from one of the sellers. 3D printed items have started to make an impact in all areas of the hobby. The plastic is very strong and if there is a down side, it is that the resulting product is often one that has a rough surface. At last night's IPMS club meeting, one of the members brought in a body for a 1/25 Pro Stock. The molding was seamless, but the surface was like 80 grit sandpaper.
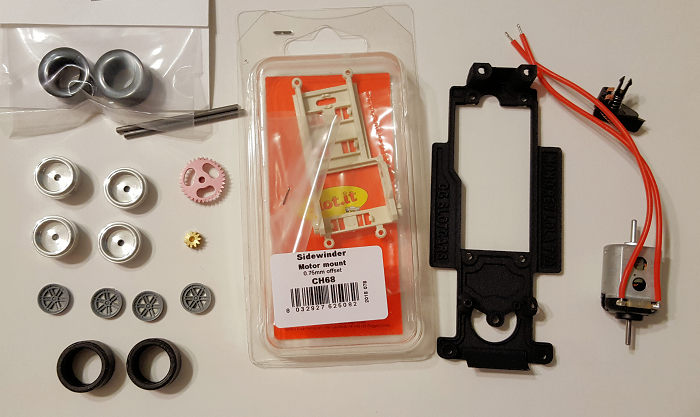 Anyway, along with the chassis, I
bought a motor pod from Slot.it, cut some 3/32 axles from a section of piano
wire that I have, pulled a spare 21,000 rpm motor from the bin to replace the
stock 18k version, selected a pinion and spur gear from Slot.it, got a Ninco
spring loaded guide, aluminum wheels from BWA, and Lola wheel inserts from the
same source. I grabbed some front tires from a big bag of extra tires I have and
selected some Super Tire silicones that should fit the rear wheels. Total cost
for all this stuff when bought is about $70.00. To be honest, the only parts I
bought specifically for this project was the chassis and motor pod. All the
other pieces had been purchased in the past as I often will buy mulitples of
something knowing that they will be used on other things some time in the
future. Buying extra gears and wheels, for instance, helps to save on shipping
costs.
Anyway, along with the chassis, I
bought a motor pod from Slot.it, cut some 3/32 axles from a section of piano
wire that I have, pulled a spare 21,000 rpm motor from the bin to replace the
stock 18k version, selected a pinion and spur gear from Slot.it, got a Ninco
spring loaded guide, aluminum wheels from BWA, and Lola wheel inserts from the
same source. I grabbed some front tires from a big bag of extra tires I have and
selected some Super Tire silicones that should fit the rear wheels. Total cost
for all this stuff when bought is about $70.00. To be honest, the only parts I
bought specifically for this project was the chassis and motor pod. All the
other pieces had been purchased in the past as I often will buy mulitples of
something knowing that they will be used on other things some time in the
future. Buying extra gears and wheels, for instance, helps to save on shipping
costs.
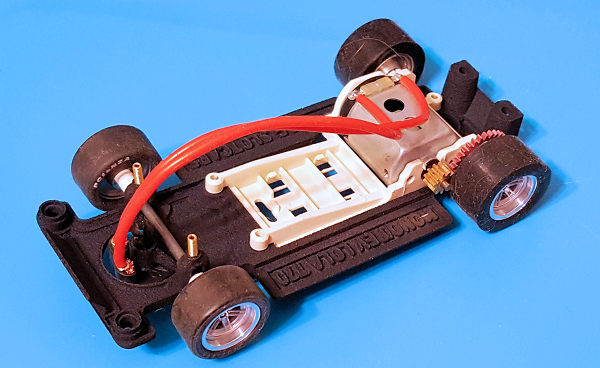 With all the pieces accounted for, I started assembling the chassis. While the
motor pod comes with bearings, I needed screws to attach it. The front axle
rides on allen screws so those were required as well. I had those already so it
was simply a matter of selecting the right sizes. Initially I chose long ones
for the upper section, however, these proved to be too tall so were replaced
with shorter ones. I could have also cut them. For those starting out from
scratch, that will be another expense. One also needs to have the special metal
ferrules to install into the guide. These hold the lead wires to the braid in
the guide.
With all the pieces accounted for, I started assembling the chassis. While the
motor pod comes with bearings, I needed screws to attach it. The front axle
rides on allen screws so those were required as well. I had those already so it
was simply a matter of selecting the right sizes. Initially I chose long ones
for the upper section, however, these proved to be too tall so were replaced
with shorter ones. I could have also cut them. For those starting out from
scratch, that will be another expense. One also needs to have the special metal
ferrules to install into the guide. These hold the lead wires to the braid in
the guide.
With the motor and attached bits in place, I installed the rear gearing. When installing the axles, I found they were a bit too long so had to cut them down a bit. When using inserts, it is important that the axles are flush with the inside of the wheel so the inserts can be pushed all the way down. This is also important as they have to be glued in place. After painting the aluminum, I used super glue to hold them down. This has proven over the years to work very well. Sometimes I paint the inside of the wheel black, but not this tie. When installing the rear tires, I discovered that the motor shaft interfered so those were cut down. I could have used less tall tires, but tires of this era had fairly tall sidewalls.
Meanwhile, back at the body, I painted it. First I used a light blue,
then masked that off to form a broad stripe. The rest of the car was painted
with dark blue. Both are gloss and part of Tamiya's rattle can paints. I use
Tamiya spray paints a lot with slot cars. The paint dries quickly, does not
orange peel and is toug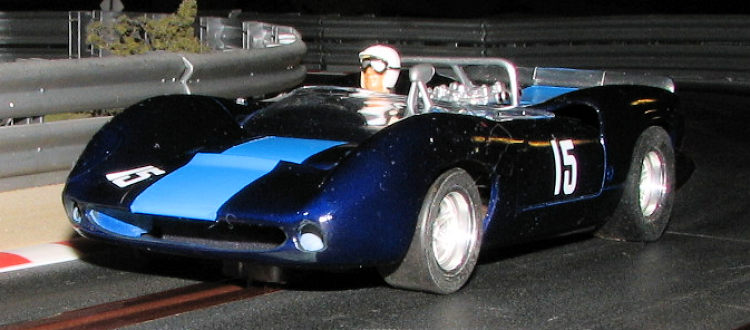 h. I had a bit of paint creep and while the bottled light
blue is close to the blue spray, the bottled dark blue is not. For those, I had
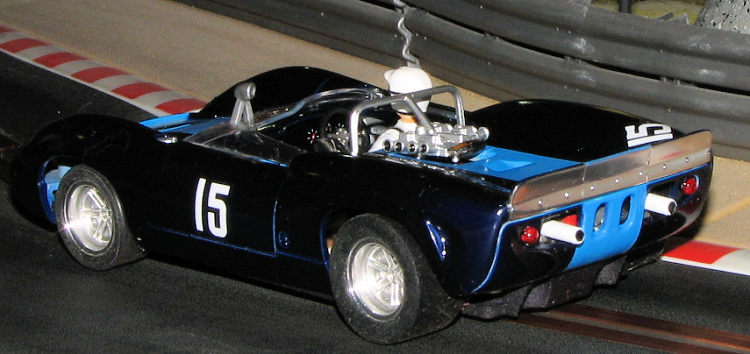
to do some careful scraping. The area around the rear spoiler was masked and it
was painted a bright aluminum using Alclad II airframe aluminum.
h. I had a bit of paint creep and while the bottled light
blue is close to the blue spray, the bottled dark blue is not. For those, I had
to do some careful scraping. The area around the rear spoiler was masked and it
was painted a bright aluminum using Alclad II airframe aluminum.
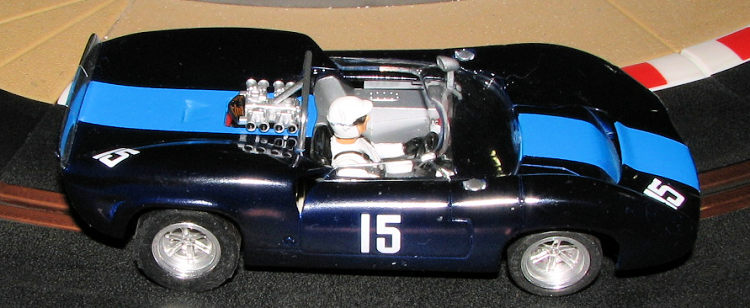
Then it was time to reassemble the bits and pieces I had removed. For the most part, I used regular plastic cement to re-attach all the pieces. I also discovered that there was a sizeable chunk out of the driver's head. Must have been a manufacturing glitch. That was painted white so as to minimize the defect. When that was done and all was dry, I attached the body to the chassis. These early cars were very light on manufacturer's markings and in some cases had none. This car carried a variety of numbers during its career. I chose #15 as I had some white numbers of the proper size for the era, even though it may not be totally accurate.
| CONCLUSIONS |
 Not the
usual for me on the rebuilds and repaints, but it turns out to be a quite quick
car on my track. I'm sure most people will not be willing to go through the
expense of all that I did, but for those who are, the end result will be most
satisfying and I'm sure you'll be as pleased with the results as am I. In fact,
I have another for which I am gathering bits.
Not the
usual for me on the rebuilds and repaints, but it turns out to be a quite quick
car on my track. I'm sure most people will not be willing to go through the
expense of all that I did, but for those who are, the end result will be most
satisfying and I'm sure you'll be as pleased with the results as am I. In fact,
I have another for which I am gathering bits.
Once I took the first round of photos, I noticed several areas that the paint did not fully cover. I then disassembled the back end and masked it to remove the light blue from the seams. On the nose section, I painted everything I could find behind the radiator and brake duct intakes with matte black. The car was then reassembled and rephotographed.
| REFERNCES |
https://en.wikipedia.org/wiki/Lola_T70
http://lolat70.com/chassis/sl70-2/
29 June 2018
Copyright ModelingMadness.com. All rights reserved.
If you would like your product reviewed fairly and fairly quickly, please contact the editor or see other details in the Note to Contributors.
Back to the Main Page Back to the Review Index Page Back to the Previews Index Page