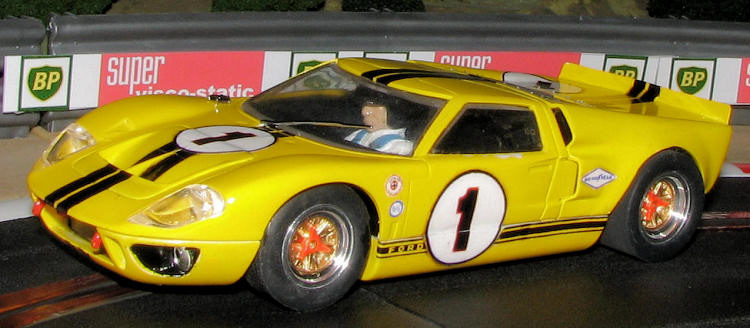
Scalextric Ford GT-40 Mk IIb (Sebring 1966)
| KIT #: | Built from spares |
| PRICE: | $54.00 or so plus paint, decals and 'sundries' |
| DECALS: | Home made |
| REVIEWER: | Scott Van Aken |
| NOTES: | Resurrected from the dead with spares and inspiration. |
| HISTORY |
The Ford GT40 was first raced in May 1964 at the Nürburgring 1000 km race where it retired with suspension failure after holding second place early in the event. Three weeks later at the 24 Hours of Le Mans, all three entries retired although the Ginther/Gregory car led the field from the second lap until its first pitstop. February 1965 saw Ken Miles and Lloyd Ruby take a Shelby American entered GT40 to victory in the Daytona 2000 km.
The experience gained in 1964 and 1965 allowed the
7-litre Mk II to dominate the 24 Hours of Le Mans race in 1966 with a 1-2-3
result. The finish, however, was clouded in controversy: in the final few hours,
the Ford GT of New Zealanders Bruce McLaren and Chris Amon closely trailed the
leading Ford GT driven by Englishman Ken Miles and New Zealander Denny Hulme.
Ford team officials faced a difficult choice. They could allow the drivers to
settle the outcome by racing each other – and risk one or both
 cars breaking
down or crashing. They could dictate a finishing order to the drivers –
guaranteeing that one set of drivers would be extremely unhappy. Or they could
arrange a tie, with the McLaren/Amon and Miles/Hulme cars crossing the line
side-by-side. The team chose the last and informed McLaren and Miles of the
decision just before the two got in their cars for the final stint. Then, not
long before the finish, the Automobile Club de l'Ouest (ACO), organizers of the
Le Mans event, informed Ford that the geographical difference in starting
positions would be taken into account at a close finish – meaning that the
McLaren/Amon vehicle, which had started perhaps 60 feet (18 m) behind the Hulme-Miles
car, would have covered slightly more ground over the 24 hours and would
therefore be the winner. Secondly, Ford officials admitted later, the company's
contentious relationship with Miles, its top contract driver, placed executives
in a difficult position. They could reward an outstanding driver who had been at
times extremely difficult to work with, or they could decide in favour of
drivers (McLaren/Amon) who were less committed to the Ford program but who had
been easier to deal with. Ford stuck with the orchestrated photo finish but
Miles, deeply bitter over this decision after his dedication to the program,
issued his own protest by suddenly slowing just yards from the finish and
letting McLaren across the line first. Sadly and ironically, Miles died in a
testing accident just two months later. Miles was thus denied his deserved
unique achievement of winning Sebring, Daytona and Le Mans in the same year, the
last before his death.
cars breaking
down or crashing. They could dictate a finishing order to the drivers –
guaranteeing that one set of drivers would be extremely unhappy. Or they could
arrange a tie, with the McLaren/Amon and Miles/Hulme cars crossing the line
side-by-side. The team chose the last and informed McLaren and Miles of the
decision just before the two got in their cars for the final stint. Then, not
long before the finish, the Automobile Club de l'Ouest (ACO), organizers of the
Le Mans event, informed Ford that the geographical difference in starting
positions would be taken into account at a close finish – meaning that the
McLaren/Amon vehicle, which had started perhaps 60 feet (18 m) behind the Hulme-Miles
car, would have covered slightly more ground over the 24 hours and would
therefore be the winner. Secondly, Ford officials admitted later, the company's
contentious relationship with Miles, its top contract driver, placed executives
in a difficult position. They could reward an outstanding driver who had been at
times extremely difficult to work with, or they could decide in favour of
drivers (McLaren/Amon) who were less committed to the Ford program but who had
been easier to deal with. Ford stuck with the orchestrated photo finish but
Miles, deeply bitter over this decision after his dedication to the program,
issued his own protest by suddenly slowing just yards from the finish and
letting McLaren across the line first. Sadly and ironically, Miles died in a
testing accident just two months later. Miles was thus denied his deserved
unique achievement of winning Sebring, Daytona and Le Mans in the same year, the
last before his death.
For Daytona 1967, two Mk II models (chassis 1016 and 1047) were fitted with Mercury 7.0 L engines. Mercury is a Ford Motor Company division, and Mercury's 427 was the exact same engine as Ford's with different logos. A batch of wrongly heat treated input shafts in the transaxles sidelined virtually every one of the six Ford Mk IIs in the race, however, and Ferrari won 1-2-3. Mark II cars continued to be entered and soldiered on in races during 1967, but that year was the year of the Ford Mk IV, an improved version that handily dominated every race it entered. Rules changes for 1968 made the cars obsolete overnight and handed the racing back into the hands of the more widely produced GT 40 Mark I with a smaller engine.
| THE KIT |
 I guess you could call it a kit as I did have to
assemble all sorts of parts. A while back, I got a box full of bits and pieces
of Scalextric GT-40s. All were without motors and guides, while most did not
have the led light assembly, wheels, axles, bearings or gears. I got several
chassis, but most of those had broken motor mounts and few had the pick up tabs
so were not usable. What was usable were a number of upper body pieces that
included clear bits and interiors.
I guess you could call it a kit as I did have to
assemble all sorts of parts. A while back, I got a box full of bits and pieces
of Scalextric GT-40s. All were without motors and guides, while most did not
have the led light assembly, wheels, axles, bearings or gears. I got several
chassis, but most of those had broken motor mounts and few had the pick up tabs
so were not usable. What was usable were a number of upper body pieces that
included clear bits and interiors.
So far, I have managed to rehab four complete Scalextric cars from these bits; this is the fifth.
| CONSTRUCTION |
With the first three cars done, I started to segregate what I had into separate zip lock bags. Into each, I put a note as to what parts I needed to complete the car. Fortunately, Scalextric does still offer lower chassis components, up to a point. I can get full body undertrays that include the front axle,wheels and tires. Motors are not a problem as it uses a standard Mabuchi and I have several of those from various sources. Scalextric also offers complete rear axle assemblies with tires and bearings. I can also get the light assembly and if lucky, the small metal tabs to allow me to use the stock Scalextric pick up guide. As you get spares with any new car you buy, I have several.
 This particular car had a bare chassis without the
front wheels and axle so in this case, I decided to use BWA aluminum wheels,
which provide a smoother running car. Into those wheels, I added resin inserts
for the GT-40 Mk II. I also chose Slot.it for the pinion and the spur
gears as they are the industry leaders and I have spares of those. For a motor,
I picked the $8.98 H&R Hawk, an 18,000 rpm motor which has a bit more performance than
the standard 18,000 rpm Scalextric version. It is also less expensive. I was
lucky enough to find one set of the small metal guide tabs and a set of lights
from a retailer, though I got the last they had. All the upper body bits came
from those sent in.
This particular car had a bare chassis without the
front wheels and axle so in this case, I decided to use BWA aluminum wheels,
which provide a smoother running car. Into those wheels, I added resin inserts
for the GT-40 Mk II. I also chose Slot.it for the pinion and the spur
gears as they are the industry leaders and I have spares of those. For a motor,
I picked the $8.98 H&R Hawk, an 18,000 rpm motor which has a bit more performance than
the standard 18,000 rpm Scalextric version. It is also less expensive. I was
lucky enough to find one set of the small metal guide tabs and a set of lights
from a retailer, though I got the last they had. All the upper body bits came
from those sent in.
So far, the parts list reads like this:
H&R Hawk 18k motor - $9.00
BWA aluminum wheels and inserts (4) - $20.00
Slot.it brass pinion and aluminum spur gear - $10.00
Scalextric pick up tabs - $4.00
Scalextric LED light assembly - $8
Brass Bearings (2) - $3
Total in parts: $54.00 Now since one can get a
ready to run and painted GT-40 for $47 and an unpainted one for $39, one might
wonder why I'd do all this. It is simple, at least to me. I like building
something from where there was little. I was able to use better wheels than what
comes with the standard car (plastic wheels are often out o f round), and a
better set of gears and a bit better motor. Were I to take the $39 car and
upgrade it to similar standards, the total cost would be $72 so I'm still ahead
and have a better running car.
f round), and a
better set of gears and a bit better motor. Were I to take the $39 car and
upgrade it to similar standards, the total cost would be $72 so I'm still ahead
and have a better running car.
Now that I've explained the rational behind it (at least to myself), I should point out that this car had some modifications done to it.
First
of all, I wanted to do the 1967 Daytona car of Bruce McLaren and Lucien Bianchi,
which eventually finished 7th after a rash of troubles and was the only Ford
GT40 Mk.II to finish the event. The event was swept by the Ferrari team. This
particular car differs from the earlier GT-40 Mk II vehicles by having a smooth
rear deck and small fender bulges to cover wider tires. This meant some work.
First thing I did was to remove the two rear cooling scoops and the larger
central intake from the rear deck. These areas were then filled and sanded
smooth. It took several applications. I also added thin plastic sheet to the
wheel wells to provide a base for the filler used to widen the fenders. This
took multiple applications and I really should have used epoxy filler rather
than standard one part as the latter left
 air holes as you can see from the
image. I also had a terrible time getting things smooth and with the proper
curvature. I the end, I reached a point of diminishing returns and did no
additional work to it.
air holes as you can see from the
image. I also had a terrible time getting things smooth and with the proper
curvature. I the end, I reached a point of diminishing returns and did no
additional work to it.
One thing that is frequently gone from 'used' GT-40s is the rear spoiler. For this one, I used thin sheet brass to make a new one and that was attached using super glue. On these later cars, the rear spoiler was higher than on previous Mk II cars. In hindsight, the brass I used is scale, but really too thin as it is easily bent and creased, as I found out after my first major excursion from the track where it flipped over! The next project, I'll use thicker material.
| COLORS & MARKINGS |
With the mods done, I primed the car with several coats of gloss white, using Testors 'colors by Boyd' enamels. I gave it a long time to cure. Then I used Tamiya yellow in the rattle can to spray on several coats. During this time, I also painted the resin wheel inserts a gold color. I should have also painted the wheels this shade, but decided not to. During this time, I painted two of the knock-offs that are molded into the inserts with blue and two with fluorescent red. This was done as the axle lugs were handed and one didn't want to accidently use the wrong ones on the wrong side and cross thread them.
I then screwed the lower and two upper body sections together in preparation for the decals.
Decals for slot cars are generally a problem. Unlike
aircraft and to some extent armor, there isn't a huge demand for aftermarket
livery in 1/32 scale. Some decal makers exist, but for the most part, they
pirate their markings from a number of sources and the quality is generally
quite poor. Much better to make them yourself. I had build the Fujimi 1/24 GT-40
MkII and still had the box for it. On the side, were the markings I needed, so I
scanned the box side and used that as a basis for my new decals. I scaled them
to t he proper size after much fiddling to be sure they were correct, then I
printed out four copies. Two on white decal paper and two on clear. The white
ones were for the roundels which were cut a bit undersized so no white appeared
around the edges, and I doubled them up on the car. The ones on clear had
crisper outer edges and they were put on top of the white ones. I also cut out
the few sponsor logos from the sheet and applied them. The black bands were not
a problem as the two sets I had on the clear sheet were more than enough. I
should mention that after I printed these decals on my inkjet, I used a few
light coatings of Testors Metallizer Sealer on them. This is the best sealer for
decals I've found, but getting it just right can be an issue. Too little and the
ink washes away when you put the decal in water. Too much, and the decal curls
up like a demon, making application quite problematic.
he proper size after much fiddling to be sure they were correct, then I
printed out four copies. Two on white decal paper and two on clear. The white
ones were for the roundels which were cut a bit undersized so no white appeared
around the edges, and I doubled them up on the car. The ones on clear had
crisper outer edges and they were put on top of the white ones. I also cut out
the few sponsor logos from the sheet and applied them. The black bands were not
a problem as the two sets I had on the clear sheet were more than enough. I
should mention that after I printed these decals on my inkjet, I used a few
light coatings of Testors Metallizer Sealer on them. This is the best sealer for
decals I've found, but getting it just right can be an issue. Too little and the
ink washes away when you put the decal in water. Too much, and the decal curls
up like a demon, making application quite problematic.
Once all the decals were on and snuggled down with Microsol setting solution (anything else can be too much for the sealer), I sprayed on a good coat of Testors One Step Clear Gloss Lacquer. This is the best stuff I have yet found for slot car bodies. After a day or two of curing, it is rock hard and can withstand the usual bumping and banging these cars can go through without any trouble. It can also handle the various oils and solvents we use in maintenance. Though dry enough to gently handle in a half hour, the long cure time is highly recommended.
| FINAL CONSTRUCTION |
 At this time, I took all the parts that were required
for the car and glued them on. This included the front grille, the four tail
lights, the rear glass, the engine injectors and the photo etch rear grilles.
The headlight covers, windscreen piece and interior just snap into place. I also
attached the windscreen wiper and fuel filler cap. The lower chassis was
assembled with the motor, bearings, gears and the LED assembly. Rather than
spend money on aftermarket axles, I use sections of 3/32 piano wire. For my
purposes the little bit of slop one might get through the bearings is worth it
as I can make about 25-30 custom axles from $3 worth of this stuff using the
cutting disc on my motor tool. MUCH better than $2-$3 apiece. The wheels were
attached and tires came from the spares bin for the front and I used Indy Grip
#1010 silicones ($4.50 a pair) for the rear to get good traction on my plastic
track.
At this time, I took all the parts that were required
for the car and glued them on. This included the front grille, the four tail
lights, the rear glass, the engine injectors and the photo etch rear grilles.
The headlight covers, windscreen piece and interior just snap into place. I also
attached the windscreen wiper and fuel filler cap. The lower chassis was
assembled with the motor, bearings, gears and the LED assembly. Rather than
spend money on aftermarket axles, I use sections of 3/32 piano wire. For my
purposes the little bit of slop one might get through the bearings is worth it
as I can make about 25-30 custom axles from $3 worth of this stuff using the
cutting disc on my motor tool. MUCH better than $2-$3 apiece. The wheels were
attached and tires came from the spares bin for the front and I used Indy Grip
#1010 silicones ($4.50 a pair) for the rear to get good traction on my plastic
track.
| CONCLUSIONS |
The end result is a car that is quicker than stock and is somewhat unique as no one does a ready to run in this livery or with these modifications. It isn't totally accurate as there should be an additional fuel filler cap on the left fender, and the rear window should have a teardrop shaped bulge, but I can live with that. I'm also not totally pleased with my butchering of the rear wheel wells, but when it zips by, you can't tell. It adds another car returned to life and adds to my growing collection of classic GT-40s. So far, I have bits enough for at least one more, perhaps two.
| REFERENCES |
http://en.wikipedia.org/wiki/Ford_GT-40
September 2009
If you would like your product reviewed fairly and quickly , please
contact
me or see other details in the
Note to
Contributors.