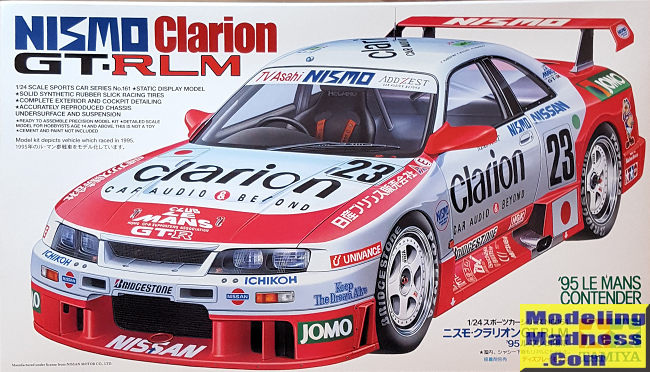
Tamiya 1/24 NISMO Clarion GT-RLM
| KIT #: | 24161 |
| PRICE: | 2800 yen SRP |
| DECALS: | One livery |
| REVIEWER: | Scott Van Aken |
| NOTES: | 1995 release |
| HISTORY |
The Skyline GT-R became the flagship of Nissan performance, showcasing many advanced technologies including the ATTESA E-TSAWD system and the Super-HICAS four-wheel steering. Today, the car is popular for import drag racing, circuit track, time attack and events hosted by tuning magazines. Production of the Skyline GT-R ended in August 2002. The car was replaced by the R35 Nissan GT-R, an all-new vehicle based on the V36 Skyline. Although visibly different, the two vehicles share similar design features and are manufactured in the same factory.
The Skyline GT-R was never manufactured outside Japan, and the sole export markets were Hong Kong, Australia and New Zealand, in 1991, and the UK (in 1997, thanks to the Single Vehicle Approval scheme) as used Japanese imports. Despite this, the car has become an iconic sports car, including countries from the Western World (mainly the United Kingdom, Australia, New Zealand, South Africa, Ireland, Canada, and the United States).
NISMO is Nissan Motorsports and was responsible for racing the GT-R in worldwide events, including the LeMans endurance race. In 1995, this car, sponsored by Clarion electronics, finished a very respectable 17th in the 1995 event. Thanks to the Group C Nissans that were raced years earlier, a goodly amount of that technical development was used in their Group 5 cars, of which this is one.
The GT-R is a car that has been produced on and off in batches. The type is currently in production again and available in the US if you have the money for one. The economy version MSRP's at $90,000 while the next step up is $110,000.
| THE KIT |
Tamiya's car kits are usually curbsides (which means it does not have a complete engine) and this one is no exception to that. The molding is top notch as you would expect with the kit having a one-piece body and rubber tires. The wheels are plated aluminum and look great. All four wheels are mounted with metal stub axles and held in place with poly-caps.
In line with most car kits, one starts by building up the suspension. In this case, the rear end is constructed and it is actually quite detailed with a goodly number of parts. The front is even moreso as one has a lower engine piece that has to be painted and this part also includes the forward subframe. With most car kits you really need to prepaint things prior to assembly as there is no way to do a clean job of it afterwards.
Once the suspension has been installed on the lower chassis pan (which includes the wheel wells, then the exhaust can be glued in place along with various crossmembers and an extension of the pan on which the body will eventually fit. Then the coolant system and the lower part of the roll cage can be constructed. After installing the seat, side panels and dash, the upper section of the roll cage is built up.
It is at this stage that one should be looking at building up the body. Careful study of the instructions is recommended as most of us like to paint the body with all the various vents, scoops and additional panels already in place, and this car has quite a few of those. The windscreen and door windows install from the inside while the quarter windows and rear window are attached from the outside. Most of the windows have a black outline. Tamiya does not supply masks with this kit as is currently the norm from most Japanese car kit makers.
 These cars
had operating lights so you have head and tail light lenses to deal with along
with a rear wing. Again, study the instructions in regards to the decal guide to
see how you want to work attaching these parts. The last thing to be attached is
a nearly full underside pan. This will cover up a lot of your suspension work so
you may want to do some dry fitting to see if you should spend the time painting
a lot of these items with the multiple colors suggested in the instructions.
These cars
had operating lights so you have head and tail light lenses to deal with along
with a rear wing. Again, study the instructions in regards to the decal guide to
see how you want to work attaching these parts. The last thing to be attached is
a nearly full underside pan. This will cover up a lot of your suspension work so
you may want to do some dry fitting to see if you should spend the time painting
a lot of these items with the multiple colors suggested in the instructions.
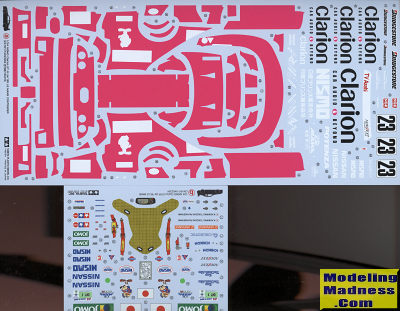
Speaking of which, the instructions are very well done and, as usual, only offer Tamiya paint numbers for the various shades. These kits usually supply all the tricky colors as decals so in this case, you simply paint the white areas. The large decal sheet is quite nicely printed. What looks like is red on the box art is a reddish purple. There are white areas on the decals to help you place sponsor decals. The large decal on the smaller sheet is the surface of the seat and belts are also supplied as decals. Use very warm water on these to help them stretch over contours.
| CONCLUSIONS |
If you have never built a Tamiya racing car kit, you are in for a treat. They are somewhat complex, but fit superbly and provide a final result that will have you wanting to build more.
| REFERENCES |
https://en.wikipedia.org/wiki/Nissan_Skyline_GT-R
March 2019
Copyright ModelingMadness.com Thanks to Mark for providing the review kit. If you would like your product reviewed fairly and fairly quickly, please
contact
the editor or see other details in the
Note to
Contributors. Back to the Main Page
Back to the Review
Index Page
Back to the Previews Index Page