RMS Resin 1/32 Cheetah
| KIT #: | ? |
| PRICE: | $35.00 |
| DECALS: | None |
| REVIEWER: | Scott Van Aken |
| NOTES: | Resin and vac plastic slot car body/chassis |
| HISTORY |
The Bill Thomas Cheetah was a street/race car built in the early to mid-1960s by well known Chevrolet performance tuner Bill Thomas as a competitor to Carroll Shelby's Cobra. The prototype was largely designed and built by Don Edmunds, an employee of Thomas' although Thomas was closely involved coordinating support for the project. Using his racing connections, Thomas arranged for material assistance from Chevrolet for major component parts - specifically, the engine, transmission and rear end. The original concept behind the car was that it was to be a styling exercise to show GM what Thomas' company was capable of doing. Eventually, Thomas decided the car would also compete on the racetrack.
California Metal Shapers formed the first coupe body from aluminum. Once
the rough body arrived back at Thomas' shop, it was finished by Don Borth and
Don Edmunds. A second car was constructed with an aluminum body but the
remainder were fiberglass. The chassis was constructed of Drawn Over Mandrel
(DOM) cro-moly tubing that was arc-welded. The design of the
 car was
unusual in that it was front engined, but the engine sat so far back in the
chassis that the output yoke of the transmission connected directly to the input
yoke on the differential without an intervening driveshaft. This gave a
front/rear weight distribution roughly approximating a mid-engined vehicle
without the cost of an expensive transaxle arrangement. Financing for the
project came from private investors including Thomas himself and a Rialto,
California Chevrolet dealer, John Grow.
car was
unusual in that it was front engined, but the engine sat so far back in the
chassis that the output yoke of the transmission connected directly to the input
yoke on the differential without an intervening driveshaft. This gave a
front/rear weight distribution roughly approximating a mid-engined vehicle
without the cost of an expensive transaxle arrangement. Financing for the
project came from private investors including Thomas himself and a Rialto,
California Chevrolet dealer, John Grow.
The racing history of the Cheetah is not particularly noteworthy in that the car suffered from the numerous teething problems that would plague any new project. Ralph Salyer owned and drove the most successful racing Cheetah, in which he won several minor events. His car was known as the Cro-Sal Cheetah, named for its mechanic Gene Crowe and Salyer. It is also became the most recognizable Cheetah after Crowe cut the roof off to keep Salyer from suffering heat exhaustion due to his close proximity to the engine. The result was the only known Cheetah roadster.
The car was prone to overheating, due in no small part to the failure to
account for vents to draw hot air out of the engine compartment. Eventually, the
overheating problems were solved by using a larger Pontiac NASCAR radiator and
by cutting various configurations of holes in the hood and full-length belly pan
and adding spoilers to draw the hot air out from underneath the hood. Another
problem was due to the aforementioned mid-stream change in purpose for the
vehicle; the chassis lacked rigidity, thus it was a challenge to carve
predictable curves through turns on a track. Adding power only aggravated the
problem 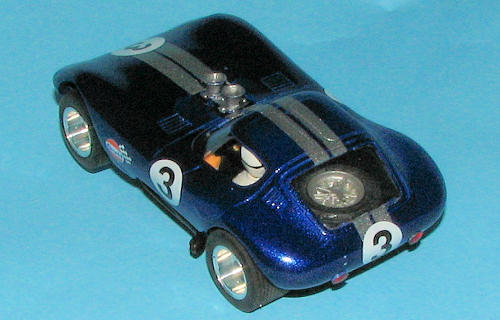 as
the trailing arms (in their original configuration) were flexible, allowing the
rear wheels to toe in under acceleration. In short, getting the vehicle to
launch out of the corners without scaring oneself was almost impossible.
However, once the vehicle was lined up on the straights, few cars could catch it
due to its Thomas-built 377 cubic-inch, dual air-meter, fuel-injected engine. On
the dragstrip, the car reportedly posted faster numbers than the much vaunted
427 Cobra.
as
the trailing arms (in their original configuration) were flexible, allowing the
rear wheels to toe in under acceleration. In short, getting the vehicle to
launch out of the corners without scaring oneself was almost impossible.
However, once the vehicle was lined up on the straights, few cars could catch it
due to its Thomas-built 377 cubic-inch, dual air-meter, fuel-injected engine. On
the dragstrip, the car reportedly posted faster numbers than the much vaunted
427 Cobra.
A fire in the factory destroyed the original plywood body buck, the factory drag car and some spare parts inventory and thus contributed to the demise of the car. The other major factor in the end of production was the adherence of General Motors to the automaker racing ban, thus killing backdoor projects like the Cheetah and the much required parts supply. When the parts supply dried up, there was no way for Thomas to achieve the homologation numbers needed for racing, which went from 100 to 1000 units. The remaining cars were left as highly desirable collector items. No official records are known to exist documenting the exact number of cars produced, but best estimates indicate 23 cars were built to varying degrees of completion.
The story is still not over. A few years back, BTM of Arizona signed for complete rights to manufacture the Cheetah and has since completed a number of cars.
| THE KIT |
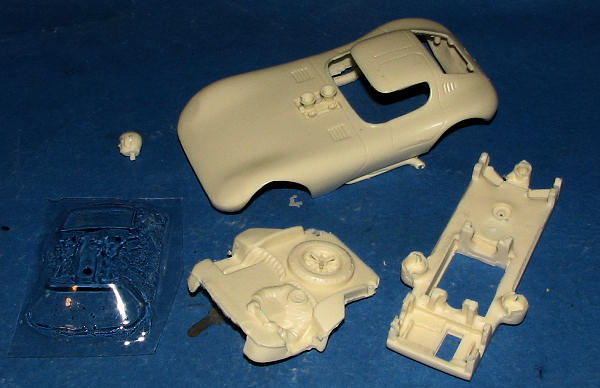 OK,
I have to admit it is a bit of a stretch to call this a kit, but it does have to
be prepped, painted and assembled, so it qualifies. For the loot, I got a resin
body, interior, driver's head, and chassis along with vacuformed windows.
OK,
I have to admit it is a bit of a stretch to call this a kit, but it does have to
be prepped, painted and assembled, so it qualifies. For the loot, I got a resin
body, interior, driver's head, and chassis along with vacuformed windows.

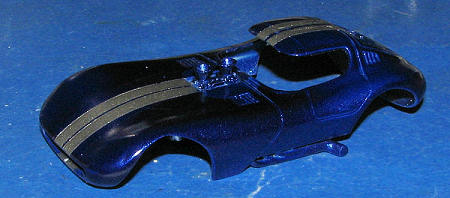
The quality of the resin casting is quite good. There was the usual mold seam to clean up and some of the holes were flashed over, but nothing a normal resin kit wouldn't have. There were three small voids; one on each exhaust and one on the front velocity stack. The driver's head had a huge void in the back and was also suffering from mold slip. No decals or instructions were included, though the RMS Resin web site does have hints and suggestions if needed.
| CONSTRUCTION |
 First,
I cleaned the resin in warm, soapy water and also treated it with isopropyl
acohol in hopes of getting all the mold release off the casting. I was mostly
successful.
First,
I cleaned the resin in warm, soapy water and also treated it with isopropyl
acohol in hopes of getting all the mold release off the casting. I was mostly
successful.
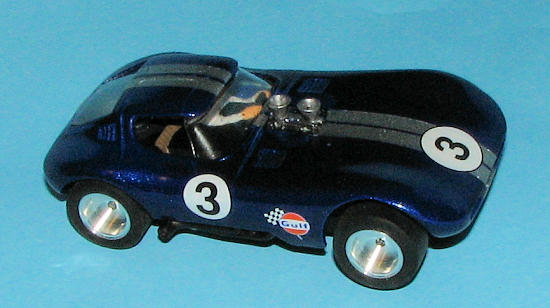
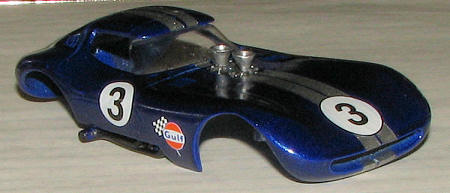
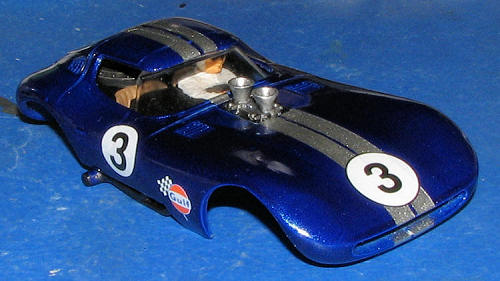
Then I went to work on the molding glitches. These were both filled with Apoxie Sculpt and then smoothed out. When dry, they were sanded to shape. On the exhaust, I completely filled the depressed exhaust opening and much later on, drilled it out. When I sanded away the mold misalignment on the driver's head, it ended up a bit more oblong than I'd have hoped. I would also have liked a visor on the helmet, but it looks fine without it. I should comment that the spare wheel that is supplied looks more like what a Daytona Cobra would have. Generally, the Cheetah used a standard five spoke American Mag wheel.
With all the resin stuff fixed and smoothed, it was time to hit the paint shop.
| COLORS & MARKINGS |
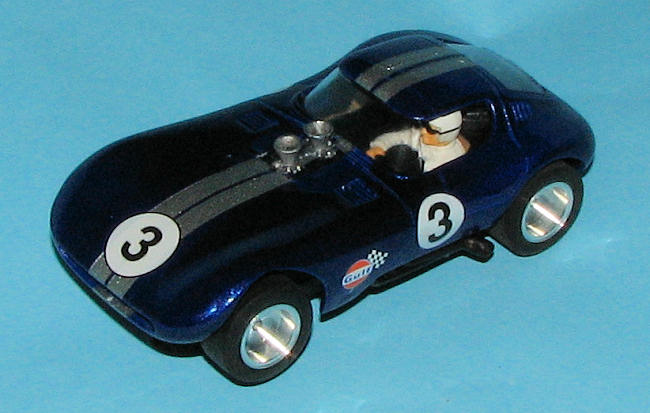
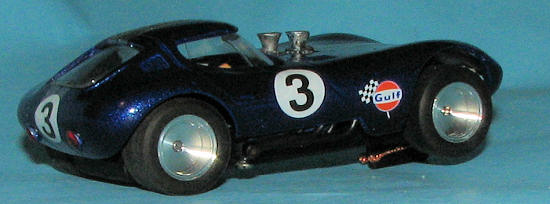
Generally speaking, when I paint a slot car, I like to duplicate
something that actually existed. Not this time. For the paint, I used Testors
newish Metalflake Lacquers, and chose two shades I'd not used before, a dark
blue and silver. I painted over the dark
 blue
first, providing several coats in quick succession. Then I let it dry for a day,
though really, it is dry to the touch in less than a half hour and one could
probably mask it soon after.
blue
first, providing several coats in quick succession. Then I let it dry for a day,
though really, it is dry to the touch in less than a half hour and one could
probably mask it soon after.
I wanted a twin racing stripe going down the center of the body so
for that used the silver metalflake, also a Testors color. For the small stripe
in the middle, I used a section of Jammydog's thin detail tape. The amount of
masking needed
 was
prodigious as one has to cover everything not to be painted silver. Then I
sprayed on several coats of the silver. While taking up the tape, I had the bad
luck to have a couple of sections around the engine detail peel up. Nothing to
do but patch mask and repaint once the area was cleaned again with the warm
soapy water and alcohol. This time, I was successful.
was
prodigious as one has to cover everything not to be painted silver. Then I
sprayed on several coats of the silver. While taking up the tape, I had the bad
luck to have a couple of sections around the engine detail peel up. Nothing to
do but patch mask and repaint once the area was cleaned again with the warm
soapy water and alcohol. This time, I was successful.
The engine detail was then given a painting with some thinned black
paint. When that was dry, all the detail stuff was painted with
 Humbrol
#11 aluminum using a brush. For the interior, it was painted black with a white
driver suit, silver wheel, dark grey tire and some mid-tan to simulate leather
or leatherette seats. The exhaust were painted with Testors 'Burnt Iron'.
Humbrol
#11 aluminum using a brush. For the interior, it was painted black with a white
driver suit, silver wheel, dark grey tire and some mid-tan to simulate leather
or leatherette seats. The exhaust were painted with Testors 'Burnt Iron'.
As all the body colors had been painted on, I then brush painted on about four coats of Future to provide a protective layer. I then applied the decals. For these, I had earlier purchased a set of Monogram roundels and numbers that have a myriad of applications. Oddly, the sheet only has roundels/number for three positions. Fortunately, one gets two of these sheets so I was able to put racing numbers in all four positions. I also gleaned a 1/24 'Gulf' decal from a Midget sheet for the lone sponsor. More Future was applied to protect these.
| FINAL CONSTRUCTION |
With the body pretty well painted, I cut out the clear bits. This vacuformed piece has a 'bridge' that attaches the windscreen with the rear window. There are also alignment pegs in the roof to help keep things in place. The rear window has two tabs on the far rear section to keep that piece in place.
 I
suspect that this resin b
I
suspect that this resin b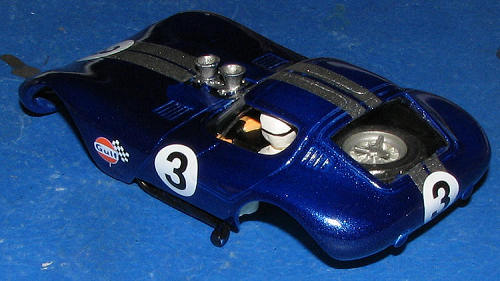 ody
may be based on either an ancient Cox or Strombecker body and simply used as a
master. Not a problem with most of us as these bodies are often quite expensive
if one can find one in good shape.
ody
may be based on either an ancient Cox or Strombecker body and simply used as a
master. Not a problem with most of us as these bodies are often quite expensive
if one can find one in good shape.
Anyway, I used superglue to attach the clear section once it had been cut out and trimmed. While it isn't Falcon quality, it is quite thick so should hold up well. The fit is only fair for the windscreen, but then, this isn't a static model and like it or not, one does expect compromises in a slot car.
 With
the windscreen in place, I
With
the windscreen in place, I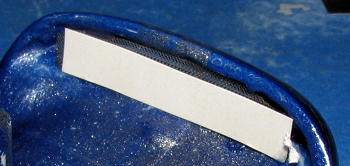 cut out a section of fine mesh and glued it behind the grille opening to prevent
the dreaded 'see through'. Not quite enough so behind that, I glued a piece of
paper cut from a magazine that had solid black printing on one side as one could
still see through the mesh.
cut out a section of fine mesh and glued it behind the grille opening to prevent
the dreaded 'see through'. Not quite enough so behind that, I glued a piece of
paper cut from a magazine that had solid black printing on one side as one could
still see through the mesh.
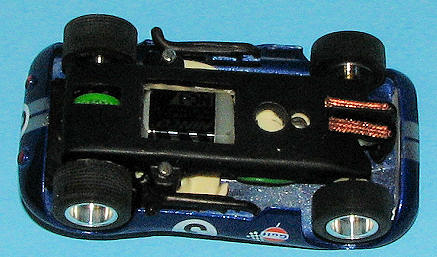
I then glued in the interior. Part of the lower interior has chassis mounting points on it. I stupidly assumed that everything would line up when it came to attaching the chassis. However, I later found that wasn't the case after securely gluing in the interior. This is something I will put into the 'things I learned' part of my brain for the next time I build one of these.
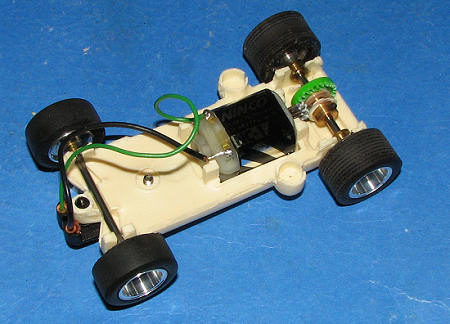 Next
step was to clean up the chassis. This was easily accomplished as the resin is a
bit softer than usual and is a lot more pliable than what we modelers are used
to. This is as much to allow the resin to go through some rather rough handling
without cracking.
Next
step was to clean up the chassis. This was easily accomplished as the resin is a
bit softer than usual and is a lot more pliable than what we modelers are used
to. This is as much to allow the resin to go through some rather rough handling
without cracking.
I then installed all the har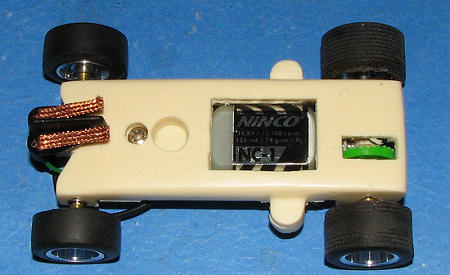 dware.
Much of this will bore non-slot car people, but here goes. The motor is a Ninco
NC-1, probably the mildest performing one around, but perfect for this type of
car. Ninco also supplied the guide and it is a bit of a tight fit. The axles and
gear are from Slot.it. I chose the largest gear I could get to fit. Wheels are
BWA 32004 aluminum set screw with True-Grip tires on the rear and some from the
tire pile for the front. I still need some inserts for the wheels so those will
have to come later.
dware.
Much of this will bore non-slot car people, but here goes. The motor is a Ninco
NC-1, probably the mildest performing one around, but perfect for this type of
car. Ninco also supplied the guide and it is a bit of a tight fit. The axles and
gear are from Slot.it. I chose the largest gear I could get to fit. Wheels are
BWA 32004 aluminum set screw with True-Grip tires on the rear and some from the
tire pile for the front. I still need some inserts for the wheels so those will
have to come later.
I made sure the chassis was lubricated and run for several laps
before attaching it. Test fitting showed the one would see the tan chassis
rather easily, so it and the easily visible parts of the inside of the body was
painted matte black. For those wondering what the largish circular cavity
in front of the motor is for, it is to place a magnet. Most ready to run slot
cars use magnets to keep
 them on the
track.
them on the
track.
Once that paint was dry, I worked on attaching the chassis to the
body. As mentioned, on the bottom of the interior are two mounting points. There
is also another on the body itself. Holding the chassis to the body, I drilled
larger and larger holes through the chassis into the mounting posts. For the
front I used a long screw cut to length and for the rear, I have to do some
major hunting to find something to fit. These need self-tapping screws as one is
screwing them into resin, something that isn't really that hard. Care and slow
going are needed. As it is, the rear screws are too long and the front mounting
po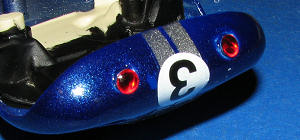 st
doesn't fit into the indentation for it on the chassis. Means the front end is
up a bit higher than would be preferable. Over time, this will be cured one way
or the other. It is all part of slot cars that a car needs to be tweaked to
properly perform. Until then, I'll put up with the fit issue.
st
doesn't fit into the indentation for it on the chassis. Means the front end is
up a bit higher than would be preferable. Over time, this will be cured one way
or the other. It is all part of slot cars that a car needs to be tweaked to
properly perform. Until then, I'll put up with the fit issue.
The final steps were to drill out the molded in tail lights and inserted a pair of #174 MV lenses. I also drilled out the exhaust at this time. A bit of touch up painting and the care was done.
| CONCLUSIONS |
I have to say I'm pleased with the result. The molding of the resin is quite good as these things go and it is a real plus to have a chassis made for it as part of the package. I have several vintage bodies of other cars that are ready to mount, but have not found a suitable vintage chassis on which to place them. I'm not that great at building a chassis, but perhaps I should consider doing so. Anyway, I now have an example of a neat car for my collection.
| REFERENCES |
August 2008 Testors paints can be found
at www.testors.com.
Jammydog tape is available at
www.jammydog.com If you would like your product reviewed fairly and
fairly quickly, please
contact
the editor
or see other details in the
Note to
Contributors.