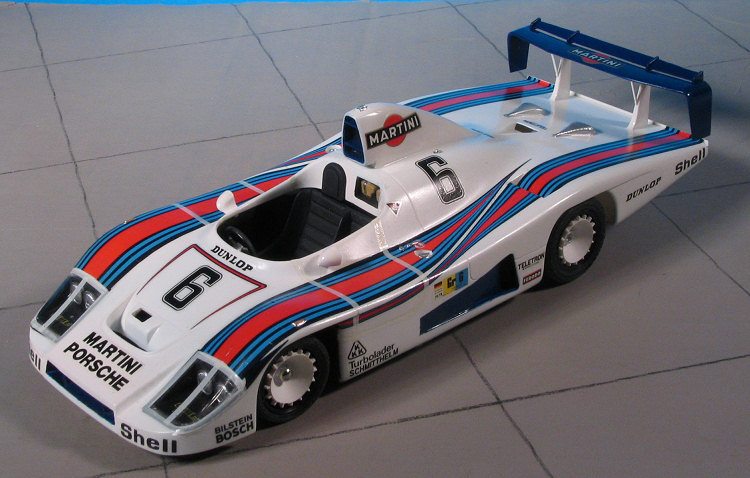
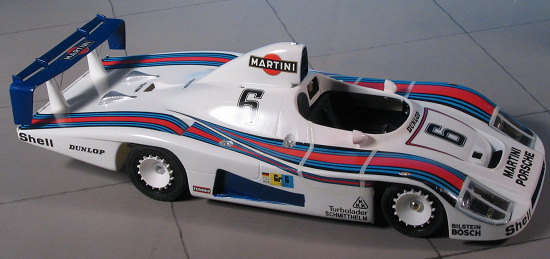
Tamiya 1/24 Porsche 936-78
| KIT #: | 24012 |
| PRICE: | Around $20-25.00 |
| DECALS: | Two Options |
| REVIEWER: | Scott Van Aken |
| NOTES: | Curbside, kit released in 2000 |
| HISTORY |
Almost from its inception, Porsche has been involved in auto racing. This stems from its founder's involvement in the pre-WWII Auto Union racing team with it's rear engined 12 cylinder engine. This car, along with Mercedes, dominated Formula One prior to the start of WWII and the cessation of motor sports in Europe.
When Porsche emerged with his own company after the war, they started building cars that were targeted to the enthusiast. Soon the engineering and quality of their products made Porsches the cars to have. This, in turn, made them very popular among sports car racers. Initially limiting their involvement to smaller displacement cars, Porsche gradually worked its way to where they were competing in the heavy-weight classes.
 For sports cars and sports racers,
THE event of the year is the 24 hour race at LeMans. This is a test of not
only speed, but endurance. Porsche has generally had the endurance part of
it pretty well down pat. The reliability of their cars is almost legendary.
What was needed was speed. This was finally achieved in the early 1970s
with their hulking 917 series that so dominated that it
brought about rule changes making the cars no longer able to compete.
For sports cars and sports racers,
THE event of the year is the 24 hour race at LeMans. This is a test of not
only speed, but endurance. Porsche has generally had the endurance part of
it pretty well down pat. The reliability of their cars is almost legendary.
What was needed was speed. This was finally achieved in the early 1970s
with their hulking 917 series that so dominated that it
brought about rule changes making the cars no longer able to compete.
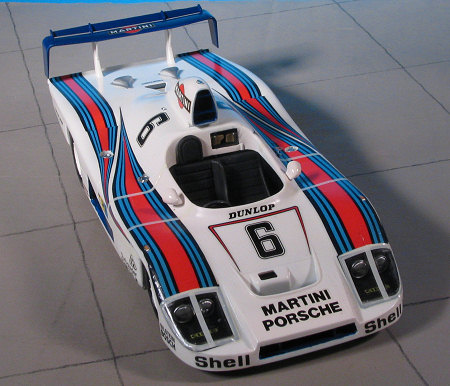
No matter, as Porsche just developed new cars to take advantage of the change in rules. By the late 1970s, the rivalry in the sport (and there is always a rivalry), was between Porsche and Renault. The 1976 and 1977 events had been won by Porsche and they were going for three in a row in 1978. They fielded two brand new cars for the 1978 event, both of them open cars, the #5 machine driven by Jacky Ickx and Henri Pescarolo, and the #6 car piloted by Wolleck, Barth and Joest.
Both cars were plagued with turbo problems and the #5 car finally had to be parked. Ickx then took over from Joest in the #6 car while it was running fourth. During the night, Ickx astonished on-lookers by moving the car into second place. The other drivers were able to maintain the position while Ickx rested. Ickx then put up a masterful drive, nearly catching the leading Renault Alpine A443 Turbo, but transmission problems meant that he was never able to catch them and Renault won the race to the thrill of the partisan French crowd. Despite finishing second, Jackie Ickx's drive was one to remember and helped to further cement his reputation as one of the world's best sports car drivers.
| THE KIT |
Those of you who have been into cars for a while realize that Tamiya is one of the best in this area. They generally don't do US cars or NASCAR stockers, or Indy cars, leaving that to ERTL and Revell. Instead they concentrate on the rest of the world, producing kits of Japanese cars we've never heard of and a lot of racing cars; from rallye to Formula 1.
 This is part of their Sports Car
series; #12 in fact. The kit is a curbside, which means that there is no
engine. The bottom part of the engine/transmission is molded onto the floor
pan and this snaps in place under the body. You see, it is designed to be
motorized and where the plastic engine would fit is taken up by mounts for
the electric motor and its batteries.
This is part of their Sports Car
series; #12 in fact. The kit is a curbside, which means that there is no
engine. The bottom part of the engine/transmission is molded onto the floor
pan and this snaps in place under the body. You see, it is designed to be
motorized and where the plastic engine would fit is taken up by mounts for
the electric motor and its batteries.
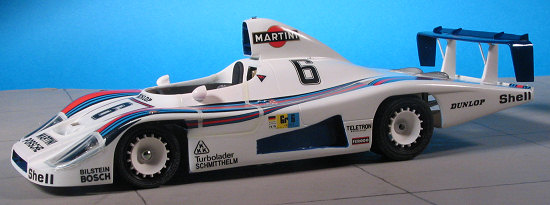
The kit comes with rubber tires and metal axles which are held in place by poly caps. In order to fill up the driver's compartment, a scale driver figure is included in the regalia of the times. Instructions are excellent as one would expect from Tamiya. All the paints are referenced to their own paint line, though generic names are given. Decals are quite extensive, though not overly so, and provide markings for both cars. They are a bit thick and the white bits are actually ivory, but they should hold up well to all the pushing and adjusting that will be required to get them into place. I also note that there are no driver's names included, which is too bad.
| CONSTRUCTION |
Since this is such a simple kit, the thing to do is to
build it as best as one can. This starts with the body. I first sanded off all
the
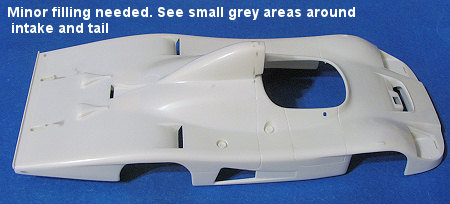 mold seams and then started filling in the sink areas. These are not large
and are mostly concentrated on the rear of the body. I also began gluing on some
of the body parts that I knew would be
mold seams and then started filling in the sink areas. These are not large
and are mostly concentrated on the rear of the body. I also began gluing on some
of the body parts that I knew would be
 painted the same color and filled in
those seams as well. The large plates on the bottom rear fit better in the
opposite sides from what the instructions stated. I used nothing 'stronger' than Mr Surfacer 500 on this one and used a number of different grades of paper,
finishing up with 2000 grit. I'll go even finer once all the body bits are
attached. The engine intake will need some scraping help in the intake to remove
some ejector pin marks. Care needs to be taken while sanding not to sand off the
small running lights, though one could probably replace these with spares from a
Hasegawa 1/48 P-40 kit.
painted the same color and filled in
those seams as well. The large plates on the bottom rear fit better in the
opposite sides from what the instructions stated. I used nothing 'stronger' than Mr Surfacer 500 on this one and used a number of different grades of paper,
finishing up with 2000 grit. I'll go even finer once all the body bits are
attached. The engine intake will need some scraping help in the intake to remove
some ejector pin marks. Care needs to be taken while sanding not to sand off the
small running lights, though one could probably replace these with spares from a
Hasegawa 1/48 P-40 kit.
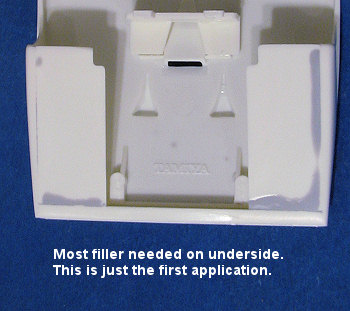
 The underside of the chassis requires a bit of special
attention. This is to fill in the holes that are part of the motorized package
to leave room for the switch and all. I began this by first cutting bits of
plastic card and using those to back up the holes and to partially fill them. As
I'm gong to use epoxy filler on these, I could have left them deep as the filler
won't shrink, but it is always better to have a hole as shallow as possible. I
also glued on and filled the front suspension piece. It looks as if I can
install the front wheel hold downs later in construction after the chassis is
painted.
The underside of the chassis requires a bit of special
attention. This is to fill in the holes that are part of the motorized package
to leave room for the switch and all. I began this by first cutting bits of
plastic card and using those to back up the holes and to partially fill them. As
I'm gong to use epoxy filler on these, I could have left them deep as the filler
won't shrink, but it is always better to have a hole as shallow as possible. I
also glued on and filled the front suspension piece. It looks as if I can
install the front wheel hold downs later in construction after the chassis is
painted.
 Probably the most tedious part of doing these kits is
cleaning up the parts such as the suspension arms and rear exhaust/body support,
but nothing as difficult as removing the mold seams from the turbocharger. Each
had to take a good 20 minutes to remove the seams and sand them smooth. I also
drilled out the exhaust to a greater depth. Then the turbochargers and the
connecting pipe was glued in place.
Probably the most tedious part of doing these kits is
cleaning up the parts such as the suspension arms and rear exhaust/body support,
but nothing as difficult as removing the mold seams from the turbocharger. Each
had to take a good 20 minutes to remove the seams and sand them smooth. I also
drilled out the exhaust to a greater depth. Then the turbochargers and the
connecting pipe was glued in place.
After tackling the gaps as best I could, the underside of the chassis was painted with aluminum and the engine itself with dark aluminum. I used SnJ for the aluminum and Alclad II for the darker shade.
Back at the body, I identified all the areas to be
painted blue and using Tamiya X-4 as in the instructions, sprayed those areas
after doing the usual clean up. The paint dried quite quickly and allowed me to
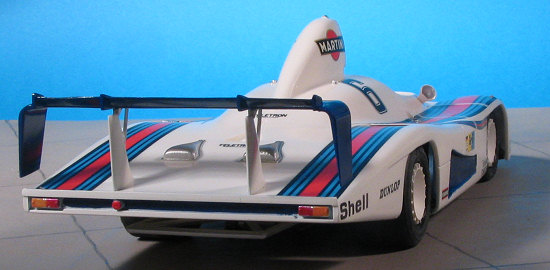
continue on. I glued in the wing support struts but did not attach the wing. The
lower strut supports needed some filler to take care of a gap.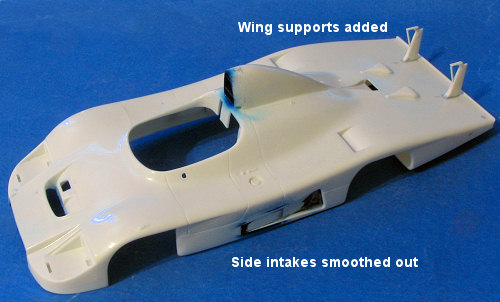
The side intake section was glued in place after painting. There is a seam between this and the body. Looking at images of this car, it appears this was one solid run so I used some filler on the join to smooth things out. I also filled in the sink area in the head rest. This and the small components piece that fits in the back of the cockpit were then painted matte black. I then repainted the intake sections and the very back where there is an indented area. I also sanded away as much overspray as I could.
| COLORS & MARKINGS |
Most of the color information is provided in the body
of the article. Cars are such that you p aint them as you go and do so relatively
early in the build. Not like aircraft where you get most of the stuff built and
then paint it. I did have to do some touch up and the headlight areas had to be
masked off and painted matte black. I also masked the engine vents on the upper
rear and painted them aluminum. Then the nose section and the little piece in
the cockpit had to be blended in with the res
aint them as you go and do so relatively
early in the build. Not like aircraft where you get most of the stuff built and
then paint it. I did have to do some touch up and the headlight areas had to be
masked off and painted matte black. I also masked the engine vents on the upper
rear and painted them aluminum. Then the nose section and the little piece in
the cockpit had to be blended in with the res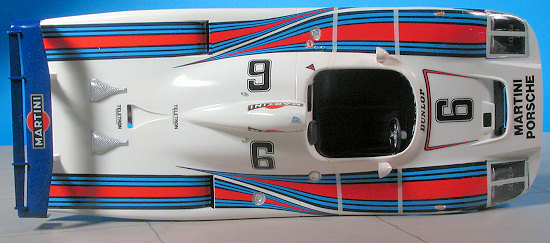 t
of the car so filler was used and sanded down. Then more white and more clear
gloss.
t
of the car so filler was used and sanded down. Then more white and more clear
gloss.
Time for the decals was nearing and with no
aftermarket, I had to use the Tamiya decals. I used pretty hot water for the big
stripes. These do stretch, but then they shrink back when drying, something that
caught me 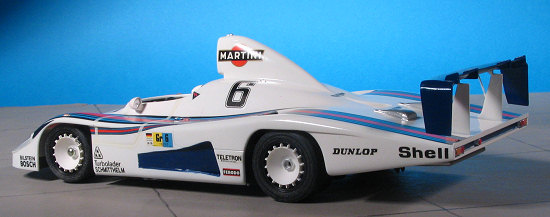 unawares during the decaling stage. These markings are also somewhat
tolerant of setting solutions, but they also tend to have permanent wrinkles if
one is not too careful. I found these solutions useful when putting the markings
over the fender lights and door handle. Frankly, I wish that Tamiya had taken
these things into consideration and put cut-outs in the decal. Same for the
three filler sections in the upper body. Cutting the decal just made it chip,
degrading all the careful work given prior to application. There is also some
problem with silvering, even on a gloss surface, that makes me not want to apply
a clear coat afterwards.
unawares during the decaling stage. These markings are also somewhat
tolerant of setting solutions, but they also tend to have permanent wrinkles if
one is not too careful. I found these solutions useful when putting the markings
over the fender lights and door handle. Frankly, I wish that Tamiya had taken
these things into consideration and put cut-outs in the decal. Same for the
three filler sections in the upper body. Cutting the decal just made it chip,
degrading all the careful work given prior to application. There is also some
problem with silvering, even on a gloss surface, that makes me not want to apply
a clear coat afterwards.
Once most of the decals were in place, I added the lights and clear lenses. Then, a few more decals were applied around the lights. It actually took me several days to apply the decals and I did make a bit of a mess of things. One reason why my airliners are never perfect! However, I'm learning and will do better on future projects. If anyone has a sure-fire way of applying Tamiya decals over compound curves and various 'lumps and bumps' without having them wrinkle, please let me know. The hot water routine didn't work as well as I'd hoped.
| FINAL CONSTRUCTION |
Most of this involved chassis bits. I glued the
steering shaft to the body and also attached the exhaust, which I'd painted
Burnt Metal. This color was also carefully brush painted on the turbochargers. I
painted the wheel inserts white and glued those in place.
 The nuts on the inside
were painted silver. This color was also used on the instrument bezels after
painting the dials white. I glued on the head rest piece to the interior. I did
not paint the driver as I had bought some nicely done racing harnesses from
Detail Master. However, there was no instruction on how the thing was to be put
together. Several phone calls to them resulted in promises to provide the
material needed via e-mail, but nothing came of it. I was also promised one from
another source, but no joy on that either. Thanks to the 'snap' aspect of the
body and chassis, if they ever come through, I'll be able to install the
harness.
The nuts on the inside
were painted silver. This color was also used on the instrument bezels after
painting the dials white. I glued on the head rest piece to the interior. I did
not paint the driver as I had bought some nicely done racing harnesses from
Detail Master. However, there was no instruction on how the thing was to be put
together. Several phone calls to them resulted in promises to provide the
material needed via e-mail, but nothing came of it. I was also promised one from
another source, but no joy on that either. Thanks to the 'snap' aspect of the
body and chassis, if they ever come through, I'll be able to install the
harness.
Anyway, I also attached the wheels. These are held in with a combination of either stub axles (as in the front) or a standard long axle in the rear. There are poly caps that are inserted in housings in the front with a lip behind them for the front wheels. Getting the stub axles onto the lip takes a bit of oomph so you know they won't come loose. The rear has metal bushings to assist in placing the axle with the wheels held on by the poly caps. Again, these take a bit of pressure to get in place so they won't be coming loose soon.
Then the seat was glued in as was the shifter and the steering wheel. The body had the instrument panel glued in place. Then the two major components were brought together. The chassis had to have the forward mating join trimmed as the notch where the body fit was too narrow. Then it took some gentle forcing to get all the bits in place. I thought I'd not have to glue these, but the chassis refused to not sag below the body line, so super glue was used on that join, followed quickly by accelerator.
Back at the body, I painted all of the filler caps with dull aluminum. The little bezels on which the various fender and body lights were placed, got the chrome silver treatment. For these shiny metallics, I use paint pens. I dab a bit of paint on a section of cardboard, and use a brush to apply it. It not only is very shiny, but it dries quite quickly. This was also used on the inside of the mirrors. A touch of color for the lenses, the wing was glued on and that was it.
| CONCLUSIONS |
I honestly thought this would be a one week build. It turned into nearly a month. Mostly because I was going to be as careful with construction as I could be. However, as often happens, I was foiled by the decals and a few other things that could be overlooked. The end result is really quite good and I'm generally pleased with how it turned out. I learned a few things and still am scratching my head over how to get good results with the decals. Still, I have several other Tamiya car kits and this one has given me the confidence to try another a bit on down the road.
| REFERENCES |
The internet and the kit instructions.
February, 2007
Copyright ModelingMadness.com. All rights reserved.
Thanks to me and my wallet for this (actually, I won it in a raffle, but still had to buy a ticket!)
If you would like your product reviewed fairly and fairly quickly, please contact the editor or see other details in the Note to Contributors.