
Fly 1/32 Lola T70GT Mk IIIB 'Fly Kit'
| KIT #: | 88305 |
| PRICE: | $44.98 |
| DECALS: | No options |
| REVIEWER: | Scott Van Aken |
| NOTES: | White body kit. DMC decals used |
| HISTORY |
The Lola T70 was built for sports car racing, popular in the mid to late
1960's. Developed by Lola Racing Cars in 1965 in Great Britain, the T70 was made
for sports car racing. In 1966, the T70 spyder with a Chevrolet V8 engine was an
entry in the CanAm series, winning five of six races during the year. It was the
most popular car in the series, powered by a variety of small block V-8 engines
from Chevrolet, Ford and Buick. In 1967, the T70 raced again but only won one
race, outpowered by the newer McLaren
 made cars. Even the upgraded T70 Mk II was
unable to be competitive with the new McLaren M6 cars.
made cars. Even the upgraded T70 Mk II was
unable to be competitive with the new McLaren M6 cars.
With eyes towards the endurance championship, Lola converted many of the open racing cars into closed GT versions and set out to challenge the Fords and Ferraris with little success. They were still quite popular as the cars were fast and, compared to the other big block cars, inexpensive to campaign, having excellent factory support. The MkIII coupe was later upgraded to MkIIIB standards, forever removing the now-common T70 nose section with a totally new one. Probably the T70 Mk IIIB's greatest victory was in the 1969 24 Hours of Daytona where a Roger Penske prepared car driven my Mark Donohue humbled the competition. Rules changes that allowed a minimum of 25 cars to be built for the GT class meant that the super powerful Porsche 917s and Ferrari 512s now were eligible and the Lola GTs were now just also-rans.
During the filming of Steve McQueen's "Le Mans", Lola chassis were sacrificed, disguised with bodywork of the Porsche and Ferrari that starred in the film. T70s also appear, albeit modified, in George Lucas' first commercial film, THX-1138.
Nowadays, the Lolas are still driven in classic car events like the Classic Endurance Racing series.
| THE KIT |
 In the past, Fly, a
company based in Spain, offered unassembled slot cars called 'Fast Kits'. These
were pre-painted and pretty much took about 20 minutes to assemble and then get
to racing. Recently, these kits have gone away to be replaced by white body Fly
Kits. These are completely unpainted and while all the parts are there, nothing
is preassembled. Even the wires leading to the electric motor have to be
soldered in place.
In the past, Fly, a
company based in Spain, offered unassembled slot cars called 'Fast Kits'. These
were pre-painted and pretty much took about 20 minutes to assemble and then get
to racing. Recently, these kits have gone away to be replaced by white body Fly
Kits. These are completely unpainted and while all the parts are there, nothing
is preassembled. Even the wires leading to the electric motor have to be
soldered in place.
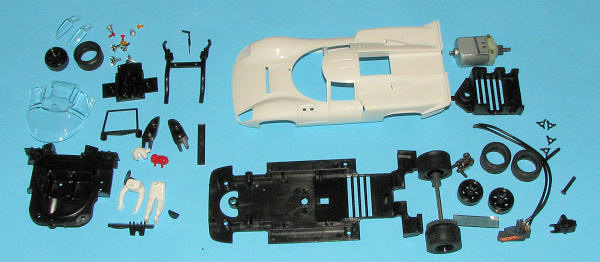
Though it is a slot car, there are a considerable number of parts to the body itself, including several pieces of photo etch for grilles. First thing the builder does is to lay out all the parts and be sure nothing is missing. These bits have been roughly torn from the sprues and put into a bag so the builder should trim off all the rough spots. this includes sanding off the mold seams from the body. The body molding is actually quite good with no really nasty sink markings and only a tad bit of flash. Unlike 'real' modelers, slot car fans are not concerned with mold seams or somewhat rough appearance in a car. However, I'm a modeler first and a slot car racer second, so I did all the additional prep work.
| CONSTRUCTION |
 Most of the initial construction took place with the running gear. I
painted the body over a couple of days and that is covered in the section below.
Most of the initial construction took place with the running gear. I
painted the body over a couple of days and that is covered in the section below.
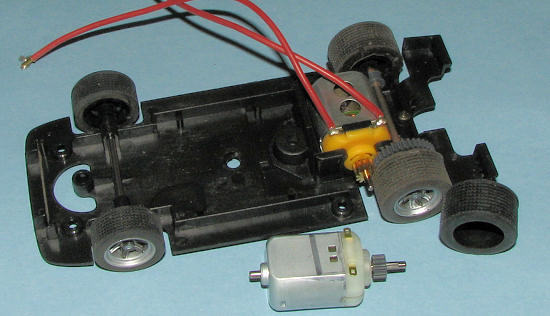
While that was happening, I worked on the chassis. Fly cars have a reputation for requiring some prep to get them to run properly. While some cars can be taken from the box and raced, this is not something for which Fly is known. Besides, I wanted to make some modifications to it. First thing I did was to get a stronger motor. The stock fly motor is just fine and it turns good lap times on my home track, but I wanted a sleeper so when I ordered the kit, I also ordered a hopped up motor from Slot.it. Their yellow end bell motors offer higher torque and rpm speeds than even their standard orange end bell motor that comes with every Slot.it car. Fortunately, the Mabuchi motors used by most slot car makers are physically the same so installation was literally a snap. I specified a sidewinder gear and the motor meshes just fine with the Fly spur gear.
Slot cars nowadays are also equipped with magnets to help hold them
in the slot. While it makes for a fast car, it removes any of the sliding
through corners many of us like and also holds down straight-away
speed due to the strong drag of the magnet. When using a magnet, if you go too
fast through a corner, the
 car will literally 'snap' out of the slot and smack
the wall with quite a bit of force. If the car is already sliding when it deslots, the impact is much less. Down side of removing the magnet is that lap
times are not as quick.
car will literally 'snap' out of the slot and smack
the wall with quite a bit of force. If the car is already sliding when it deslots, the impact is much less. Down side of removing the magnet is that lap
times are not as quick.
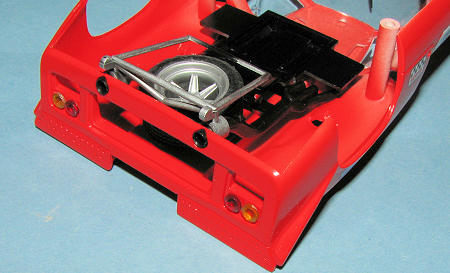
I also took the opportunity to put in a solid front axle, also from Slot.it. Most of these types of Fly cars have stub axles and while that allows each front tire to turn independently, it also has a lot of slop in it. This is barely noticeable when using the magnet, but once you take the magnet out, it upsets the handling of the car. I used the 48mm axle and it seems to fit perfectly. With the magnet gone, some additional weight was added to the front to help keep the guide in the slot. Probably put in too much, but it does help. Finally, I removed the stock tires. These provide little traction on my track and so I installed a set of Tru-Grip urethane tires. Silicones would also be a good choice, but I didn't have any on hand so installed the Tru-Grips. I glued the knock-offs on the wheels and when dry, oiled up the chassis and let things break in for a few minutes after installing the guide flag and attaching the motor wires. In the photo, the stock stuff is shown unattached to the chassis.
| COLORS & MARKINGS |
 The biggest problem
with these cars is finding aftermarket decals for them. There is a company in
Australia called Pattos that has a huge inventory, of sheets he prints on an
ALPS, but the quality of his decals are such that while fine for slot car
racers, any dedicated modeler would consider them third rate. The only quality
waterslide decals I could find were DMC from Pendle Slot in the UK who had two
sheets for the Lola T70 GT Mk IIIB. I bought them both and 2 Porsche 956 sheets.
Be warned that this guy sends everything registered mail, even if you tell him
not to. I'm not into paying $12 for shipping four very small decal sheets (one
of which was the wrong one and he has still not answered my e-mails about
getting the right one), but that is what I was charged.
The biggest problem
with these cars is finding aftermarket decals for them. There is a company in
Australia called Pattos that has a huge inventory, of sheets he prints on an
ALPS, but the quality of his decals are such that while fine for slot car
racers, any dedicated modeler would consider them third rate. The only quality
waterslide decals I could find were DMC from Pendle Slot in the UK who had two
sheets for the Lola T70 GT Mk IIIB. I bought them both and 2 Porsche 956 sheets.
Be warned that this guy sends everything registered mail, even if you tell him
not to. I'm not into paying $12 for shipping four very small decal sheets (one
of which was the wrong one and he has still not answered my e-mails about
getting the right one), but that is what I was charged.
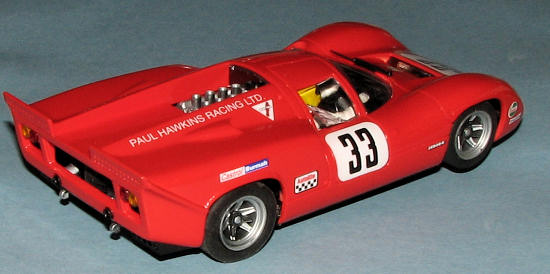
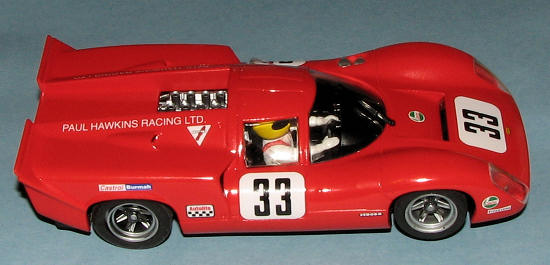
The one I chose for this project was the Paul Hawkins Racing car as
entered in the Francorchamps 1000km race in 1969. This car qualified on the pole
for the race and despite engine problems, finished a respectable 8th. finding
color photos or any photos of these cars is not at all easy. Even intense web
searching turns up little. However, in a book I have on Lola cars from this time
period, there was a photo that shows the car in an orange/red scheme. The color
is very close to Testors Italian Red so that is the shade I picked. Several
coats were all that were needed to paint the car. I also chose to paint the head
light inserts this color. These cars had fiberglass bodies and while Fly
provides these
 inserts in black,
it would be logical to assume that the entire nose section was painted prior to
the installation of lights or any other sort of hardware. While all that was
going on, The various bits and pieces were also painted. Molded in a black
plastic, these needed a bit more paint than the norm. I painted the wheels,
engine section, filler caps, gearbox section, and rear brace Aluminum, the
exhaust with Jet Exhaust and the wheel knock-offs in Steel using Alclad II. The
tail lights and turn signals were given an aluminum backing with Humbrol paint.
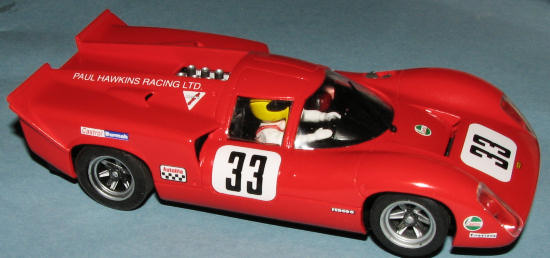
I also painted some of the detail bits in the interior with aluminum and painted
the driver's seat harness in Red. His helmet was painted Yellow using Vallejo
acrylics just to add some color.
inserts in black,
it would be logical to assume that the entire nose section was painted prior to
the installation of lights or any other sort of hardware. While all that was
going on, The various bits and pieces were also painted. Molded in a black
plastic, these needed a bit more paint than the norm. I painted the wheels,
engine section, filler caps, gearbox section, and rear brace Aluminum, the
exhaust with Jet Exhaust and the wheel knock-offs in Steel using Alclad II. The
tail lights and turn signals were given an aluminum backing with Humbrol paint.
I also painted some of the detail bits in the interior with aluminum and painted
the driver's seat harness in Red. His helmet was painted Yellow using Vallejo
acrylics just to add some color.
The DMC Decals gave no trouble at all and frankly, there are not that many to worry about. The book reference was enough to figure out where the markings went as the sheet came without any guide at all. I really find this quite odd as they'd have needed a reference to make the decals, so why not provide that to the user? Anyway, though there is some bleed-through, it isn't bad. A second set would have probably cured that, but I couldn't see paying $24 for decal markings.
| FINAL CONSTRUCTION |
Once the decals and paint had dried, it was time to put all these
bits together. I used superglue for most attachments, though some are tight
enough for a press fit. When these cars are factory assembled, the parts are
melted into place, but I'm a modeler so used glue. The rest of the construction
went fairly quickly, though I did spend some time letting things dry thoroughly
before 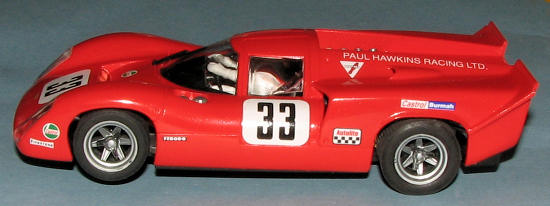 going on to the next part. Unlike your static models, these will be
taking some pounding and so it was important that all be well attached.
going on to the next part. Unlike your static models, these will be
taking some pounding and so it was important that all be well attached.
Probably the area that had the most parts and had to have care taken when assembling was the rear body section. The spare tire had to be installed first then the exhaust section. This had to be followed by the interior and then the engine section was the last to go on, as this held in several of the other pieces. Tail lights were easily stuck in the approprate holes and cemented in place.
Back at the front the clear lenses were initially installed from the outside. Then the light pieces were glued into the housings that had been painted the same as the body color. The photo etch radiator grille was glued in position and on the outside, the windscreen wiper and two filler caps were then glued in place. Once this had dried completely, the transmission piece was attached to the rear of the chassis, the body was screwed down onto the chassis and the car was done.
| CONCLUSIONS |
So now that it is done, how does it run? It is very fast. In a
straight line, it is one of the quickest that I own. However, all is not
 roses. I
discovered that two of the wheels are out of round, causing the car to hop quite
a bit around corners and when initially accelerating. The only real fix for this
is to replace the wheels with aftermarket aluminum ones and that is what I'm
going to have to do. It will increase the cost by about $16, but will be worth
it.
roses. I
discovered that two of the wheels are out of round, causing the car to hop quite
a bit around corners and when initially accelerating. The only real fix for this
is to replace the wheels with aftermarket aluminum ones and that is what I'm
going to have to do. It will increase the cost by about $16, but will be worth
it.
I also had difficulty keeping the chassis properly placed. The problem turned out to be that the driver's feet were hitting the small sheets of lead I'd added when I pulled the magnet out. Cutting off the lower legs (which you cannot see from the outside anyway), took care of that situation. I also had to add small spacers to the rear axle to keep it from moving so much side to side.
All this is somewhat typical for Fly slot cars and once one realizes what needs to be done, it is something that takes just a few minutes to adjust, and results in a much nicer running car.
| REFERENCES |
Some information came from Dave Friedman's "Lola: Can-Am and Endurance Racers", 1998, MBI Publishers. Now out of print.
October 2008 If you would like your product reviewed fairly and
fairly quickly, please
contact
the editor or see other details in the
Note to
Contributors.