| KIT #: | 125 |
| PRICE: | $45.00 when new |
| DECALS: | Two options |
| REVIEWER: | Scott Van Aken |
| NOTES: | Resin and cast metal |
| HISTORY |
The BRM P 154 was designed and built in house by British Racin Motors to compete in the 1970 Can-Am series for Group 7 cars by Tony Southgate, who had joined BRM in 1969. Southgate had worked earlier at Lola working on the T70.
While he worked on the Formula 1 BRM P153 car he was tasked to design a CAN-Am car as part of the project 154. For the new BRM Can-Am car, Southgate developed a very conventional aluminum monocoque chassis with independent suspension on all four corners. While BRM, like Ferrari, usually produced all major components in-house, the specific needs of Can-Am racing prompted the manufacturer to use a third-party drivetrain. This consisted of a big-block Chevrolet V8 engine and a Hewland four-speed gearbox though an engine shop was set up to further develop the engine.
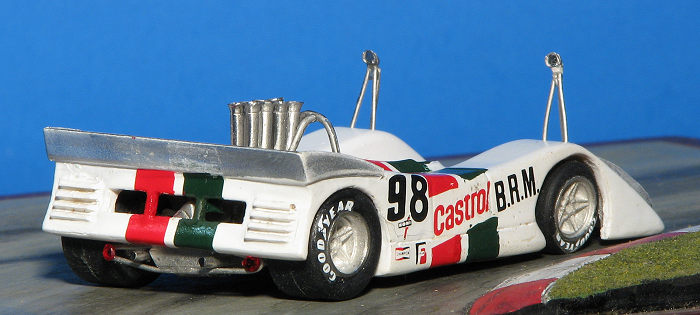
 Known as the P154, the new BRM was clothed in a lightweight fiberglass
body. Tony Southgate believed sufficient downforce could be created by a
wedge-shaped body, so no separate rear wing was fitted. Instead the rear
body-work boasted a 'ducktail' that was 83in. wide. They had intended the body
to cover a pair of special wide rear Firestone tires that never appeared. The
broad nose featured a low-mounted radiator intake with the hot air exiting ahead
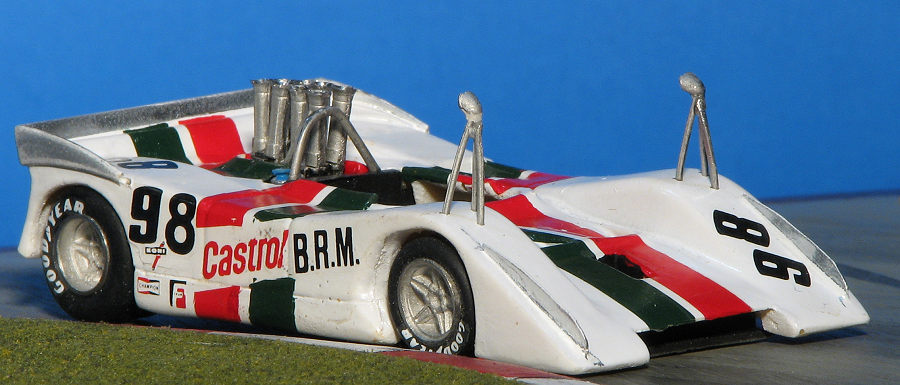
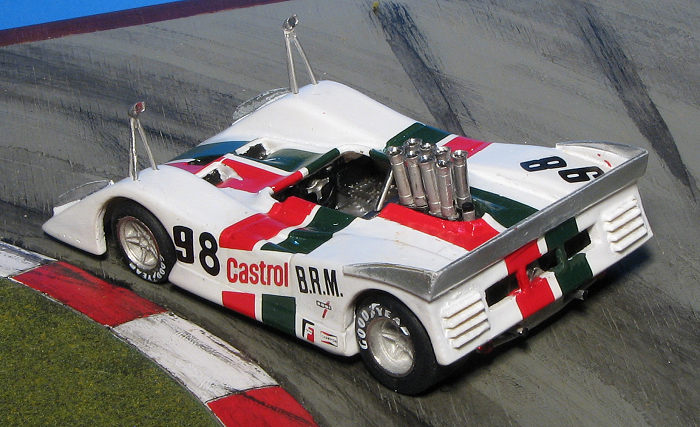
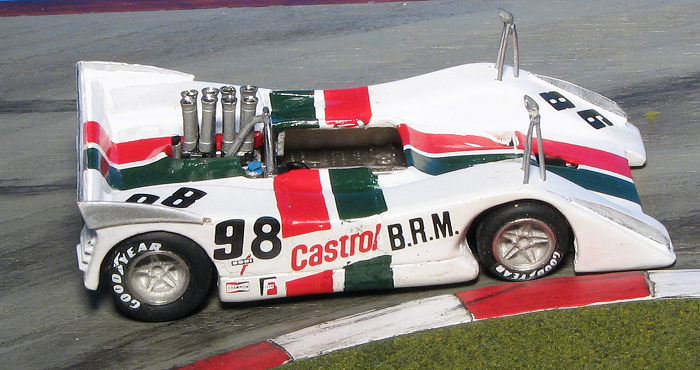
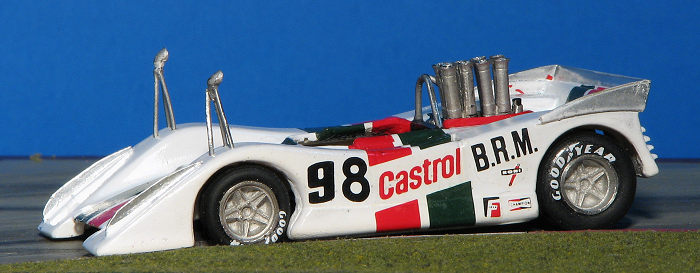
of the cockpit. The P154 was finished in white with red and green stripes
courtesy of sponsor Castrol. Testing of the new car was minimal and it was sent
off to America with mechanics Roger Bailey who formerly worked with Chris Amon
and his Can-Am effort and Mike Underwood to sort out.
Known as the P154, the new BRM was clothed in a lightweight fiberglass
body. Tony Southgate believed sufficient downforce could be created by a
wedge-shaped body, so no separate rear wing was fitted. Instead the rear
body-work boasted a 'ducktail' that was 83in. wide. They had intended the body
to cover a pair of special wide rear Firestone tires that never appeared. The
broad nose featured a low-mounted radiator intake with the hot air exiting ahead
of the cockpit. The P154 was finished in white with red and green stripes
courtesy of sponsor Castrol. Testing of the new car was minimal and it was sent
off to America with mechanics Roger Bailey who formerly worked with Chris Amon
and his Can-Am effort and Mike Underwood to sort out.Tasked to drive the BRM P154 was the team's Canadian driver George Eaton, who had previously raced in the Can-Am with private entries. The car was ready for the opening round at Mosport where Eaton qualified seventh but failed to finish with mechanical issues. This revealed a weakness in BRM's operation caused mainly by the lack of experience with running and more importantly properly tuning the big American engine. All this was briefly forgotten a fortnight later when Eaton placed third at Mont-Tremblant. This success was short-lived as Eaton would not finish another race that season due a myriad of problems. For the final three races, he was joined by BRM's #1 driver Mexican Pedro Rodriguez; the team's principal F1 driver. He actually faired little better, finishing ninth at Donnybrooke, fifth at Laguna Seca and third at Riverside.
| THE KIT |
A considerable number of years back, I built M.A. Models' Ford Honker II Can-Am racer and swore I'd never build another from these folks. Well, time has a way of changing things and since I'd bought two kits at that time, I figured I might as well get this one out of the way. The molding on this one is a little better than before in that there are no surface air bubbles, but the rest of the molding can be charitably called average.
 The resin has the usual flash and a ton of small stubs
on the underside of the resin parts to remove. Fortunately, I have 80 grit paper
to deal with these. There are also a few clear blobs that I can only assume are
some sort of incomplete molding. These will also need to be attended to. Some of
the more fragile parts are on sections of 3x5 card. The tires are rubber. Red
plastic tail lights are provided as well as a metal front axles The rear wheels
fit on the stubs of the rear axle assembly you see just above the two headers. A vacuformed windscreen is provided that will need to be tinted a clear green. The
majority of the small parts are indifferently cast metal items with considerable
mold seams. However, some quality time with files will take care of those.
The resin has the usual flash and a ton of small stubs
on the underside of the resin parts to remove. Fortunately, I have 80 grit paper
to deal with these. There are also a few clear blobs that I can only assume are
some sort of incomplete molding. These will also need to be attended to. Some of
the more fragile parts are on sections of 3x5 card. The tires are rubber. Red
plastic tail lights are provided as well as a metal front axles The rear wheels
fit on the stubs of the rear axle assembly you see just above the two headers. A vacuformed windscreen is provided that will need to be tinted a clear green. The
majority of the small parts are indifferently cast metal items with considerable
mold seams. However, some quality time with files will take care of those.
Instructions are basically an exploded view that has been somewhat crudely hand drawn, but is adequate to complete the kit. Two photos of a completed model are provided for reference. The car is basically white with the decals in green and red attached. Also as a decal is a seat harness. The kit came with two sets of decals, and that isprobably due to the one pair of 8s being in the wrong font. There are markings for both the #98 and #1 cars
| CONSTRUCTION |
After building their Honker II many years ago, I was pretty gun-shy about starting on this one. But I like the car, despite its lack of success, and figured that over a decade of model building maturity would be helpful. Just looking at the quality of some of the casting gave me reservations about my choice, but I figured that I could now handle it.
 I spent a LOT of time sanding on the two resin parts to get rid of flash, resin
attachment points, and getting things to fit. The engine/transmission part of
the chassis/interior is pretty mediocre in terms of detail and a lot of
file/sandpaper work needs to be done to get the cast metal rear suspension piece
to fit.
I spent a LOT of time sanding on the two resin parts to get rid of flash, resin
attachment points, and getting things to fit. The engine/transmission part of
the chassis/interior is pretty mediocre in terms of detail and a lot of
file/sandpaper work needs to be done to get the cast metal rear suspension piece
to fit.
All of the cast metal parts need a fair amount of clean-up as they are either somewhat poorly cast or have a fair amount of flash that needs cleaned up. I then attached the instrument panel piece to the interior. The rear suspension piece was also glued into place. The next step was paint. The forward part of the chassis was painted black and the rear portion that included the engine casting got a coat of duralumin. Meanwhile the body got several coats of white. Both resin parts were primed prior to getting their paint.
Next the engine intakes, magneto and oil input pieces were installed. All of these required a considerable amount of cleanup. In addition the mounting holes all had to be deepened and enlarged. When test fitting the body over the interior, it wouldn't fit. A bit of sleuthing noticed that the steering wheel was the issue. I cut the top from the wheel and the body fit without issues.
| COLORS & MARKINGS |
 The
body was painted white in preparation for the decals. I tried one of them
and it broke up. The kit came with a second decal sheet and so that was
given a coat of Microscale decal film. Even with a couple of coats, the long
decals cracked when trying to fit over sharp curves. Fortunately, I had some
paint that fairly matched. Tamiya red was used for the red and SMS RAAF
foliage green was used for the green. The smaller markings were not an
issue.
The
body was painted white in preparation for the decals. I tried one of them
and it broke up. The kit came with a second decal sheet and so that was
given a coat of Microscale decal film. Even with a couple of coats, the long
decals cracked when trying to fit over sharp curves. Fortunately, I had some
paint that fairly matched. Tamiya red was used for the red and SMS RAAF
foliage green was used for the green. The smaller markings were not an
issue. | CONCLUSIONS |
Those who are used to Marsh Models or even Provence Moulage or Starter kits will be taken aback at these kits. They are the most crude 1/43 kits I've ever built. Fortunately I only bought two back about 20 years ago and this was the second one. Unless the newer releases are a lot better, I won't be doing another.
| REFERENCES |
http://www.grandprixhistory.org/brmp154.htm
13 June 2025
Copyright ModelingMadness.com. All rights reserved. No reproduction in any form without express permission from the editor.
If you would like your product reviewed fairly and fairly quickly, please contact the editor or see other details in the Note to Contributors.
Back to the Main Page Back to the Review Index Page Back to the Previews Index Page