
Marsh Models 1/43 Ford X-1
|
KIT # |
MM 85K |
|
PRICE: |
$68.00 |
|
DECALS: |
One car: Chris Amon: Riverside 1965 |
|
REVIEWER: |
|
|
NOTES: |
Multimedia |
|
HISTORY |
In late 1965, two experimental, all-alumimum GT40 chassis were manufactured
by Abbey Panels in England. One of the tubs was shipped back to Ford's Kar
Kraft's Dearborn for testing, never to be seen again. The remaining aluminum
chassis, GT110, was shipped to McLaren to become a lightweight open version of
the 427 GT40 which raced at the 1965 LeMans. Under contract, McLaren would
assemble, prepare and race the aluminum car.
 Providing a basis for the X1 were the two 427 GT40s developed in a rush by Kar
Kraft for Le mans. These cars, chassis GT106 and GT107, featured a long nose
designed by Roy Lunn. This distinguishing feature of the prototype 427 cars
was lent over to the X1 roadster.
Providing a basis for the X1 were the two 427 GT40s developed in a rush by Kar
Kraft for Le mans. These cars, chassis GT106 and GT107, featured a long nose
designed by Roy Lunn. This distinguishing feature of the prototype 427 cars
was lent over to the X1 roadster.
Due to the steel chassis, most of the other prototype 427 GT40s weighed a
hefty 2900 lbs. The goal set for McLaren was to reduce this number by 1000
lbs. At McLaren, Howden Ganley considered every component of the GT40 to give
it a well needed diet. With the aluminum chassis and lighter Hewland LG 500
Gearbox, the X1 weighted 1900 lbs after modifications.
On The Track
Unfortunately the X1 was unable to secure a victory in its original McLaren
configuration. At the hands of Chris Amon, the X1 raced in four times in 1965,
most of which resulted in the car not finishing. This was basically because it
was too big and too heavy. One rarely has success when pitting an endurance
car against those designed for shorter sprint races.
To the disappointment of McLaren, the X1 was handed over to Shelby American at
the end of the 1965 season. Shelby studied and the roadster and then it was
sent to Kar Kraft to be extensively modified as a test car. Heavier headers
and a heavier T44 manual transmission were installed. Combined with an
additional front fuel tank the balance of the original lightweight roadster
was lost.
 Other temporary modifications to the X1 included testing of Ford's two speed
automatic transmission, and aerodynamic work, both of which led to shape the
Ford J Car. After the testing was finished, a standard Mark II nose was fitted
to the X1.
Other temporary modifications to the X1 included testing of Ford's two speed
automatic transmission, and aerodynamic work, both of which led to shape the
Ford J Car. After the testing was finished, a standard Mark II nose was fitted
to the X1.
The final race for GT110 came at the 1966 Sebring Race. Driven by Ken Miles
and Lloyd Ruby, the red painted roadster took the overall victory despite
competition from Ferrari's 330 P3, Chapparals and Porsches. After the race,
provisions were made for Holman & Moody to rebuild X1, but sadly the plan was
never acted upon. Instead, the car was ordered destroyed by customs officials.
Conclusion
The purpose of the X1 was to provide Ford with further information on the
potential of the 427, provide a basis for the J Car and act as a test mule for
various engines and transmissions. The fact that such an experimental car
managed to secure a victory at Sebring is remarkable, especially given that
most of the other cars were production GT40s.
Although the X1 was never competitive in any race other than Sebring it
provided Ford with a considerable background to develop new cars such as the
Ford J Car and F3L.
Thanks to http://www.supercars.net for
the background information.
|
THE KIT |
 Over the years, Marsh Models
in the UK has been providing 1/43 racing enthusiasts with a wide range of
multi-media kits that include resin bodies, cast metal parts, turned aluminum
wheels, etched metal parts and vacuformed windscreens. They also have provided
superb decals. This one is no exception.
Over the years, Marsh Models
in the UK has been providing 1/43 racing enthusiasts with a wide range of
multi-media kits that include resin bodies, cast metal parts, turned aluminum
wheels, etched metal parts and vacuformed windscreens. They also have provided
superb decals. This one is no exception.
The kit comes in a very sturdy box with the resin body wrapped in bubble wrap. The etched fret and decals are in the bottom of the box where they can be kept flat. For some reason, the decals that come with these kits are always a bit too big so have to be curled to fit into the boxes. This is not just a Marsh Models deal but it is endemic throughout the industry. Every one I've built had been like this.
 The resin body is very well done with minimal mold and flash. The engraved
areas still seem a bit on the large size, but some of this will disappear with
paint. The amount of clean-up on the resin parts will be minimal. The cast metal
parts are fair. These are probably the most poorly molded part of the kit. There
are lumps and pits and areas where the molds have not properly aligned. Now it
isn't as horrid as it sounds, but it does mean that how well these are sanded or
filed down will make or break the completed model. The smaller cast parts are
generally problem free, with only the larger parts, such as the transaxle and
intake manifold being of a major concern
The resin body is very well done with minimal mold and flash. The engraved
areas still seem a bit on the large size, but some of this will disappear with
paint. The amount of clean-up on the resin parts will be minimal. The cast metal
parts are fair. These are probably the most poorly molded part of the kit. There
are lumps and pits and areas where the molds have not properly aligned. Now it
isn't as horrid as it sounds, but it does mean that how well these are sanded or
filed down will make or break the completed model. The smaller cast parts are
generally problem free, with only the larger parts, such as the transaxle and
intake manifold being of a major concern
The wheels are spun aluminum and fit into specially molded tires. The tires
have large , well, sprue stubs
that must be sanded down, effectively destroying the tread detail. I'm not
really sure how to repair this, so it is best if these kits are attached to a
base of some sort with these sanded down areas meeting the 'pavement'. Inserts
are from cast metal with photo etch spinners. A vacuformed windscreen and light
areas are provided as are some lenses for the lights themselves.
, well, sprue stubs
that must be sanded down, effectively destroying the tread detail. I'm not
really sure how to repair this, so it is best if these kits are attached to a
base of some sort with these sanded down areas meeting the 'pavement'. Inserts
are from cast metal with photo etch spinners. A vacuformed windscreen and light
areas are provided as are some lenses for the lights themselves.
 A photo-etched sheet provides a wealth of details such as the aforementioned
spinners, inner door panels, spoilers, intakes, vents, grilles and the like. It
even includes a name plate. Since racing cars can change from race to race, this
one is for the car as raced at the Riverside USRRC in 1965, the year before the
start of the Can-Am.
A photo-etched sheet provides a wealth of details such as the aforementioned
spinners, inner door panels, spoilers, intakes, vents, grilles and the like. It
even includes a name plate. Since racing cars can change from race to race, this
one is for the car as raced at the Riverside USRRC in 1965, the year before the
start of the Can-Am.
The decal sheet is very well done and includes seat markings, tire markings and the entire hood with numbers. Instrument decals are also provided to place on the cast metal instrument panel. An additional sheet from another kit (not shown) is provided for the sponsor decals.
|
CONSTRUCTION |
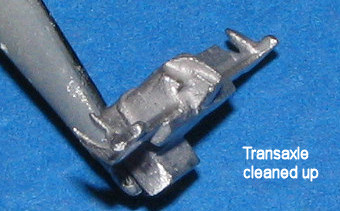 First step is to clean up the
parts. The minimal mold lines and light flash were cleaned from the body and the
other resin bits. Then I grabbed my square jeweler's file and flexi-file so that
I could clean up the cast metal parts. As mentioned, these are not the easiest
to clean and in many ways are not the best parts of the kit. It would b
First step is to clean up the
parts. The minimal mold lines and light flash were cleaned from the body and the
other resin bits. Then I grabbed my square jeweler's file and flexi-file so that
I could clean up the cast metal parts. As mentioned, these are not the easiest
to clean and in many ways are not the best parts of the kit. It would b e much
nicer to see these bits in resin as not only do resin parts generally provide
higher detail, but they are usually easier to clean. Of course, it could be that
the folks who design the kits are not good at doing resin when it comes to
detail bits.
e much
nicer to see these bits in resin as not only do resin parts generally provide
higher detail, but they are usually easier to clean. Of course, it could be that
the folks who design the kits are not good at doing resin when it comes to
detail bits.
Anyway, after about a half hour with the files and sandpaper, I was ready to
start gluing on parts. In this case, I started by putting on the small intake
'trumpets' onto the fuel injection manifold. The fit of these is fair. I was
seriously considering filing
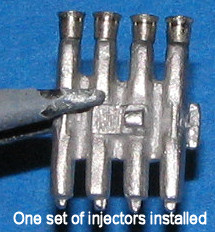 the
mating surfaces flat and removing the guide pins, but thought better of it as it
would have made it more difficult to install these tiny pieces. I also glued on
the small upper fender spoilers as they were to be painted the same shade as the
body.
the
mating surfaces flat and removing the guide pins, but thought better of it as it
would have made it more difficult to install these tiny pieces. I also glued on
the small upper fender spoilers as they were to be painted the same shade as the
body.
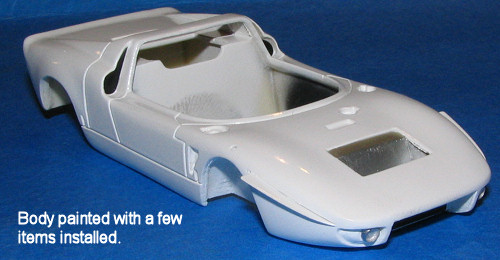
Meanwhile, I started painting. The instrument panel, wheel inserts, and seat section as well as the interior door panels were painted matte black while the body and underside pan were painted matte white, as much as to be an undercoat as anything. Good thing, too, as I spotted an area on the body that needed some sanding. The radiator exhaust section and the part that will hold the intake section were painted with Alclad II aluminum. All these colors were those recommended by the instructions.
While the first coats of paint were drying, I cleaned up some of the smaller parts as the fuel and oil fillers, steering wheel, and mirrors are cast metal and had attachment points and mold lines to remove. The steering wheel was particularly difficult to clean up. I also did some more research into the car and discovered that the wheels were not black as I'd thought, but a very dark magnesium color, so those bits had to be repainted. I used Alclad II Steel as it is a very dark metallic color. I also glued the injectors onto their mounting and spent some quality time trying to figure how to best cut the vacuformed parts as the trim lines are not that well delineated.
 I gave the body several light coats of Model Master Gloss White thinned with
lacquer thinner land it was dry to the touch within an hour. This meant that it
could be carefully moved somewhere else to cure and not to start into any sort
of additional work as just about every gloss paint I've ever used needs at least
a day or more to where it can be handled a lot. Try as I might, I was
cursed with a touch of orange peel in the most difficult area to reach so left
it as was.
I gave the body several light coats of Model Master Gloss White thinned with
lacquer thinner land it was dry to the touch within an hour. This meant that it
could be carefully moved somewhere else to cure and not to start into any sort
of additional work as just about every gloss paint I've ever used needs at least
a day or more to where it can be handled a lot. Try as I might, I was
cursed with a touch of orange peel in the most difficult area to reach so left
it as was.
While the body was curing, I went to work on the interior. I carefully cut out the vacuformed windscreen to the level it needed to be and left it for when I could start test fitting. I also cut out the headlight covers, again, leaving them a bit larger. The interior had the photo etched side panels glued in place and I cleaned up the gear shift knob. Well, I tried to clean it up. It is quite tiny and did the 'zing' thing into the black hole where missing parts go. It was replaced with a piece of stretched sprue that had the end heated into a knob shape.
I also installed the wheel inserts into the tires. Though they are the same depth on the outside, the rear ones have a deeper 'dish' to them. The spoke inserts were then installed as well. Next, I trimmed of the spinners, bent them a bit into shape and glued them on. They really look nice.
 I decided to wear some
latex gloves to keep from getting dirt on the body (white is such a pain to keep
clean) and started adding on some etched bit. Marsh provides inserts for the
radiators which really helps out. I left the back one in bare metal and painted
the front one black. It will later be dry brushed with aluminum. The resin
radiator exhaust was then glued in place and I also glued in the headlight
bezels. A pair of brass blanking plates are provided for the side scoops and
these are so much easier to use than trying to get in there with a paint brush.
A dab of super glue was all that was needed. In the back, I press fit in the
tail lights. The fit is quite tight and to make sure, I put a teeny bit of super
glue on them from the inside. All the upper hood pieces will wait until the
large decal is in place.
I decided to wear some
latex gloves to keep from getting dirt on the body (white is such a pain to keep
clean) and started adding on some etched bit. Marsh provides inserts for the
radiators which really helps out. I left the back one in bare metal and painted
the front one black. It will later be dry brushed with aluminum. The resin
radiator exhaust was then glued in place and I also glued in the headlight
bezels. A pair of brass blanking plates are provided for the side scoops and
these are so much easier to use than trying to get in there with a paint brush.
A dab of super glue was all that was needed. In the back, I press fit in the
tail lights. The fit is quite tight and to make sure, I put a teeny bit of super
glue on them from the inside. All the upper hood pieces will wait until the
large decal is in place.
 I placed the decals on the instrument panel and the seats.
These are relatively flat spaces and flooding the decal with Solvaset had them
fitting nicely. When I applied the very large hood decal, I found that it took
more than a single application. Whatever these decals are made of, they are
resistant to setting solutions. After four attempts, I still had a tad bit of
wrinkling in a few places and so decided to give in and continue. I highly
recommend painting this area as that will take care of any fit problems. I'm not
sure what Marsh Models recommends for a solution in cases like these.
I placed the decals on the instrument panel and the seats.
These are relatively flat spaces and flooding the decal with Solvaset had them
fitting nicely. When I applied the very large hood decal, I found that it took
more than a single application. Whatever these decals are made of, they are
resistant to setting solutions. After four attempts, I still had a tad bit of
wrinkling in a few places and so decided to give in and continue. I highly
recommend painting this area as that will take care of any fit problems. I'm not
sure what Marsh Models recommends for a solution in cases like these.
Next bit to be added was the steering wheel. I had to drill out the attachment point on the instrument panel piece to get this to fit properly. It was then painted matte black. Meanwhile, I glued on the piece with the injectors and the louvered section right behind it. The holes for the mirrors were drilled out a bit as well. I also bend the lower nose intake piece and removed a number of the etched bits for installation. The oil and gas fillers were installed after drilling out their access holes a bit deeper. I then drilled out the exhaust and after painting the area where it attaches in flat black, it was glued in. The transmission section was then put in place. It fits so tightly that gluing isn't needed. I also glued in the rear screens at this time and the spoiler. Instructions state that the spoiler was supposed to be a bit too wide, but none of the photos I found of the car confirm this. Regardless, the little mounting dimples are in such a position that trimming the spoiler will cut right through them, so I left it as it was.
 Moving to the front, the small headlight lenses were
installed and then I cut out the covers. These are a real chore to do and it
isn't helped by the headlight bezels sticking out a tad too far. After much work
and lots of white glue, these were finally in place and looking pretty good. I
then glued in the windscreen, also using white glue as superglue would fog it.
With that dry, I applied the tiny door buttons and the teeny hood and engine
cover latches. A few more decals were put on and the instrument panel was
glued in place with super glue.
Moving to the front, the small headlight lenses were
installed and then I cut out the covers. These are a real chore to do and it
isn't helped by the headlight bezels sticking out a tad too far. After much work
and lots of white glue, these were finally in place and looking pretty good. I
then glued in the windscreen, also using white glue as superglue would fog it.
With that dry, I applied the tiny door buttons and the teeny hood and engine
cover latches. A few more decals were put on and the instrument panel was
glued in place with super glue.
I also glued on the rear tires. The axles provided are just pieces of metal rod that one cuts to length. I glued the tires on the rod and then glued this all to the rear axle housing, first making sure that the sprue attachment points for the tires were on the bottom. After that dried, I did the same to the front ones. I used a metal plate to keep things level.
Once those were dry, I started with some more decals. There are ones for the tires as well and they fit fairly well though there was a tendency for them to twist up so care is needed. A second sheet is provided for some of the more common sponsorship markings. While these were drying, I cleaned up the outside mirrors and glued the painted seat harness to the driver's side. This is a bit too narrow for the seat, unfortunately. However, since I painted it sea blue, it is not that visible. I also painted the small spoiler to fit above the radiator exhaust opening with this shade and glued it in place.
 I knocked off my stretched sprue gear shift so substituted
a shirt pin cut to the proper length. The dash was glued in place, followed by
the interior. Once the interior was in place, the inner door panels were glued
in.
I knocked off my stretched sprue gear shift so substituted
a shirt pin cut to the proper length. The dash was glued in place, followed by
the interior. Once the interior was in place, the inner door panels were glued
in.
The bottom pan was next and here I ran into trouble. You see, there are holes drilled to match up with three attachment points on the body. Unfortunately, they do not align. If you match up the rear ones, the pan is too far aft. If you attach by the front, then the rear holes do not align. I decided to just screw in the front one and then glue the pan to the body in the back. This seems to have worked OK.
The last bits to be attached were the outside mirrors. These are not the best mold, but with some trimming and filing look fairly good. I painted the rear lights with transparent red and glued in the front air dam. That was pretty well it aside from a few decals for the windscreen and a bit of touch up painting.
|
CONCLUSIONS |
 Gosh, I really like these kits. They are fun to build, are not a major
pain, though they do take careful construction, and are subjects that I really
like. I realize they are not everyone's favorite thing, but I've been a sports/GT
enthusiast for a very long time and especially during those times when racing
was somewhat unlimited in scope. I have several more of these to build and do
hope to improve with each one. Cheap they are not and you can probably get ready
painted die cast of some of these, but I am not just a collector so a model has
to have a building aspect to it as well!
Gosh, I really like these kits. They are fun to build, are not a major
pain, though they do take careful construction, and are subjects that I really
like. I realize they are not everyone's favorite thing, but I've been a sports/GT
enthusiast for a very long time and especially during those times when racing
was somewhat unlimited in scope. I have several more of these to build and do
hope to improve with each one. Cheap they are not and you can probably get ready
painted die cast of some of these, but I am not just a collector so a model has
to have a building aspect to it as well!
Thanks to my whimpering wallet for the review kit.
|
REFERENCES |
Various Internet sites and 'The Shelby GT40' by Dave Freidman.
February 2006
#1401 in a series
If you would like your product reviewed fairly and quickly by a site that has over 300,000 visitors a month, please contact me or see other details in the Note to Contributors.