
Revell 1/32 FW-190D-9 (late)
| KIT #: | 04725 |
| PRICE: | $ |
| DECALS: | Three options |
| REVIEWER: | Scott Van Aken |
| NOTES: | 2004 boxing |
| HISTORY |
| THE KIT |
 This is a reboxed Hasegawa kit and
had the benefit of being a bit less expensive though I don't remember what I
paid for it. Like most big scale Hasegawa kits, this one comes with a pilot
figure. The cockpit is adequate for most modelers, but many will at least want
to add a harness. The kit provides a full engine accessory section as it is
easily seen from the wheel wells. The fuselage comes with a separate tail
section and this kit is one of the reasons why. With the interior and accessory
section built and painted, they, along with the backing sections for the
exhaust, can be glued into the fuselage halves and the halves close. There may
be those of you who prefer to glue the separate tail halves to each fuselage
half and before adding stuff to the inside of the fuselage would be a good time
to do this.
This is a reboxed Hasegawa kit and
had the benefit of being a bit less expensive though I don't remember what I
paid for it. Like most big scale Hasegawa kits, this one comes with a pilot
figure. The cockpit is adequate for most modelers, but many will at least want
to add a harness. The kit provides a full engine accessory section as it is
easily seen from the wheel wells. The fuselage comes with a separate tail
section and this kit is one of the reasons why. With the interior and accessory
section built and painted, they, along with the backing sections for the
exhaust, can be glued into the fuselage halves and the halves close. There may
be those of you who prefer to glue the separate tail halves to each fuselage
half and before adding stuff to the inside of the fuselage would be a good time
to do this.
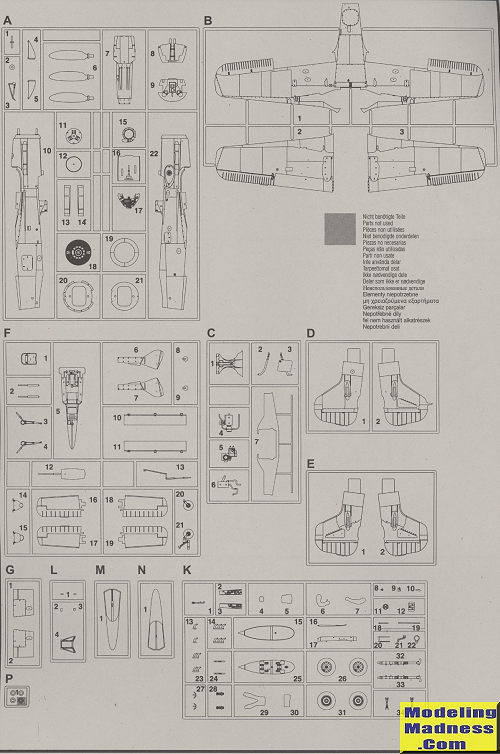
The kit provides both the broad and a standard tail piece and one of the three options is a standard plane. Which ever you choose, attach the tail gear assembly and join the halves. Instructions have you glue the stabs together at this time and set them aside. Then you move on to the forward cowling and install all the pieces that attach to the nose.
Wings are next with a hefty spar assembly which then fits into the lower wing. Flaps are then attached, followed by the upper wing halves. There is the option to do the flaps raised or lowered. Note that various holes can be opened in the lower wing section for the boarding step, antenna and a drop tank mount. With the wing attached, one moves on to the landing gear. Typical of Hasegawa, the mountings are good, but not perfect and there will be a bit of slop. Next all the underside bits are added before moving to the upper side. This includes the installation of either the early or later canoph to match whichever markings option you are doing.
 Instructions
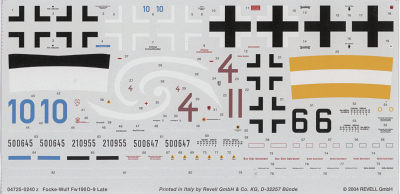
are standard Revell AG fare with Revell paint references and some shades
requiring mixing. The box art plane, brown 4 is in 75/83/76 with parts of the
underside unpainted and the fuselage RLM 76 a fairly greenish shade. Black 6 is
in RLM 75/83/81 uppers with 76 undersides and areas in unpainted metal. Some of
the RLM 76 is also the greenish shade that some have called RLM 84. Finally
there is yellow 10 in 82/83 again with parts of the underside unpainted and in
the 'RLM 84' shade. This aircraft does not have the broad tail. Decals are
nicely printed and do not include swastikas so you will need to source those
elsewhere.
Instructions
are standard Revell AG fare with Revell paint references and some shades
requiring mixing. The box art plane, brown 4 is in 75/83/76 with parts of the
underside unpainted and the fuselage RLM 76 a fairly greenish shade. Black 6 is
in RLM 75/83/81 uppers with 76 undersides and areas in unpainted metal. Some of
the RLM 76 is also the greenish shade that some have called RLM 84. Finally
there is yellow 10 in 82/83 again with parts of the underside unpainted and in
the 'RLM 84' shade. This aircraft does not have the broad tail. Decals are
nicely printed and do not include swastikas so you will need to source those
elsewhere.
| CONCLUSIONS |
This is an excellent kit. I built the standard version in a Hasegawa box several years back and was very pleased with how it turned out. I expect this one to be the same.
August 2020
Copyright ModelingMadness.com. All rights reserved.
If you would like your product reviewed fairly and fairly quickly, please contact the editor or see other details in the Note to Contributors.
Back to the Main Page Back to the Review Index Page Back to the Previews Index Page