|
KIT: |
Hasegawa 1/72 Ki-45 kai Otsu 'Nick' |
|
KIT # |
51262 |
|
PRICE: |
$37.98 MSRP |
|
DECALS: |
See review |
|
REVIEW & |
|
|
NOTES: |
|

|
HISTORY |
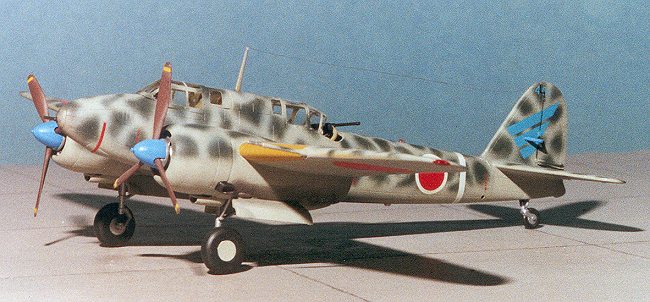
The Ki-45 was Japan's answer to the heavy fighter like Germany's Bf-110. However, it was not used as a bomber escort, but mainly for ground attack, a role in which it was relatively successful. It was also used as a bomber interceptor and was armed with Schräge Muzik or obliquely mounted cannon in the aft cockpit.
 The Ki-45 had an extremely long gestation period before it finally
entered production. There were all sorts of problems much of them relating to
tail flutter and lack of general stability. There was also a lack of power from
the chosen engines. As this aircraft was also being developed concurrently with
the Ki-48 and using many of the same components, similar problems cropped up
with the Ki-48. Eventually the
airframe was modified and more powerful engines used bring the aircraft up to
specifications.
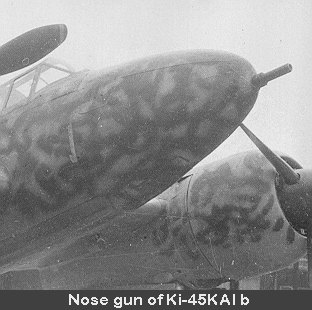
Most of the Ki-45s that entered service were the Ki-45KAI (KAI = modified) version. There were four subtypes of the Ki-45KAI; the a, b, c, and d versions. They are all differentiated by armament and nose shapes. The a has a relatively blunt nose with a landing light in it, The b and c has a 20 or 37mm cannon in it, and the d has a sharper nose. Both the a and b have two machine guns in the nose and the some versions of the c had the obliquely mounted cannon.
The subject of this kit, the Ki-45KAIb was specifically developed as a ground attack aircraft, hence the 20mm nose cannon in addition to the 37mm ventral cannon. This relatively heavy forward firepower made it perfect for hunting PT boats or intercepting 5th AF Liberators.
As for some specs, the top speed was 340 mph, range about 1,400 miles and a little over 1,700 aircraft were built. One was experimentally fitted with a 75mm cannon, but it proved too much for the light airframe of the Ki-45.
 (Addendum) A few notes on the above
information. The previous part of the history was written based on information
that was gleaned from the references, particularly the Francillon book (which I
could read). Over the years, more information has come to light that makes
Francillon's book suspect in some information. It also doesn't help that I
simplified the info even more to try to make it more understandable to the
casual reader.
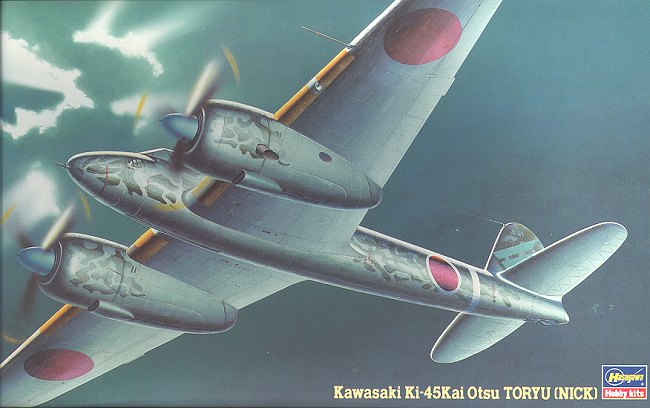
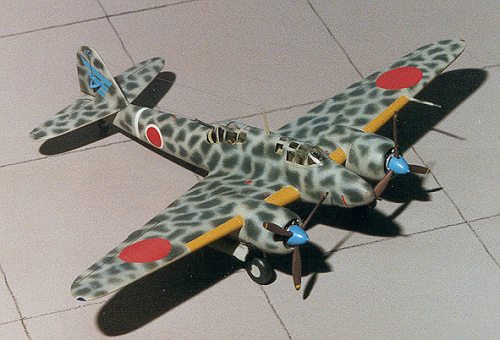
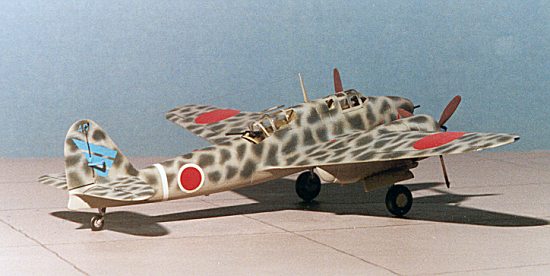
All this was done prior to a number of e-mails with Tom Hall, editor of Asahi Journal, a magazine devoted to the Japanese military of WW2. Here is the gist of the correspondence. What Hasegawa has boxed and what the image above shows is NOT a Ki-45Kai b or Otsu. It is actually an early, short nosed, Ki-45 Hei. The Hei had a 37mm Ho-203 cannon developed for aircraft installed in the nose. It also had a 20mm ventral cannon. The early short nosed Hei was a conversion of the earlier Kou and around 65 airframes were converted at Tachikawa between May and October 1943. The photo above shows one of these aircraft.
Later, the factory-built aircraft had a lengthened nose to cover most of the 37mm gun barrel. 595 of these Hei versions were eventually built. As for using markings in the kit, Tom has suggested that the best markings for the kit are the ones on the box art for the 21st Sentai in the Dutch East Indies.
To do a real Otsu from this kit, one needs a different nose that can handle the twin machine guns. This may be done by removing the cannon barrel, sanding off the bulge under the nose and by filling in the vents. Then drill holes in the top of the nose for the machine guns and cut away an area for the landing light. Then use part B2 (fairing) and D19 (barrel) for the 37mm ventral cannon. This cannon was not designed for the aircraft and had to have each shell hand loaded by the rear gunner. Do not use the fuel radiators between the engines and fuselage under the wing as the Otsu didn't have them. As for units, Tom suggests that most Ki-45 units had one or two mixed in with their other aircraft.
|
THE KIT |
The date on the box is 1996, so this is a pretty recent model for Hasegawa. Hasegawa started producing super 1/72 models of Japanese WW2 twin-engined aircraft around the middle of the '90s and they have made almost no impact on the modeling community here in the US. I'm not sure if it is the subjects of the kit or the scale or the price of them that has kept them out of sight, but in several years of attending model shows here around St. Louis, the only one I have seen on the tables has been the Ki-67 kit I entered at Memphis in 2000. And it is a shame as they are very nice kits.
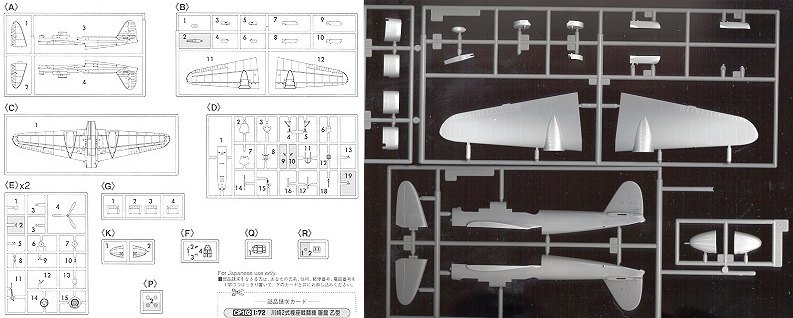
 I don't think I need to go into the usual diatribe on how nice
this kit is molded or the color of the plastic as all modern Hasegawa kits are
very well done. You can see a diagram of all the kit parts and a sample of the
sprues in the image above. What I will mention is that like the Ki-67 kit, this
one has some sink marks in the plastic. There are not many of them and they are
on either thick pieces or opposite alignment pins and slots, but they shouldn't
be there at all. At least not for a nearly $40 1/72 aircraft kit! There is no
flash as experienced with the Ki-67 kit earlier reviewed.
The cockpit is complete with a decal for the pilot's instrument panel and no sidewall detail at all. There is a rudder hinge that I think most modelers will leave off until the very end or it will make it difficult to apply the tail camo and unit decal. The engine nacelles look as if they will be a bit of a challenge. Though most of it is integral with the upper and lower wing, the portions forward of the leading edge consist of a number of pieces instead of doing the front cowling as one piece.
There is only one option on this kit and that is the installation of a shell collector for the 37mm ventral cannon. Landing gear are well detailed and look fragile, however construction will bear out how well they hold up.
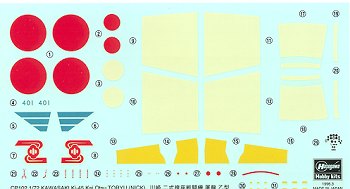 Decals
provide markings for two Ki-45KAIb's. One from the 21st flight regiment and the
other from the 4th. The box art shows the one from the 21st. Both are in overall
grey with random green bits on the upper surfaces. The 21st bird is in a blocky
style of overpainting while the 4th aircraft is more of random squiggles. Either
way, it will be fun to paint!. The 4th aircraft has white 'bandages' for a home
defense unit and the yellow IFF leading edge markings are provided as decals.
Frankly, I would not use these as this sheet suffers from a typical problem of
Japanese kit decals: the white is ivory and the reds a bit too bright.
Typical of Hasegawa kits, all the parts are in one bag which means that parts are easily ripped from sprues and others are scratched by the shifting of the plastic during transportation. I do wish that Hasegawa would spend a few more yen to put fewer sprues in each bag as the other kit makers do. Other than that, it looks like a super kit that should build very nicely!
|
CONSTRUCTION |
First step is to do the interior. This is made of a front seat, control stick and instrument panel. Then there is a pilot's bulkhead with armor plate, then the gunner's bulkhead with a shelf, the gunner's seat and the rear gun mount. There is no sidewall detail at all. All these parts were glued together and painted in Nakajima Interior Green, as was the interior of the fuselage. Some detail painting included leather on the seats, a darker green on the package shelf for the rear seat and black on the instrument panel. There is a decal for the instrument panel, but I stupidly put some Champ on it and it just fell apart (i.e. melted!).
 There has been much confusion
about IJAAF interior colors, however, current thinking is that most interiors
were a 'bamboo' color of a yellowish green primer. The Aeromaster Nakajima
Interior Green Acrylic is pretty close to this color so was used for the primer
color. It was also the recommended color in the paint chart. This interior can
be fit from the underside with the fuselage together so I worked on other parts
of the kit while the interior was being painted.
This included gluing together the wings, engine cowlings, nose section and the fuselage itself. The wings fit quite well, as did the two nose halves with the 20mm cannon. The engine cowlings are a three piece affair consisting of two sides and a front ring. Fit is fair and needs some smoothing out with some sandpaper. These cowlings are handed so make sure you use the proper part numbers together. Since the Ki-45 is closely cowled with a large spinner, there is no engine to install. There is some pipework on the front of the cowling face and that is it. Seems to be enough from the pictures I have seen.
The wings also have a lower nacelle section that is made of two pieces which need to be glued together and then glued to the underside of the front of the nacelle. These don't fit too well at all and are actually a bit larger in diameter than the nacelle. I had to use a pretty coarse sanding stick to get the size down and so trashed any detail. Once smoothed out, it looks OK. There are two small teardrop shaped fairings that have to be glued onto the lower nacelle. I believe that these are to clear the landing gear attachment point. I had one go ZING! when cut off the sprue. It was just dumb luck that I found it several hours later after having given up on it!
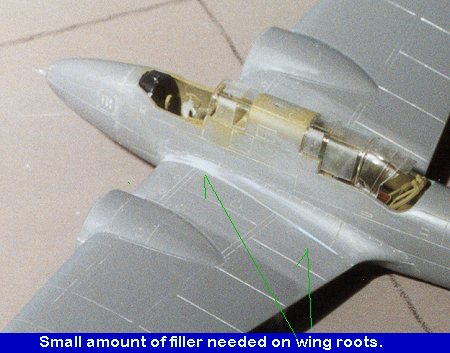 The fuselage halves were glued
together and fit quite well. The only filler needed was on the interior
bulkheads where a seam would be easy to see through the transparencies. Then the
nose was glued in place. Fit here is good as well, with only a touch of filler
needed. Then the interior was glued in from the underside. It fits very well. It
is glued at the upper part of the instrument panel, the pilot's armor plate and
the gunner's forward bulkhead. It seems to be holding quite well.
Next
was the wing. This fit quite snugly and I'd like to say that no filler was
needed, but that isn't the case. Some was needed at the upper wing/fuselage join
where there was a bit of a gap. The gap was larger at the rear so that got
filler whereas the front sections just had Mr. Surfacer used. The tailplanes
were then attached and fit quite well. The next step was to attach the
transparencies. These were glued in place with non-fogging superglue. When dry,
they were 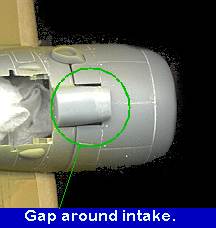 masked with Scotch tape in preparation for painting. The aft canopy
does not meet all the way down and is open for the gunner. This will need to be
filled with tissue. For this reason, the gun is not attached at this time.
Before actual painting begins, there are a few other bits and pieces that need to be glued in place. These are the fuel radiators, the radio antenna, the pitot tube and the engines. The engines fit fairly good. They are handed with the exhaust to the outside. The exhaust are separate pieces that were glued on at this time. The final bits before the paint shop were the carburetor intakes. These are a two piece affair that need glued together and then smoothed out before installing. Once they are installed in the proper place (on the forward end of the wheel well), the kit can then be prepped for painting. One final note on the carb intakes. There is a rather large gap left after these are glued in place. I can only assume they are supposed to be there as I see no way to close them up.
|
PAINT & DECALS |
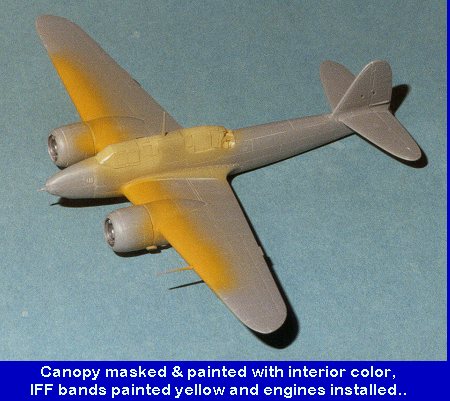 Preparation for painting included filling the wheel wells and
aft opening with tissue. The first part painted was the cockpit canopy. This was
painted with the interior color so that this color would show through for the
'flashlight' crowd if this kit turns out well enough to take to contests.
Next, I painted the IFF strips on the leading edge of the wing. I know there are decals, but I don't have good luck with those decals so preferred painting them on. Benefit of those stripes is that just about any color from pale yellow to a near orange is acceptable. I used Xtracolor RLM 04 as I had some already mixed! Once it was dry, it was masked with Tamiya tape in preparation for the 'real' painting. In the process, I did break off the radio antenna while attaching the tape to the leading edge!
The kit was then painted in overall grey-green using Aeromaster acrylics. It was at this time that I received an e-mail from Tom Hall, who was kind enough to answer some inquiries about the Ki-45. It appears that this kit isn't a Ki-45 Kai Otsu as Hasegawa claims it is, but actually an early Hei (this is one of the problems with not reading Japanese and trying to figure out what is what by looking at Japanese-only books for references!). This leaves me at a bit of a quandary. Do I continue with the build or do I stop and modify the kit? One thing in my favor is that very few actually know about the glitch! Around this time, Tom came to my rescue with additional information about this kit. If you read the addendum in the 'History' section, you will see what has come to pass regarding this.
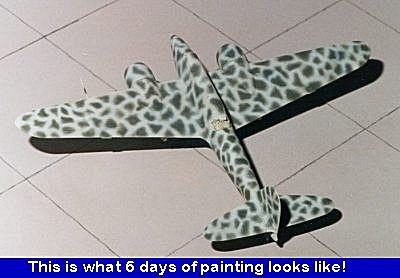 Once
the overall color was painted, the kit went back to the bench to have the
landing gear installed. I did this so that I would have something to set the
plane on when doing the rest of the paintwork. Returning to the paint shop, it
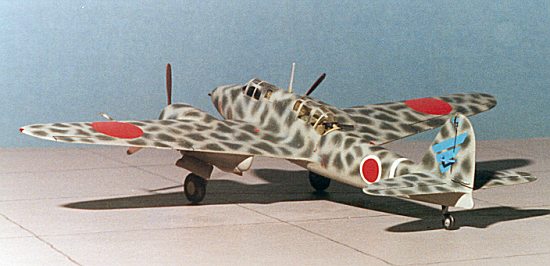
was time to apply the paint scheme. This one is a sort of 'giraffe' deal made up
of a lot of dark green segments. I used Aeromaster Kawasaki Army Green and
sprayed a bunch of them as tight as I could get them. This kind of work is very
tiring and it took four days to get all the segments down. Naturally, there was
some overspray so another couple of days was spent going back over them with the
light grey. Once I was satisfied with the scheme, a coat of clear acrylic was
sprayed on the plane.
Next were the decals. I used the ones in the kit as there really isn't any choice. They are nice and thin, but a bit transparent. This goes for the red in the Hinomarus as well. You can just barely see the underlying paint scheme through them. The white is a lot more transparent, but fortunately, I'm not doing the one with the large white patches! I used Microset with minimal problems. Once the decals were dry, they were wiped down and a coat of clear semi-matte was sprayed over them to seal them in.
|
CONSTRUCTION |
Before adding the pastel stains, the wheels and gear doors were glued on. The axle stubs are a bit thinner than the holes in the wheels so you need to use some fast setting glue to get these right. The gear doors fit very nicely even though they are a bit thick. Next the 'engines' were repainted using black and steel. The prop hubs and the rudder balance bar were painted blue after mixing white and blue to get as close as possible to the color of the unit marking on the tail. Not perfect, but close. Then the prop was painted 'propeller color', which is a flat, dark brown, and the backing plate painted aluminum. When all these were dry, they were glued together. Then the prop warning stripe decals were placed near the tip. The prop was then shoved into the retainer. The hub pretty well covers any possible engine detail so it doesn't matter that there isn't any!
 Now the pastels were brought
out for exhaust and gun staining. The next thing was the antenna that I had
broken off. This was then glued into place. Finally, the upper and lower
anti-collision lights were painted using clear red, but not glued on at this
time. The kit was then resprayed with clear semi-matte to seal in the pastels.
It was then time to remove all the masking from the clear parts. Not too bad, though there was some leakage. This was easily removed by scraping the affected area with a sharpened toothpick, the wood being softer than the plastic and not causing any damage. Then the small lights were glued in place with a touch of superglue, the radio antenna made with stretched sprue and finally, the other lights painted using Gunze clears of various colors.
|
CONCLUSIONS |
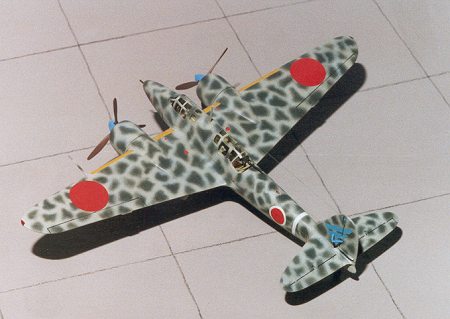 This really is a very nice little kit. Unbelievably, it isn't
that large an aircraft. The B5N 'Kate' that I built a few weeks ago is actually
a larger aircraft. What makes this aircraft so neat are the myriad of paint
schemes that can be applied to it. It is also what makes this one of the more
difficult kits to finish. I'd be willing to bet that nearly 1/2 of the time it
took to complete it was devoted to painting.
The small parts make this unsuitable for the bare beginner, but those who have developed basic skills should find it to be as fun a kit to build as I did.
|
REFERENCES |
Japanese Aircraft of the Pacific War, Rene J Francillon, 1979
Famous Aircraft of the World #21: Army Type 2 Two-Seat Fighter 'Toryu', March 1990
Review copy courtesy of me and my wallet!
If you would like your product reviewed fairly and quickly by a site that has over 900 visits a day, please contact me or see other details in the Note to Contributors.