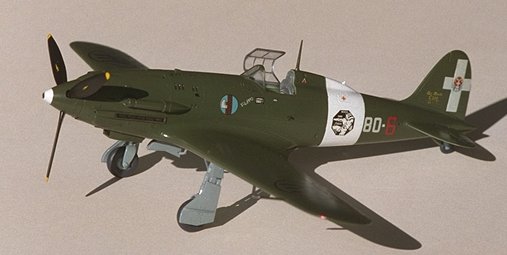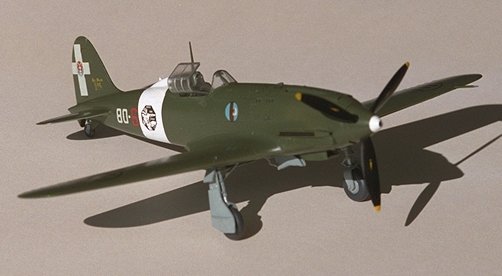
Kit: Macchi MC.202 Folgore "Cavallino Rampante"
Scale: 1/48
Kit Number: JT 39
Manufacturer: Hasegawa
Price: $29.95
Media: Injected Plastic
Decals: 2 versions: 96 Squadriglia 9 Gruppo 4 Stormo in a mottled camo of green and brown over sand: 80 Squadriglia 1 Stormo in overall dark green
Date of Review: 9 Feb, 97

Another photo at the bottom of the page
The MC.202 Folgore is probably one of Italy's most successful fighters of WWII, thanks mostly to the inclusion of Germany's DB.601 engine. Like many of their cars, Italian aircraft were beautiful but underpowered (I owned a Fiat X1/9 so should know). Built in numbers too small to be of any real offensive use, the 202 was upgraded to the 205 with a later DB.605 engine. Many went on to serve with both the AMI and RSI and saw some post-war usage as well.
I was very pleased to see Hasegawa release this kit and as they are wont to do, it has been released in many versions and decals options. This kit is also the basis of the very similar MC.205. Molded in Hasegawa's standard medium grey plastic with superb engraving and including a rather good decals sheet. I was ready for a pretty quick time of it. After reading of any possible problems, I set to work.
This is a typical Hasegawa kit of current manufacture. I found it a delight to build. First off was the cockpit which is rather complete with seat, flap handle, control stick, a nice engraved instrument panel and rudder pedals. I used Israeli AF green for the interior as per instructions with an aluminum seat and armor plate. It fit beautifully. The fuselage halves were then cemented together after trimming down the spreader bar. A review said it would cause wing problems and would have were it not trimmed. Other parts were equally easy to build. One builder induced problem was with the supercharger intake. This kit is of an early Series 1 without a sand filter. I am so used to seeing these with the filter that this is the intake I put on the kit. I realized my goof in time to prevent permanent problems, but be warned that this could occur to you.
The wing was a simple matter with a very nice wheelwell insert. Pay close attention to the drawings when inserting the brace in the wheel well. A review suggested not gluing in the brace so I did not. Fit perfectly. the wheel well areas were painted underside colors as were the gear struts, wheels and inside of doors. With the fuselage spreader bar having been trimmed, the wings fit perfectly with proper dihedral. The front oil cooler is shown backwards in the diagram. The flat part is to the front.
All other aspects of the kit were a breeze. For more details, see the section at the end of the review. I used RLM colors as per instructions as I do not have any Italian colors. I would bet that the RLM colors are not 100% correct as I am pretty sure the underside should be grey vice blue. Anyway, I used Xtracolor paints with typically excellent results. I also used kit decals as I was too lazy to wait for an aftermarket set. I painted the white band as these types of decals usually give me a problem. The problem with that was it was a bit of a contrast to the semi-translucent white decals that are the norm from Hasegawa. Next time, an aftermarket set.
Overall the kit was just great and I have an MC.205 on the pile (about 40 kits down). Highly recommended.

Hasegawa JT39 1/48 Macchi MC.202 'Folgore' Series I
11 Jan, 97
Another hopefully nice 1/48 Hasegawa WWII fighter kit. The review on this site as well as in MMP said nice things about this kit. This one is boxed 'Cavallio Rampante' and comes with two schemes; one a mahogany and green mottle over sand with large areas of medium grey on the wing root and white bands on the nose and fuselage. The other is overall dark green with a white fuselage band. Neither is very appealing to me so I'll be looking for a replacement sheet of some sort. I have always liked the MC.202 and have built a couple of Supermodel kits of this in 1/72. Looking at the instructions, it states that the inside color is supposed to be 34227, that light Israeli green. I have not seen much in the way of camouflaged books for Italian aircraft so do not know if this is correct. Anyone know? I have little in the way of references other than the popular 'In Action' title, so will be looking through that for clues and suggestions. The one part I have glued is the wheel well assembly. There are helpful hints in a back issue of MMP so I'll be using that during construction. Say what you will about MMP, but they have been a great help to me avoiding some pitfalls and problems. More next week.
19 Jan, '97
A huge amount of progress has occurred with this kit since last week as it is relatively complete. I went ahead and used the 34227 for the interior. The seat, control stick, rudder pedals, pilots armor and flap handle were painted aluminum. I used the kit instrument panel decals over the instrument panel. A bit of Solvaset on them and they snuggled right down and look very convincing. Painted various boxes inside flat black and some knobs had color added to them. Then the whole deal was drybrushed with steel.
One thing I have noticed are the huge number of injector marks on almost every part. Many of them are in difficult to remove locations. I feel there must have been a better way to engineer the kit to prevent this as it is annoying. The interior was then assembled and fitted into the fuselage halves (not glued) to dry, ensuring a good fit. While that was drying, I assembled the wheelwells and wings. A superb fit as expected from Hasegawa. Once the interior was dry, the fuselage was assembled. The propeller installation is enhanced by having a stub on which to fit it trapped by the fuselage. I like this as it allows the prop to be tacked on for later removal and still allow a spinning propeller. The upper engine cowling fit well at the back, but was a bit loose in the front requiring a bit of putty to seal the gap. The next assembly was the wing to fuselage. I got a superior fit. One thing you must be aware of is that the fuselage spreader must be cut to where it does not touch otherwise you will have NO dihedral in the wing. I did this and it made for a perfect fit. Next was the under engine cowling which also fit very well. I then used a tiny bit of putty at the forward and aft wing/fuselage join to smooth things out.
The engine intake was next. I grabbed the tropical filter one and glued it on the kit. Then I noticed that this is an early Series I aircraft without it. I pulled off the intake, waited for the glue to dry, puttied the mess I made, sanded it down and put on the proper intake. The horizontal stabilizers were then attached with no problems as was the windscreen. The underside of the aircraft was then painted with the colors recommended in the instructions as RLM 68. Frankly, I doubt that the Italians used RLM colors at this stage of the war, but since I did not have any Italian specific paint, I sprayed on Xtracolor's superb paint. I hear you purists out there cringing, but it does look pretty close to Italian underside grey. To make things worse, I will be using the RLM 83 in place of the Italian dark green as it is also pretty close. I forgot to attach the tail wheel fairings so have done that and puttied them as well (the parts don't fit to each other very well). Once the putty dries and is sanded down, more painting will get underway (and it is a tough job as I paint outside and it is well below freezing).
26 Jan '97
The putty job on the tail wheel fairings went very well. I then painted the aft fuselage and propeller spinner white before masking them off for the upper surface color. When the white was dry, I used Scotch tape to mask off the tip of the spinner and the white fuselage band. The antennas and other small bits painted fuselage color were then attached. I masked off the underwings (the upper color wraps under) and the under horizontal stabilizers and painted the aircraft (minus the canopy) RLM 83 dark green. I needed to apply two coats as I did not get complete coverage the first time out. The kit is now having some of the detail parts painted as well as having the radiators attached. I should be getting it on its undercarriage this week and starting into the decaling.
2 Feb '97
The landing gear has been completed and attached. Once dry the gear doors and actuating mechanisms were attached as well. Then the decals were applied. I used the kit decals as I figured aftermarket ones would have very few schemes (if any) for a series one. The biggest worry I had about the decals was the lack of opacity in the white and I was not disappointed. The white and yellow decals are just a bit transparent and when put on a dark green are noticeably duller than the white nose and fuselage bands that were painted. Not a disaster, just something you should be aware of. Other than that, they fit very well, required no setting solution, and were commendably thin for Hasegawa decals. I have also added the various probes using teeny amounts of super glue as Xtracolor paint wrinkles up big time when it comes in contact with ANY glues other than white glue or epoxy. The propeller was assembled and attached and the only thing left to do is to attach the engine exhausts, paint the canopy bare metal and apply a coat of semi-gloss clear.
4 Feb
Well, the kit is finished and looks just great. I painted the engine exhausts burnt iron and attached them and the newly painted aluminum canopy to the aircraft. The kit was sprayed with semi-gloss clear and it now inhabits the 'New Kit' portion of my display case. This is a great kit and a joy to build. If you have it, build it...if not, buy it.