Cape Hobby 1/72 FW Fighter (BMW 8011 Engine)
| KIT #: | CHG 015 |
| PRICE: | $41,95 direct from Cape Hobby |
| DECALS: | Generic insignia |
| REVIEWER: | Scott Van Aken |
| NOTES: | Resin with vac canopy. |
| ALTERNATE HISTORY |
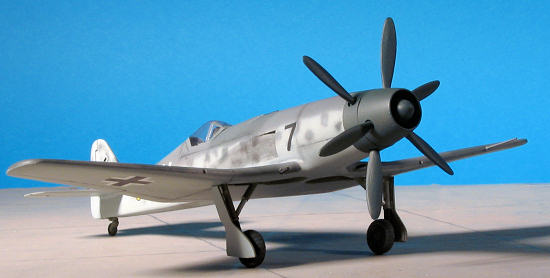
A fine late summer day in 1943 and Gfr Ludwig Schloss was just excited. Here he had recently finished advanced fighter training in Pau, France and was now assigned to one of the best in the West, 9./JG 54. What was more, he was about to fly the newest Luftwaffe fighter, the powerful Focke-Wulf FW-205A-2. The set back cockpit and huge contra-rotating prop powered by the latest BMW 8011 engine made it look fast on the ground. And that nice prop counteracted any tendency for the aircraft to swing when power was applied, so no leg cramps holding down on the rudder during take-offs!
Ludwig had the opportunity to fly the new jets, but he loved the sound of piston engines and this aircraft was in service now. No need to spend time working the bugs out of a new design. Sure, the 8011 was still a relatively new engine, but aside from a rare tendency to catch fire during ground ops, it was a smooth engine.
Time at last to get into his plane. He hopped on the
truck that took the new pilots and their instructors to the revetments where the
planes awaited. He and Lt. Grossmann hopped off the truck in front of Black 7,
looking nearly new and waiting in the sun. The
 ground crewman acknowledged that
the aircraft was ready to go and so helped Ludwig into the cockpit while the
instructor pilot stood next to him while they went over the switches and
controls. It looked very much like the FW-190s on which he had recently trained,
though there were some new controls, such as the one that allowed feathering of
one bank of props in case of trouble and the one that operated the new ejection
seat. This was something that few planes had and it was able to get a pilot out
of the plane even if the canopy were jammed thanks to a raised post that punched
a hole in the canopy, shattering the plexiglas.
ground crewman acknowledged that
the aircraft was ready to go and so helped Ludwig into the cockpit while the
instructor pilot stood next to him while they went over the switches and
controls. It looked very much like the FW-190s on which he had recently trained,
though there were some new controls, such as the one that allowed feathering of
one bank of props in case of trouble and the one that operated the new ejection
seat. This was something that few planes had and it was able to get a pilot out
of the plane even if the canopy were jammed thanks to a raised post that punched
a hole in the canopy, shattering the plexiglas.
Three different guns were available; cowl mounted 7.7mm machine guns, wing root mounted 20mm cannon and the new 30mm cannon in the outer wings. These last ones only carried 20 rounds per gun but would bring down a bomber in two shots. One basically got range with the nose guns then used the cannon to rip the enemy apart. Actually, one reason for the prop feathering feature is that with contra-rotating props, synchronizing the cowl guns had to be extremely precise to keep from putting holes in the props. The electronics governing this sometimes failed.
After the briefing, it was time to fire up the engine. The 'black man' fired up the ground power cart and it was time to start the engine. A bit of winding up, a couple of coughs and the engine caught. First sputtering a bit it started to produce a roar that was quite unique for fighters. The sound of the engine combined with the sound of the props made quite heavenly music. The airframe shook while the engine idled.
Broken from his reverie by a tap on the shoulder, Lt Grossmann indicated that he was headed for his plane and to put the radio to channel F. Soon Ludwig heard the Lt state that he was going to take off and that Ludwig should follow. A maintenance man had to ride the wings as they zig-zagged along the taxi way to the take off point. Word was given and power was gently applied. Lt Grossmann started moving and Ludwig followed several meters behind. More power and the tail quickly came up and then the plane rose into the air. Only half throttle; amazing!
Gear was retracted and the planes climbed into the blue. Ludwig followed the Lieutenant through a series of maneuvers. Easy ones at first and then ones more and more difficult as the time went on. Each time, the aircraft responded as none before. It seemed this one could do anything asked of it. Some mock combat was tried and though Lt. Grossmann got him every time, Ludwig was filled with confidence that this plane would best any of the enemies he found in the air.
 After about 35 minutes, it was time to head home.
Flying at about 5,000 meters, a glint was seen off to the right. Lt. Grossman
told Ludwig to hang onto his wing as they went to investigate. Quickly catching
up to what were four aircraft, it was soon obvious that these were Spitfires and
they lined up for attack. The Lieutenant dove into the mix with guns blazing and
soon shot down one. As they turned around to engage the others, the Spitfires
tried to latch on to them but with no avail. The Ludwig had not yet fired a shot
and was eager to try.
After about 35 minutes, it was time to head home.
Flying at about 5,000 meters, a glint was seen off to the right. Lt. Grossman
told Ludwig to hang onto his wing as they went to investigate. Quickly catching
up to what were four aircraft, it was soon obvious that these were Spitfires and
they lined up for attack. The Lieutenant dove into the mix with guns blazing and
soon shot down one. As they turned around to engage the others, the Spitfires
tried to latch on to them but with no avail. The Ludwig had not yet fired a shot
and was eager to try.
Another tight turn put them into a cloud and Ludwig lost his leader in the mist. Pulling out of the cloud, he spotted Lt. Grossmann with a pair of Spitfires behind him. Diving down behind them, Ludwig picked the leader of the two and opened fire. My God! what a noise the guns made as all six of them spit bullets at the aircraft, which basically disintegrated in the air under the barrage. The other plane broke off as Lt. Grossmann finished off the plane he was stalking. Forming up, Ludwig was pumped up with excitement at his first kill. The Lieutenant chastised him at wasting ammunition, and then congratulated him on his victory. There would be a celebration when they returned, Lt. Grossman promised; all to be paid for by one Gfr. Schloss! Despite the devastation that would be done to his pocket book, Ludwig had his first of what he hoped would be many, and all in the best plane in the world!
| HISTORY |
 My usual sources failed me on this one so I'll have to
paraphrase from the instructions. "In August 1941, Dipl-Ing Mittelhuber did a
study on the design and performance of single seat fighters with power plants
still under development. This was based on the FW-190 design, which was just
entering service. One such project was powered by the BMW 802 18 cylinder engine
with a three speed, single stage supercharger, rated at 2600 HP for take-off and
1600 HP at altitude. Thanks to being over engineered, the 802 was never able to
pass the 50 hour reliability tests and was later abandon for a more conservative
design.
My usual sources failed me on this one so I'll have to
paraphrase from the instructions. "In August 1941, Dipl-Ing Mittelhuber did a
study on the design and performance of single seat fighters with power plants
still under development. This was based on the FW-190 design, which was just
entering service. One such project was powered by the BMW 802 18 cylinder engine
with a three speed, single stage supercharger, rated at 2600 HP for take-off and
1600 HP at altitude. Thanks to being over engineered, the 802 was never able to
pass the 50 hour reliability tests and was later abandon for a more conservative
design.
Another option for the aircraft was to use the BMW P.8011. This was rated at 2800 HP take-off. It was basically an 802 with two exhaust turbines enclosed in an aerodynamic cowling and driving a contra-rotating prop. Probably due to the lack of reliability of the base BMW 802 engine, this project was never realized, however, Focke-Wulf did go on to produce the superlative Ta-152 which would have performed the same missions.".
| THE KIT |
This is another Anigrand molded kit. Packaging is the same, overall feel of the kit is the same, and the clear bits, which are well molded and nicely done, do not have pronounced framework, typical of an Anigrand kit. The overall look of the kit parts are nicely done. Not to say there are not some molding glitches as you'll find that in most of these resin garage kits. Each spinner section has an air pocket to fill and there is one on the trailing edge of the rudder. The tailplanes are devoid of them which is nice.
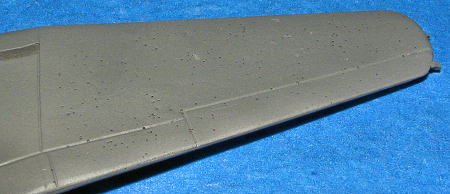 However,
the wings are going to take some work. You see, on both the upper and lower
surfaces, but especially the lower surfaces are a myriad of small indentations
and pin holes. Things like this don't happen very often, but when they do they
cause additional work. The trick is to fill these tiny indentations without
opening up new ones. Though difficult to photograph, I applied a couple of coats
of primer to the wing to make them more visible. When to click on the thumbnail
to the right, you can see these tiny pinholes and 'dents' in the wing.
However,
the wings are going to take some work. You see, on both the upper and lower
surfaces, but especially the lower surfaces are a myriad of small indentations
and pin holes. Things like this don't happen very often, but when they do they
cause additional work. The trick is to fill these tiny indentations without
opening up new ones. Though difficult to photograph, I applied a couple of coats
of primer to the wing to make them more visible. When to click on the thumbnail
to the right, you can see these tiny pinholes and 'dents' in the wing.
 I should mention, while on the
wings, that these are designed with an interlocking feature that helps to keep
things properly aligned while building. A nice engineering feature that I
wish more would have. Since this is a FW-190 derivative, one could also use a
photo etch set on it to spruce up the interior. Though little can be seen in the
small cockpit anyway, a nice etched instrument panel and some belts will
really help. Might even want to consider cannibalizing an old Italeri 1/72
FW-190 kit for bits. Since this seems to have the same landing gear as the 190, plastic
ones will not be prone to warp over time as resin ones will do. It is a good
investment next time you are at a show and can pick one up for a few dollars.
I should mention, while on the
wings, that these are designed with an interlocking feature that helps to keep
things properly aligned while building. A nice engineering feature that I
wish more would have. Since this is a FW-190 derivative, one could also use a
photo etch set on it to spruce up the interior. Though little can be seen in the
small cockpit anyway, a nice etched instrument panel and some belts will
really help. Might even want to consider cannibalizing an old Italeri 1/72
FW-190 kit for bits. Since this seems to have the same landing gear as the 190, plastic
ones will not be prone to warp over time as resin ones will do. It is a good
investment next time you are at a show and can pick one up for a few dollars.
Instructions consist of several pieces of inkjet printed paper. One is a short history and the others are images of the kit during several stages of construction. This works out quite well for assembly, but please note that the photos of the landing gear show them installed backwards. The main strut is at the outer edges of the wheel well and not in the center of the well as the image shows. Use the three-view on the box top when it comes time to installing gear. A generic insignia decal sheet is provided if you wish to use it. Superscale did a 1/72 FW-190 insignia sheet a year or so back that would be perfect for this kit.
| CONSTRUCTION |
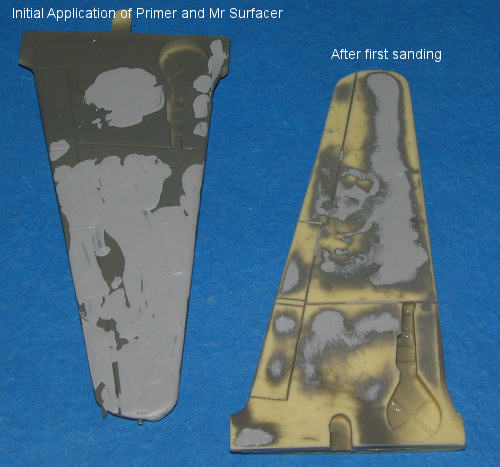 As
you might guess, the first thing was to tackle the wings. When I run into
situations were there are a lot of pinholes, I first spray on a coating of
primer. In this case I used Alclad II's grey primer and fully covered both sides
of the wing. This primer dries fast enough so that if holding one end of the
wing, the other end will be dry enough to handle by the time you get to the
sections you are originally holding. Once that is dry, I applied Mr. Surfacer
500 to the pinholes using a flat toothpick. If I saw an additional sink area, I
applied a drop atop it to help fill things. One wing side at a time was all I
could do as the Mr. Surfacer dries a bit more slowly, especially if it is on
thick. Then, I used worn 400 and then 600 grit sandpaper to sand the surface as
smooth as I could. You don't always have to sand most of it away as a thin layer
will keep the pinholes at bay. The result will look terrible, but it is
necessary.
As
you might guess, the first thing was to tackle the wings. When I run into
situations were there are a lot of pinholes, I first spray on a coating of
primer. In this case I used Alclad II's grey primer and fully covered both sides
of the wing. This primer dries fast enough so that if holding one end of the
wing, the other end will be dry enough to handle by the time you get to the
sections you are originally holding. Once that is dry, I applied Mr. Surfacer
500 to the pinholes using a flat toothpick. If I saw an additional sink area, I
applied a drop atop it to help fill things. One wing side at a time was all I
could do as the Mr. Surfacer dries a bit more slowly, especially if it is on
thick. Then, I used worn 400 and then 600 grit sandpaper to sand the surface as
smooth as I could. You don't always have to sand most of it away as a thin layer
will keep the pinholes at bay. The result will look terrible, but it is
necessary.
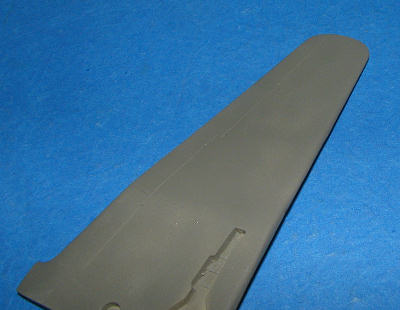
 When
done with the first round, the wing is then resprayed with the primer and any
additional pinholes tackled in the same way with a drop of Mr. Surfacer on it.
The second round had few additional holes, but there were enough to need
correction. After the second application, the wing was basically free of
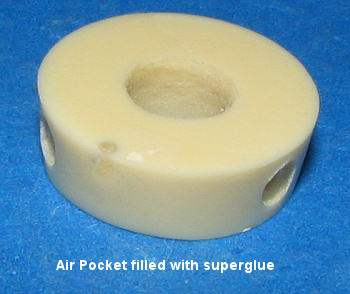
pinholes. The air pockets in the wing tips were handled using superglue. Apply
the superglue, then accelerator then sand. You'll probably have to repeat this
process, but the key is to sand as soon after applying the accelerator as you
can. Here is an image of what it looks like after you are done. This image is
the rear spinner section.
When
done with the first round, the wing is then resprayed with the primer and any
additional pinholes tackled in the same way with a drop of Mr. Surfacer on it.
The second round had few additional holes, but there were enough to need
correction. After the second application, the wing was basically free of
pinholes. The air pockets in the wing tips were handled using superglue. Apply
the superglue, then accelerator then sand. You'll probably have to repeat this
process, but the key is to sand as soon after applying the accelerator as you
can. Here is an image of what it looks like after you are done. This image is
the rear spinner section.
![]() Meanwhile,
I tackled the fuselage. For this, I cemented the halves together and t
Meanwhile,
I tackled the fuselage. For this, I cemented the halves together and t![]() hen
clamped them. Using a knife blade, I applied the superglue to the seams and also
to a few holes I found in the rudder. These areas were then sanded smooth and
primed to show any additional work needed. Naturally, there was some so
I used Mr. Surfacer 500 to handle the gaps and then
reprimed the seams. You'll note that no interior parts have been added.
I'll do that after the basic airframe is together. If you want to add a lot of
detail to the cockpit, you will need to work on that prior to closing the
fuselage, but all I'm adding are an instrument panel, control stick, and
seat.
hen
clamped them. Using a knife blade, I applied the superglue to the seams and also
to a few holes I found in the rudder. These areas were then sanded smooth and
primed to show any additional work needed. Naturally, there was some so
I used Mr. Surfacer 500 to handle the gaps and then
reprimed the seams. You'll note that no interior parts have been added.
I'll do that after the basic airframe is together. If you want to add a lot of
detail to the cockpit, you will need to work on that prior to closing the
fuselage, but all I'm adding are an instrument panel, control stick, and
seat.
During all the drying that is needed, I cleaned up the
rest of the kit parts including the prop blades and the wheels. I also cleaned
up the landing gear in case the Italeri ones I plan on using don't work. The
wheels need to have the tread rescribed after removing
 the seam. The hole in one
of them will be on the bottom so not seen. For that reason, I didn't fill it.
the seam. The hole in one
of them will be on the bottom so not seen. For that reason, I didn't fill it.
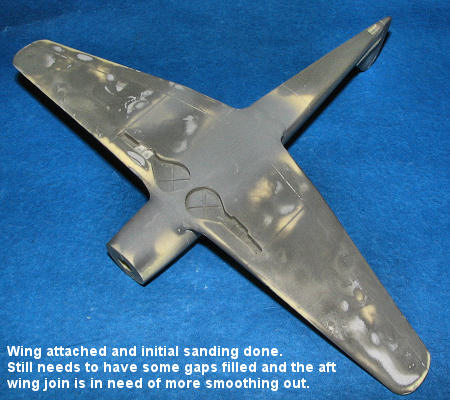
It was now time to attach the wings. I lined things up as carefully as I could and then just tacked the front and rear in place on the fuselage. After a bit more fiddling, I added more super glue to hold the wing in place. When all was dry, I sanded the join areas . A few areas will need some additional filler and there is a step at the rear wing fuselage join that I wasn't able to totally remove. While tackling that, I added the tail planes and glued the fan into the forward spinner. I also cleaned up the prop blades in preparation for painting.
Back in the interior, I robbed the seat, control stick and instrument panel from an Italeri 1/72 FW-190D-9 kit. I had to trim the instrument panel to fit and overdid it a bit, but better than a blank wall. I also trimmed one of the vac canopies and found the fit to be excellent. Helps that the canopy isn't very large! The interior was painted RLM 66 Dark Grey and then the canopy attached using white glue. It was masked with Tamiya tape and then it was time to consider some painting.
| COLORS & MARKINGS |
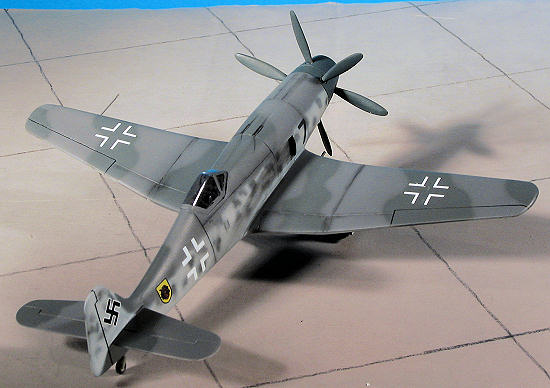
Nice thing about Luft '46 is that you can pretty well
paint it how you want. However, in this case, I decided to stick wit the colors
it would have worn in 1943/44 when it might have entered service.
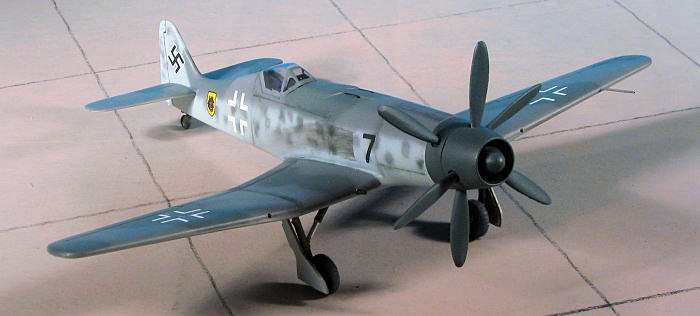
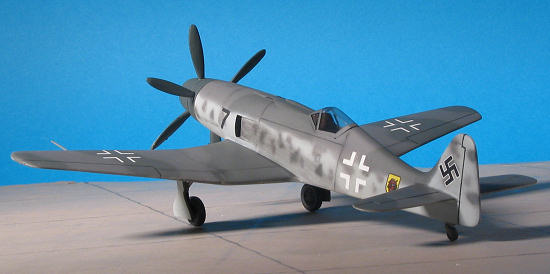
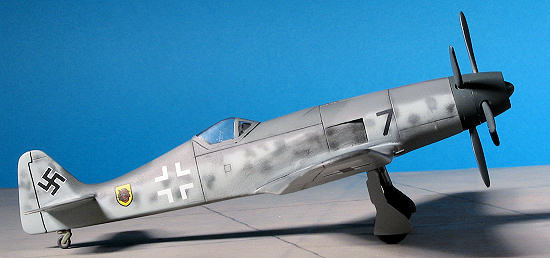
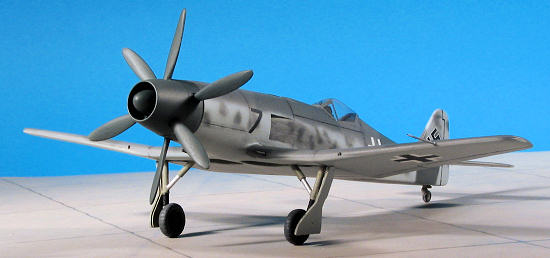
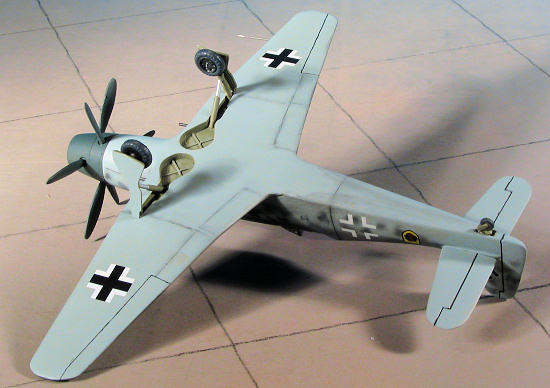
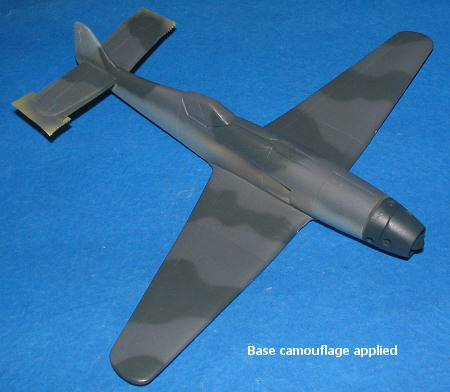 Standard
RLM 74/75/76 with an RLM 70 spinner and props. The pattern was not your usual
splinter but something a bit more free-flowing. The side was mottled with RLM 74
and RLM 75. I should mention that I used my
Skybow AB 100 detail airbrush to do
the camo scheme and it allowed a superlative fine line to the scheme. It also
allows a broad enough pattern to fill in the sections after doing the outlines.
A really great airbrush.
Standard
RLM 74/75/76 with an RLM 70 spinner and props. The pattern was not your usual
splinter but something a bit more free-flowing. The side was mottled with RLM 74
and RLM 75. I should mention that I used my
Skybow AB 100 detail airbrush to do
the camo scheme and it allowed a superlative fine line to the scheme. It also
allows a broad enough pattern to fill in the sections after doing the outlines.
A really great airbrush.
Back to the bench to put it on its landing gear. After
much angst, I decided to use the resin landing gear on this one instead of
robbing plastic ones. If it sags in a year or so, I can always replace them. The
mounting holes need to be enlarged for the main gear legs, though the ones for
the retraction strut are just fine. There is not much forward angle available so
the struts stick pretty much straight down. However, this is Luft '46. The plane
never made it beyond paper so the egg-spurts can whine and fuss all they want
 about "correct gear alignment" as they'll never be able to produce a photo for
proof!
about "correct gear alignment" as they'll never be able to produce a photo for
proof!
The gear and wells were painted RLM 02 with black oleo protective boots. I then sprayed the model with clear gloss prior to choosing decals.
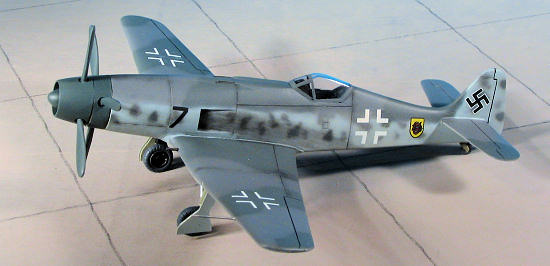
While the kit markings will probably work just fine, I chose to use Eagle Strike 72-067: FW-190 Insignia. I'm not sure of availability of this sheet as it was produced several years back and things like this tend to sell out quickly. The 9./JG 54 unit badge and aircraft number came from a couple of old Almark sheets that I have for Bf-109s. Just to see how the kit decals performed, I tried one out on a test section of plastic and they worked just fine. The aircraft was then wiped down and sprayed with Vallejo Matte Clear as my flat base had dried up so I couldn't use my usual flat Future! At least with the Vallejo, I just put a few drops in the bottom of my airbrush and replenished it from the eye-dropper type bottle. Actually, quite an easy thing to do.
| FINAL CONSTRUCTION |
 I did a
bit more painting on the gear legs by adding bright aluminum to the retraction
struts. Then the wheels were installed. These fit quite well after a bit of
trimming of the axle stubs. They are also for early FW-190s and may not be
appropriate for this aircraft. The Italeri kit ones for the later 190D were not
well done so I used the kit ones. I also had to trim the gear doors. They are
way too long for the gear legs, though they do fit into the well openings if you
want to do it gear up. The upper section was trimmed about 1/8 inch or so and I
also trimmed the bottom straight across. This is because the gear legs are also
not at the same angle as the FW-190 due to how they fit in the wheel wells.
After the trimming, they do look quite a bit better. I then cemented the props
in place and cut some fine tubing for the wing root gun barrels and a pitot
tube. Then I used some pastels to outline the few panel lines and provide some
convincing exhaust soot. The model was then given another coat of matte clear to
seal in the pastels. Finally, the gun barrels were painted and the masking
removed from the canopy and the model was complete.
I did a
bit more painting on the gear legs by adding bright aluminum to the retraction
struts. Then the wheels were installed. These fit quite well after a bit of
trimming of the axle stubs. They are also for early FW-190s and may not be
appropriate for this aircraft. The Italeri kit ones for the later 190D were not
well done so I used the kit ones. I also had to trim the gear doors. They are
way too long for the gear legs, though they do fit into the well openings if you
want to do it gear up. The upper section was trimmed about 1/8 inch or so and I
also trimmed the bottom straight across. This is because the gear legs are also
not at the same angle as the FW-190 due to how they fit in the wheel wells.
After the trimming, they do look quite a bit better. I then cemented the props
in place and cut some fine tubing for the wing root gun barrels and a pitot
tube. Then I used some pastels to outline the few panel lines and provide some
convincing exhaust soot. The model was then given another coat of matte clear to
seal in the pastels. Finally, the gun barrels were painted and the masking
removed from the canopy and the model was complete.
| CONCLUSIONS |
 Gosh, I
really love to do models like this. Perhaps I'm odd, but to me, it is more fun
to build a short run kit than to do a superbly engineered Tamiya or other
similar model. Probably because the skill levels are more challenging, but
probably because rather than yet another 1/48 FW-190, I've done something few
will tackle.
Gosh, I
really love to do models like this. Perhaps I'm odd, but to me, it is more fun
to build a short run kit than to do a superbly engineered Tamiya or other
similar model. Probably because the skill levels are more challenging, but
probably because rather than yet another 1/48 FW-190, I've done something few
will tackle.
I'm especially pleased that the pinhole situation was so easily handled as I've had these turn into a real nightmare. The rest of the kit went together well without any real surprises and the result is something that is quite cool. Give it a try.
October 2006
#1435 in a series
My thanks to Cape Hobby and Gifts for providing the review kit. If you want one, visit them at their link. You won't find them anywhere else.
If you would like your product reviewed fairly and fairly quickly, please contact the editor or see other details in the Note to Contributors.