Just Fantasy 1/48 von Braun Interceptor
|
KIT # |
4802 |
|
PRICE: |
$ |
|
DECALS: |
one aircraft |
|
REVIEW : |
|
|
NOTES: |
Resin with vac and decals. Includes trailer |
|
ALTERNATE HISTORY |
This was the big day. The first attempt at breaking the speed of sound. Just the thought of being the first one to do this sent chills up the spine of test pilot Hans Grundig. He had an immense trust in the designer, the famed Werner von Braun. After all, it was von Braun's A-4 missile along with the successful implementation of several other 'wonder weapons' that had changed the course of the war and caused the allies to offer a cease-fire. Perhaps it was the devastation of Allied bases in the UK that had done it, but Hans felt that it was more the destruction of the French Channel and Riviera ports and the inability of the Allies to get in supplies following the Normandy invasion that did it. Whatever the reason, the Germans still held central Europe as well as the Scandinavian states, so some of their early conquests still held up.
The A-4 and longer range versions were also used to cause grievous damage to Moscow and Leningrad from bases in Finland. Having one hit the Kremlin and kill Josef Stalin and most of his henchmen was pure serendipity. The new leader of the Soviets was much more of a pacifist and agreed to a truce where both the Soviets and Germany went back to their old pre-war borders. The Germans did get to keep the Baltic states, which was very much in their favor. It also meant that the Hungarians and Rumanian forces were free to operate in the Balkans, helping to stalemate the Allies in Italy. The Italian peninsula was now divided into a north and a south with the pro-German government of Mussolini in charge of the northern half.
 But, that was two years ago in 1944.
Getting back to the business at hand, Hans has successfully flown the VB P.2084 in several drop tests and on limited power. The
rocket was a real powerhouse, even at low operating levels and was surely enough
to push the plane to the sound barrier. Already he had flown it at 600kph and
the airframe was stable enough though it did have a tendency to porpoise a bit
at high angles of attack. Hans was also a bit worried about the fuel. Having all
that explosive alcohol and liquid oxygen behind him wasn't exactly his idea of
fun, but it did provide the required power and was easy to make. Other fuels
were being developed, but they had their down side as well.
But, that was two years ago in 1944.
Getting back to the business at hand, Hans has successfully flown the VB P.2084 in several drop tests and on limited power. The
rocket was a real powerhouse, even at low operating levels and was surely enough
to push the plane to the sound barrier. Already he had flown it at 600kph and
the airframe was stable enough though it did have a tendency to porpoise a bit
at high angles of attack. Hans was also a bit worried about the fuel. Having all
that explosive alcohol and liquid oxygen behind him wasn't exactly his idea of
fun, but it did provide the required power and was easy to make. Other fuels
were being developed, but they had their down side as well.
Initial testing under power had been done by using a V-1 test site here at Peenemunde and being boosted off by an auxiliary rocket. Gets you up to speed fast enough, but one is always worried about strain from the initial boost. A He-177 bomber was modified to carry the P.2084 in a modified bomb bay. This way, the aircraft wouldn't be using fuel getting up to an altitude where the air was properly thin for high speeds. Much better to have that 10,000 meter head start!
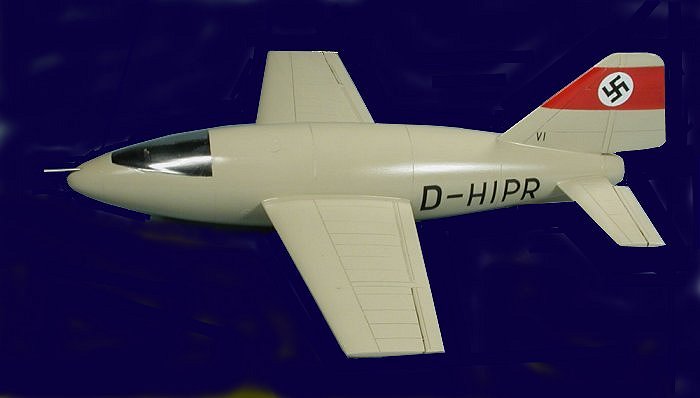
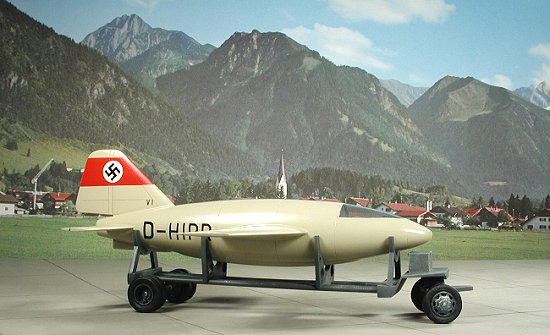
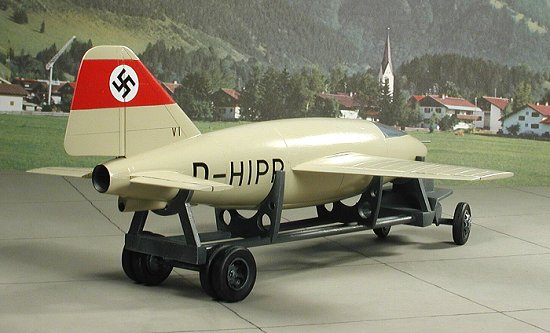
Time to climb into the aircraft. Looking at the cream colored plane with its civil markings and red tail band, Hans always wondered why this thing wasn't carrying military markings. After all, everything around the project was handled by the military. Guess it is better propaganda to have people think it is a civilian effort. Once bolted in place in the cockpit and as comfortable as he could be in this darned pressure suit, the plane was towed under the He-177 and then attached to the shackles in the bomb bay.
Once all the connections were properly checked, the engines of the 177 were started and the combo taxied out to the runway. The engines were properly warmed up, then at full throttle and the plane slowly gained speed. Hans could see darn little in the cockpit and had to rely on the guys in the 177 to let him know how things were going. Slowly the bomber climbed up to the drop altitude of 10,000 meters. Once drop altitude was reached, Hans went over the instruments for a final check. All the pressures and temperatures seemed fine. He called to the men in the cockpit that he was ready and to give him a countdown to drop.
 3 -- 2 -- 1 -- Drop! The small plane fell away from the He-177 and Hans flipped
the switch that would fire the booster rocket. With a roar the small rocket lit
off and he was roughly pushed back in his seat by the acceleration. Clearing the
177, he pulled the nose up and reached for the two switches on the left
instrument panel that would fire off the main engine.
3 -- 2 -- 1 -- Drop! The small plane fell away from the He-177 and Hans flipped
the switch that would fire the booster rocket. With a roar the small rocket lit
off and he was roughly pushed back in his seat by the acceleration. Clearing the
177, he pulled the nose up and reached for the two switches on the left
instrument panel that would fire off the main engine.
Straining to reach them against the acceleration of the booster, he lifted the red covers and engaged the main engine switches. The result was an instantaneous increase in noise from the engine and a further increase in pressure on his chest. He quickly shot up watching the altimeter go past 18,000 meters as he put the plane into level flight. The aircraft accelerated even more quickly than before. Eyes fixed on the air speed indicator, he watched it go to 800, then 900, then 1,000.
Still the aircraft continued to accelerate and started to become rather difficult to control. There was a rather severe buffeting as the needle crept towards 1,100 kph. As the buffeting continued to increase to a level he though he could not control, it suddenly became a great deal quieter and the buffeting seemed to decrease significantly. He looked at the air speed indicator and saw that it was very near, and now exceeding 1,100 kph. He had done it!
Just then, the engine sputtered and stopped. Hans got out a red grease pencil and marked the ultimate speed that was reached during his flight. He knew in his heart that he had finally broken through the sound barrier. During the long glide back to Peenemunde, he wondered how history would view this day. Would he be famous? Or would the military keep his accomplishments secret? He sincerely hoped it would be the former, for a great step forward had been made in manned flight.
|
BACKGROUND |
Please visit the preview for more information on the kit itself.
|
CONSTRUCTION |
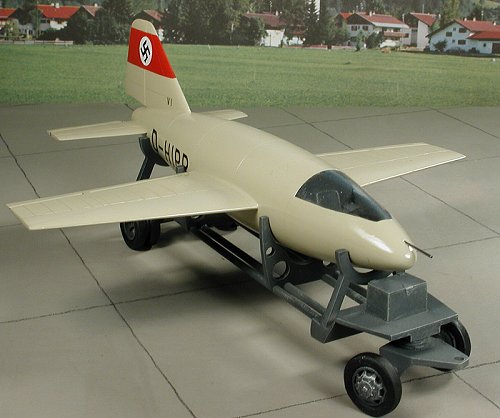
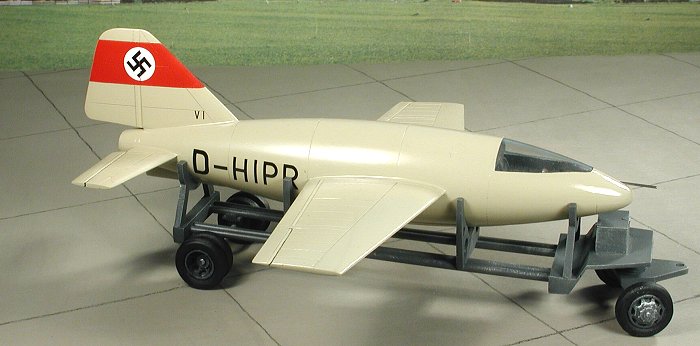
Construction of this kit can go in two parallel builds. One for the aircraft and one for the ground handling trolley. Once the various parts were cleaned up all of the bits for the cockpit were glued in. This included the control stick, rudder pedals and the instrument panel. Then the fuselage halves had the resin attachment points removed. These and the cockpit were then painted RLM 66 dark grey.
Meanwhile, the fore and aft sections of the handling trolley were cleaned up. The main framework is four pieces of plastic tubing. There are holes drilled in the fore and aft sections to accept this tubing. The front section was glued first, then when dry, their lengths were made equal by a touch of trimming and then glued to the aft section. Next, there forward support frame and tool box were glued in place.
 Then the
rear axle mounts were attached along with the rear axle. In the front, the axle
was threaded through the holes in the swivel section and glued in place. Then
the front wheels were sanded down and glued on the axles. The actual axle
attachment points are really too long so you'll need to carefully trim those
down until the wheels fit properly. In all fairness, I'd have to say that the
wheels on this kit are not really up to the standards of the rest of it.
Actually, it is the tire detail that is not very good. The wheels themselves are
quite nice, but the tires have some air bubbles in them and the tread is not
good. Filling the air bubbles isn't hard, but for me, regrooving the tires
turned out to be a frustrating experience.
Then the
rear axle mounts were attached along with the rear axle. In the front, the axle
was threaded through the holes in the swivel section and glued in place. Then
the front wheels were sanded down and glued on the axles. The actual axle
attachment points are really too long so you'll need to carefully trim those
down until the wheels fit properly. In all fairness, I'd have to say that the
wheels on this kit are not really up to the standards of the rest of it.
Actually, it is the tire detail that is not very good. The wheels themselves are
quite nice, but the tires have some air bubbles in them and the tread is not
good. Filling the air bubbles isn't hard, but for me, regrooving the tires
turned out to be a frustrating experience.
With the trailer pretty far along, I returned back to the fuselage. The cockpit was gussied up with some drybrushing and a few dabs of colored paint. It was then installed into the nose. No problems. The fuselage halves were then glued together. Fit is quite good. It was then I noticed that I must have gotten a bit overenthusiastic with the sandpaper (a major fault of mine and resin/vac kits) as the nose area had a rather large gap. No worries as it was filled with superglue and sanded smooth. I needed filler for the seam so started out with a healthy dollup of Mr. Surfacer 500 and when dry and sanded down, remaining gaps were attacked with my usual filler. I find the two colors quite helpful in filling gaps.
With the fuselage now together, I installed the exhaust piece. A simple job as it just slides in the back. Then I got the fin ready to glue in place. Once the join area was relatively smooth, I drilled a hole in the middle of the mount area and inserted a section of paper clip. A hole was also drilled in the fuselage to accept it. It just adds that extra bit of security.
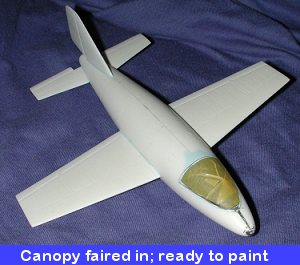
 Turning to the nose section, the anti-glare panel was trimmed and fit into
place. Then one of the two vac canopies was cut out and after much trimming, was
ready to install. I made sure that the anti-glare panel was depressed a small
amount when glued in place. This will allow for a fairly flush canopy
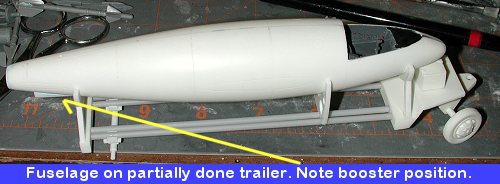
installation. Returning to the aft section, the booster rocket mount was glued
on the lower section. The drawing doesn't have it go all the way to the back,
but is about a scale foot or two forward of that position. It was glued in place
and the gaps filled and sanded.
Turning to the nose section, the anti-glare panel was trimmed and fit into
place. Then one of the two vac canopies was cut out and after much trimming, was
ready to install. I made sure that the anti-glare panel was depressed a small
amount when glued in place. This will allow for a fairly flush canopy
installation. Returning to the aft section, the booster rocket mount was glued
on the lower section. The drawing doesn't have it go all the way to the back,
but is about a scale foot or two forward of that position. It was glued in place
and the gaps filled and sanded.
Then the fuselage was used to
position the middle mounts on the trailer. It seems that they should be
positioned in such a  way as not to interfere with the wing. It took quite a bit
of fiddling to get things just where I wanted them. Actually, I only glued on
the front mount as it was forward of where the wing would go. At this time, I
cleaned up the rear 'dualies' and glued the inner and outer wheel together. The
fit of the inner wheel was a bit sloppy, but the super glue held. As I mentioned
earlier, the wheels are not the high point of the kit. Not sure if there are
1/48 replacements available, but if there are, and you are into contests, I'd
recommend replacing them. For the rest of us, they'll do just fine. These were
then glued onto the rear axles after the axles were trimmed a bit.
way as not to interfere with the wing. It took quite a bit
of fiddling to get things just where I wanted them. Actually, I only glued on
the front mount as it was forward of where the wing would go. At this time, I
cleaned up the rear 'dualies' and glued the inner and outer wheel together. The
fit of the inner wheel was a bit sloppy, but the super glue held. As I mentioned
earlier, the wheels are not the high point of the kit. Not sure if there are
1/48 replacements available, but if there are, and you are into contests, I'd
recommend replacing them. For the rest of us, they'll do just fine. These were
then glued onto the rear axles after the axles were trimmed a bit.
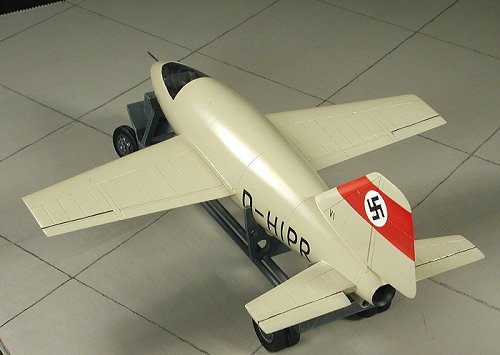
Returning to the rocket itself, All of the control surfaces were cleaned up as best as I could get them. Then they all had holes drilled in them to accept small lengths of paper clip (except the fin, which had already been done). The fin was then glued in place with super glue and made as straight as possible. After that the wings and tail planes were glued in place. I'm pretty horrible at getting things to butt up perfectly, so where all the flying surfaces touched the fuselage needed filler.
 While all that was drying the final brace was glued onto the trailer and it was
taken off to be painted. From most of the images I have seen of airfield support
equipment, RLM 66 dark grey seems to be the color of choice. So it was that
color that I painted the handling trailer.
While all that was drying the final brace was glued onto the trailer and it was
taken off to be painted. From most of the images I have seen of airfield support
equipment, RLM 66 dark grey seems to be the color of choice. So it was that
color that I painted the handling trailer.
Back at the aircraft, the worst, to me, part of the kit got underway. That was cutting out and fitting the canopy. This canopy is very streamlined and after an hour or so of careful trimming and test fitting, it was glued in place. It was then masked off, leaving a small frame around the edge. The entire area where the canopy joins was then puttied to make it as smooth as possible. I figured that if this thing was to be flying as fast as designed, it would need a tight fitting canopy. After a few applications and some more sanding, the canopy was as good as I could get it. During all that sanding, some of the protective tape had been sanded through, scratching the canopy. The tape was completely removed and the canopy polished as best that could be done. Then the canopy was remasked.
|
PAINT & DECALS |
 With a resin kit, I always use a primer coat. It shows up any glitches and
provides the paint a surface it can adhere to. Most resin kits have some amounts
of residue in the engravings that you can't see when the kit is the normal light
buff color. The primer shows up any of those spots so they can be attended to. A
simple swipe or two with a hobby knife is all that is needed. The kit is then
reprimered. It also showed up my biggest problem with resin kits and that is
over-sanding. I managed to do just that on the nose and got a bunch of tiny air
bubbles. It took many applications of Mr.Surfacer and reprimering to get rid of
most of them. I also drilled a hole for a stainless steel pitot tube. It is
deliberately off center as I planned for another probe, but ran out of time.
With a resin kit, I always use a primer coat. It shows up any glitches and
provides the paint a surface it can adhere to. Most resin kits have some amounts
of residue in the engravings that you can't see when the kit is the normal light
buff color. The primer shows up any of those spots so they can be attended to. A
simple swipe or two with a hobby knife is all that is needed. The kit is then
reprimered. It also showed up my biggest problem with resin kits and that is
over-sanding. I managed to do just that on the nose and got a bunch of tiny air
bubbles. It took many applications of Mr.Surfacer and reprimering to get rid of
most of them. I also drilled a hole for a stainless steel pitot tube. It is
deliberately off center as I planned for another probe, but ran out of time.
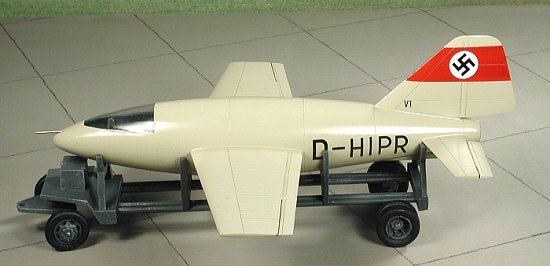
For this particular plane, I wanted the pre WWII red tail band. After all, it was supposedly a civilian plane. Not wanting to trust this to decals, the tail was painted white and when dry, Insignia red was sprayed over it. When that was dry, it was masked off. Then the entire airframe was painted a light tan or cream color. I used a number of enamel paints mixed together to do this. I could have easily used RLM 02 or some other 'approved' RLM shade, but decided against it.
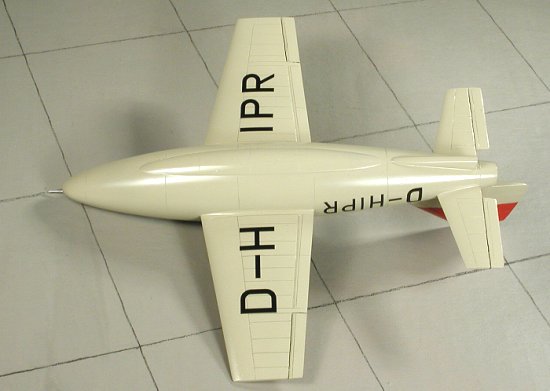 WIth the airframe done, it was time to get decals. Now this was not
'officially' a military aircraft so it needed civil markings. Rummaging through
the decal stash (a rather time consuming job), I found some old kit decals and a
Modeldecal sheet that had what I was looking for. Unfortunately, there were not
enough 'D's for the upper wing. The Modeldecal sheet was for postwar RAF
lettering and the D is the wrong shape. Wartime Ds are the right shape, but
there were no black code letters on RAF planes! Anyway, there were enough for
under the wing and for the fuselage. I made up a phoney registration 'D-HIPR'
(as in hyper-speed). I didn't use a 'Y' vice the 'I' as I couldn't find one
large and skinny enough to match the rest of the lettering on the wing. Knowing
my luck. I'll have ten people tell me of German civil lettering sheets!! I also
added a small 'v1' to the tail as it normal with some prototypes.
WIth the airframe done, it was time to get decals. Now this was not
'officially' a military aircraft so it needed civil markings. Rummaging through
the decal stash (a rather time consuming job), I found some old kit decals and a
Modeldecal sheet that had what I was looking for. Unfortunately, there were not
enough 'D's for the upper wing. The Modeldecal sheet was for postwar RAF
lettering and the D is the wrong shape. Wartime Ds are the right shape, but
there were no black code letters on RAF planes! Anyway, there were enough for
under the wing and for the fuselage. I made up a phoney registration 'D-HIPR'
(as in hyper-speed). I didn't use a 'Y' vice the 'I' as I couldn't find one
large and skinny enough to match the rest of the lettering on the wing. Knowing
my luck. I'll have ten people tell me of German civil lettering sheets!! I also
added a small 'v1' to the tail as it normal with some prototypes.
Once the decals were on and dry, many coats of Future (clear gloss acrylic) were applied (by brush, believe it or not) as these planes would naturally be waxed to a gloss for speed attempts.
|
FINAL BITS |
Actually, there aren't that many. The pitot tube was glued in place, the masking removed and the exhaust painted. It's a prototype record plane and doesn't need wing lights and other things like that. I also painted the wheels on the trailer flat black. Normally I'd use RLM 66 but since that is the color of the trailer, it would look very monotone. The trailer was drybrushed with some lighter grey and aluminum to scuff it up a bit, and that was it!
|
CONCLUSIONS |
Other than the canopy (which is my own cross to bear), and the tires on the trailer wheels, the kit is really super. It is very well molded, goes together pretty quickly, and makes for a most interesting and unusual item to add to your display case. In my opinion, the products of Pend Oreille are among the best resin kits you can buy.
February 2002
Copyright ModelingMadness.com. All rights reserved.
Review copy courtesy of Pend Oreille. Who is now long out of business.
If you would like your product reviewed fairly and fairly quickly, pleasecontact the editor or see other details in the Note to Contributors.
Back to Reviews Page 2017