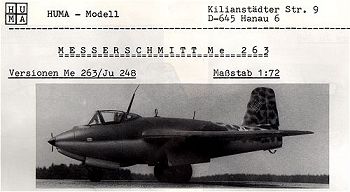
Huma 1/72 Ju-248/Me-263
Kit # 2507
Price: $25.95 MSRP
Decals: Two versions; the Ju-248 and Me-263v1
Date of Review: 9 January 1999
Review and Photos by:
Scott Van Aken
The Me-263 was a design improvement of the Me-163 Komet rocket fighter. The largest drawbacks to the 163 were short duration as well as poor landing and takeoff characteristics. Of the latter, the 163 used a droppable wheel assembly and landed on skids, which had a very long landing 'roll' and required special equipment to pick up the aircraft. It was also very difficult to land and tended to 'float' for a long distance; requiring the aircraft to literally be flown onto the landing field. The duration problem was relieved by increasing the size of the airframe, and therefore the amount of fuel it could carry. The landing and take-off was improved by adding real landing gear...with wheels. The greater weight of the aircraft and a parabrake helped its landing performance.
However, Messerschmitt had a problem. It had no available space to develop the 263. The development was given to Junkers and the aircraft was called the Ju-248. Once the aircraft was built and tested by Junkers, it was given to Messerschmitt for final testing. Thanks to the ability to use the wings and tail assembly of the 163, the 263's production was well underway when hostilities closed. The only 263 to fly was the prototype built by Junkers and later handed over to Messerschmitt. Differences between the Ju-248 and Me-263 are very minor and the only external clue is that the Me-263 had full main gear doors.
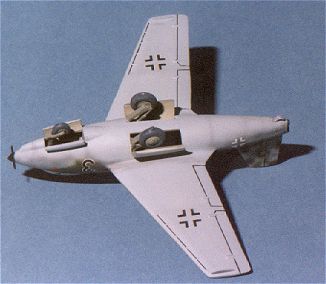
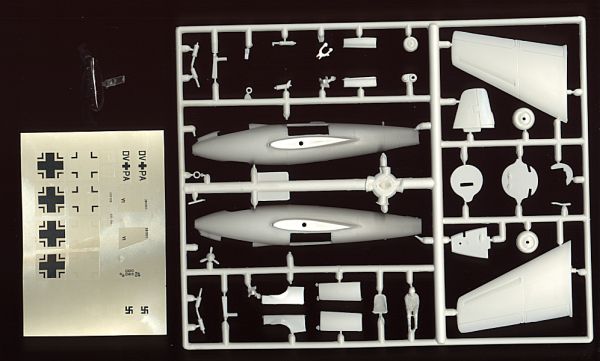 Huma's kit
of the 263 is very typical of its early releases. It comes on a single
sprue of soft, white plastic with a single clear canopy. The parts are finely
engraved and suffer a bit from flash. Trailing edges of the wings and stabilizer
are so sharp that you could cut yourself on them. Instructions are a single
large sheet with photographs of the real aircraft as well as a color diagram and
several exploded views to assist in construction. The cockpit photos are quite
good and can be used to super detail the interior, should you wish. Downside of
the color diagram is the upper view is split into upper on the right and lower
on the left. As a result, one does not get a full upper view for the camo.
Colors are pretty standard RLM 74/75/76. Also included is a decal sheet (with
swastikas) giving both markings for the 248 and 263. The insignia look a
bit fat from what is the norm for the time. The decals are also very matte. The
image on the instruction sheet above is not of a Huma kit, but of one built in
1/12 scale that was featured in a Monogram Aviation Publications Camouflage
book!!
Huma's kit
of the 263 is very typical of its early releases. It comes on a single
sprue of soft, white plastic with a single clear canopy. The parts are finely
engraved and suffer a bit from flash. Trailing edges of the wings and stabilizer
are so sharp that you could cut yourself on them. Instructions are a single
large sheet with photographs of the real aircraft as well as a color diagram and
several exploded views to assist in construction. The cockpit photos are quite
good and can be used to super detail the interior, should you wish. Downside of
the color diagram is the upper view is split into upper on the right and lower
on the left. As a result, one does not get a full upper view for the camo.
Colors are pretty standard RLM 74/75/76. Also included is a decal sheet (with
swastikas) giving both markings for the 248 and 263. The insignia look a
bit fat from what is the norm for the time. The decals are also very matte. The
image on the instruction sheet above is not of a Huma kit, but of one built in
1/12 scale that was featured in a Monogram Aviation Publications Camouflage
book!!
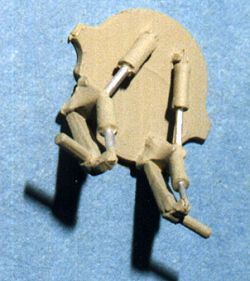 The
parts are numbered in a general sequence of construction. The first part I
did was the main gear. This is constructed on a bulkhead that is then
inserted in a fuselage half prior to gluing the halves together. Really,
there is no way to build up the gear once the fuselage is cemented together.
The construction of this needs a bit of dry fitting as there are rather
heavy mold marks on all parts. In fact, during cleanup, I broke one of the gear
retraction assemblies :( Once the assembly was built, it was painted RLM02
grey. It was then cemented into one fuselage half.
The
parts are numbered in a general sequence of construction. The first part I
did was the main gear. This is constructed on a bulkhead that is then
inserted in a fuselage half prior to gluing the halves together. Really,
there is no way to build up the gear once the fuselage is cemented together.
The construction of this needs a bit of dry fitting as there are rather
heavy mold marks on all parts. In fact, during cleanup, I broke one of the gear
retraction assemblies :( Once the assembly was built, it was painted RLM02
grey. It was then cemented into one fuselage half.
Next the interior. It is pretty plain with only a seat, stick and instrument panel. These components are cemented on to the floor and then cemented to a rear bulkhead, which is then cemented to a fuselage half. It really could benefit from some detail work. Needless to say, I was rather lazy and just left it as it was. The cockpit was painted RLM 66 dark grey as was the surrounding area. The kit supplied an instrument decal that was placed onto the panel and then snuggled down with some Champ setting solution. The decal was a bit off register, but looks better than a blank panel.
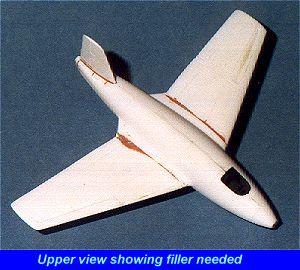
Cementing together the fuselage halves was the next step. Before doing that, a weight was superglued behind the cockpit bulkhead. There was some warp in the halves so the front was glued first. Then I noticed a problem. The panel lines didn't match up between left and right. So it was decision time. What was more important; a square fuselage or matched panel lines. The square fuselage won out. Once glued together and dry, the seams were puttied and then sanded.
 |
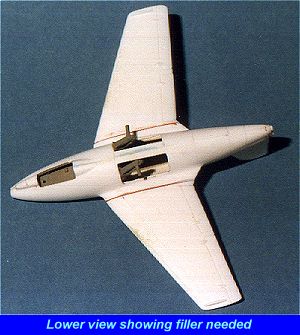 |
Then the wings were attached. The fit is good, but not great. One needs to make sure they are square with each other. It is at this time that I noticed the landing gear were not square with the wings. Hmmm....Decision time again. What's more important; wings level with the ground and cockpit/tail askew or the whole airframe square with the gear askew. The airframe won out. Have to figure out a way around the landing gear problem as it really isn't something one can add on after the airframe is together. Anyway, after the wings were dry it was putty time again. This is one of Huma's early kits and not as refined as later versions.
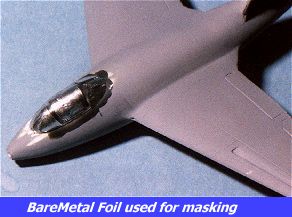 After the wings were done, the tail was
glued on and it was time to add the cockpit. Fit here is not good,
especially in the front, so some white glue was used to fill the gap. Then
it was masked with Bare Metal Foil. First time I have tried this material
for masking and the end results were very good, with no seepage at all. Then it
was time for painting. Since I wasn't doing the prototype (more on this
later), the colors of RLM 75 Grey and RLM 83 dark green over RLM 76 were used, a
typical late war paint scheme. All colors by Aeromaster the upper colors
were masked. Once dry, the sides and tail were mottled in 75 and 83.
After the wings were done, the tail was
glued on and it was time to add the cockpit. Fit here is not good,
especially in the front, so some white glue was used to fill the gap. Then
it was masked with Bare Metal Foil. First time I have tried this material
for masking and the end results were very good, with no seepage at all. Then it
was time for painting. Since I wasn't doing the prototype (more on this
later), the colors of RLM 75 Grey and RLM 83 dark green over RLM 76 were used, a
typical late war paint scheme. All colors by Aeromaster the upper colors
were masked. Once dry, the sides and tail were mottled in 75 and 83.
Next step was to overcoat the paint with Future to give a gloss for the decals. I should mention that between each color, the paint was allowed a minimum of 24 hours to dry and before the Future, 48 hours to ensure proper curing of the paint. Once the gloss coat was dry, the nose landing gear was assembled and installed. Not a particularly good fit, but a bit of shaving here and there got all in there OK. Then the wheels were installed. Now the offcamber main gear reared its ugly head. No real cure for this so I sanded on the bottom of one main wheel and added a bump on the other to level the kit. It really isn't that noticeable. Finally the gear doors, antenna and nose prop for the electrical system were installed. My attempts at cleaning up the DF loop antenna only resulted in it breaking into many pieces so it was left off.
 |
 |
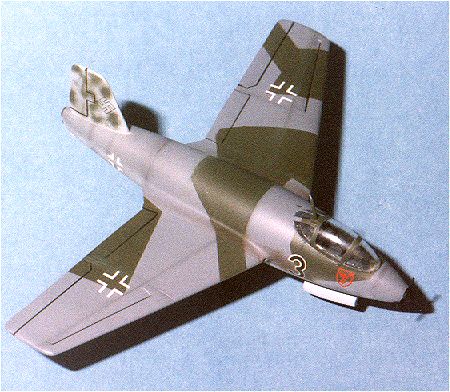
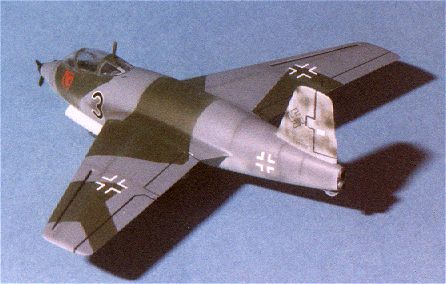
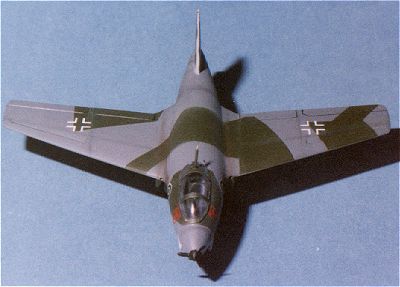 Originally,
I wanted to do a prototype, but the decals were just terrible. Not only
were they horribly off register, they just plain wouldn't conform to the kit and
were destroyed by any attempt to use setting solution. Oh well. Fortunately,
several sheets of Microscale and Xtradecal sheets were available for the
insignia and an old FW-190A sheet provided the number and unit markings. So, I
have an Me-263A of JG 3 'Udet' circa September 1945!
Originally,
I wanted to do a prototype, but the decals were just terrible. Not only
were they horribly off register, they just plain wouldn't conform to the kit and
were destroyed by any attempt to use setting solution. Oh well. Fortunately,
several sheets of Microscale and Xtradecal sheets were available for the
insignia and an old FW-190A sheet provided the number and unit markings. So, I
have an Me-263A of JG 3 'Udet' circa September 1945!
Final impression of the kit now that it is done is not at all bad. I have built much worse and most of the fit problems were anticipated as they are typical of early Huma kits. The real surprise were the decals as they have been OK on other Huma kits I have built. Frankly it was the subject that drew me to building this kit. Not exactly a 'slammer', but a nice kit that will add to my collection of unusual and prototype Luftwaffe aircraft.
Copyright Modeling Madness.com. All rights reserved. No reproduction in part or in whole without express permission from the editor.
Back to Reviews Page 2016