Cyberhobby 1/32 Bf-110C-7
| KIT #: | 3203 |
| PRICE: | $109.00 SRP |
| DECALS: | Two options |
| REVIEWER: | Scott Van Aken |
| NOTES: | Initial release |
| HISTORY |
The Messerschmitt Bf 110, often known unofficially as the Me 110, is a twin-engine Zerstörer (Destroyer, heavy fighter), fighter-bomber (Jagdbomber or Jabo), and night fighter (Nachtjäger) developed in Nazi Germany in the 1930s and used by the Luftwaffe during World War II. Hermann Göring was a proponent of the Bf 110, believing its heavy armament, speed, and range would make the Bf 110 the Luftwaffe’s premier offensive fighter. Early variants were armed with two MG FF 20 mm cannon, four 7.92 mm (.312 in) MG 17 machine guns, and one 7.92 mm (.312 in) MG 15 machine gun for defence (later variants would replace the MG FFs with MG 151s and the rear gunner station would be armed with the twin-barreled MG 81Z). Development work on an improved type to replace the Bf 110 - the Messerschmitt Me 210 - began before the war started, but its teething troubles resulted in the Bf 110 soldiering on until the end of the war in various roles. Its intended replacements, the aforementioned Me 210 and the significantly improved Me 410 Hornisse never fully replaced the Bf 110.
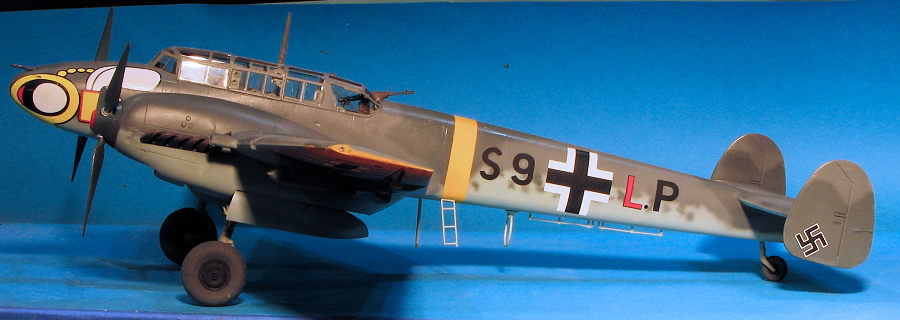
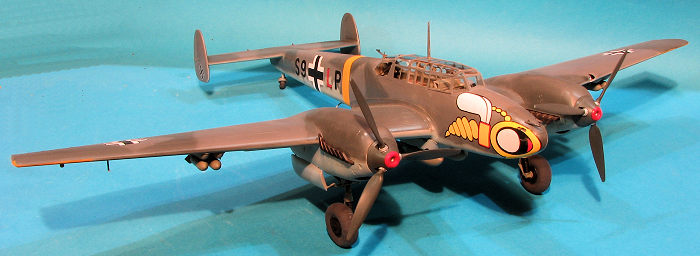
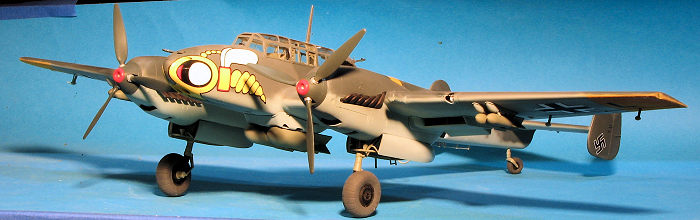
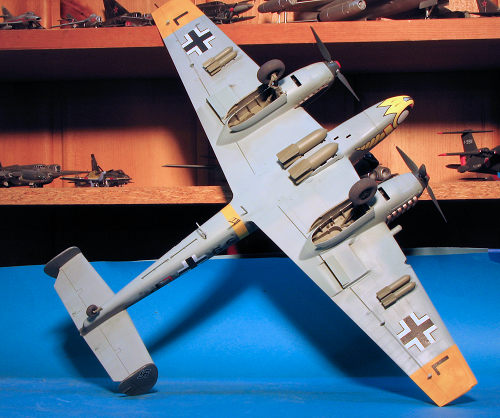
The first fully capable production version was the Bf-110C. This aircraft was built in several variations with each one having improved equipment, capabilities or engines. The C-7 variant was a specially built fighter-bomber based on the earlier C-4/B, with the main visual difference being the large lower fuselage bomb rack capable of carrying two 1,000 kg bombs as well as outer wing bomb racks for four smaller weapons.
| THE KIT |
 Many
modelers felt that Dragon screwed the pooch with their 1/32 Mustang kits. There
were a number of problems with the shape of some parts, but most of all it was
the aggressive surface detailing that caused the most fuss. Though the kit has
sold well, it could have done better.
Many
modelers felt that Dragon screwed the pooch with their 1/32 Mustang kits. There
were a number of problems with the shape of some parts, but most of all it was
the aggressive surface detailing that caused the most fuss. Though the kit has
sold well, it could have done better.
This time around, Dragon seems to have done everything right. Gone is the Trumpeter-like surface detailing, leaving something more like what Hasegawa might have done and that is a very good thing. The surface detailing is crisply engraved and a far cry from what was. The kit also has a ton of interior detailing as well as nicely done wheels wells.
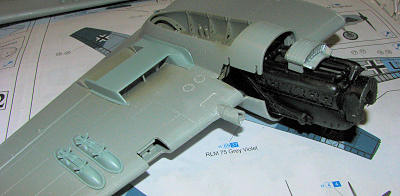
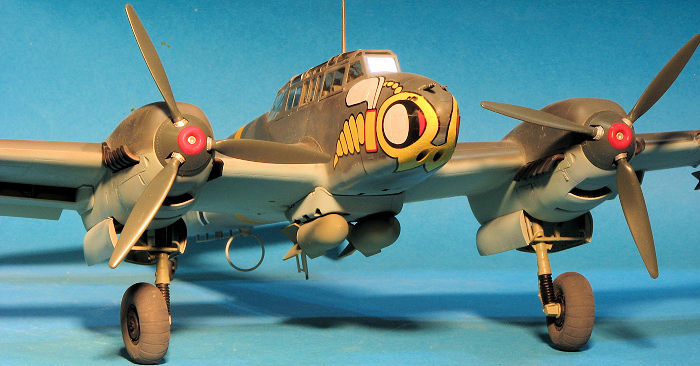
Apparently the thing to offer on these kits is additional detailing. To that length, Dragon has provided a fully detailed nose gun bay. Thanks to a single piece nose molding, one simply slips it off to show the four guns. There are also a pair of fully detailed engines provided for you. One will have the ability to show this with panels off or to keep them closed up. Since two engines are provided, the enthusiastic modeler can have them both exposed as if going through a major overhaul or inspection. The lazy among us will undoubtedly use just enough of the engine to support the exhaust and the prop, leaving the covers closed.
Interior is superbly detailed with all the radio boxes and other bits needed. There are photo etch harnesses/belts for the all the crew. Also in photo etch is the DF loop antenna. One could use the plastic one, but the 'double' ring antenna one can do with the photo etch is much more realistic. Thanks to duplicating the harness, one has a spare. Clear parts are also crisply molded and in sections so one can pose the various areas open to show off the interior.
 In
addition to all the guns, there are centerline and wing racks for the bombs. Of
course, when fully loaded the range would be short, but it is possible to fully
load the aircraft. As this is large scale, there are a lot of smaller parts to
install, but that just adds to the detail level.
In
addition to all the guns, there are centerline and wing racks for the bombs. Of
course, when fully loaded the range would be short, but it is possible to fully
load the aircraft. As this is large scale, there are a lot of smaller parts to
install, but that just adds to the detail level.
As you know, many modern kits do not use discreet pins and sockets for parts alignment on the fuselage and this is no exception. There are tiny tabs and indentations on the fuselage and wing leading edge to help out. This prevents sink areas. There are, however, large pins and sockets for installing the interior sidewalls. Fortunately, the fuselage exterior is totally free from any mold glitches and that is true of the rest of the sprues that I inspected.
Instructions are superbly done with Gunze and Model Master paint references. There are detail bits to the various construction steps where needed. I'm sure there is a part number glitch somewhere in there, but I won't know where it is until I am working on the kit. Test fitting some of the parts shows that the fit is excellent and should proceed without too much trauma. The addition of a sub-spar to help keep the wings aligned is much appreciated as this will not be a small model.
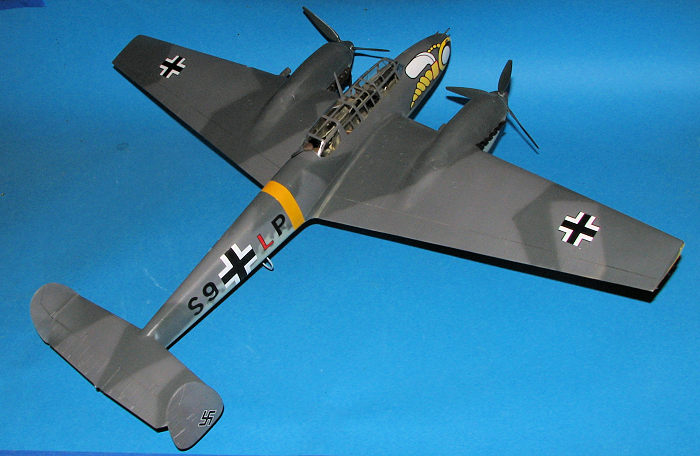
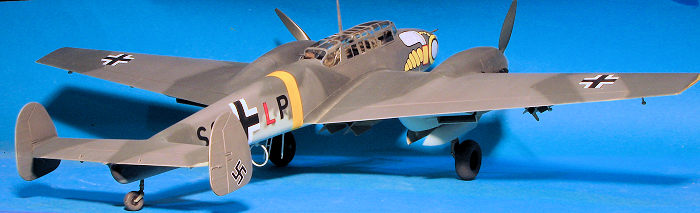
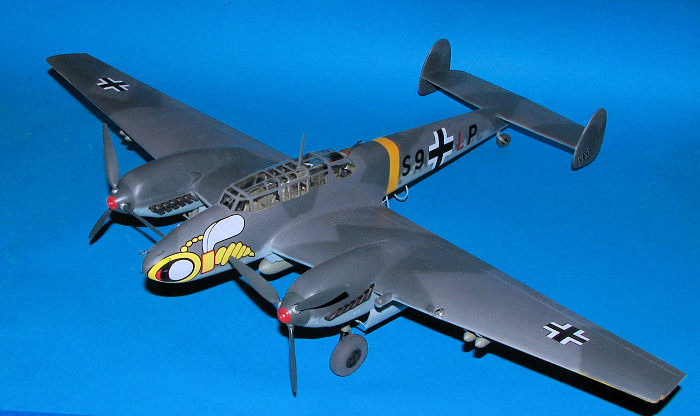
Markings are provided for two planes. One is the box art plane of 6./ZG 1 'Wespen' in Russia during 1942. The other is from 1(Z)./JG 77 in Norway during 1941. Both planes are in RLM 74/75/76 with side mottling. Both have yellow lower wing tips with the Russian front plane having a yellow fuselage band as well. The decals are superbly printed by Cartograf in Italy. Seems like these folks have been getting a lot of work doing kit decals. They are great decals, but I've found in the past that they are somewhat resistant to weaker decal setting solutions. The large wasp head has been pre-cut to help it conform to the nose, but you many have to enhance those cuts a bit. You'll also have to scrounge swastikas from somewhere else as none appear to be included
| CONSTRUCTION |
 This is a kit in which I immediately started snipping
parts from the sprue once I got it. I even glued a few items to the cockpit
floor and then, for whatever reason, the kit lay dormant until a couple of
months ago. Not sure why things like this happen as I was very enthusiastic
about building it, but it could well be that the realization hit me that this
would not be a two week build. And it wasn't.
This is a kit in which I immediately started snipping
parts from the sprue once I got it. I even glued a few items to the cockpit
floor and then, for whatever reason, the kit lay dormant until a couple of
months ago. Not sure why things like this happen as I was very enthusiastic
about building it, but it could well be that the realization hit me that this
would not be a two week build. And it wasn't.
So once I got back into it, the first thing I did was to spray everything I would be soon working on with RLM 02. That meant cockpit bits and the inside of gear doors and wells. I had heard there would be a few issues in building the kit and I had a list of what to look for in various steps. Something that was missing from this kit was a painting guide. Sure, there was a nice color chart in the instructions, but nothing in the actual construction area that stated what bit was what color. Fortunately, I have built quite a few Luftwaffe kits in my time so was able to pretty much wing it. You will be pleased to know that later boxings of this kit have taken care of that omission.
As the kit is chock full of subassemblies, I was able to spend some of the time waiting for the glue or paint to dry to build these up. Two of the biggest were the engines. These are highly detailed and the kit is designed to allow you to have the engine panels removed to show it. However, I knew I was not going to do that so built up the engines enough to allow the exhaust and the prop to be attached. In fact, I think I went a bit overboard and attached too many parts.
For instance, the aft accessory housing and the valve covers do not need to be attached. Nor does the oil tank in the front of the engine. For those of you building up the engine, note that the aft accessory housing needs to be attached before you glue on the valve covers, not as shown in the instructions. The engines were glued to the motor mounts and everything was painted black.
I also did the inner, lower wheel well part that is
part of the lower wing. These have small triangular bulkheads to be attached.
The instructions show the inside of the right lower wing. Only one wheel well
wall can be seen in the drawings. You are to install the bulkheads shown with
the numbers in parentheses
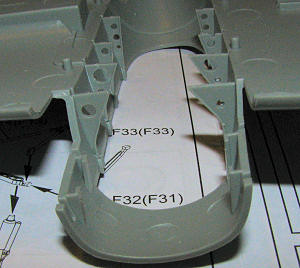 going on the other side. The pieces on each side are
NOT the same. You are not shown what goes on the other well. You simply have to
mirror image the parts and match things up. So the forward right piece on one
well is the forward left piece on the other. Something I missed until it was too
late is that there are mounting pieces for the rear wheel well arches in the
lower wing section. They should be mounted here instead of on the well base as
is shown. There is no mounting location on the base and I just put them where I
thought they would go. While mentioning the wings, do not open the hole near the
leading outboard edge of the wing. This is for the E model pitot tube. The one
for the C/D is already opened for you. Do make sure to open the holes for the
wing racks if you wish to use them.
going on the other side. The pieces on each side are
NOT the same. You are not shown what goes on the other well. You simply have to
mirror image the parts and match things up. So the forward right piece on one
well is the forward left piece on the other. Something I missed until it was too
late is that there are mounting pieces for the rear wheel well arches in the
lower wing section. They should be mounted here instead of on the well base as
is shown. There is no mounting location on the base and I just put them where I
thought they would go. While mentioning the wings, do not open the hole near the
leading outboard edge of the wing. This is for the E model pitot tube. The one
for the C/D is already opened for you. Do make sure to open the holes for the
wing racks if you wish to use them.
Once that is done, I assembled all the inner well parts and attached the motor mounts to the bulkhead. These then were glued into the lower wing. Instructions show you attaching the landing gear to the well before gluing it to the wing, but that is not necessary and will aid in painting later.
I also decided not to build up the nose gun compartment. For this, all you have to do is paint the forward end of the guns as that is all you will see. Once I did that, I test fit the gun bay into the nose and nearly couldn't get it back out again!
Back at the interior, there are a few items not
mentioned. One is part E3 that fits flush with the upper part of E 13. A small
box, E1, is also not mentioned and goes on the port sidewall. The drawing shows
it in place. Trim wheel part D 59 goes on the pilot's side fuselage half. Also,
there are two spare MG/FF racks, part D20 that are to be installed on the floor
next to the gun section
 with the tall part of the L facing forward. I put one of
them in backwards and cannot get it free! I also found that to properly install
the radio bulkhead, I had to trim back two mounting forks on the floor gun pack.
with the tall part of the L facing forward. I put one of
them in backwards and cannot get it free! I also found that to properly install
the radio bulkhead, I had to trim back two mounting forks on the floor gun pack.
I also opened up all the various holes in the upper cockpit coaming. Be sure to closely follow the guide on this. Other bits I glued together were the fin/rudders, the horizontal stab, the bombs, the wheels, and the radiators. When attaching the latter, attach them to the wings first as that will ensure you have them properly placed.
Back at the interior, I was slowly installing all the bits. The etched brass belts are nice to have, though the brass is pretty thick. I had to open the hole in the back of the pilot's seat in order to thread the shoulder harness through and even then, I had to trim off the end to get it to go through. Attaching the gunner's chair was not easy as it is just a single attachment point in the middle.
Returning to the wings, I glued the upper and lower halves together. Take your time on this. I also glued the upper, rear nacelle cover in place. This is not a tight fit as it is designed to be easily removed to display the engine. Filler will be needed. The wing tips were glued on. One wing was a great fit while the other was too large in length and width. A bit of sandpaper took care of that.
Continuing with my moving around on subassemblies, I assembled the smaller bombs. I then glued the wing spar structure on to the lower fuselage piece. The instructions do not mention drilling the holes for the centerline rack so be sure to do that prior to attaching the spar structure as it hides one of the holes. The centerline rack insert also needs holes drilled in it to accommodate the pins on the two large bombs. These are pretty good size holes. Once drilled, that insert was glued to the rack and the rack glued in place. This assembly was prepainted RLM 65 and set aside.
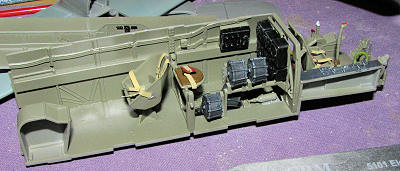 Back
at the interior I started attaching the side walls while also gluing pieces onto
the upper decking section. There is what looks to be a canopy interior framework
that needs parts attached and then glued to this decking. Be sure to remove the
paint from the attachment locations as the framework is wider than the decking
area so will need to be glued one side at a time or clamped. Look fondly at
some of the work you have put into the gun bay as some of it will nearly
disappear once the cockpit is installed.
Back
at the interior I started attaching the side walls while also gluing pieces onto
the upper decking section. There is what looks to be a canopy interior framework
that needs parts attached and then glued to this decking. Be sure to remove the
paint from the attachment locations as the framework is wider than the decking
area so will need to be glued one side at a time or clamped. Look fondly at
some of the work you have put into the gun bay as some of it will nearly
disappear once the cockpit is installed.
 While
gluing more bits on the interior, I worked on the area under the horizontal
stab. The inserts here are an excellent fit and quite tight. Returning to the
wings, I glued in the radiators, then the radiator housing. There is a small
support in the front (N5) which is not shown in the instructions that needs to
be installed. I also glued on the wing racks and housings. Next was the insert
for the air filter. This piece is a bit larger than the area in which it fits so
I ended up sanding it down to get it to fit. This aircraft will have a sand
filter on it. That item is a bit larger in diameter than the area to which it is
attached. When this was done, I painted the wingtips white then yellow.
While
gluing more bits on the interior, I worked on the area under the horizontal
stab. The inserts here are an excellent fit and quite tight. Returning to the
wings, I glued in the radiators, then the radiator housing. There is a small
support in the front (N5) which is not shown in the instructions that needs to
be installed. I also glued on the wing racks and housings. Next was the insert
for the air filter. This piece is a bit larger than the area in which it fits so
I ended up sanding it down to get it to fit. This aircraft will have a sand
filter on it. That item is a bit larger in diameter than the area to which it is
attached. When this was done, I painted the wingtips white then yellow.
I
installed the interior into the fuselage halves and then glued the halves
together. I highly recommend finishing the upper interior decking assembly and
attaching it before gluing the fuselage halves together. I did not and the fit
was not to my liking, sitting up higher than it should be. What this means is
that the canopy section that fits over the framework about half way b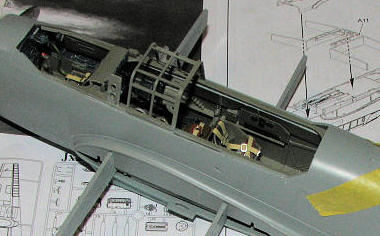 ack will
not fit flush. To correct this, I sanded on that framework piece until the
canopy section fit flush. It took a lot of sanding. I then attached the rear
cover just in front of the machine gun. There are three different ones so be
sure to choose the correct version. You want the one without a cut out or a
plate over the cut out. During all this, I noticed some of the detail work I had
done disappear from view! When the lower section with the wing spars was
installed, I found out that there will be some fit issues at the forward wing
root. Specifically the insert ended up being a bit narrower than the fuselage
proper. This is going to leave a gap that will need to be filled. Could I have
prevented it? Probably, but I did not realize there was a gap until after the
fuselage halves had dried.
ack will
not fit flush. To correct this, I sanded on that framework piece until the
canopy section fit flush. It took a lot of sanding. I then attached the rear
cover just in front of the machine gun. There are three different ones so be
sure to choose the correct version. You want the one without a cut out or a
plate over the cut out. During all this, I noticed some of the detail work I had
done disappear from view! When the lower section with the wing spars was
installed, I found out that there will be some fit issues at the forward wing
root. Specifically the insert ended up being a bit narrower than the fuselage
proper. This is going to leave a gap that will need to be filled. Could I have
prevented it? Probably, but I did not realize there was a gap until after the
fuselage halves had dried.
With that done, the horizontal stabilizer was glued in place. There is a tab on the rear fuselage that fits into slots on the inside of the rear cap. This area also contains the main tail gear attachment point. I had to push in pretty hard on this piece while the super glue dried or there would have been a gap and the tail gear hole on the cap would not have lined up. The fins were then glued on after the usual filling and sanding.
My attention then returned to the wings. There is an insert on either side of the engine cowling that I should have installed before gluing the wings together. I simply spaced them and getting them to fit at this stage was the pits. I eventually had to sand down the very aft section of these inserts and grunt them in place. Do not forget to install these at an earlier stage or you will be asking for trouble. Apparently I begged for it. Once on, the gaps were apparent and those were taken care of.
The kit then did as several kits I have built, and frustrated me to the point of my doing nothing with it for many, many months. About a year later, I decided to get back into it. I sanded down the filler for the small inserts and then looked into getting the rest of the cowlings attached. One side already had the lower piece installed prior to the hiatus so I removed one of the exhaust from the sprues to see if it could be installed after the small surrounding piece was installed. It proved to be quite possible so I installed the two small surround sections to that particular side. I should mention that you need to saw off the exhaust. The attachment points are large and there was real danger of snapping the pieces when removing them with sprue cutters. I attached the small curved piece to the forward part of this same piece.
I then set those aside and went on to other parts of the kit. This included the props. These are a somewhat complex assembly as you might guess. There are separate blades and they are keyed to the proper pitch. I built up the hubs, planning to install the blades later. The front of each spinner was hand painted red. I had to drill out the hubs a bit to get the prop shaft to fit.
 Back at the fuselage, I masked all the clear bits, a
bit of a time consuming job as there are a lot of panes. I decided to model my
110 with all these bits closed. This means the fit wasn't perfect and so I had
to do a bit of sanding on the two side flaps for the pilot. These are also
available with the windows slid back, but my reason for closing up the cockpit
was to keep it free from dust over the years. Besides, it looks nicer. Before
attaching the rear clear bit, I built up and installed the rear gun. Note that
there are two rear sections, one that is 'pre-squeezed' in the open position, so
you will not be using that one if you do things closed up.
Back at the fuselage, I masked all the clear bits, a
bit of a time consuming job as there are a lot of panes. I decided to model my
110 with all these bits closed. This means the fit wasn't perfect and so I had
to do a bit of sanding on the two side flaps for the pilot. These are also
available with the windows slid back, but my reason for closing up the cockpit
was to keep it free from dust over the years. Besides, it looks nicer. Before
attaching the rear clear bit, I built up and installed the rear gun. Note that
there are two rear sections, one that is 'pre-squeezed' in the open position, so
you will not be using that one if you do things closed up.
I also installed the forward gun section and after much effort, got the nose cone in place. It is such a tight fit that cement is not needed. Then it was on to finishing up the engine cowlings. There are clear pieces to fit in each cowling that will allow the engine mounted instruments to be viewed from the outside. For those who are detailing the engine, you'll be surprised to find that the instructions leave these parts out completely. They are in the kit, but it will be up to you to figure out where they go and how they are mounted. Still, they were there and they will need to be masked.
Anyway, with the help of super glue, I got the one side installed. For the other I thought it might be less hassle to glue all the cowling bits together first then work them over the engine. This did work, though if I'd had all the various pipes and bits on the engine block, there would be no way to get it on cleanly due to how the area around the exhaust mounts. To say there were gaps that needed filled would be an understatement. This kit is not designed to have the cowlings tightly closed.
| COLORS & MARKINGS |
 In this case, the aircraft is RLM 74/75/76. I had
prepainted quite a bit of the RLM 76 on the underside having first painted the
wing tips white and then yellow. I delayed the yellow fuselage band until after
I got all the clear bits in place. These pieces were then painted RLM 02 while
the fuselage band was painted white then RLM 04 yellow. I then sprayed on the
RLM 75 to the upper surfaces. Rather than mask the pattern, I free-handed the
RLM 74 and this took a bit of time as I suck at spraying straight lines. There
was a lot of back and forth as you can imagine before the pattern looked
presentable.
In this case, the aircraft is RLM 74/75/76. I had
prepainted quite a bit of the RLM 76 on the underside having first painted the
wing tips white and then yellow. I delayed the yellow fuselage band until after
I got all the clear bits in place. These pieces were then painted RLM 02 while
the fuselage band was painted white then RLM 04 yellow. I then sprayed on the
RLM 75 to the upper surfaces. Rather than mask the pattern, I free-handed the
RLM 74 and this took a bit of time as I suck at spraying straight lines. There
was a lot of back and forth as you can imagine before the pattern looked
presentable.
During this painting time (and it takes time as this is a fairly large airplane in this scale), I assembled and painted the landing gear and wheels, assembled and painted the bombs (I chose RLM 02), and painted some other items on the sprues such as the exhaust and gear doors. Then, for whatever reason, I simply lost interest in the kit. It sat in a box in my basement for years.
| FINAL CONSTRUCTION |
 It was the arrival of the Valiant Wings book on the Bf-110
that finally motivated me to start back into this kit. First thing I did was to
remove the cobwebs and other detritus that accumulates when you have the box
open for all that time. Once all that was done, I sorted out what was still
there and then figured out what still needed to be done. In this case, I painted
and attached the landing light then the surrounding piece that fit into the
wing. During the 'rest' time, the landing light cover seems to have disappeared.
Well. nothing I could do about that now and so I repainted the wing in that area
to include that surrounding piece.
It was the arrival of the Valiant Wings book on the Bf-110
that finally motivated me to start back into this kit. First thing I did was to
remove the cobwebs and other detritus that accumulates when you have the box
open for all that time. Once all that was done, I sorted out what was still
there and then figured out what still needed to be done. In this case, I painted
and attached the landing light then the surrounding piece that fit into the
wing. During the 'rest' time, the landing light cover seems to have disappeared.
Well. nothing I could do about that now and so I repainted the wing in that area
to include that surrounding piece.
Next, I installed the exhaust. Then the landing gear. Tail gear was an easy glue job. Main gear was a bit more fiddly and took a bit of prodding as well as the use of glue as a lubricant to get in place. Once that was done, the main gear doors and the door prop were installed. This latter piece was a bit challenging to get in place as the instructions were not very clear on its proper placement. Again, the Valiant Wings book came to the rescue as it had some excellent images to help me out. I did each wing separately, so this took a bit of time but the plus was that what I learned on one wing helped make doing the other one so much easier.
With
that done, the next step was to attach the wings. It was then that I found what
might have caused the delay in construction. The lower wing/fuselage area had a
very large gap. It is not simply a matter of sanding something down as the wing
join area isn't designed so that will work. One either has t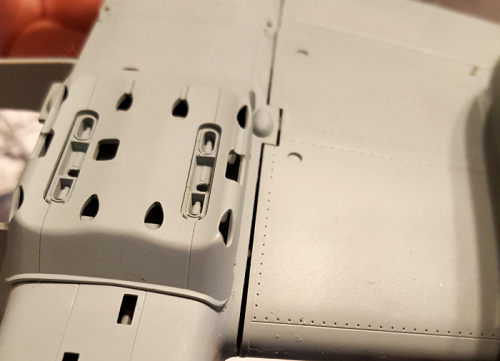 he gap on top or on
the bottom of the wing. I opted for the bottom. The gap was filled with
stretched sprue and then filler was used to smooth it out. The other side was
the same way. Obviously I made a goof somewhere, but since it was so many years
ago, I don't remember where.
he gap on top or on
the bottom of the wing. I opted for the bottom. The gap was filled with
stretched sprue and then filler was used to smooth it out. The other side was
the same way. Obviously I made a goof somewhere, but since it was so many years
ago, I don't remember where.
With the wings properly filled, sanded, and repainted, I gave the airframe a clear coat so I could apply the decals. I was going to use a set of aftermarket decals I had for another plane with the wasp nose and painted the forward props red as shown in the decal instructions. After that had dried, I realized the decals I wanted to use were 1/48. Hmm. Well no choice but to use the kit decals. These went on without too much hassle, though I had to do something about the staffel color. I simply applied red stripe decals to the fuselage 'L' decals and that took care of that situation. The wasp decal, however, was a real chore to install. It did not fit at all well, the cuts designed to help simply didn't close up enough so I had to brush paint yellow over sections of it. Eventually all was done.
On the underside, I attached the various antennas, steps, aileron balances and the bombs. The airframe was then given a matte coat. Then the exhaust were installed and the masking removed from canopy. Even after all these years, they came free without leaving any residue. Then the upper radio mast was installed and painted. The last items were the landing light lens and the wingtip lights (which I simulated with Cementine as fitting those tiny lenses proved to be impossible for this kid). Props were pushed in place and that was it.
| CONCLUSIONS |
If you have not realized it by now, I and 1/32 airplane kits = a very long build time. The kit itself is really quite good and generally fit was quite nice. It is a large model when done so if you are space challenged, you'll have to hang it from the wall like a framed picture. Hopefully the next one I do won't take 13 years to complete, though I do have a few that might come close!
| REFERENCES |
https://en.wikipedia.org/wiki/Messerschmitt_Bf_110
14 October 2022 Copyright ModelingMadness.com. All rights reserved. No
reproduction in part or in whole without express permission from the editor. If you would like your product reviewed fairly and fairly quickly, please contact the editor
or see other details in the
Note to
Contributors.