| KIT #: | 7302 |
| PRICE: | $13.50 |
| DECALS: | Two options |
| REVIEWER: | Scott Van Aken |
| NOTES: | New tool snap kit |
| HISTORY |
Development of the new
Bf 109F airframe had begun in 1939. After
February 1940 an improved engine, the Daimler-Benz DB 601E, was developed for
use with the Bf 109. The engineers at the Messerschmitt facilities took two Bf
109 E-1 airframes and installed this new powerplant. The first two prototypes,
V21 (Werksnummer (Works number) or W.Nr 5602) and
V22 (W.Nr
1800) 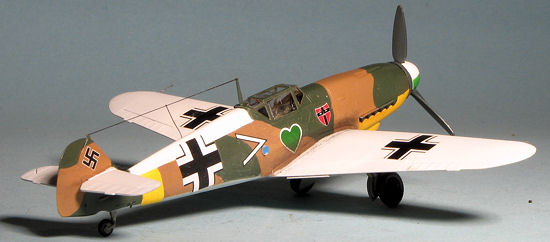 kept the trapeziform wing shape from the E-1, but the span was reduced by
61 cm (2 ft) by "clipping" the tips. Otherwise the wings incorporated the
cooling system modifications described below.
V22 also became the testbed
for the pre-production DB 601E. The smaller wings had a detrimental effect on
the handling so V23,
Stammkennzeichen (factory Code)
CE+BP,
W.Nr 5603, was fitted with new, semi-elliptical wingtips. The fourth prototype,
V24
VK+AB, W.Nr 5604, flew with the clipped wings but featured a
modified, "elbow"-shaped supercharger air-intake which was eventually adopted
for production, and a deeper oil cooler bath beneath the cowling. On all of
these prototypes the fuselage was cleaned up and the engine cowling modified to
improve aerodynamics.
kept the trapeziform wing shape from the E-1, but the span was reduced by
61 cm (2 ft) by "clipping" the tips. Otherwise the wings incorporated the
cooling system modifications described below.
V22 also became the testbed
for the pre-production DB 601E. The smaller wings had a detrimental effect on
the handling so V23,
Stammkennzeichen (factory Code)
CE+BP,
W.Nr 5603, was fitted with new, semi-elliptical wingtips. The fourth prototype,
V24
VK+AB, W.Nr 5604, flew with the clipped wings but featured a
modified, "elbow"-shaped supercharger air-intake which was eventually adopted
for production, and a deeper oil cooler bath beneath the cowling. On all of
these prototypes the fuselage was cleaned up and the engine cowling modified to
improve aerodynamics.
The Bf-109F-2
As the DB 601E was not yet available in numbers, the pre-production
F-0
(the only F variant to have a rectangular supercharger intake) and the first
production series F-1/F-2 received the 1,175 PS (1,159 hp, 864 kW) DB
601N engine driving a VDM 9-11207 propeller. The F-0/F-1 and F-2 only differed
in their armament; the F-1 being fitted with one 20 mm MG FF/M
Motorkanone
firing through the engine hub, with 60 rounds. The F-1 first saw action in the
Battle of Britain in October 1940 with JG 51. The most
 experienced fighter aces
like Werner Mölders were the first ones to fly the first Bf 109 F-1s in combat
in October 1940. A total of 208 F-1s were built between August 1940 and February
1941 by Messerschmitt Regensburg and the
Wiener Neustädter Flugzeugwerke.
experienced fighter aces
like Werner Mölders were the first ones to fly the first Bf 109 F-1s in combat
in October 1940. A total of 208 F-1s were built between August 1940 and February
1941 by Messerschmitt Regensburg and the
Wiener Neustädter Flugzeugwerke.
The F-2 introduced the 15 mm Mauser MG 151 cannon with 200 rounds. The Motorkanone was supplemented by two synchronized 7.92 mm (.312 in) MG 17 machine guns mounted under the engine cowl, with 500 rpg. As the harder-hitting 20 mm version of the same gun become available, a number of F-2s were retrofitted with it in the field. About 1,380 F-2s were built between October 1940 and August 1941 by AGO, Arado, Erla, Messerschmitt Regensburg and WNF. No tropicalized version was built, although individual F-2s were retrofitted with sand filters in the field. The maximum speed of the F-1 and F-2 was 615 km/h (382 mph) at rated altitude.
| THE KIT |
This is the second of Zvezda's snap fit 1/72 WWII fighters. These are actually very nicely molded kits, despite the large parts attachment points. The detail has not really been simplified as much as you might think. There is interior sidewall detail and the rest of the cockpit is nicely done as well.
One of the cockpit options is for a
full pilot figure, complete with his butt molded into the seat. A non-butt
containing seat is provided for those who do not want a pilot. The kit also
has additional 'gear up' landing gear and a slot in the lower wing insert in
case you have a stand and want to model this one gear up. There is no stand
included or even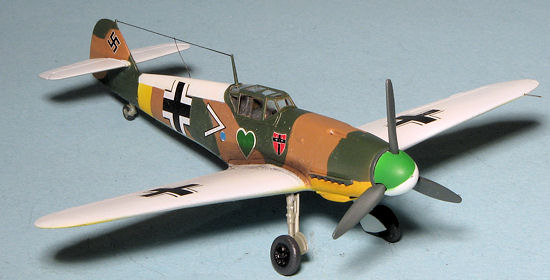 info on obtaining one as Airfix provides. Of course, it
could be in the Russian language section of the instructions and I missed
it.
info on obtaining one as Airfix provides. Of course, it
could be in the Russian language section of the instructions and I missed
it.
The cockpit also provides a raised detail instrument panel and a flat one in case you would rather use the instrument decal. The head armor is attached to the area behind the pilot instead of the canopy. This latter item is only offered in the closed position and while thick, is relatively clear.
The wings are nearly one piece with the lower section that contains the landing gear being the insert. The kit does not provide a drop tank or rack. Moving to the fuselage, I found some sink areas opposite interior detail or braces, but they are not that deep and easily managed. The kit has an unusual feature in the the very forward part of the nose is separate. I also found the separate gun troughs to be a first in my experience. Aside from increasing the parts count, I see no reason for these to be so molded. Landing gear and wheels are well molded with the usual sturdy mounting lugs. As a bit of a note, the F-2 had a retractable tail wheel, but this is not offered and, indeed, there is a section of lower fuselage between the gear strut and the open well.
Instructions are easy enough to follow and indicate not only inside colors, but where optional bits are to be placed. Color information is with Model Master paints. Two options are provided. One is the box art plane in winter white over RLM 76 as flown by Hans Philipp of Stab I./JG 54 in March 1940. This has a yellow partial fuselage band and lower wings and cowling. The other is from 15 (Spanish)./JG 51 in June of 1942. It has yellow bits in its standard RLM 74/75/76 camouflage. Mottling seems light. Decals are well printed and quite matte. No completed swastika, of course, so that will need to be pieced together with the four separate arms. I am lazy and will use one from aftermarket or the spares box.
| CONSTRUCTION |
The first thing I did was to attach the lower wing center section to the rest
of the wing. The fit is quite good, but as you might imagine, the gaps between
the parts are larger than the engraved panel lines. What's more, most of the
 separation lines are not along extant panel lines so some filler will be needed.
Part of that filler will be used to take care of the sunken areas opposite
cockpit detail.
separation lines are not along extant panel lines so some filler will be needed.
Part of that filler will be used to take care of the sunken areas opposite
cockpit detail.
The cockpit was the next area assembled. I found that in some cases, I had to slightly trim the tabs on parts to get them to fit. I glued all the joins anyway to be sure they stayed in place. The canopy head armor is glued to the interior instead of the canopy, but this is not an issue as the canopy is a single piece and cannot be displayed open. I painted the interior with RLM 66 and dry brushed it with buff to allow detail to show up. Be sure to install the instrument panel prior to installing the wing where the interior sits. I forgot and it was not easy to get the panel in place later.
For whatever reason, the gun troughs are separate bits. I found the fit to be fair, but there were gaps that needed filler and sanding was not a simple task. This is one area that I would have preferred them to be molded in place. I then put the fuselage halves together. Later I realized I had forgotten to install the tail wheel as it is to be trapped between the halves. Fit of the halves is pretty good, but the fin section does not fit all that well, being a bit too thick and needing filler to get a smooth junction.
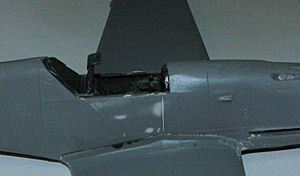
 I then inserted the wing into the fuselage section. Fit is quite good and as
you can see from the small image above, there is a bit of a seam where the wing
and fuselage join, but it is not really that major a deal. At this time, I also
attached the tailplanes. These are not as tight a fit as some other parts so
glue would be a wise move. The oil and coolant radiators were snapped in place
next. These are a very tight fit. This kit has a separate nose cap, which I
thought was a bit odd, but it does fit well. I also took the time to drill out
the solid supercharger intake and fit that in place.
I then inserted the wing into the fuselage section. Fit is quite good and as
you can see from the small image above, there is a bit of a seam where the wing
and fuselage join, but it is not really that major a deal. At this time, I also
attached the tailplanes. These are not as tight a fit as some other parts so
glue would be a wise move. The oil and coolant radiators were snapped in place
next. These are a very tight fit. This kit has a separate nose cap, which I
thought was a bit odd, but it does fit well. I also took the time to drill out
the solid supercharger intake and fit that in place.
Next, the canopy was masked and pushed in place. This proved to be a very tight fit and I used glue as a bit of a lubricant to get things in place. I also drilled out the tail wheel opening so I could get the trimmed strut in place. After a bit more filler on the nose, it was time to look into painting.
| COLORS & MARKINGS |
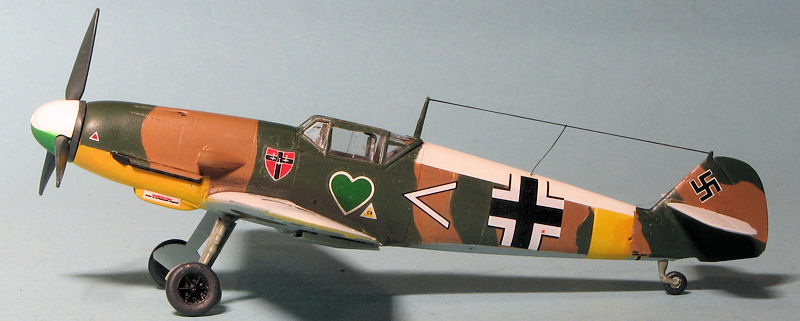
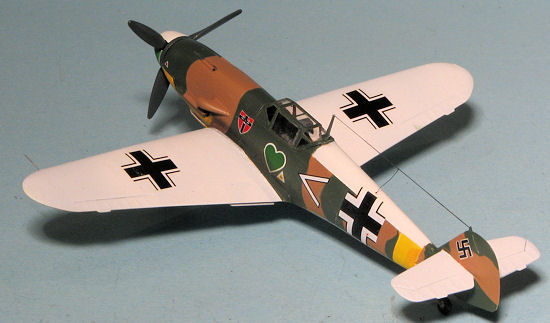
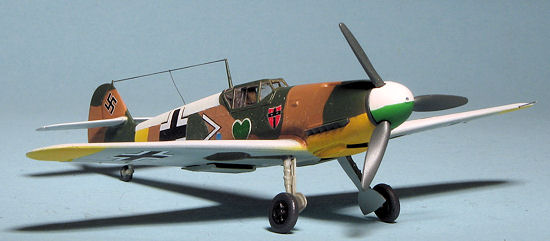
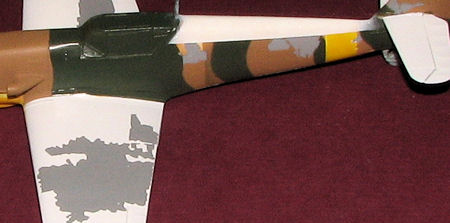
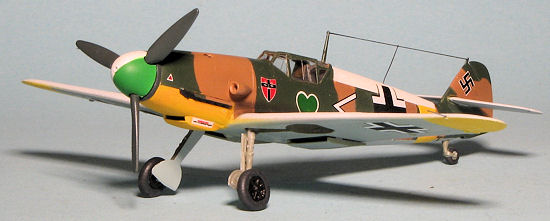
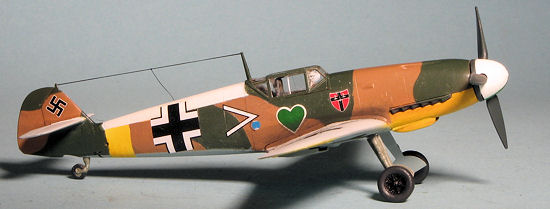
I probably should not have, but I decided to do a somewhat complex paint scheme. It was an aircraft of III./JG 54 in Russia during the winter of 1942. It was painted in a non-standard scheme of RLM 79/80/76 with most of the upper surfaces in white. Spinner is half white, half green.
 I
used a variety of paints for this. Aeromaster enamels for the RLM 79, Model
Master enamels for the RLM 80 and 76. Agama RLM 04 and Tru-Color white. This
meant a lot of masking and quite a bit of back and forth painting. It was a
disaster. Both the Tru-Color and the Aeromaster lifted along with the Tamiya
tape. I had it with the Tru-Color as this was not the first time I had this
happen with this brand. It was tossed in the trash and the pulled up white area
was repainted with Tamiya. Not sure why the Aeromaster lifted as I have not had
these issues with Aeromster or Zvezda kits in the past.
I
used a variety of paints for this. Aeromaster enamels for the RLM 79, Model
Master enamels for the RLM 80 and 76. Agama RLM 04 and Tru-Color white. This
meant a lot of masking and quite a bit of back and forth painting. It was a
disaster. Both the Tru-Color and the Aeromaster lifted along with the Tamiya
tape. I had it with the Tru-Color as this was not the first time I had this
happen with this brand. It was tossed in the trash and the pulled up white area
was repainted with Tamiya. Not sure why the Aeromaster lifted as I have not had
these issues with Aeromster or Zvezda kits in the past.
I eventually got everything painted and then installed the main landing gear prior to a clear coat for decals. The main gear are a very tight fit and do not go all the way down into the sockets so additional pushing is not recommended if you do not want to break a gear leg! Once that was installed and dry, the kit got the usual clear coat on the sides and underside prior to application of the decals.
Anyway, the markings are Aeromaster SP 72-02 Luftwaffe Green Hearts, a very worthwhile set though long out of production, but that does not mean it is impossible to be found. It covers 20 aircraft so any Luftwaffe fan should be able to find several useful schemes for a variety of 109s and 190s. Despite their 1994 print date (yep, that is nearly 20 years ago), I had no real issues with them. For some of the data markings, I used the ones on the kit sheet. These also worked very well with no issues.
| FINAL CONSTRUCTION |
 With the
kit painted, there was not much left. The prop was attached and the spinner
pushed on. I was unable to get it to fit all the way down. After much cursing
and prying, I was able to free the spinner. Some cement was applied and that was
enough to get it on all the way. I used cement to attach the wheels too, as well
as a pair of flat nose pliers. I used the same pliers to attach the gear doors.
If you have not guessed already, the press fit is a bit much more than most
would expect. As I had broken off the pitot tube early in the build, another was
installed using fine brass tubing. This was painted aluminum. I drilled a hole
in the upper fuselage for the antenna lead wire and using EZ Line, rigged up a
radio antenna. The masking was removed from the clear bits, some pastels were
used for exhaust and that was it.
With the
kit painted, there was not much left. The prop was attached and the spinner
pushed on. I was unable to get it to fit all the way down. After much cursing
and prying, I was able to free the spinner. Some cement was applied and that was
enough to get it on all the way. I used cement to attach the wheels too, as well
as a pair of flat nose pliers. I used the same pliers to attach the gear doors.
If you have not guessed already, the press fit is a bit much more than most
would expect. As I had broken off the pitot tube early in the build, another was
installed using fine brass tubing. This was painted aluminum. I drilled a hole
in the upper fuselage for the antenna lead wire and using EZ Line, rigged up a
radio antenna. The masking was removed from the clear bits, some pastels were
used for exhaust and that was it.
| CONCLUSIONS |
 There are
darn few 1/72 Bf-109Fs on the market, so I would suppose that having another
option is a good thing. The best F version in this scale is by Fine Molds, but
they are horribly expensive for most of us. This one is not a bad F model, but
it is lacking in several areas. One is that there is no drop tank or rack for
it. There are also no aileron balances that are so prominent on 109s. The wheel
wells are at best only appropriate for very late F-4 versions. Most of the rest
of the F line had circular openings. The head armor is attached to the
back of the cockpit instead of to the canopy. The tail wheel strut is far too
thick. However, we are talking about a snap kit and perhaps one should overlook
these omissions in that light. It is a bit of a conundrum really. There is
detail enough in many areas of the kit to satisfy those who want an accurate
kit, yet there are other aspects of it that are simplified. Overall, it is a
good value for the money, if one keeps in mind that it will not make a totally
accurate 109F-2.
There are
darn few 1/72 Bf-109Fs on the market, so I would suppose that having another
option is a good thing. The best F version in this scale is by Fine Molds, but
they are horribly expensive for most of us. This one is not a bad F model, but
it is lacking in several areas. One is that there is no drop tank or rack for
it. There are also no aileron balances that are so prominent on 109s. The wheel
wells are at best only appropriate for very late F-4 versions. Most of the rest
of the F line had circular openings. The head armor is attached to the
back of the cockpit instead of to the canopy. The tail wheel strut is far too
thick. However, we are talking about a snap kit and perhaps one should overlook
these omissions in that light. It is a bit of a conundrum really. There is
detail enough in many areas of the kit to satisfy those who want an accurate
kit, yet there are other aspects of it that are simplified. Overall, it is a
good value for the money, if one keeps in mind that it will not make a totally
accurate 109F-2.
| REFERENCES |
http://en.wikipedia.org/wiki/Messerschmitt_Bf_109_variants
December 2012 Thanks to www.dragonmodelsusa.com
for the review kit. You can find this one at your favorite hobby shop
or on-line retailer. If you would like your product reviewed fairly and fairly quickly, please
contact
the editor or see other details in the
Note to
Contributors.