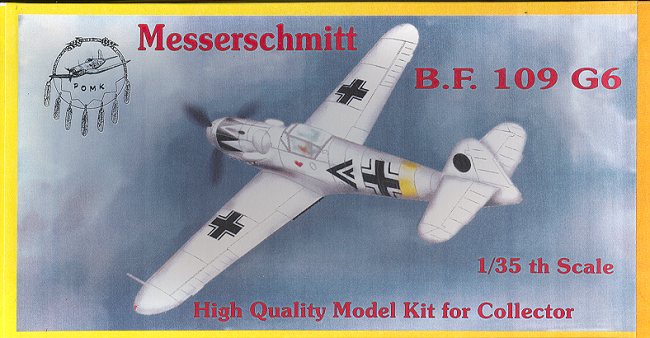
Pend Oreille 1/35 Bf-109G-6
|
KIT # |
3501 |
|
PRICE: |
$95.00 |
|
DECALS: |
Two aircraft, see review |
|
REVIEW : |
|
|
NOTES: |
Resin kit |
|
HISTORY & KIT |
For the history and description of the kit, follow this link.

|
CONSTRUCTION |
I decided to make this review a primer on how to do resin kits.
It is perfect for this purpose as it is not a real multi-media kit not having
any etched or injected plastic parts. It will also be in a diary format so you
can see how things are going. I'll do images when it is practical.
July 30, 2000
The
first step in doing a resin kit is cleanup. Resin kits are generally hand made
or at least a very low production run. That is the reason resin kits and
conversions are so expensive. However, they all have some sort of agent that is
used to keep the resin from sticking to the molds and this needs cleaned off.
Warm (not hot as it will warp the resin) soapy water is the best, followed by a
thorough towel drying.
First
of all, it can warp. To remove the warp, simply dunk the part in very hot (not
boiling) water and gently bend back into shape. It may take several applications
to get it right. Secondly, resin is often brittle so cannot
take a lot of stress before it breaks, so be careful when handling it not to put
too much pressure on it, especially thin parts. If a part does break, superglue
is the only thing that really works well. A third caution is
sanding parts. Depending on the quality of the resin and the method of casting,
resin can be chock full of tiny air bubbles. Most are just below the surface of
the 'skin' of the part. For an example of these bubbles look at the three part
image below. You can see large air bubbles that are just lightly skinned over.
Vigorous sanding will break through that skin and open all these bubbles, which
are a real pain to fill and get rid of, so be very gentle when sanding in areas
that will eventually be seen on the model. Along with that,
resin dust is not good stuff so wet sand and/or wear a dust mask to keep from
inhaling the particles. Back at the kit: now that you have the
release agent removed, you need to to remove the bits and pieces from the excess
Removing an item from a wafer usually
just requires a good pair of small scissors. I use moustache trimming scissors
for this purpose. The large blocks have to be sawn off using a razor saw. The
best ones are thin to fit under some of the larger blocks. It is a good ideal to
start at the edges and work your way in. Don't cut too deep or you may overcut
the part. Any excess left can be sanded down. You can also sand off the resin
from the back of parts on a wafer. Often the additional thickness is not a
problem, but in some instances (like side
Once
you have all the parts free, then all the flash and other imperfections must be
removed. Some of these are easy to remove and others require a delicate
touch. The first are mold seams. These can be easily
removed with sandpaper. Again, be very careful when doing those to prevent
Another
area where bubbles can be found is in seams or corners of parts. These bubbles
are usually outside the part and need to be removed. The best way is to simply
The other areas needing attention are
those that are filled with resin that need cleaned out. Often this is just a
thin area and all that is needed is a hobby knife and a quick swipe with
sandpaper. Other times the resin is thicker. These can be cleaned up after some
careful carving or you can use small files. It is important to remove all the
resin to assure a good fit. It is not unusual for this step alone
to consume a large number of hours. While this part is dated 30 July, in reality
the cleanup is an on-going process. Often it is a good idea to keep the smaller
bits on their wafers or blocks until they are needed. This prevents loss or
accidental breakage. July 30, 2000
Not
much modeling time available today, so I only worked on a few parts. That
consisted of more clean-up though some actual construction got underway. This
was confined to the cockpit area. The front bulkhead, rudder pedals and control
stick were glued in place. At this time I test fit the sidewalls to make sure
there would be no problems in installation. The rudder pedals have a nice eyelet
on either side for the foot straps. These eyelets stick up at a 90 degree angle
from the rest of the pedal. Unfortunately, all but one was broken off during
shipment. That is the problem with packaging all the bits in one bag.
I also cleaned up the
exhaust. Make sure that you DO NOT remove the seam on them as they are supposed
to have it there. The exhaust were then test fit in the slots in the nose
section. The slots needed some cleaning up. The exhaust fit snugly. In fact, too
snugly as there are a couple of metal plates that need to fit above and below
the exhaust. I got out the plates and then started to carefully sand away at the
opening until I was sure that I could get them to fit. These parts will be
installed AFTER the fuselage is complete and painting has been done. To make
sure that I can get them to fit without falling into the fuselage, I superglued
a piece of strip plastic in behind the exhaust slot opening.
All
of this took about an hour and that was all the time I could spare on it.
Tomorrow, I'll start cleaning up the other exhaust. August
2, 2000
On
the side panels, I still had the quandary about the trim wheels. It has to fit
on the middle sprocket so cannot be too large. After much mulling, I hit on the
idea of using tubing. I had some 1/4 inch (.25 inch) Evergreen tubing so cut off
a thin section of that. The edge was scored several times with a razor saw until
I had a nice groove. This would simulate two of these wheels side by side as in
the real plane. The interior bits of the wheels was made from tiny bits of .03
inch Evergreen strip. It took a while to get everything in place, but it
should hopefully look OK once cleaned up and dry brushed. I then went on to the right fuselage half to open up the exhaust
opening so that the exhaust and metal shields would fit. After using a sanding
stick to get the opening wide enough, a piece of plastic sheet was superglued to
the inside. This will allow me to install the shields and exhaust after the kit
has been I also took the
opportunity to paint the inside of the gear doors with RLM 02. These parts are
extremely thin and are best painted while still on the resin wafer. I also took
the time to clean up the landing gear. These have metal rod reinforcements in
them which is very nice. Most of the cleanup on these parts is removing much of
the casting block from the bottom (this part needs to be shaped so be careful
and don't get carried away with sanding). There are also a number of resin
bubbles that need cleaned up. Most of these just brushed off, but a few needed a
sharp knife point to remove. I also
cleaned up the main wheels. Once the seam has been removed, the tread was
replaced in the wheels by gently scoring it with a razor saw. Again, you need to
be careful so as to not overdo it. Though
this kit may seem like it is an awful lot of work, this is pretty well standard
for a resin kit. This particular one is one of the better ones that I have
worked with. So far, everything is going quite smoothly.
Tomorrow or the next day, I'll be doing some more work in the interior
and starting to glue some major bits together.
August
3, 2000
Next, the fuselage halves
themselves were glued together. Since I already had them taped and
properly aligned, it was a simply matter to drip superglue into the seams from
the inside. This way, there were no superglue smears on the outside of the
fuselage to clean up. This was allowed to dry for a few hours. Then the seams
were filled using putty. The fuselage was then set aside to dry until the filler
completely cured. After
that, I spent some time adding small amounts of filler to some areas on the wing
edges as well as the wing radiators that needed it. I also cleaned up the tail
insert in preparation for installing it in the fuselage.
August
4-6, 2000 Like most of you, I spent most of
my weekend doing something other than modeling, however, some work was done on
the kit. First of all, I smoothed out the filler that was put on the wings and
fuselage. Once that was done, it was time to tackle the
The result is that when the tail was glued on, it was done so more with
a look at the final placement of the horizontal stabilizer than anything else.
The result is that a lot of sanding was needed on the bottom of the tail insert.
To add to this, the insert was a bit wider than the rest of the fuselage at that
point so I had to sand that section as well. This opened up some air bubbles
along the leading part of it which needed filler and so on.
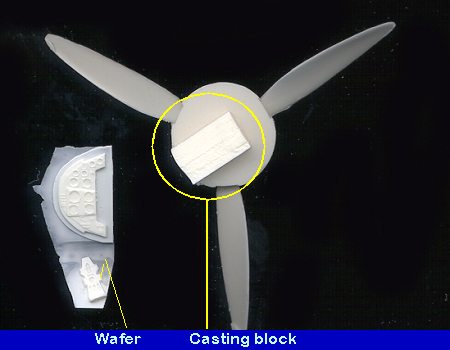 Here is are some general cautions about resin.
  resin. There are two main ways
of molding resin pieces. One is by having a resin block and the other is
the wafer. Both have their uses. Wafers are generally used for relatively flat
pieces like gear doors and instrument panels, while blocks are used for large,
chunky pieces. These methods relate to the way the mold is made. Resin isn't
cheap so the most economical method is used depending on the size and shape of
the resulting part.
resin. There are two main ways
of molding resin pieces. One is by having a resin block and the other is
the wafer. Both have their uses. Wafers are generally used for relatively flat
pieces like gear doors and instrument panels, while blocks are used for large,
chunky pieces. These methods relate to the way the mold is made. Resin isn't
cheap so the most economical method is used depending on the size and shape of
the resulting part.  panels) this additional sanding will be needed.
  opening up any air bubbles.
Often this cannot be prevented. Once you have all the mold seams cleaned up,
hold the part up to the light and look for imperfections. If you find bubbles,
you need to fill them. The best thing I have found is Mr. Surfacer. It is really
just very thin filler. You can also use White Out or other paper correction
fluid as it is also thin and fills these small holes. Once the filler has dried,
carefully sand it down and repeat if necessary. Again, the key is to be gentle
as firm sanding will only open more holes. Any really large air bubbles can be
filled with superglue, then hit with accelerator and then sanded down. The key
is to not let the superglue dry to where it is real hard or it will be a chore
to sand. Start sanding almost immediately after using the accelerator.
opening up any air bubbles.
Often this cannot be prevented. Once you have all the mold seams cleaned up,
hold the part up to the light and look for imperfections. If you find bubbles,
you need to fill them. The best thing I have found is Mr. Surfacer. It is really
just very thin filler. You can also use White Out or other paper correction
fluid as it is also thin and fills these small holes. Once the filler has dried,
carefully sand it down and repeat if necessary. Again, the key is to be gentle
as firm sanding will only open more holes. Any really large air bubbles can be
filled with superglue, then hit with accelerator and then sanded down. The key
is to not let the superglue dry to where it is real hard or it will be a chore
to sand. Start sanding almost immediately after using the accelerator. scrape them off with a sharp knife or
to dig them out of corners. Those in seams can also be removed with a knife and
then the seam cleaned out. At times these bubbles can lead to buried air bubbles
that need filler. At other times there is no easy way to clean them up and you
have no choice but to leave them and mask their presence as well as you can.
scrape them off with a sharp knife or
to dig them out of corners. Those in seams can also be removed with a knife and
then the seam cleaned out. At times these bubbles can lead to buried air bubbles
that need filler. At other times there is no easy way to clean them up and you
have no choice but to leave them and mask their presence as well as you can. 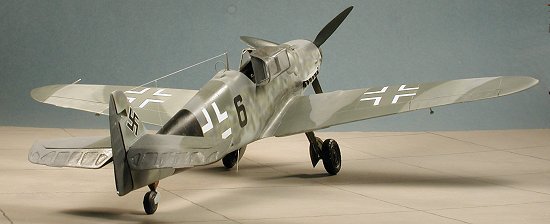 The
underwing radiators had the resin blocks removed from the rear of the part and a
number of small resin bubbles removed from the inside and grille areas. Then
they were test fit in the wing. The left one was nice and snug while the right
one has a bit of play in it. Some small imperfections had putty put on them and
will be smoothed out tomorrow.
The
underwing radiators had the resin blocks removed from the rear of the part and a
number of small resin bubbles removed from the inside and grille areas. Then
they were test fit in the wing. The left one was nice and snug while the right
one has a bit of play in it. Some small imperfections had putty put on them and
will be smoothed out tomorrow.  Today's efforts were mostly in the cockpit section. First of all,
the partially assembled cockpit and the sidewalls were painted RLM 66 using
Aeromaster's paint. When that was dry, the seat belts were painted with Gunze
sail color, though you could use a very light grey as well. The buckles were
carefully painted with aluminum.
Today's efforts were mostly in the cockpit section. First of all,
the partially assembled cockpit and the sidewalls were painted RLM 66 using
Aeromaster's paint. When that was dry, the seat belts were painted with Gunze
sail color, though you could use a very light grey as well. The buckles were
carefully painted with aluminum.  Next, I turned my
attention to the right inside panel. Now there is a fuel line that runs along
the sill on the right side. This fuel line has a clear piece in it on the real
plane. That way the pilot can tell if his engine problem is due to no fuel flow,
as the tinted fuel will be visible if everything is all right. What I did was to
remove the section that is supposed to be clear. I'll replace it later with a
section of clear rod. This section will be made by heating and stretching a
piece of clear sprue. I've done this in 1/48 before and though it will take
several attempts, the proper size can be made.
Next, I turned my
attention to the right inside panel. Now there is a fuel line that runs along
the sill on the right side. This fuel line has a clear piece in it on the real
plane. That way the pilot can tell if his engine problem is due to no fuel flow,
as the tinted fuel will be visible if everything is all right. What I did was to
remove the section that is supposed to be clear. I'll replace it later with a
section of clear rod. This section will be made by heating and stretching a
piece of clear sprue. I've done this in 1/48 before and though it will take
several attempts, the proper size can be made. painted. I did notice
that the depth of these slots was different from side to side. Apparently the
excess material was removed from the inside of the fuselage masters with a power
tool of some sort as the thickness varies between the right and left side. This
may mean that some more trimming of the back of the exhausts will be needed
prior to installation.
painted. I did notice
that the depth of these slots was different from side to side. Apparently the
excess material was removed from the inside of the fuselage masters with a power
tool of some sort as the thickness varies between the right and left side. This
may mean that some more trimming of the back of the exhausts will be needed
prior to installation. Now that the
backing plates are dry, it is time to check the fit of the cockpit. First the
fuselage halves were taped together. Then the fuselage side panels were taped to
the cockpit side. The entire cockpit assembly was then fit into the fuselage
halves. Fit is quite good. What I learned from this is that I need to trip the
rudder pedals as I put them in wrong. They are too tall and should be more
horizontal. They prevent the side panels from fitting all the way. It also looks
like I need to do a touch of trimming on the cockpit to get a perfect fit. I'll
deal with that when the time comes.
Now that the
backing plates are dry, it is time to check the fit of the cockpit. First the
fuselage halves were taped together. Then the fuselage side panels were taped to
the cockpit side. The entire cockpit assembly was then fit into the fuselage
halves. Fit is quite good. What I learned from this is that I need to trip the
rudder pedals as I put them in wrong. They are too tall and should be more
horizontal. They prevent the side panels from fitting all the way. It also looks
like I need to do a touch of trimming on the cockpit to get a perfect fit. I'll
deal with that when the time comes.
 tail insert. Now here I ran into some problems,
and I'm not sure if they were self-inflicted or not, so I'll take the blame.
There was a lot of fiddly cleanup done to both the insert and the fuselage to
make sure I had a good fit. When I had it to where it looked like a good, tight
fit, it became apparent that the horizontal stabilizer wouldn't be horizontal.
In fact it appeared that it would have a decided forward tilt.
tail insert. Now here I ran into some problems,
and I'm not sure if they were self-inflicted or not, so I'll take the blame.
There was a lot of fiddly cleanup done to both the insert and the fuselage to
make sure I had a good fit. When I had it to where it looked like a good, tight
fit, it became apparent that the horizontal stabilizer wouldn't be horizontal.
In fact it appeared that it would have a decided forward tilt.
 Then it was on to some other parts of
the kit. The interior was next with a bit of attention. If you recall, on the
2nd I removed a section from the right sidewall for the insertion of a piece of
clear sprue. That was accomplished with minimal fuss. Only took three or four
stretches to get a section the right diameter! It was glued in place with
non-fogging superglue.
Then it was on to some other parts of
the kit. The interior was next with a bit of attention. If you recall, on the
2nd I removed a section from the right sidewall for the insertion of a piece of
clear sprue. That was accomplished with minimal fuss. Only took three or four
stretches to get a section the right diameter! It was glued in place with
non-fogging superglue.  Next, the
trim wheel that was made on that day was also installed and painted. With
the installation of this bit, I can now finish up painting the interior. I have
a great shot of a G-6 interior taken at the Smithsonian Air and Space Museum
back some 20 years ago that is a great reference for 109 interiors. When I find
it, I'll make a large scan of it and post it so you can use it as well. While in
the interior, the instrument faces were filled with white paint in anticipation
of having Reheat instrument decals installed in them.
Next, the
trim wheel that was made on that day was also installed and painted. With
the installation of this bit, I can now finish up painting the interior. I have
a great shot of a G-6 interior taken at the Smithsonian Air and Space Museum
back some 20 years ago that is a great reference for 109 interiors. When I find
it, I'll make a large scan of it and post it so you can use it as well. While in
the interior, the instrument faces were filled with white paint in anticipation
of having Reheat instrument decals installed in them.
Turning to the wings, the underwing radiators were painted on the inside and then glued into the appropriate slots in the wing. These are actually a bit long as they jut out over the edge of the trailing edge of the wing. Once these are fully dry, I'll do some sanding to cure that. This will have to be done over much of the bottom of the radiator otherwise there will be a large blocky edge to them. These radiator doors fit flush and very smoothly in with the rear of the wing.
August 7-8, 2000
The last few days I have been doing some small stuff. First of all, I painted the wheels black. Then drilled out the attachment holes to accept the gear struts. Then the gear was painted RLM 02 Grey and when dry the oleo was covered with chrome Bare Metal Foil. The tail wheel strut was also removed from its block. Unfortunately, the fork of the tail wheel was broken from the strut during shipment and that will have to be repaired.
 Then I added a few more rounds of
filler to the tail section just to take care of a few holes. When that was done
the fin tip was glued on. I am using the taller wooden tail. This was attached
and the attachment points were then smoothed out and filler was applied to take
care of any glitches. Looking closely at both the fin and fuselage, it seems
that the tail section is a bit too large as the fin tip extension is actually
thinner than the tail section itself. I'll eventually fare in as much as
possible, but other than a killer sanding session (which I'm not going to do for
fear of opening up a mass of air bubbles), it will be quite a challenge to
correct the size difference. I also slightly enlarged the slot for the
horizontal stabilizer, removing small amounts of resin until the stabilizer fit
snugly into place.
Then I added a few more rounds of
filler to the tail section just to take care of a few holes. When that was done
the fin tip was glued on. I am using the taller wooden tail. This was attached
and the attachment points were then smoothed out and filler was applied to take
care of any glitches. Looking closely at both the fin and fuselage, it seems
that the tail section is a bit too large as the fin tip extension is actually
thinner than the tail section itself. I'll eventually fare in as much as
possible, but other than a killer sanding session (which I'm not going to do for
fear of opening up a mass of air bubbles), it will be quite a challenge to
correct the size difference. I also slightly enlarged the slot for the
horizontal stabilizer, removing small amounts of resin until the stabilizer fit
snugly into place.
The next thing was to test fit the lower wing again to see if everything lined up. Again, the wing dihedral seems to be a bit much. I decreased the dihedral a bit by pouring very hot water over the center section and then gently bending the wing. That seemed to have done it. Be very careful not to use water that is too hot as resin will warp; even the thick pieces.
 I also cleaned up the prop and spinner as well sanding on the aft part of the wing radiators to get a good fit. Then went and did a bit of more work on the interior. Painted a few more things and then added some instrument decals to the various instruments. I used all three scales of Reheat Instrument Decals for this one. The downside of this sheet is that it is basically for modern aircraft, though it does have some 'older' instruments. Of course, none of them are for any Luftwaffe aircraft. Upside is that unless you are an expert, you won't notice the difference and they really to look nice when done. It is
quite large and will take a bit to load. You'll notice that this interior and
the kit one are not exactly the same.
I also cleaned up the prop and spinner as well sanding on the aft part of the wing radiators to get a good fit. Then went and did a bit of more work on the interior. Painted a few more things and then added some instrument decals to the various instruments. I used all three scales of Reheat Instrument Decals for this one. The downside of this sheet is that it is basically for modern aircraft, though it does have some 'older' instruments. Of course, none of them are for any Luftwaffe aircraft. Upside is that unless you are an expert, you won't notice the difference and they really to look nice when done. It is
quite large and will take a bit to load. You'll notice that this interior and
the kit one are not exactly the same.
August 9-10, 2000
I started off by finishing the drybrushing of the interior parts. Then it came to be time to install the interior into the fuselage. First, I glued the bottom of the side panels to the interior, leaving the tops slightly spread out. That way, they will push out to the sides of the fuselage. At least, that is the theory and it has worked with injected styrene kits. There are some cut-outs on the side walls for the instrument panel to fit on, though they need to be enlarged slightly. The panel was glued to two fuselage sides and I had a complete cockpit.
Then the cockpit was carefully installed into the fuselage from below. It was a bit of a tight fit, but superglue and accelerator are wonderful things. I was able to get it in place without major trauma. Unfortunately sometime during this process, the instrument panel slipped from one side and is now in their a bit crooked, fore and aft-wise!

Then it was time to put on the wing. First attempt wasn't too good as there wasn't any way to get it to fit flush. The problem is a large resin block that is in the bottom of the inside of the wing. That is there to hold the interior in, but it is too tall. This baby took a LOT of sanding to finally get it down to size. One way to tell if something like this is hitting (because you can't see it when installed), is to slightly wet the top of it and then do a test fit. If there is moisture on the bottom of the interior, then the block needs more sanding. Once that was done, then the wing was test fit. Fits perfectly.
Before gluing, the was installed to check for alignment. Something wasn't right. There was a gross alignment difference between the wings and tail section. I tweaked the horizontal stabilizer to see if that would cure it and immediately broke the fin tip off! AAARRRGGGHHH!
After redoing the fin tip, the stabilizer was again installed. It lined up perfectly with the fin; a nice 90 degree angle. So what was the problem? Well, it seems that when I glued the tail section into the aft section of the fuselage, I didn't get it perfectly aligned. No way could I get this thing back out to try again. Superglue is very unforgiving stuff! I thought about heating the fin tip and bending it to compensate, but that would have put a kink in the rudder hinge line and I couldn't have installed the rudder.
 No, the only way I could fix this mess was to shim
the wing. This was done using evergreen strip. I had to shim it about .03 inches
on one side. Now this meant that the front and back of the wing/fuselage join
was sticking up on one side. No choice but to break out the 120 grit sandpaper
and start grinding away at the wing to get it smoothed out. As you may suspect,
when everything was nice and smooth, a bunch of tiny air bubbles were brought to
the surface of the wing. It took several applications of Mr. Surfacer and filler
to finally get all the bubbles filled in. However, I now have an aircraft where
the wings and horizontal stabilizer are pretty well aligned with each other.
There is a message here, unfortunately, it is one I ignore frequently!
No, the only way I could fix this mess was to shim
the wing. This was done using evergreen strip. I had to shim it about .03 inches
on one side. Now this meant that the front and back of the wing/fuselage join
was sticking up on one side. No choice but to break out the 120 grit sandpaper
and start grinding away at the wing to get it smoothed out. As you may suspect,
when everything was nice and smooth, a bunch of tiny air bubbles were brought to
the surface of the wing. It took several applications of Mr. Surfacer and filler
to finally get all the bubbles filled in. However, I now have an aircraft where
the wings and horizontal stabilizer are pretty well aligned with each other.
There is a message here, unfortunately, it is one I ignore frequently!
Coming up, tailplane and rudder! :o)
August 11-16, 2000
Despite the time that has passed, not much has gone on with the kit. This is mostly due to a contest on the 13th that took priority. I don't know about you, but I always need a day to recuperate after long drives and this one was a bit over 600 miles round trip. Did rather well though, placing with 4 out of 8 entries.
 Meanwhile, when I did get back to the kit, I did more work on
smoothing out the self-inflicted wing alignment. I mentioned earlier about the
air bubbles I opened up while sanding the wing. Here is a picture of what that
looks like after all the various fillers have been applied and the area smoothed
out. Things look pretty ugly right now, but that will all disappear under
paint.
Meanwhile, when I did get back to the kit, I did more work on
smoothing out the self-inflicted wing alignment. I mentioned earlier about the
air bubbles I opened up while sanding the wing. Here is a picture of what that
looks like after all the various fillers have been applied and the area smoothed
out. Things look pretty ugly right now, but that will all disappear under
paint.
The horizontal tailplane was installed and glued into place. Some filler was needed in that area as I overdid some of the opening up to get it to fit. Nothing major. Then the elevators were glued in place. I left them drooping a bit just to add to the look. The rudder was not yet glued in place as I'm still not sure what camouflage scheme to use with the kit.
The oil cooler under the nose was also glued in place. Fit is quite good. Just a couple of coats of Mr. Surfacer to fill in a few gaps, a quick sand and that was it. Also glued in place at this time was the supercharger intake. I really thought long and hard about waiting until installing the exhaust and shields before doing this, but I figured that if any filler was needed, it would be better to get it done now. Good thing, too as I rounded the base of it a bit and it will need some filler.
 Then I started cleaning up the tail wheel.
If you recall, this was broken in shipment. I glued the fork to the base of it
and then started cleaning it up. This part is badly formed. It seems as if the
mold slipped while curing and the offset between halves is really bad. There was
also a huge chunk of resin around the mating pin. I ended up removing all of it
as it would have been more work than it was worth to clean it up. During this
work I was reminded of the need to wear eye protection as a small piece of resin
flew into my eye as I was clipping it off the part. That pretty well put a halt
to the work until I was able to get it removed.
Then I started cleaning up the tail wheel.
If you recall, this was broken in shipment. I glued the fork to the base of it
and then started cleaning it up. This part is badly formed. It seems as if the
mold slipped while curing and the offset between halves is really bad. There was
also a huge chunk of resin around the mating pin. I ended up removing all of it
as it would have been more work than it was worth to clean it up. During this
work I was reminded of the need to wear eye protection as a small piece of resin
flew into my eye as I was clipping it off the part. That pretty well put a halt
to the work until I was able to get it removed.
I'll just reiterate that even hobbies can be dangerous and to take full advantage of what safety items are available. In addition to eye protection, that also includes a respirator when sanding and painting to prevent breathing in all the dust and harmful particulates.
That is where the work now stands. I have a coat of filler on the supercharger intake and once that is all done, I'll start painting the airframe!
August 17-21, 2000
Just to let you know, work is still going on with the kit. I have done some work around the supercharger intake as I really messed up sanding the bottom of it. Now that I have a pretty complete airframe, it is off to the paint shop.
|
PAINT & DECALS |
 The first thing I did was to
paint the aircraft overall RLM 76. I did this for several reasons. First of all,
it does make a very nice primer. Once I painted the entire aircraft (and that
took a few days as I don't have it on landing gear), it was carefully scanned
for places that might need some more filler. I found a few spots and so had to
fix them and then repaint the areas sanded off. Secondly, I was seriously
contemplating leaving the model in overall 76. According to one of my
references, Erich Hartmann flew an overall RLM 76 Bf-109G-6 with a tall tail and
Galland hood.
The first thing I did was to
paint the aircraft overall RLM 76. I did this for several reasons. First of all,
it does make a very nice primer. Once I painted the entire aircraft (and that
took a few days as I don't have it on landing gear), it was carefully scanned
for places that might need some more filler. I found a few spots and so had to
fix them and then repaint the areas sanded off. Secondly, I was seriously
contemplating leaving the model in overall 76. According to one of my
references, Erich Hartmann flew an overall RLM 76 Bf-109G-6 with a tall tail and
Galland hood.
After
some serious consideration of actually doing this, I decided against it and will
go for a 'normal' RLM 74/75/76 scheme with this one. With that in mind, I
painted much of the upper surface with the lighter of the two greys, RLM 75.
That is where the kit now stands, so to speak. I have a few more bits to clean
up that need added, and I still haven't settled on the final aircraft that I
want to model. There are about four aircraft to choose from and it depends on
how I can do the decals that will depend on which one will be done. Stay tuned.
August
22-29, 2000
It
also doesn't help that there was a model contest during this week and I had to
prep and repair other kits for that. During this time, I had some pictures come
back from the developers, one of which shows the shimming of the wing that was
needed. You can see that image in the August 10 update.
The results are quite
convincing as compared to free-handing it. It leaves a nice transition area that
isn't as sharp as tape and is much cleaner than free-handing it. Downside is
that it doesn't like matte surfaces that well. It sticks VERY nicely to gloss
surfaces, though. I have given samples to friends and they report the same
thing.
As you can see by the images above, there is a definite difference in
results. I sprayed half the plane by masking and the rest was done free-hand.
Frankly, I like the masked line a lot better, despite the time it takes to do
all the masking and painting. It should be even more convincing and useful when
doing smaller scale aircraft. Once the
upper colors were sprayed, the demarkation line along the fuselage was painted.
This was done free-hand as that part always looked more ragged in photos than
the upper surfaces. The kit was then taken back to the work bench to have more
done to it prior to continuing on.
August
30 - September 25, 2000 During this long period of time,
the kit was set aside for much of it in order to concentrate on other projects.
Not to say that nothing was done, as the final paint job was done to the kit.
First of all, I sprayed the wrong pattern on the right wing. That was corrected,
using U-Knead-It as a masking material. The more I use this stuff, the better I
like it. It doesn't eliminate the need to mask areas you don't want overspray
on, but it does a good job on getting relatively tight demarkation lines done.
The other
toy was a Nikon 990 digital camera. This required a bit of a learning curve, but
I think it will be a real asset to the site. The image at right as well as the two
side by side images of the cockpit under 'August 9-10' were taken with this
camera. Now that I am back into working on the kit, it shouldn't be that much
longer before the kit is completed. Stay tuned.
September
25 - October8, 2000 Ye Gads! This has been going on for
over two months! Isn't this thing ever going to get finished?
Well,
the kit has been repaired, repainted and ready for another attempt at putting on
decals. I also have the canopy cut and pretty close to fitting. It is a vacuform,
so I'm not that good at cutting them. Fortunately, there is a spare, thanks Pend
Oreille! That is where we now stand. This is pretty standard for me and resin,
vacuform and multi-media kits.
October
8 - December 27, 2000
The
other day, I had finished a kit and was considering starting another. I then
noticed that there were a number of models in various boxes around the bench
that were near completion, but for one reason or another, I had not worked on
for quite some time. This kit was one of them. With renewed enthusiasm, I
pondered what to do about the fuselage decal. About the only thing I could think
of was to either mask the area and paint it on, or to take a 'regular' fuselage
decal, cut the white parts out and apply them. That is what I chose to do. The
end result is not bad, though not as good as a dedicated decal would have been. CONSTRUCTION CONTINUES I
then set to try to get the canopy to fit properly. What seems to have happened
is that the master mold is 1/35, but the actual canopies themselves ended up
being larger, like 1/32. I messed up both windscreen sections of the two Erla
Haube canopies trying to get them to fit. In the end, I cut the canopy from the
messed up windscreen section and then cut the windscreen section from one of the
older canopies given. Before trying to attach the canopy
parts, I first installed the gunsight, painted it black, drybrushed it and put a
small square of clear on it. Then I cleaned up and painted the canopy armored
back section and cut a section of clear to install on that. I'm still trying to
figure out how to attach this piece to the very flimsy canopy section. At the
same time, the exhaust and exhaust shields were glued in place. The shields
still need to be painted. Still going slow, but at least it is still going! December
28 2000 - January 1 2001
Also painted the exhaust shields with RLM 76. Then I went to
look for ways to attach the canopy armor. Most of the methods I though of were
not very practical. What I decided to do was to make small tabs from scrap brass
sheet and then attach it to the inside of the canopy with non-fogging superglue.
The installation just didn't work well and so I removed it and the brass strips
and will try again.
January
2 2001 - July 12 2001 Hate to say it, but
the kit sat and sat and sat. Interest had completely gone away. This happens
from time to time and it often takes a push of some sort to get things going
again. This was done in the form of a replacement sheet of decals and a new kit
to review from Pend Oreille. There was some guilt involved in knowing that I had
been sitting on this thing for so long as well! July 13 2001 - July 21 2001 Resolved to getting the kit finished, I attacked it with renewed vigor.
The first thing I did was to get the armored head rest glued in. This was done
not with brass strips, but with attaching thin pieces of styrene to it. These
were then trimmed to fit onto where the framing was on the canopy. The canopy
was then masked and painted RLM 66 using Testors Model Master
Next, the gear doors were glued on again as they had broken off during
the preceding months. Returning to the upper fuselage, the short antenna mast
was glued on and painted. Then a small section of wire was formed into a loop
antenna by bending it around a paint brush handle and then trimming off the
'legs'. These were inserted in holes that were drilled in the loop antenna
mount. Another hole was drilled in the upper fuselage near the tail for the
radio antenna lead in and a similar one was drilled in the right lower fuselage
near the cockpit section for another antenna.
At this time, the very thin tail wheel fork on the right side decided
to break off and disappear into the hands of the carpet elves. No choice but to
make a new one from plastic card. This was done and glued in place. It was then
smoothed in using standard putty and repainted. Then it was back to the decals. I used the number 6 and a few stencil
decals. These went down OK, but no amount of pressure or setting solution would
have them conform to the panel lines. The yellow is also very transparent, even
when backed up with white. While I did not have the problem with fragmenting
decals from the earlier sheet, my lack of success in
Next the pitot tube was glued into the wing leading edge, followed by
the prop. These were given any last minute painting needed. The model was then
sprayed with clear matte where needed before the final parts were glued on.
These are the aileron balances. Of all the 109s I have built, these bits are the
easiest to lose. If someone wanted to make major money, they'd produce an after
market set of these in styrene or resin in at least 1/48 and 1/72 scales. I
can't tell you how many of my 109s are missing these bits! Once the balances
were on, the kit was given some exhaust staining with pastels and was finished (chorus of 'Hallelujah' in the background).

 I was recently given a relatively new product to try and figured
I'd do it with this aircraft. The stuff is called 'You Knead It' and it is a
masking putty very similar to Silly Putty. The idea is to use it to mask over
what you don't want and the height of the material will give your a finely
sprayed edge. Well, with a kit of this size, using to mask big areas wasn't an
option so thin lines of it were made, placed along the border area, then
a business card was used to contain overspray. When painting, make sure
that you do NOT spray right at the putty or it will build up against it and look
very yucky!
I was recently given a relatively new product to try and figured
I'd do it with this aircraft. The stuff is called 'You Knead It' and it is a
masking putty very similar to Silly Putty. The idea is to use it to mask over
what you don't want and the height of the material will give your a finely
sprayed edge. Well, with a kit of this size, using to mask big areas wasn't an
option so thin lines of it were made, placed along the border area, then
a business card was used to contain overspray. When painting, make sure
that you do NOT spray right at the putty or it will build up against it and look
very yucky! 
 Also
during this time period I acquired two new toys. One was an Iwata Eclipse
airbrush. Though it did not have the fine tip installed, I used it to spray the
mottling on the fuselage sides using RLM 74/75/02. AT this time I also painted
the rudder RLM 66 and masked off a large black band on the aft fuselage. This
was done using a drawing found in 'Luftwaffe
Codes, Markings and Units' for an aircraft from JG 53. I then sprayed some areas of the fuselage
with clear acrylic gloss in preparation for adding the decals. Additionally, the
prop blades were painted RLM 70 and the spinner black.
Also
during this time period I acquired two new toys. One was an Iwata Eclipse
airbrush. Though it did not have the fine tip installed, I used it to spray the
mottling on the fuselage sides using RLM 74/75/02. AT this time I also painted
the rudder RLM 66 and masked off a large black band on the aft fuselage. This
was done using a drawing found in 'Luftwaffe
Codes, Markings and Units' for an aircraft from JG 53. I then sprayed some areas of the fuselage
with clear acrylic gloss in preparation for adding the decals. Additionally, the
prop blades were painted RLM 70 and the spinner black. A positive and constructive comment,
to say the least. Well, I had hoped to have had it done by this time, however, a
number of things have happened to it since then. FIrst of all, I decided to give
the kit decals a try just to say that I had. So I cut out the wing crosses and
applied them using Microscale's setting fluids. As you know, these are a solid
sheet so need to be cut out. When placed on the aircraft, of the four crosses,
two of them broke into pieces as in the accompanying photo. As for the opacity
of the white, it is quite good and I shouldn't have worried as you can see by
the image below. The Microscale stuff had no effect on them whatsoever. So I
tried Solvaset. While it made the decals stick, it didn't help them conform to
the panel lines. What was worse, the upper crosses silvered very badly. The only
choice was to remove them and use other decals.
A positive and constructive comment,
to say the least. Well, I had hoped to have had it done by this time, however, a
number of things have happened to it since then. FIrst of all, I decided to give
the kit decals a try just to say that I had. So I cut out the wing crosses and
applied them using Microscale's setting fluids. As you know, these are a solid
sheet so need to be cut out. When placed on the aircraft, of the four crosses,
two of them broke into pieces as in the accompanying photo. As for the opacity
of the white, it is quite good and I shouldn't have worried as you can see by
the image below. The Microscale stuff had no effect on them whatsoever. So I
tried Solvaset. While it made the decals stick, it didn't help them conform to
the panel lines. What was worse, the upper crosses silvered very badly. The only
choice was to remove them and use other decals. 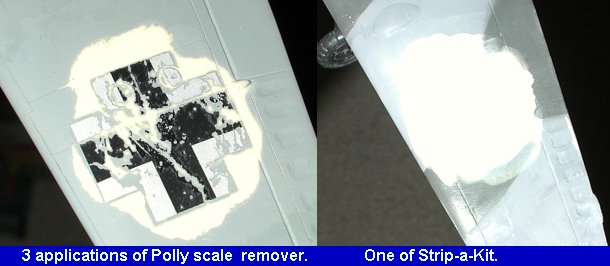 This is where I ran into big
trouble. I put numerous applications of Solvaset on the decals in an attempt to
soften them up so I could remove them. Nothing. Then I tried some Pollyscale
Decal and Paint remover. I had used this in the past with much success in
removing decals. More nothing, however it did start to remove the paint around
the decal. Well, by this time, I had enough and went for a surefire material,
Strip-a-kit. In no time, I had not only the decal but the paint removed from the
wings where the crosses went. Naturally, this meant some extra sanding to smooth
the edges and a respray of the wings. During this evolution, I managed to drop
the model on the floor. Concrete, nonetheless. To say a few pieces departed the
kit would be a fair guess. Mostly landing gear stuff.
This is where I ran into big
trouble. I put numerous applications of Solvaset on the decals in an attempt to
soften them up so I could remove them. Nothing. Then I tried some Pollyscale
Decal and Paint remover. I had used this in the past with much success in
removing decals. More nothing, however it did start to remove the paint around
the decal. Well, by this time, I had enough and went for a surefire material,
Strip-a-kit. In no time, I had not only the decal but the paint removed from the
wings where the crosses went. Naturally, this meant some extra sanding to smooth
the edges and a respray of the wings. During this evolution, I managed to drop
the model on the floor. Concrete, nonetheless. To say a few pieces departed the
kit would be a fair guess. Mostly landing gear stuff.  As often times happens, when
one runs into a major glitch, things tend to sit around for a long time before
the muse strikes again to start in. That is what has happened to this kit. After
much hunting around for decals, I managed to find a sheet that supplied the
upper and lower wing crosses. However, finding fuselage crosses was a task that
met with zero success. So I basically gave up for a while.
As often times happens, when
one runs into a major glitch, things tend to sit around for a long time before
the muse strikes again to start in. That is what has happened to this kit. After
much hunting around for decals, I managed to find a sheet that supplied the
upper and lower wing crosses. However, finding fuselage crosses was a task that
met with zero success. So I basically gave up for a while.
 Had a nice long weekend to work on the kit but did little more
than get the windscreen glued in place. It isn't a very neat installation, but
the windscreen just doesn't fit the allotted area worth a hoot. I faired it in
as best I could and it required some sanding to get it to look any good at all.
This kit definitely won't be a contest winner! It was then masked off with Tamiya masking tape.
Had a nice long weekend to work on the kit but did little more
than get the windscreen glued in place. It isn't a very neat installation, but
the windscreen just doesn't fit the allotted area worth a hoot. I faired it in
as best I could and it required some sanding to get it to look any good at all.
This kit definitely won't be a contest winner! It was then masked off with Tamiya masking tape.
 paint. Many late war 109s had canopies that were
simply primed and without exterior colors. Once the paint was dry, the armored
headrest was glued in with non-fogging superglue and actually helped to stiffen
the very flimsy canopy! A small section of stretched sprue was glued to the
right lower canopy frame to represent the hinge and the canopy glued to the
fuselage in the open position. I also glued a couple of pieces of sprue to the
upper corners of the windscreen frame as grab handles.
paint. Many late war 109s had canopies that were
simply primed and without exterior colors. Once the paint was dry, the armored
headrest was glued in with non-fogging superglue and actually helped to stiffen
the very flimsy canopy! A small section of stretched sprue was glued to the
right lower canopy frame to represent the hinge and the canopy glued to the
fuselage in the open position. I also glued a couple of pieces of sprue to the
upper corners of the windscreen frame as grab handles. Once that was done, a
long-wire antenna was made from clear stretched sprue and attached to the
antenna mast and tail with superglue. The lead in wire was placed in the hole
and also glued to the long wire. The underfuselage wire was then glued in. A
section was also used to simulate the cable that kept the canopy open and was
glued to the interior and the bottom of the head armor.
Once that was done, a
long-wire antenna was made from clear stretched sprue and attached to the
antenna mast and tail with superglue. The lead in wire was placed in the hole
and also glued to the long wire. The underfuselage wire was then glued in. A
section was also used to simulate the cable that kept the canopy open and was
glued to the interior and the bottom of the head armor. getting them to snuggle
into crevices means that they are still less than ideal. Perhaps installing them
onto Future, as many do, will be beneficial.
getting them to snuggle
into crevices means that they are still less than ideal. Perhaps installing them
onto Future, as many do, will be beneficial.
|
CONCLUSIONS |
 Pend Orielle has done us a real favor by producing this kit and
doing it in 1/35 scale. It is just what WWII armor diorama builders have wanted.
Now they can use all those neat military vehicles in an airfield scene and have
a properly scaled aircraft to go with it. I would hope that it would spawn other
models in this scale like a Hurricane or a Mustang, but that has not yet
happened.
Pend Orielle has done us a real favor by producing this kit and
doing it in 1/35 scale. It is just what WWII armor diorama builders have wanted.
Now they can use all those neat military vehicles in an airfield scene and have
a properly scaled aircraft to go with it. I would hope that it would spawn other
models in this scale like a Hurricane or a Mustang, but that has not yet
happened.
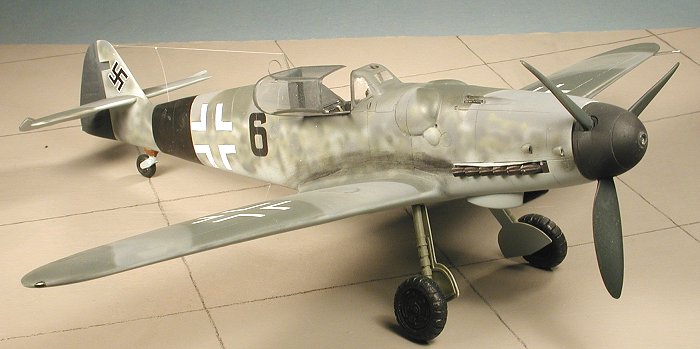
109 addicts will like it because it is another 109 model, and one that looks pretty accurate to boot. As you know, I don't drag out the tape measure for each kit, but base my opinions on if it looks like what it is supposed to be and this one does. What wasn't planned was that it would take almost a year to finish, and that is entirely my fault. The model is not a terribly difficult build and anyone who has any experience at all with resin models should be able to build theirs in considerably less time. I am quite pleased with the over all result and it will look really great in with my ever-growing collection of 109s!
Review copy courtesy of Pend Oreille Thanks for your support and your patience!
2008 update: To my knowledge, Pend Oreille is no longer a going concern.
July 2001
Copyright ModelingMadness.com. All rights reserved.
If you would like your product reviewed fairly and quickly, please contact the editor or see other details in the Note to Contributors.
Back to Reviews Page 2020