Hasegawa 1/48 Bf-109G-6 'JG 51
Molders'
Kit #: JT156
Price: $27.98 retail
Decals: Two versions : White 7 with an eye over the gun bulge for JG 51 (see box art), and White 6 for JG 3 with a comet on the gun bulge. Both with underwing 20mm cannon pods.
Date of Review: January 20 1999
Review and Photos by: Scott Van Aken
What can I say about the 109G that has not been repeated by countless others? Actually nothing except that it is probably one of the top aircraft kitted. The A6M is undoubtedly #1 with the P-51, Spitfire, F-16 and F-4 up there along with it.
 Hasegawa's kit of the G uses a lot of sprues for the F kit with extra bits
tossed in to make the G and later versions. I
know
the wings are for the F as I had to cut out the round wheel wells to square
them off for the G. What it means is that you get a lot of extra parts
for your spares box, like tail wheels, windscreens, drop tanks, radio antenna
and a bunch of other various and sundry bits.
Hasegawa's kit of the G uses a lot of sprues for the F kit with extra bits
tossed in to make the G and later versions. I
know
the wings are for the F as I had to cut out the round wheel wells to square
them off for the G. What it means is that you get a lot of extra parts
for your spares box, like tail wheels, windscreens, drop tanks, radio antenna
and a bunch of other various and sundry bits.
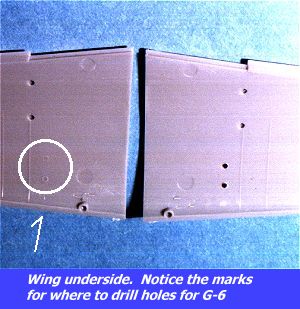
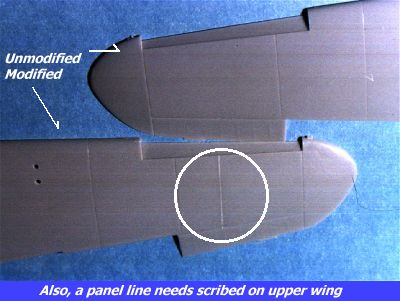
I wanted to build this kit as a 'slammer' with very few, if any, aftermarket parts, and the only thing other than decals that I changed was to add some brass etched rudder pedals and seat belts. Before getting to actual construction, the instructions were read to see what I had to do to make my particular version. I already mentioned having to modify the wheel wells, and in addition, there are fuel fillers on the spine that need filled, an extra panel line scribed into the upper wings and the holes for the wheel bulges need to be drilled. The holes are not actually started as you might think, but there are clear marks where you need to drill.
|
|
|
Should I expect all the parts to be specifically for the 109G? Sure. Will I get it? No. It is a clear trend and a matter of economics to do multi-version kits where the builder needs to make small modifications. Not a real problem for most, and those that don't want to do it don't have to. Can you make an F from this kit? Yes you can, but you do need to do some mods to the windscreen by removing the small intakes and polishing that area as there were windows there on the F. Other areas that needed attention were some small areas of flash, especially on the underwing radiator intakes.
 Once all that was remedied, the interior was constructed with brass rudder
pedals from a Reheat set added. This was then painted RLM 66 as were
other areas of the interior. The seat belts were painted and installed before
the side panels were attached. The interior can be added from the
underside, so the fuselage was glued together and any areas needing filler
were done. The prop attachment is trapped between the halves so care was
spent in that area. While waiting for that to dry, the instrument panel
decal was applied. Not real colorful, but it fit perfectly over the engraved
instruments. A touch of Champ setting solution forced the decal into
position. it was then installed. Next the completed interior was installed.
Make sure that the side panels are glued loosely to the floor to ensure a
good fit. Once in place, they can be more securely attached. The interior
was drybrushed to bring out details before installation.
Once all that was remedied, the interior was constructed with brass rudder
pedals from a Reheat set added. This was then painted RLM 66 as were
other areas of the interior. The seat belts were painted and installed before
the side panels were attached. The interior can be added from the
underside, so the fuselage was glued together and any areas needing filler
were done. The prop attachment is trapped between the halves so care was
spent in that area. While waiting for that to dry, the instrument panel
decal was applied. Not real colorful, but it fit perfectly over the engraved
instruments. A touch of Champ setting solution forced the decal into
position. it was then installed. Next the completed interior was installed.
Make sure that the side panels are glued loosely to the floor to ensure a
good fit. Once in place, they can be more securely attached. The interior
was drybrushed to bring out details before installation.
As mentioned earlier, most of the adjustments needed were on the wings.
The various engraving and drilling and cutting was done, then the radiators
were painted, drybrushed and installed. Before gluing the wings together,
add the wheel bulges to the upper wing.
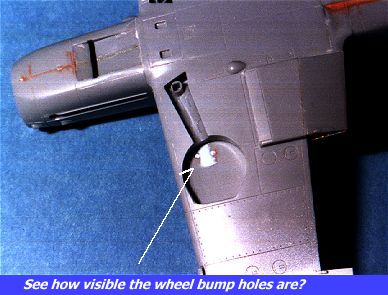 Then go back
and fill the holes in the underside as they can be seen in the wheel wells.
Other than the areas denoted by the images, there are no other areas that
differ from any other kit. The wing upper and lower surfaces were glued
together and while drying, one needs to determine how to position the flaps
and radiator exhaust. I chose the exhaust to be fully closed and the
flaps slightly deployed. Make sure you do not glue the exhaust flaps together
before attaching to the wing. I did and had to cut them apart once
I realized my error! You need to attach the upper then the lower exhaust
flap to the wing then to each other at the trailing edge. Major goof #1.
Were there more in store? Actually there I did make one more, but I'll leave
it to you to discover that one.
Then go back
and fill the holes in the underside as they can be seen in the wheel wells.
Other than the areas denoted by the images, there are no other areas that
differ from any other kit. The wing upper and lower surfaces were glued
together and while drying, one needs to determine how to position the flaps
and radiator exhaust. I chose the exhaust to be fully closed and the
flaps slightly deployed. Make sure you do not glue the exhaust flaps together
before attaching to the wing. I did and had to cut them apart once
I realized my error! You need to attach the upper then the lower exhaust
flap to the wing then to each other at the trailing edge. Major goof #1.
Were there more in store? Actually there I did make one more, but I'll leave
it to you to discover that one.
The fit of the wing to fuselage is really very good indeed. In fact it is tight in the fore and aft direction The upper wing roots had a small gap that went away once glued. After all that dried, the tailplanes were installed. Then the nose radiator was installed after being painted and drybrushed.
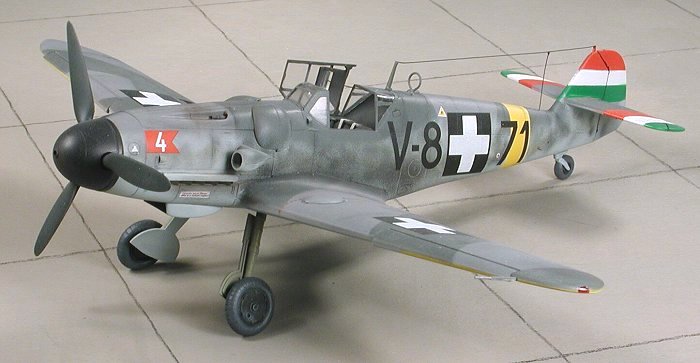
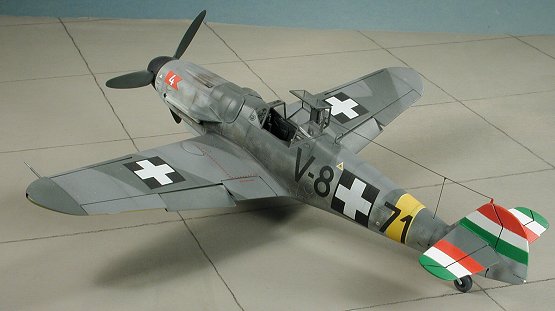
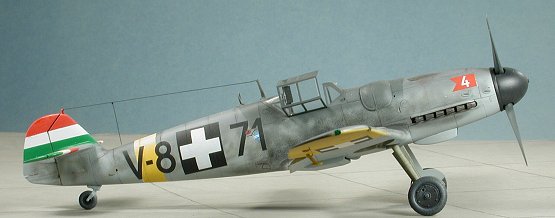
Now I had basically a complete airframe and it was time to paint. Aeromaster paints were used for most of the RLM colors. This is my favourite and most frustrating part of building. I love to paint camo, but make a lot of goofs which require redoing areas. This 109G was to be from the Hungarian AF so needed areas of red, white, green and yellow painted on. This meant undercoating with white. The tail, tailplanes, rear fuselage and underwing tips were treated to the Testor's gloss white. I used a scheme in Aeromaster's sheet #48-221 on the Hungarian AF. This requires painting the colorful tail markings. The yellow was Xtracolor RLM04, the Red was Tamiya Acrylic Red and the Green was Testors in the small bottle. Once each color was painted and dry for at least a day, it was masked. The underside was then painted Aeromaster RLM 76. After that dried, the canopy was masked and installed with 5 minute epoxy, and then the upper colors were painted RLM 74 and 75. Sides were mottled with 74, 75 and 02.
 While all this painting was going on the other bits were attended to. The
struts were painted RLM 02 and oleos given the Bare Metal Foil treatment.
Prop blades were cleaned up and painted RLM 70 Black Green with the
spinner painted in black. Gear doors painted 02 inside and 76 outer. This
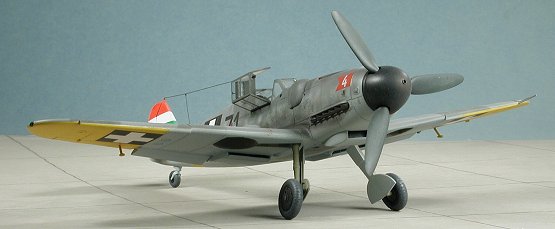
aircraft is to be clean with no underwing weapons or drop tank. After the
kit was fully painted, it was sprayed with several coats of Future
to give it some gloss for the decals. The landing gear and doors were
then installed as were the radio antenna and DF loop. They were brush
painted to match the surrounding color. At this stage, the exhausts and shields
were also installed. These gave me fits as the fit was incredibly tight.
I ended up cutting off the alignment tabs on the shields and, with
much grunting and straining, finally got them installed. No glue needed for
these items!!
While all this painting was going on the other bits were attended to. The
struts were painted RLM 02 and oleos given the Bare Metal Foil treatment.
Prop blades were cleaned up and painted RLM 70 Black Green with the
spinner painted in black. Gear doors painted 02 inside and 76 outer. This
aircraft is to be clean with no underwing weapons or drop tank. After the
kit was fully painted, it was sprayed with several coats of Future
to give it some gloss for the decals. The landing gear and doors were
then installed as were the radio antenna and DF loop. They were brush
painted to match the surrounding color. At this stage, the exhausts and shields
were also installed. These gave me fits as the fit was incredibly tight.
I ended up cutting off the alignment tabs on the shields and, with
much grunting and straining, finally got them installed. No glue needed for
these items!!
 On to decaling. The Aeromaster decals are superb as always. The only downside
are the opaqueness of the underwing crosses. The yellow of the wingtips
shows through the white of the decal. It isn't a problem with the other
ones as the underlying colors are not so brilliant. Were I to do it
again, I would put an extra bit of white decal under them. Aeromaster includes
a full stencil set for the 109 so the Hasegawa sheet was not used, except
for the instrument panel. Once the decals were dry, the excess setting solution
(Champ) was removed with a damp cloth and the aircraft sprayed with a dullcoat.
The kit was then given the pastel treatment, both to accentuate panel
lines and to do the usual exhaust and gun stain treatment. Once that was
done a light coat of matte clear was resprayed to seal in the pastels.
On to decaling. The Aeromaster decals are superb as always. The only downside
are the opaqueness of the underwing crosses. The yellow of the wingtips
shows through the white of the decal. It isn't a problem with the other
ones as the underlying colors are not so brilliant. Were I to do it
again, I would put an extra bit of white decal under them. Aeromaster includes
a full stencil set for the 109 so the Hasegawa sheet was not used, except
for the instrument panel. Once the decals were dry, the excess setting solution
(Champ) was removed with a damp cloth and the aircraft sprayed with a dullcoat.
The kit was then given the pastel treatment, both to accentuate panel
lines and to do the usual exhaust and gun stain treatment. Once that was
done a light coat of matte clear was resprayed to seal in the pastels.
Final assembly consisted of the usual addition of small pieces like the pitot tube and the removal of masking from the transparencies. The canopy was glued in the open position. Lastly, the radio antenna was made from stretched sprue and attached and a small canopy stay added.
What can I say. It really is a super kit of the 109G. I put it and the Fujimi 109s on about the same plateau. Neither of them are 'shake and bake' kits as they have their minor fit problems. However, the general availability of the Hasegawa kit and the additional finesse of details makes it the one most will try.