
Eduard 1/144 Bf-109F
|
KIT # |
4405 |
|
PRICE: |
$4.99 |
|
DECALS: |
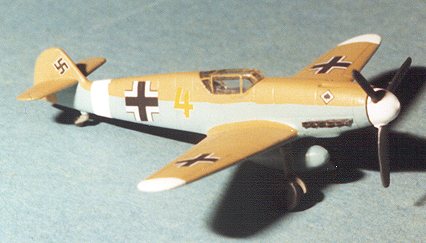
Two versions: Marseille & von Maltzahn, 1942 |
|
REVIEW BY: |
|
|
NOTES: |
|
|
HISTORY |
No real need to go into the long history of the Bf-109 save to say that it was the only German aircraft to be in continual production from the first to the last day of the war. It is also probably the most kitted Western aircraft that there has ever been. Add one more to that list with this one.
|
THE KIT |
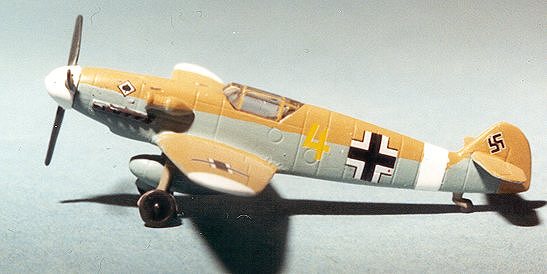

I saw this in a hobby shop the other day and thought to myself. Hmm. What in the world could there be about this kit that makes it worth $4.99 when I can get a nice, big, Dragon A-10 for two bucks less? Well, curiosity and my penchant for 109s got the best of me and of the two available (the other being a 109G), I picked up this F model.
Hurrying home, I breathlessly tore off the shrink wrap and gazed at.....one sprue with very small parts on it. Oh yes, one also gets two canopies (why is beyond me as they look the same) as well as the now expected, Polish printed, Eduard decal sheet. A very thorough decal sheet with all that one could ever want. The instruction sheet is also very well done with one page devoted to the introduction, one to the parts breakdown and paint info, one to a 3 step construction sequence and one to the camouflage and decal placement.
 You get the option of a
tropical version and, since this is obviously the same sprue as what comes with
the 109G kit, you get underwing cannon packs and the nose blisters for the nose
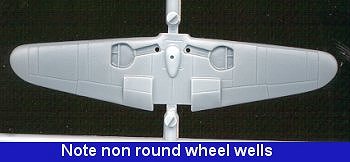
guns. What makes this kit a real poser is the wing. A good look at the wheel
wells shows that one has to be very sure of one's references to make this kit an
F. Most F's had circular wheel wells vice the squared off ones of the earlier E
and later G models. As you can see from the image these have the squared off
wells of the G model and rounding them off isn't really an option with a solid
wing.
You get the option of a
tropical version and, since this is obviously the same sprue as what comes with
the 109G kit, you get underwing cannon packs and the nose blisters for the nose
guns. What makes this kit a real poser is the wing. A good look at the wheel
wells shows that one has to be very sure of one's references to make this kit an
F. Most F's had circular wheel wells vice the squared off ones of the earlier E
and later G models. As you can see from the image these have the squared off
wells of the G model and rounding them off isn't really an option with a solid
wing.
OK, so I'll just do a G version. Well, there is a problem there as well. To do any of the later G's one needs to have the wheel bumps on the top of the wing for the wider wheels introduced with the late G-4 aircraft. This pretty well limits you to doing a late G-2 or early G-4. Not that this is a bad thing, just that it isn't what was advertised on the box top. Now those that are really 'serious' modelers probably wouldn't look twice at this kit, and those that aren't (which is what I suspect is the target), don't care, but there it is.
|
CONSTRUCTION |
If there ever was a 'weekend project', this is it. The first step is to glue the fuselage halves together and then add the wing. You need to do a bit of work to make sure that everything is square or you'll have lopsided wings. While that was drying, I glued together the drop tank. It isn't exactly round and looks a bit 'squashed', but it should do. Then I went and looked up references for a Bf-109G-2/4 as you can't do an F with this kit (see above). Well, I found a number of them in several schemes that will do just nicely. BTW, did I mention that this kit comes with the later, non-spoked wheels as used on the late G-4 through G-14?
After letting the glue dry, some filler was applied to a few spots where the wing meets the fuselage. Next the tailplanes were glued in place. Despite the size of the slots in the tail, the tailplanes fit just fine. Then the landing gear was glued in place and left to dry.
|
PAINT & DECALS |
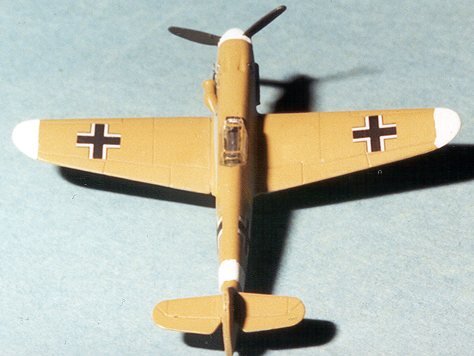
Frankly, airbrushing a kit this size wasn't what I was looking forward to doing. So I didn't! Grabbing a couple of tins of Xtracolor in RLM 78 blue and RLM 79 sand, and a brush, I first painted the underside and the drop tank in blue. This stuff is great. It goes on smoothly and leaves almost no brush marks when dry. After about 4 hours of drying, I applied the upper sand color. Again, a nice, smooth application. Then the white theater bands were painted using Testor's white. Naturally one coat wasn't sufficient and the Testors doesn't dry as fast as the Xtracolor.
The forgotten supercharger intake was then glued in place and when dry painted. Wheels were painted black and when dry the tires painted with Aeromaster tire paint as was the tail wheel. The interior was repainted RLM 66 and the canopy glued in place. Once that was done, the canopy was painted with a sharpened toothpick. Frankly, the clear is waaaay too thick and the only way to get a decent look of this would be to paint the thing blue and then do the frames.
Decals for this kit are typical of what is in with Eduard kits today. Made in Poland and thinner than the ice in May. They tear just via telepathy so one must be very careful when using them. Somehow, I managed to get most of the important ones on the plane. Thankfully, there are enough so that you can goof up one or two and not have a total disaster. Final results, of course, look just great, however their thinness does mean that they are slightly transparent so probably wouldn't look too great on a segmented camouflage scheme.
Final steps were painting and installing the props, and wheels. Then the kit was given a slight coat of matte clear to seal the decals and cut down on the Xtracolor shine.
|
CONCLUSIONS |
Once past the price tag, the buyer should be happy with this kit. The fit is fairly good, the detail is equally good and the kit looks like what it is supposed to be; a Bf-109F/G. It really is tiny but should fit in well into any 1/144 collection.
|
REFERENCES |
Messerschmitt Bf-109F,G, & K, by Jochen Prien and Peter Rodeike
Copyright ModelingMadness.com. All rights reserved.
Review copy courtesy of me and my wallet.