Monogram 1/48 Bf-109G-10
|
KIT # |
5225 |
|
PRICE: |
$Currently (2002) Out of Production |
|
DECALS: |
One aircraft |
|
REVIEW & |
|
|
NOTES: |
Same as the RoG mold from the 80's |
|
HISTORY |
The 109G-10 was actually the last 'production' Bf-109 built. The plane first flew a few months after the K-4, using airframes currently on the assembly line. In the past it had been thought that the G-10 was made of rebuilt airframes, but this has since been shown to not be the case. These airframes were brought up to as close to K-4 standards as possible.
The result for researchers is that the plane is as difficult to identify from photos as just about any 109 variant. Early G-10s did not have the DB.605D engine in them and had to rely on the earlier DB.605AS engine. These 109G-10/AS airframes can be distinguished by the absence of two small 'bumps' under the forward cowling as on the later aircraft. Early G-10s also had the narrower 660x160 wheels and tires so didn't have the long wheel fairings in the upper wing. Those with the 660x190 wheels and tires had the longer fairings.
 All G-10s had the Erla Haube canopy and tall wooden fin and
rudder. Some had a short tail wheel strut and others the longer version. There
were also two different rudders, one with two additional external trim tabs. In
addition, there were two upper cowling designs, the type 100 with a smooth
upsweep on the left side and the type 110 with a flat plate fairing instead.
While many G-10s had a deeper oil cooler than the earlier G-14, this was not
always the case. A final difference was that some had a short antenna mast and
some had none at all with the antenna lead going right into the fuselage spine
aft of the cockpit.
All G-10s had the Erla Haube canopy and tall wooden fin and
rudder. Some had a short tail wheel strut and others the longer version. There
were also two different rudders, one with two additional external trim tabs. In
addition, there were two upper cowling designs, the type 100 with a smooth
upsweep on the left side and the type 110 with a flat plate fairing instead.
While many G-10s had a deeper oil cooler than the earlier G-14, this was not
always the case. A final difference was that some had a short antenna mast and
some had none at all with the antenna lead going right into the fuselage spine
aft of the cockpit.
WHEW! That makes for a lot of different variations. Unfortunately, most profiles will not show the upper wing fairings and many photos are such that this feature is not visible. This makes it almost impossible to determine if an airframe is a G-10 or a G-14 or even a later G-6, especially if it had the 605AS engine. Only serials could tell. This has led to several aircraft being identified as a G-14 in one book and a G-10 in another!
|
THE KIT |
Revell/Monogram's kit is based on the G-10 that is held at the Chino
Museum in California. However, Chino's G-10 is not your regular run of the mill
G-10. The most common combination of parts for a G-10 were the DB 605D engine,
the type 100 cowling, wide 660x190 wheels (therefore the wide wheel fairings),
the taller tail wheel strut, and the rudder with the two external trim tabs.
Chino's plane has a shorter tail wheel and the wide wheels. Not many G-10s
were built like this. Generally, if the plane had the short tail wheel strut, it
had the thinner wheel/tire combo and no large upper wing fairings. This will
come to bite me when looking for a camo and markings scheme later.
This particular kit was given to me by a fellow who knew it wouldn't get
finished. It had been started and came with no instructions, no decals, and no
clear bits, but with a small Eduard brass fret (though for a 109G-6, was
just as good for a G-10). I'm always a sucker for basket cases like this and
thanks to a rather large spare parts bin, felt it would not be impossible to
make this one into a fine model.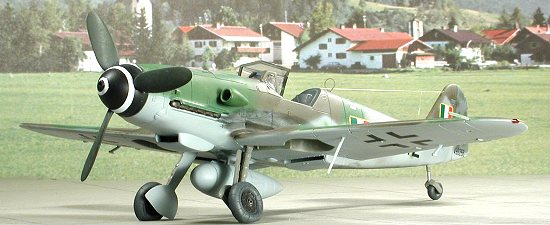 The kit itself has engraved panel lines, a fairly compete cockpit with sidewall
detail, and the drop tank mount molded into the lower wing. For decades, was the
most accurate 1/48 109 kit on the planet. This has now changed with the newer
Hasegawa 109 kits, but it is still quite popular with builders thanks to its
much lower purchase price. Even today with it out of production, it is easy to
find at around $7 or so from swap meets or on-line auctions. When compared to
the Hasegawa kit, its deeper panel lines and generally lower level of overall
detail is apparent, but it still builds into a very nice model, especially if
you want to fork over a few bucks on some aftermarket detail bits.
The kit itself has engraved panel lines, a fairly compete cockpit with sidewall
detail, and the drop tank mount molded into the lower wing. For decades, was the
most accurate 1/48 109 kit on the planet. This has now changed with the newer
Hasegawa 109 kits, but it is still quite popular with builders thanks to its
much lower purchase price. Even today with it out of production, it is easy to
find at around $7 or so from swap meets or on-line auctions. When compared to
the Hasegawa kit, its deeper panel lines and generally lower level of overall
detail is apparent, but it still builds into a very nice model, especially if
you want to fork over a few bucks on some aftermarket detail bits.
|
CONSTRUCTION |
As I mentioned, the kit had been started. The wings were glued
together, the exhausts glued into the fuselage as was the nose radiator. There
was no seat to be found, but one was gleaned from the spares bin. The cockpit
floor had the rudder pedals broken off, but these were replaced with small
strips of plastic on which some generic German pedals from a Reheat brass set
were glued. From the Eduard fret, a floor plate was installed after the kit
plate was scraped off. On the side walls, the kit trim wheel attachment point
was removed and the brass trim wheels and chain were glued on. There was also a
small instrument panel and other brass 'thingie' (I think for the O2 regulator),
attached.
The main instrument panel had its detail sanded off and the
Eduard one put in its place. The brass instrument panel was two parts with a
small raised section. These were 'glued' together using Future. Once painted, a
clear film with instruments was attached to the back (again using Future) and
the back of this film painted white. Then it was attached to the kit panel,
again using Future. If the part will have no stress on it, Future or clear paint
will work quite well. It gives you time to fiddle with it before it dries and
won't make the types of horrible mess that superglue will. If you need firm
attachment, super glue or epoxy are still the best way.
Prior to all these brass bits being attached, all cockpit parts were painted RLM
66 as was the interior walls. Then when all was in place, some detail painting
was done and the whole thing lightly dry-brushed with aluminum. Then the cockpit
was glued to one side of the fuselage and left to dry. When I was sure that the
fuselage would close properly, the oil cooler grille was painted black and the
fuselage halves glued together. During this time, I was also reading up on
various G-10s in the references, trying to find one that would match what was
given in the kit and what I had decals for. No joy. However, I did find one with
an extended tail wheel strut that would fill the bill nicely. Scrounging through
the parts bin, I found a long strut, but no wheel (it had been used on the
Otaki P-47D). I cut off the kit tail wheel and
removed the molded on fork. Then I glued it in place in the long strut. A hole
was drilled in the rear fuselage to accept the new strut. Now I
finally had a plane to match both photos and a decal sheet!
When
the fuselage was glued together, I also glued on the wings. The fit of this kit
is really very good, making it one that even a relative beginner will do well
with. Meanwhile, I had a few minutes on my hands, so removed the elevators from
the With the stabilizers and elevators glued on, I turned
my attention to the canopy situation. If you recall, this kit came with no
canopy. I pulled what looked like a good replacement from the spares box. It
appears to have come from a Fujimi kit. It is also a tad narrower than the
opening. Since I'll be displaying the canopy open, this won't be apparent. The
windscreen, however, was not a very good fit and had lots of gaps. These were
filled with super glue. Then the canopy was tacked down in the closed position
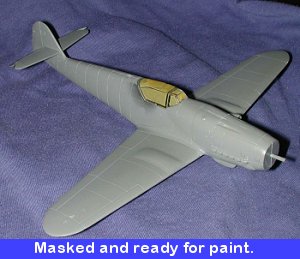
with a touch of super glue and all was masked with Tamiya Tape. I must confess
to you that the panel lines on the Fujimi canopy are not very crisply done and
the clear parts are a bit thick as well. However, they are no worse than the
original Revell parts and you can do the canopy open, which you can't with the
Revell bits. Yes, I could have used a vac canopy, but if I have a choice, I'd
rather not. With that done a hole was drilled where the rear wheel strut was to
fit and the kit was off to the paint shop.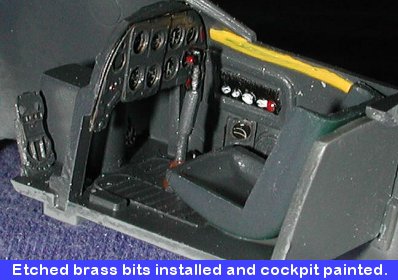
 horizontal stabilizers. It is an easy task to do and takes about 10 swipes
on each side with a hobby knife to make the parts easily snap free. A bit of
sanding on the edges and they were set aside until a little later. I've never
seen a 109 on the ground with the elevators in the neutral position, so figured
why not?
horizontal stabilizers. It is an easy task to do and takes about 10 swipes
on each side with a hobby knife to make the parts easily snap free. A bit of
sanding on the edges and they were set aside until a little later. I've never
seen a 109 on the ground with the elevators in the neutral position, so figured
why not?
|
PAINT & DECALS |
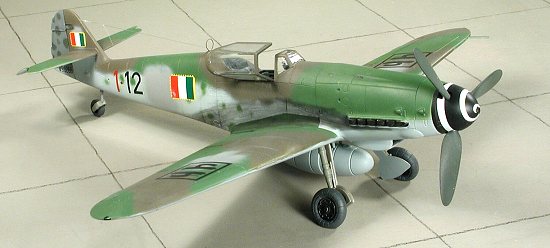
On all my models, I first paint the underside color. In this case RLM 76 from
the Aeromaster enamel line. Then the underside of the tail planes was masked
off. The cockpit area was painted RLM 66 at this time as it would be seen from
the inside. After allowing the paint time to cure, the uppersurface color of RLM
83 bright green was painted, also using Aeromaster enamels. The rudder was to be
painted RLM 75 with RLM 82 mottling. This was done using Aeromaster enamel for
the RLM 75 and Extracolor enamel for the RLM 82 mottling. Later it was masked
off to prevent overspray.
Back at the rest of the airframe, RLM 81, again using an Aeromaster enamel was
freehand painted on the upper surfaces. I can tell you that since switching from
a Badger 150 to an Iwata Eclipse a little over a year ago, my Luftwaffe paint
schemes have greatly improved. It also helps that I thin the paint a bit more
than usual and spray at a rather low pressure.
I now had all the major colors on it with quite a bit of overspray onto the
previous RLM 76. After letting all that cure, the wing roots were carefully
masked off, again with Tamiya tape (try it, you'll like it). Then the sides and
overspray were carefully done with more RLM 76. I now had the basic camouflage
scheme on the plane in five colors!
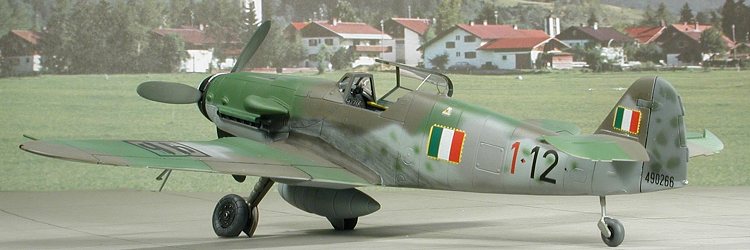
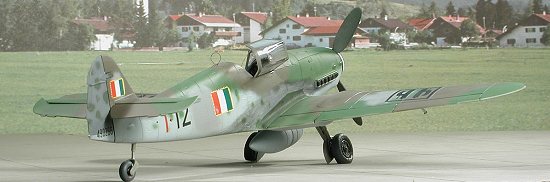
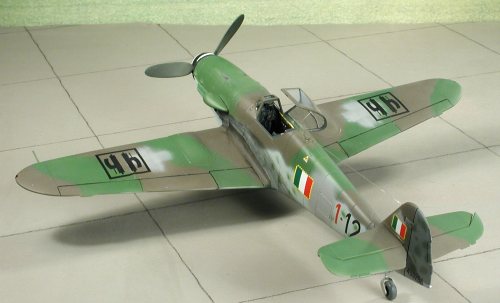
I chose Aeromaster 48-007, Italian Bf-109s, for the decals to be used on this
kit. I had already used one of the subjects from this 1992 sheet on an AMT
Bf-109G-4, but had not used any of the RSI markings that were given. With at
least 5 ANR subjects on the sheet, I could do a G-6, G-10 or a K-4. The sheet
supplies all of the markings needed, but none of the stencil ones. The first
thing I did was to apply all the Aeromaster decals. I had no real problem until
it came to the nose spiral. It seems that 10 years is too much for this sheet as
the spiral broke into about six large segments. Throwing caution to the wind, I
pieced together a rather convincing spiral from the bits. A touch of Solvaset on
all these markings made sure they wouldn't be going anywhere! When dry, the
model was wiped down with clear water to remove any excess solvent and the
control surfaces were highlighted with a Rapidograph pen. Then the entire model
was given a coat of matte clear to seal in the decals. THE LAST ROUNDUP The canopy and windscreen were unmasked and the canopy popped off as it was
to be displayed open. First, though, the interior needed a couple of more items.
First, it needed some seat belts. I had a very nice sheet of decals for
instruments and belts produced by ProModler and one of the belt decals was used.
It took some effort to get it in, but once placed, a touch of Solvaset was all
that was needed to get things to drape properly. With that done, I still needed
a gun sight (remember, this kit came with no clear bits). Scrounging through the
spares bin, I found one for a 109E. Not exactly the same, but better than
nothing. I had no luck finding any head armor that was proper for the Erla Haube
canopy so left it off. Almost done. The last things were to glue on the canopy and a thin piece of
sprue to act as a canopy wire to keep the canopy from flopping over. Then the
position lights were painted and some pastels were used to simulate engine
exhaust. 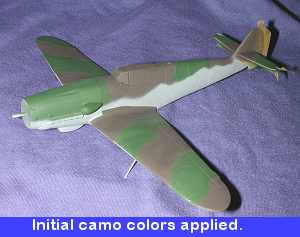 I know that there are a lot of people out there who poo-poo the
preponderance of Luftwaffe in general and the 109 or 190 in particular. However
it is the wide variety of camouflage schemes that these planes carried that is
much of the appeal. To me, the painting stage is exceeded in interest only by
the research portion of kit building. With these late war planes, you have such
a variety of schemes and colors. You also rarely have photographic reference
which gives you some leeway with the color police.
I know that there are a lot of people out there who poo-poo the
preponderance of Luftwaffe in general and the 109 or 190 in particular. However
it is the wide variety of camouflage schemes that these planes carried that is
much of the appeal. To me, the painting stage is exceeded in interest only by
the research portion of kit building. With these late war planes, you have such
a variety of schemes and colors. You also rarely have photographic reference
which gives you some leeway with the color police.
 With that done, the main gear was attached after being painted RLM 02 grey and
having the oleo section wrapped with Bare Metal Foil. The tail strut and wheel
were then glued in place and left to dry. Next painting step was to do the very
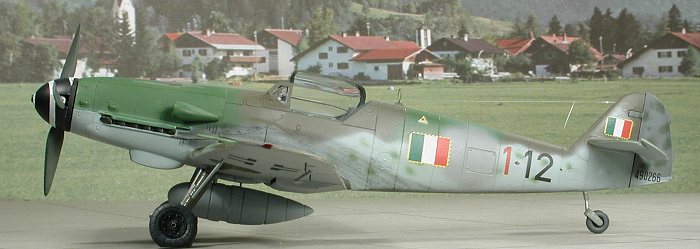
light mottling applied to the this aircraft in RLM 83. After that paint had
dried I mixed up a batch of Aeromaster Italian grey and sprayed over where the
German markings would have been on the wings, fuselage and tail. A bit of
additional touchup was needed as I missed the RLM 76 on the bottom of the
rudder. Then clear acrylic gloss (Future) was sprayed full strength in light
coats to give a sheen needed for the decals.
With that done, the main gear was attached after being painted RLM 02 grey and
having the oleo section wrapped with Bare Metal Foil. The tail strut and wheel
were then glued in place and left to dry. Next painting step was to do the very
light mottling applied to the this aircraft in RLM 83. After that paint had
dried I mixed up a batch of Aeromaster Italian grey and sprayed over where the
German markings would have been on the wings, fuselage and tail. A bit of
additional touchup was needed as I missed the RLM 76 on the bottom of the
rudder. Then clear acrylic gloss (Future) was sprayed full strength in light
coats to give a sheen needed for the decals.
 Meanwhile, back at the
ranch, with the kit properly decaled, the last pieces were glue in place. This
included the wheels (which do look like the tires are flat, but are so nicely
detailed), and the gear doors (which are a trifle too long, thanks to the flat
tires, but don't look too bad). With the plane now able to stand on its own, I
turned my attention to the drop tank. This kit has the rack molded into the
bottom of the wing. It also had the two aft mounting lugs for the tank broken
off. These were drilled out and two sections of stretched sprue were glued in
place. They were then painted and the tank mounted. It looks quite good other
than being about half as thick as the front ones!
Meanwhile, back at the
ranch, with the kit properly decaled, the last pieces were glue in place. This
included the wheels (which do look like the tires are flat, but are so nicely
detailed), and the gear doors (which are a trifle too long, thanks to the flat
tires, but don't look too bad). With the plane now able to stand on its own, I
turned my attention to the drop tank. This kit has the rack molded into the
bottom of the wing. It also had the two aft mounting lugs for the tank broken
off. These were drilled out and two sections of stretched sprue were glued in
place. They were then painted and the tank mounted. It looks quite good other
than being about half as thick as the front ones!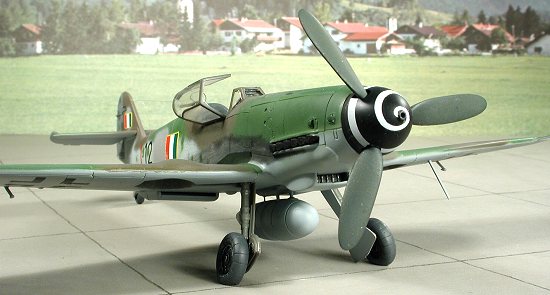 Next, holes were drilled in
the fin and fuselage spine for the radio antenna. When that was done, some clear
sprue was stretched to provide the needed antenna. I prefer the clear stuff as
it curls a lot less and, like the real thing, is nearly invisible. Look at a
photo of an aircraft with these antennas and they are very difficult to see. I
know that some don't install them at all, but to me, the plane looks incomplete
without it. Sure, it may break off at a later date, but that is then and this is
now! Once the antenna was installed, a flimsy brass loop antenna was glued in
place (I used it as the kit loop antenna was gone).
Next, holes were drilled in
the fin and fuselage spine for the radio antenna. When that was done, some clear
sprue was stretched to provide the needed antenna. I prefer the clear stuff as
it curls a lot less and, like the real thing, is nearly invisible. Look at a
photo of an aircraft with these antennas and they are very difficult to see. I
know that some don't install them at all, but to me, the plane looks incomplete
without it. Sure, it may break off at a later date, but that is then and this is
now! Once the antenna was installed, a flimsy brass loop antenna was glued in
place (I used it as the kit loop antenna was gone).
|
CONCLUSIONS |
And there you have it. A kit that cost a fraction of what the Hasegawa one does (even when adding the wheels, etched set and decals, which many will add to the Hase kit anyway), and looks just fine when it is finished. If you don't want to gussy it all up, it builds equally as good out of the box. It is a kit that can be enjoyed by new modelers as well as those of us who have been around for a while!
March 2002
|
REFERENCES |
The Messerschmitt 109 in Italian Service, D'Amico & Valentini, 1985
Messerschmitt Bf-109G, Robert Peczkowski, 2000
Warpaint Special #2: Bf-109, edited by Alan Hall, 2001
German Aircraft of the Second World War, Smith & Kay, 1978
Copyright ModelingMadness.com. All rights reserved.
Review kit courtesy of my kit collection.
If you would like your product reviewed fairly and quickly, please contact the editor or see other details in the Note to Contributors.