Airfix 1/48 Bf-109E-3
| KIT #: | A05122 |
| PRICE: | $25.00 MSRP |
| DECALS: | Three options |
| REVIEWER: | Scott Van Aken |
| NOTES: | Includes enough bits to do any E variant. |
| HISTORY |
In late 1938, the "Emil" entered production. To improve on the performance afforded by the rather small 447-522 kW (600-700 hp) Jumo, the larger Daimler-Benz DB 601A engine was used, yielding an extra 223 kW (300 hp) at the cost of an additional 181 kg (400 lb). To test the new 1,100 PS (1,085 hp, 809 kW) DB601A engine, two more prototypes (V14 and V15) were built, each differing in their armament. While the V14 was armed with two 7.92 mm (.312 in) MG 17s above the engine and one 20 mm MG FF in each wing, the V15 was fitted with the two MG 17s mounted above the engine only. After test fights the V14 was considered more promising and a pre-production batch of 10 E-0 was ordered. Batches of both E-1 and E-3 variants were shipped to Spain for evaluation, and received their baptism of fire in the final phases of the Spanish Civil War.
 The production version E-1 kept
two 7.92 mm (.312 in) MG 17s above the engine and two more in the wings. Later,
many were modified to the E-3 armament standard. The E-1B was
a small batch of E-1s becoming the first operational Bf 109 fighter bomber, or Jagdbomber(usually
abbreviated to Jabo).
These were fitted with either an ETC 250 bomb rack, carrying one 250 kg (550 lb)
bomb, or two ETC 50 bomb racks, each carrying a 50 kg (110 lb) bomb under both
wings. The E-1 was also fitted with the Reflexvisier "Revi" gunsight.
Communications equipment was the FuG 7 Funkgerät
7 (radio
set) short-range radio apparatus, effective to ranges of 48–56 km (30–35 mi). A
total of 1,183 E-1 were built, 110 of them were E-1/B.
The production version E-1 kept
two 7.92 mm (.312 in) MG 17s above the engine and two more in the wings. Later,
many were modified to the E-3 armament standard. The E-1B was
a small batch of E-1s becoming the first operational Bf 109 fighter bomber, or Jagdbomber(usually
abbreviated to Jabo).
These were fitted with either an ETC 250 bomb rack, carrying one 250 kg (550 lb)
bomb, or two ETC 50 bomb racks, each carrying a 50 kg (110 lb) bomb under both
wings. The E-1 was also fitted with the Reflexvisier "Revi" gunsight.
Communications equipment was the FuG 7 Funkgerät
7 (radio
set) short-range radio apparatus, effective to ranges of 48–56 km (30–35 mi). A
total of 1,183 E-1 were built, 110 of them were E-1/B.
Only very limited numbers of the E-2 variant were built, for which the V20 prototype served as basis. It was armed with two wing mounted, and one engine mounted MG FF cannon, which gave considerable trouble in service, as well as two MG 17s cowl machineguns. In August 1940, II./JG 27 was operating this type.
To improve the performance of the Bf 109E, the last two real prototypes, V16 and V17 were constructed. These received some structural improvements and more powerful armament. Both were the basis of the Bf 109 E-3 version. The E-3 was armed with the two MG 17s above the engine and one MG FF cannon in each wing. A total of 1,276 E-3 were built, including 83 E-3a export versions. Both the E-1 and E-3 were built at the same time on the same assembly lines at a ratio of 6 109E-3s for every 4 109E-1s.
 E-4
E-4
The E-3 was replaced by the E-4 (with many airframes being upgraded to E-4 standards starting at the beginning of the Battle of Britain) which was different in some small details, most notably by using the modified 20 mm MG-FF/M wing cannon and having improved head armor for the pilot. With the MG FF/M it was possible to fire a new and improved type of explosive shell, called Minengeschoß (or 'mine-shell') which was made using drawn steel (the same way brass cartridges are made) instead of being cast as was the usual practice. This resulted in a shell with a thin but strong wall, which had a larger cavity in which to pack a much larger explosive charge than was otherwise possible. The new shell required modifications to the MG FF's mechanism due to the different recoil characteristics, hence the MG FF/M designation.
The cockpit canopy was also revised to an easier-to-produce, "squared-off" design, which also helped improve the pilot's field of view. This canopy, which was also retrofitted to many E-1s and E-3s, was largely unchanged until the introduction of a welded, heavy-framed canopy on the G series in the autumn of 1942. The E-4 would be the basis for all further Bf 109E developments. Some E-4 and later models received a further improved 1,175 PS (1,159 hp, 864 kW) DB601N high-altitude engine; known as the E-4/N this first appeared in July 1940. The E-4 was also available as a fighter-bomber with equipment very similar to the previous E-1/B. It was known as E-4/B (DB 601Aa engine) and E-4/BN (DB 601N engine). A total of 561 of all E-4 versions were built, including 250 E-4, 20 E-4/N, 211 E-4/B and 15 E-4/BN.
| THE KIT |
Let's start with the detailing. What seems to be a bit overdone in 1/72 scale, seems just about right in 1/48. It is still not as petite as what you find on Hasegawa kits and is nearly the same as on Tamiya kits though not quite as crisp. The plastic has a somewhat matte finish and thanks to good quality control, there are no sink areas near the alignment pins, a real problem with some kits. There are a few inserts to take care of the different variants, specifically the gun position on the wing leading edge where the position of the gun is different on the E-1 as compared to the cannon armed E-3/4/7 versions.
 The
cockpit is very nicely done with all the various bits one would expect and that
includes sidewall detailing and parts. The seat has a molded in seat harness and
Airfix provides a very nicely done three piece pilot in appropriate garb. An
engine half is molded into each fuselage half and there are engine mounts to add
to the detail. Cementing the upper cowling is an option, though I think most
will do just that. Unlike Airfix's competitors, all of the flight control
surfaces are separate. This includes the leading edge slats. The flaps have tabs
to be in the normal down position, but by removing them you can position them
up. Rudder and elevators are also separate to allow them to be more dynamically
positioned. Two different upper cowlings are provided. A sand filter is provided
for those wanting to use desert markings.
The
cockpit is very nicely done with all the various bits one would expect and that
includes sidewall detailing and parts. The seat has a molded in seat harness and
Airfix provides a very nicely done three piece pilot in appropriate garb. An
engine half is molded into each fuselage half and there are engine mounts to add
to the detail. Cementing the upper cowling is an option, though I think most
will do just that. Unlike Airfix's competitors, all of the flight control
surfaces are separate. This includes the leading edge slats. The flaps have tabs
to be in the normal down position, but by removing them you can position them
up. Rudder and elevators are also separate to allow them to be more dynamically
positioned. Two different upper cowlings are provided. A sand filter is provided
for those wanting to use desert markings.
A
'wheels up' option is provided by doors with wheels halves attached. The kit
main wheels are flattered and bulged a bit. The outer wheel hub is a separate
item to assist in painting. For things under the fuselage, there are options of
a drop tank, 250 kg bomb, 500 kg bomb or a tray with four bombs (I'm guessing 50
or 100 kg). Several different windscreens and backlights are provided depending
on which variant is being done. The windscreens include one with additional
armor and one with a telescopic gun sight. The main canopy section is molded
with tabs on it to pose it open, but one can cut those away for a closed
cockpit. As with the windscreen, there are separate canopy types for early and
later versions. This also extends t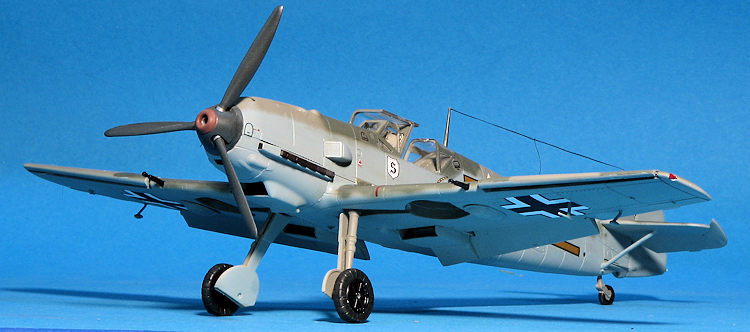 o the rear clear section. The clear bits are
not as nicely done as those on the Tamiya and Hasegawa kits, being a bit thick
with rather vague frame lines. Three different spinners are offered, one with
the cannon opening and two pointed spinners; one more blunt than the other.
o the rear clear section. The clear bits are
not as nicely done as those on the Tamiya and Hasegawa kits, being a bit thick
with rather vague frame lines. Three different spinners are offered, one with
the cannon opening and two pointed spinners; one more blunt than the other.
I know that people will or have picked this one apart already and I'll let them. The only real disconnect I could find is that there are no wing shell ejector chutes. There is an area to be opened if one is using the cannon wings (for the E-3/4 version). I don't recall if the 109E ejected shells or retained them in catch areas to be recycled. If not, one can duplicate these openings with little rectangles of black decal. I also noted that some parts not used may be applicable to an E-7 version. One has to realize that during the Battle of Britain and before, 109Es were not plumbed for drop tanks or even bombs (until late 1940). It was the 109E-7 that introduced the ability to carry a drop tank and of course, this and the bomb thing was retrofitted to the earlier versions.
Instructions are well done and the 43 construction steps are easy to follow. Airfix continues their irritating habit of using Humbrol numbers for paints rather than telling us what the shade actually is. The only place that is provided is in the full color painting and markings guide. There are three decal options. One is for the box art plane, a 109E-7 with JG27 in a desert scheme with tropical filter. Next is a Romanian Air Force 109E-3 and the last option is a Spanish Civil War E-1 of JG 88. The decal sheet is well printed and includes full data markings, but no swastikas. Time to break out the swastika sheets for this and other Airfix kits.
| CONSTRUCTION |
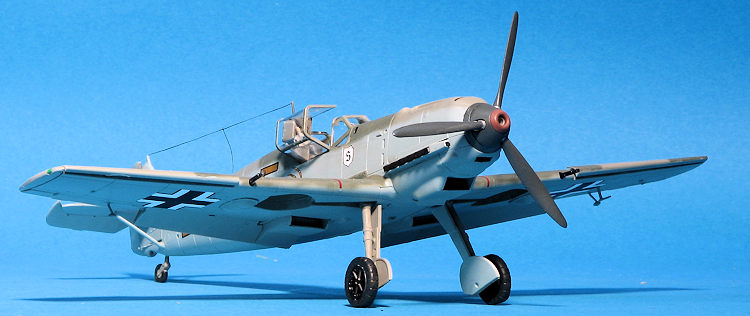
This is the second time I've built this kit, the first being when it came out in 2010. That time I used a goodly number of aftermarket bits from Pavla to correct the elevators, radiators and prop to name a few. I also used Eduard belts. This time, I'm only using a set of Quickboost exhaust with the rest of the kit being out of the box.
I started by assembling the cockpit. This fit quite well and though the belts
molded on the seat are not all that convincing, I'm glad they are there. There
is some sidewall detail. The interior at this stage would have been RLM 02 with
an RLM 66 instrument panel. Airfix supplied a decal for the instruments and I
painted the rudder pedals aluminum. During that time, I painted the engine block
black and the engine bearers RLM 02. You won't see much of this, but it is nice
that it is there. When that was done I installed the interior along with the
spinner backing plate and shaft in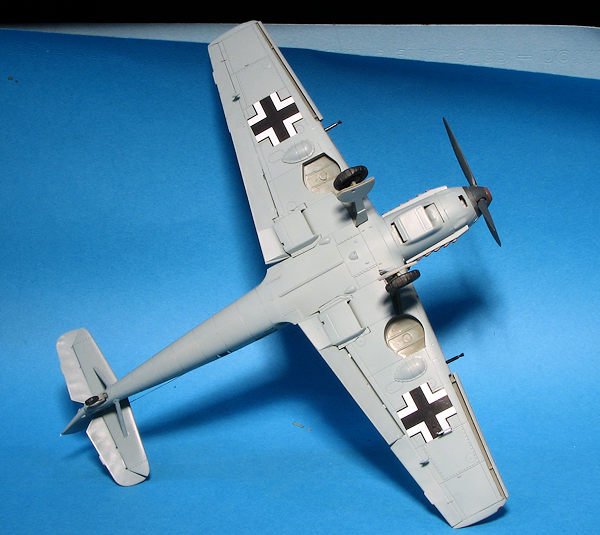 the fuselage and closed it. Naturally, I got
glue on the prop shaft so it doesn't turn.
the fuselage and closed it. Naturally, I got
glue on the prop shaft so it doesn't turn.
Meanwhile, I assembled the wings. As I'm doing the E-3 version, I opened the holes in the lower wing for the clearance bumps. I also installed the cannon openings in the leading edge of the wings. These are not the greatest fit so I used some filler to take care of the issues. No other holes were opened as the E-3 did not initially have a drop tank. That would come with the E-7 and while many extant airframes were retrofit, this one is being modeled before that.
I then glued the wing to the fuselage. Fit is actually very good with only some filler used at the very rear wing/fuselage join. The upper cowling had the guns installed and it was glued in place. This was followed by the lower cowling piece after the radiator had been glued in. Back at the wings, the radiator bits were installed, followed by the radiator housings. These are a bit sloppy of a fit and really should be clamped in place while the glue dries.
The supercharger intake was attached followed by the horizontal stabs. The braces for the stabs look like they won't fit properly, but after the glue deals with the soft plastic, they will fit as they should. The kit has separate ailerons and flaps. These were glued on. The little tabs on the flaps are easily broken during installation so take care. I broke mine. A separate rudder and elevators are provided. The rudder fits well, the elevators do not, which explains the Pavla replacement set. I ended up using super glue to get them to stay in place.
Clear bits are next. These are probably the worst part of the kit. The frame lines are not well defined, making masking difficult. They are also easily damaged removing them from the sprue. After installing and painting the gun sight, I attached the windscreen and rear section. I used the later canopy to cover the cockpit opening prior to painting as one cannot do the open canopy option and use that canopy to cover the cockpit.
| COLORS AND MARKINGS |
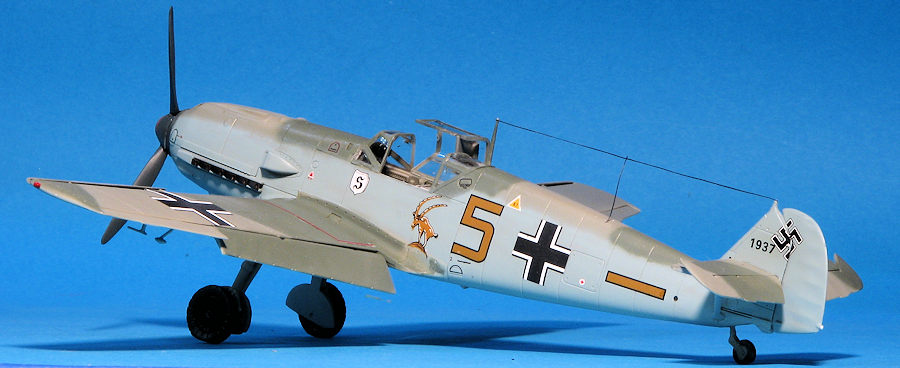
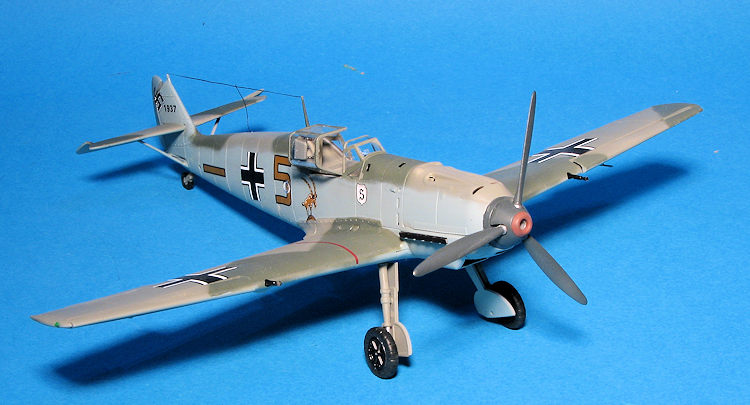
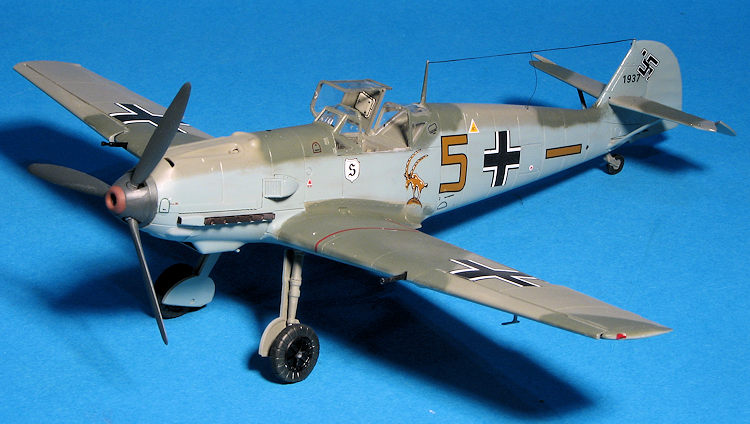
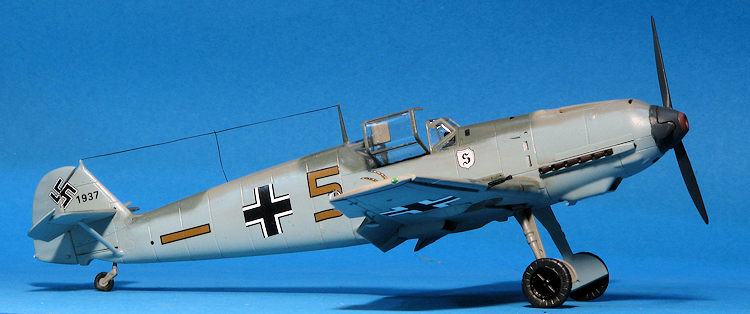
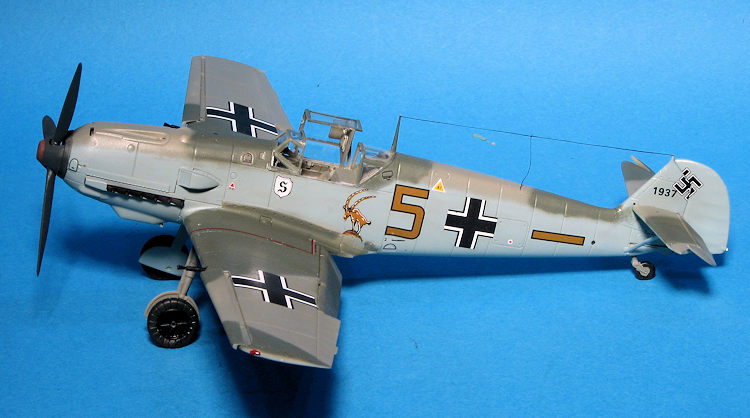
This aircraft is depicting Brown 5, a 109E-3 with 6./JG 26 based in France in January 1940. It is in the then new camouflage scheme of RLM 71/02/65 with a very high demarcation line and no mottling. For this scheme, I am using Aeromaster 48-514 'Attack in the West pt.1'. It has a number of very nice schemes on it and I already used one of them during an earlier build.
In line with most of my aircraft builds, I first painted the underside RLM 65
then masked it and painted the upper surface RLM 02 and RLM 71. This
was further masked and any remaining RLM 65 areas were painted.
 All the
demarcation lines were freehand sprayed.
All the
demarcation lines were freehand sprayed.
While that was going on, I did some surgery to the landing gear by taking out about a 2mm section from each one so the plane would not sit so nose high. I drilled a hole in each leg and used a section of .020 bronze wire to hold them together. These were then glued onto the plane after it had come from the paint shop. The airframe was then given a gloss coat and the decals were applied. The Aeromaster decals are a bit thick and needed setting solution. I used the kit decals for some of the stencils and they worked fairly well, though have somewhat large carrier around each marking.
Following a semi-matte clear coat to seal things in, I attached the final parts. The gear legs needed to be trimmed to match the shorter legs. Guns, pitot and mass balances were fitted. The prop spinner had the tip painted with Vallejo Saddle Brown as it seemed to match the brown on the numbers. I installed the head armor into the canopy and naturally had glue seep in between it and the glass. :(
I did a bit of touch up painting, installed the prop and canopy after removing the masking. The antenna mast was installed and an antenna wire made using EZ-line. The last step was the addition of the only aftermarket part I used on this kit, the Quickboost exhaust. These look a TON better than the sawtooth lumps of plastic provided in the kit. I did not weather this kit at all.
| CONCLUSIONS |
It is only natural that one compare this one with the Eduard and Hasegawa kits. I have not built the Eduard kit so cannot truthfully make a comparison with that one, but I can with the Hasegawa offering. The Airfix kit is less expensive in terms of MSRP. It offers more options in the kit beside the variant being kitted. It has separate slats, elevators and rudder that the Hasegawa kit does not.
 The
Hasegawa kit has finer detailing. It includes photo etch for the radiator
grilles and the head armor. I think it fits a bit better.
The
Hasegawa kit has finer detailing. It includes photo etch for the radiator
grilles and the head armor. I think it fits a bit better.
The Airfix kit has main landing gear legs that are too tall and in line with other kits, there is no definite demarcation line separating the tail wheel with the tire. The clear bits are quite poor with either too thick or missing frame lines. There are no shell ejection chutes under the wing. I also think that the prop blades may be the wrong shape, but don't know for sure.
So there you have it. If you have Hasegawa kits, don't get rid of them. If you are modeling on a budget, then the Airfix kit does have quite a bit to offer. Despite its discrepancies, it does make into a nice model. I bought two of these kits and have built them both. I see no need to get another and will instead finish off the Hasgeawa and the Eduard kits I have before looking to buy another 1/48 109E. Really, all three of them are worth getting. This also takes care of this year's 109 build.
4 November 2016
Copyright ModelingMadness.com. All rights reserved.
Thanks to me for the kit, decals and exhaust. If you would like your product reviewed fairly and fairly quickly, please
contact
the editor or see other details in the
Note to
Contributors.