Airfix 1/48 Bf-109E-1
| KIT #: | A05122A |
| PRICE: | $25.98 SRP |
| DECALS: | Two options |
| REVIEWER: | Scott Van Aken |
| NOTES: | Boxed as an E-4/N; built as an E-1 variant |
| HISTORY |
In late 1938, the
"Emil" entered production. To improve on the performance afforded by the
rather small 447-522 kW (600-700 hp) Jumo, the larger Daimler-Benz DB 601A
engine was used, yielding an extra 223 kW (300 hp) at the cost of an
additional 181 kg (400 lb). To test the new 1,100 PS (1,085 hp, 809 kW)
DB601A engine, two more prototypes (V14
and V15)
were built, each differing in their armament. While the V14 was armed with
two 7.92 mm (.312 in) MG 17s above the engine and one 20 mm MG FF in each
wing, the V15 was fitted with the two MG 17s mounted above the engine only.
After test fights the V14 was considered more promising and a pre-production
batch of 10 E-0
was ordered. Batches of both E-1 and E-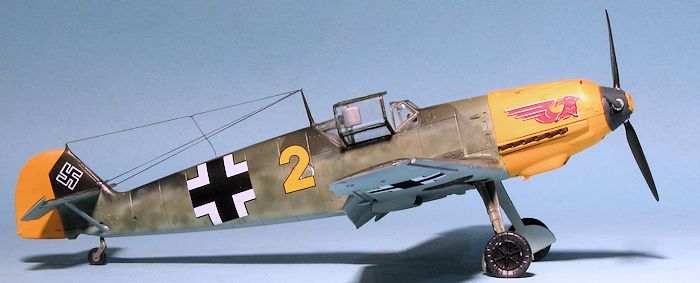 3 variants were shipped to Spain for
evaluation, and received their baptism of fire in the final phases of the
Spanish Civil War.
3 variants were shipped to Spain for
evaluation, and received their baptism of fire in the final phases of the
Spanish Civil War.
E-4
The E-3 was replaced by the E-4 (with many early airframes being upgraded to E-4 standards starting at the beginning of the Battle of Britain) which was different in some small details, most notably by using the modified 20 mm MG-FF/M wing cannon and having improved head armor for the pilot. With the MG FF/M it was possible to fire a new and improved type of explosive shell, called Minengeschoß (or 'mine-shell') which was made using drawn steel (the same way brass cartridges are made) instead of being cast as was the usual practice. This resulted in a shell with a thin but strong wall, which had a larger cavity in which to pack a much larger explosive charge than was otherwise possible. The new shell required modifications to the MG FF's mechanism due to the different recoil characteristics, hence the MG FF/M designation.
The cockpit canopy was also revised to an
easier-to-produce, "squared-off" design, which also helped improve the
pilot's field of view. This canopy, which was also retrofitted to many E-1s
and E-3s, was
 largely unchanged until the introduction of a welded,
heavy-framed canopy on the G series in the autumn of 1942. The E-4 would be
the basis for all further Bf 109E developments. Some E-4 and later models
received a further improved 1,175 PS (1,159 hp, 864 kW) DB601N high-altitude
engine; known as the E-4/N this first appeared in July 1940. The E-4 was
also available as a fighter-bomber with equipment very similar to the
previous E-1/B. It was known as
E-4/B (DB 601Aa engine)
and E-4/BN
(DB 601N engine). A total of 561 of all E-4 versions were built, including
250 E-4, 20 E-4/N, 211 E-4/B and 15 E-4/BN. Many E-4s were also retrofitted
with plumbing to allow the use of a drop tank, something introduced in E-7
production in late 1940 and which would have been very useful during the
Battle of Britain.
largely unchanged until the introduction of a welded,
heavy-framed canopy on the G series in the autumn of 1942. The E-4 would be
the basis for all further Bf 109E developments. Some E-4 and later models
received a further improved 1,175 PS (1,159 hp, 864 kW) DB601N high-altitude
engine; known as the E-4/N this first appeared in July 1940. The E-4 was
also available as a fighter-bomber with equipment very similar to the
previous E-1/B. It was known as
E-4/B (DB 601Aa engine)
and E-4/BN
(DB 601N engine). A total of 561 of all E-4 versions were built, including
250 E-4, 20 E-4/N, 211 E-4/B and 15 E-4/BN. Many E-4s were also retrofitted
with plumbing to allow the use of a drop tank, something introduced in E-7
production in late 1940 and which would have been very useful during the
Battle of Britain.
| THE KIT |
This is the fourth or fifth incarnation of Airfix's 1/48 Bf-109E. This time it is being boxed as an E-4/N trop. In line with Hasegawa, this kit is nothing more or less than a new decal sheet. At least that is how it looks to me. There sprues are identical and it makes me wonder why the 'A' is in the kit number suffix. That usually indicates some sort of improvement, but I don't see one; only a different decal sheet. The prop is the same, the rudder appears the same, and the landing gear legs look the same as well. Those are the areas I noticed that needed improvement on the initial boxing I built.
As a recap, let's start with the detailing. What seems to be a bit
overdone in 1/72 scale, seems just about right in 1/48. It is still not as
petite as what you find on Hasegawa kits and is nearly the same as on Tamiya
kits. The plastic has a somewhat matte finish and thanks to good quality
control, there are no sink areas
 near the alignment pins, a real problem with
some kits. There are a few inserts to take care of the different variants,
specifically the gun position on the wing leading edge where the position of the
gun is different on the E-1 as compared to the cannon armed E-3/4/7 versions.
near the alignment pins, a real problem with
some kits. There are a few inserts to take care of the different variants,
specifically the gun position on the wing leading edge where the position of the
gun is different on the E-1 as compared to the cannon armed E-3/4/7 versions.
The cockpit is very nicely done with all the various bits one would expect and that includes sidewall detailing and parts. The seat has a molded in seat harness and Airfix provides a very nicely done three piece pilot in appropriate garb. An engine half is molded into each fuselage half and there are engine mounts to add to the detail. Cementing the upper cowling is an option, though I think most will do just that. Unlike all of Airfix's competitors, all of the flight control surfaces are separate. This includes the leading edge slats. The flaps have tabs to be in the normal down position, but by removing them you can position them up. Rudder and elevators are also separate to allow them to be more dynamically positioned. Two different upper cowlings are provided. A sand filter is provided for the desert markings.
A 'wheels up' option is provided by doors with wheels halves attached. The kit main wheels are flattered and bulged a bit. The outer wheel hub is a separate item to assist in painting. For things under the fusealge, there are ooptions of a drop tank, 250 kg bomb, 500 kg bomb or a tray with four bombs (I'm guessing 50 or 100 kg). Several different windscreens and backlights are provided depending on which variant is being done. The windscreens include one with additional armor and one with a telescopic gunsight. The main canopy section is molded with tabs on it to pose it open, but one can cut those away for a closed cockpit. To my eye, the windscreens are not as nicely done as those on the Tamiya and Hasegawa kits, being a bit thick. Three different spinners are offered, one with the cannon opening and two pointed spinners; one more blunt than the other.
I know that people will or have picked this one apart
already and I'll let them. The only real disconnect I could find is that there
are no wing shell ejector chutes. There is an area to be opened if one is using
the 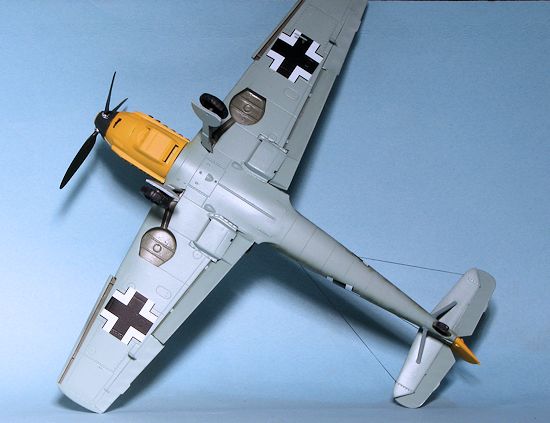 cannon wings (for the E-3/4 version). I don't recall if the 109E ejected
shells or retained them in catch areas to be recycled. If not, one can duplicate
these openings with little rectangles of black decal. I also noted that some
parts not used may be applicable to an E-7 version. One has to realize that
during the Battle of Britain and before, 109Es were not plumbed for drop tanks
or even bombs (until late 1940). It was the 109E-7 that
introduced the ability to carry a drop tank and of course, this and the bomb
thing was retrofitted to the earlier versions.
cannon wings (for the E-3/4 version). I don't recall if the 109E ejected
shells or retained them in catch areas to be recycled. If not, one can duplicate
these openings with little rectangles of black decal. I also noted that some
parts not used may be applicable to an E-7 version. One has to realize that
during the Battle of Britain and before, 109Es were not plumbed for drop tanks
or even bombs (until late 1940). It was the 109E-7 that
introduced the ability to carry a drop tank and of course, this and the bomb
thing was retrofitted to the earlier versions.
Instructions are well done and the 43 construction steps are easy to follow. Airfix continues their irritating habit of using Humbrol numbers for paints rather than telling us what the shade actually is. The only place that is provided is in the full color painting and markings guide. There are two decal options. One is the box art plane of Edward Neuman of 1./JG 27 in North Africa during 1941/42. This has the then-standard European scheme of RLM 71/02/65 with a yellow rudder and white fuselage band. The other is an E-7 variant flown by Stab II./JG 54 in Romania during March of 1941. This aircraft has an interesting scheme with lots of yellow on the nose, rudder, wing tips and the trailing edges of the upper wings as well. The decal sheet is well printed and includes full data markings, but no swastikas. Time to break out the swastika sheets for this and other Airfix kits.
| CONSTRUCTION |
Once I started construction, I found out what the A stood for in the kit number. It stands for additional flash and mold seams. I'm not sure how many pressings this kit has had, but I did find some flash and overly thick mold seams. Naturally, these were on the smallest parts. Thanks to the rather soft plastic, they were not difficult to clean up, though one has to be careful not to over-do it.
I also found that acrylic paint would not stick to the plastic. Call me lazy,
but I do not wash kits and probably should have done so to this one. The acrylic
I tried to use on the interior parts beaded up like a freshly waxed car. I ended
up using Tamyia (which is an acrylic laquer) and Model Master enamels for the
interior bits. I'll have to give the airframe a coat of primer before painting
if I want to use water based acrylics. While building up the interior I found
that most of the holes on various parts had to be enlarged. When I assembled the
wings, I used the E-1 gun inserts. The boxing you buy has all the bits for all
the E  versions on the sprues so it is simply a matter of using those pieces for
the version you wish to build. This kit was marketed as an E-4/7, but you can
build an E-1/3 from it as well. Since I'm using aftermarket decals for an E-1,
I'll use those parts.
versions on the sprues so it is simply a matter of using those pieces for
the version you wish to build. This kit was marketed as an E-4/7, but you can
build an E-1/3 from it as well. Since I'm using aftermarket decals for an E-1,
I'll use those parts.
I assembled the wings and installed the inserts. As I found out the last time I did one of these kits, the inserts need filler to match up with the surrounding wing. While that was drying, I drilled out the barrels of the cowl guns and installed those in the upper cowling piece.
The interior was then assembled. For the instrument panel, I used one from a ProModeler sheet for 1/48 Bf-109s. I also used a set of Eduard seat belts over the rather bland ones moded onto the kit seat. Detail was picked out with various paints and the fuselage halves were assembled. During this time, I also attached the wings. As with just about every 109E kit I've built in this scale, the lower wing fuselage join was the area that needed the most attention. In this case a gap. The upper wings fit well.
I then attached the horizontal stabilizers and then the elevators. I had to remove the small pins on the elevators as they did not line up with the holes in the fin. The ailerons were then installed, followed by the flaps. The pins on the flaps were larger than the openings into which they are to fit so those were sanded down before installation. The lower wing radiators were assembled and then glued in place. Fit on these is not the best and I needed to clamp them in place while the glue dried. In case you are wondering why I did not run into these issues on the previous build, it is because I used a lot of Pavla aftermarket parts on the kit, and they fit a lot better.
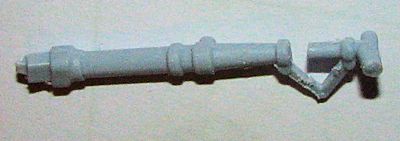 Meanwhile, I shortened both
of the main landing gear but cutting a small section out of the oleo. It was
then an easy task to make a cut or two on the oleo scissors to allow the
shortened strut to fit. The flaps were then glued in place. I then masked the
clear bits and, like the last time I built this kit, I found the the frame lines
near the top of the canopy section and the rear section were very indistinct.
I'm not sure what the deal is on this as it seems to be an issue with a number
of new mold Airfix kits. It isn't rocket science to get this right. I also had
to use a later back window section as the one I wanted to use broke in half when
I cut it from the sprue. The windscreen and rear section were then glued in
place and the cockpit stuffed with tissue and tape in preparation for painting.
Meanwhile, I shortened both
of the main landing gear but cutting a small section out of the oleo. It was
then an easy task to make a cut or two on the oleo scissors to allow the
shortened strut to fit. The flaps were then glued in place. I then masked the
clear bits and, like the last time I built this kit, I found the the frame lines
near the top of the canopy section and the rear section were very indistinct.
I'm not sure what the deal is on this as it seems to be an issue with a number
of new mold Airfix kits. It isn't rocket science to get this right. I also had
to use a later back window section as the one I wanted to use broke in half when
I cut it from the sprue. The windscreen and rear section were then glued in
place and the cockpit stuffed with tissue and tape in preparation for painting.
| COLORS & MARKINGS |
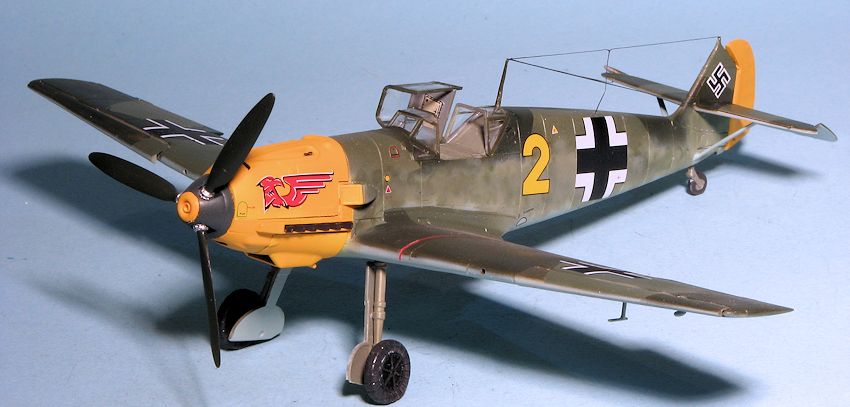
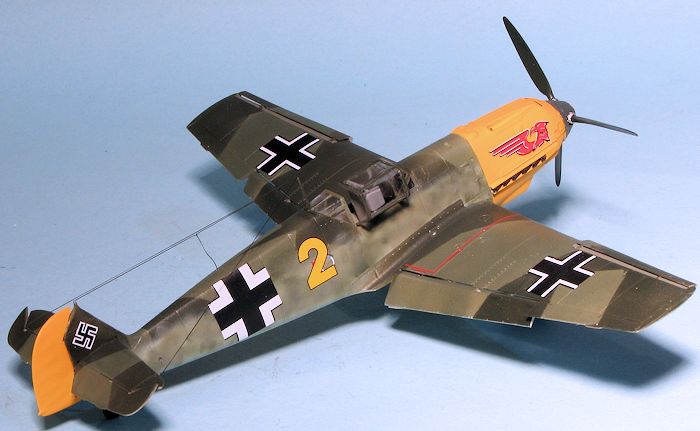
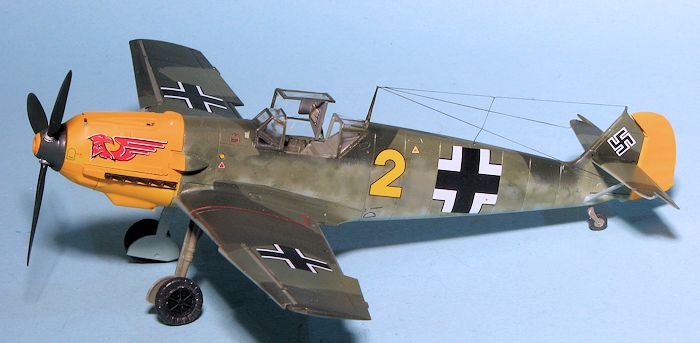
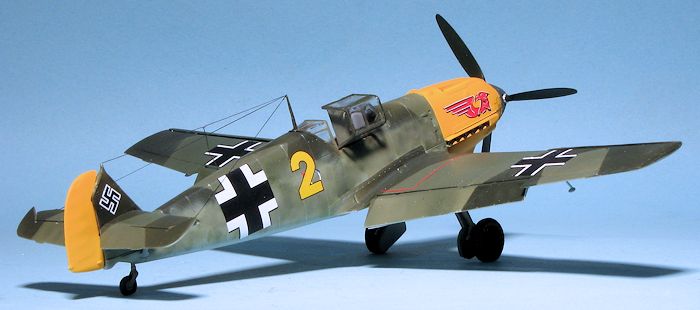
For this one, I wanted to model one of Barkhorn's
early mounts when based in Germany proper. For this I used Start's new sheet on
his various mounts that was reviewed earlier. I chose Yellow 2, which was an E-1
and according to the instructions, painted in RLM 70/71/65 with a heavy mottle
of 71 and 02 on the fuselage side. I thought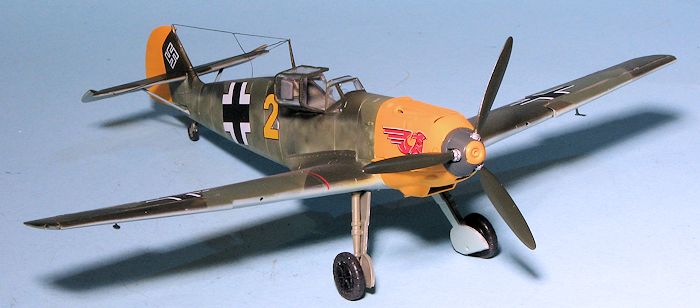 it rather odd that an old scheme like that would last into 1941, but apparently
it was felt that it was easier to modify what was there than do a total repaint.
it rather odd that an old scheme like that would last into 1941, but apparently
it was felt that it was easier to modify what was there than do a total repaint.
Since the instructions only provide a profile, the upper surface camouflage required some research to find the proper pattern. I used AK Interactive acrylics on this one with no real issues. One thing I have realized about it is that it needs an undercoat of primer. Another is not to thin the paint very much or it will be way too thin. I had no issues with the Tamiya tape pulling up the AK paints after the area was masked, and there is quite a bit of masking to do on splinter patterns. I got the pattern I used from Merrick's "Luftwaffe Camouflage and Markings 1933-1945 Volume 1. I also did the mottling using AK paints and typical of acrylics, the tip had to be cleaned often as the paint would quickly dry on it. However, it did not stop me from getting a fair heavy mottling on the fuselage sides.
| FINAL CONSTRUCTION |
With that done, the kit was placed on its landing gear in preparation for the markings. The main gear legs were very tight and like many of the tight bits, I used cement as a lubricant to melt the plastic to allow the parts to fit. I also glued on the aileron mass balances and repainted that are after cleaning up the parts. A gloss clear acrylic was then sprayed on to make decal installation easier. The majority of markings had to come from the kit as the Start sheet only offers the unique ones (in this case the aircraft number and the cowling markings. The Airfix decals are superb and I had no issues using Solvaset on them. I was not sure how many data markings would have been on this plane. Probably not many on the fuselage, but I put on quite a few of them anyway. The Start decals are glossy, but also went on with no issues. For the swastika, I used a KoPro sheet.
 I located
the depression in the lower wing decal where the pitot tube would go, opened
that up and installed the part. For the exhaust, I substituted a set of nice
Quickboost parts as the kit ones are really just shapes. I also installed an
Ultracast prop and spinner. One of the misshapen parts on this kit are the prop
blades and so an aftermarket one is a major improvement. The blades fit into the
spinner so tightly that they did not need to be glued. I attached the wheels,
gear doors and the slats. Then the kit got a coat of semi-matte clear acrylic. I
removed the masking from the clear bits, glued on the canopy and then attached
the radio wires using EZ-Line. This antenna arrangement might look odd to some
of you, but there is plenty of photo evidence of this sort of arrangement and
apparently this plane had it. I did not weather it at all, though I guess
perhaps some engine soot would have been nice, but I was rapidly running out of
time to meet my self-imposed deadline.
I located
the depression in the lower wing decal where the pitot tube would go, opened
that up and installed the part. For the exhaust, I substituted a set of nice
Quickboost parts as the kit ones are really just shapes. I also installed an
Ultracast prop and spinner. One of the misshapen parts on this kit are the prop
blades and so an aftermarket one is a major improvement. The blades fit into the
spinner so tightly that they did not need to be glued. I attached the wheels,
gear doors and the slats. Then the kit got a coat of semi-matte clear acrylic. I
removed the masking from the clear bits, glued on the canopy and then attached
the radio wires using EZ-Line. This antenna arrangement might look odd to some
of you, but there is plenty of photo evidence of this sort of arrangement and
apparently this plane had it. I did not weather it at all, though I guess
perhaps some engine soot would have been nice, but I was rapidly running out of
time to meet my self-imposed deadline.
| CONCLUSIONS |
The Airfix kit is a nice one and a good value for the
money. However, in terms of accuracy, it is not near the top. It has the
downside of the wrong shape prop blades, rudder (too shallow), poor exhaust
representation, too tall main gear legs, no 'splitter' in the oil cooler opening
(though to be honest, most of
 these were
removed at field level as being unnecessary and an impediment to maintenance),
and the issue with the indistinct canopy and rear window frames. You could add
on the poor fit of the lower wing radiators and lack of cannon shell openings on
the lower wing to this. It does have the benefit of being able to be built as
several variants, a fairly nice cockpit, separate flaps, slats, elevators and
rudder, and a nice weapons load for those doing the later variants or the
fighter bomber version. Despite not being that old a mold, the sprues are
showing their age in terms of flash and thick mold seams.
these were
removed at field level as being unnecessary and an impediment to maintenance),
and the issue with the indistinct canopy and rear window frames. You could add
on the poor fit of the lower wing radiators and lack of cannon shell openings on
the lower wing to this. It does have the benefit of being able to be built as
several variants, a fairly nice cockpit, separate flaps, slats, elevators and
rudder, and a nice weapons load for those doing the later variants or the
fighter bomber version. Despite not being that old a mold, the sprues are
showing their age in terms of flash and thick mold seams.
Despite all this, it is a nice kit that goes together fairly well and is at a reasonable price now that the Hasegawa kits are in the $40 range. Those who are not concerned about the errors in the kit will be pleased with it and frankly, only an enthusiast would spot the glitches. I cannot comment on the Eduard kit as I've not built any, so I'll leave that for another day.
| REFERENCES |
http://en.wikipedia.org/wiki/Messerschmitt_Bf_109_variants
October 2014
Thanks to me for the kit, Ultracast for the prop, and AK Interactive for the paint.
If you would like your product reviewed fairly and fairly quickly, please contact the editor or see other details in the Note to Contributors.