Hasegawa 1/48 Bf-109G-14
| KIT #: | 09148 (Jt48) |
| PRICE: | 2200 yen when new. |
| DECALS: | Two options |
| REVIEWER: | Scott Van Aken |
| NOTES: | 1997 Boxing |
| HISTORY |
 The Bf-109G-14 was in most ways, the very last of the G
series of 109s; at least by number. The G-14 incorporated all of the
improvements made to the type up until mid-1944 and pretty well standardized the
series. Most G-14 airframes are indistinguishable from some late production G-6
versions. Most G-14s include the new, taller wooden fin and rudder along with
the Erla Haube that offered improved vision. Still with the airframe were
the bulges over the nose machine guns and the small wing bulges as on the G-6.
It included pretty much the same DB 605 as on later G-6 models as well. Most had
the shorter tail wheel. There were some G-14/AS versions that had the improved
DB 605, the wider wheels and subsequently the wider wing fairings as well as the
taller tail wheel. Most of these had a rounded lower rudder and the smoother
cowling as used in the G-10 and K-4 series. The type was flown until the end of
the war, though I'm sure most were destroyed on the ground or in accidents
rather than to Allied air power.
The Bf-109G-14 was in most ways, the very last of the G
series of 109s; at least by number. The G-14 incorporated all of the
improvements made to the type up until mid-1944 and pretty well standardized the
series. Most G-14 airframes are indistinguishable from some late production G-6
versions. Most G-14s include the new, taller wooden fin and rudder along with
the Erla Haube that offered improved vision. Still with the airframe were
the bulges over the nose machine guns and the small wing bulges as on the G-6.
It included pretty much the same DB 605 as on later G-6 models as well. Most had
the shorter tail wheel. There were some G-14/AS versions that had the improved
DB 605, the wider wheels and subsequently the wider wing fairings as well as the
taller tail wheel. Most of these had a rounded lower rudder and the smoother
cowling as used in the G-10 and K-4 series. The type was flown until the end of
the war, though I'm sure most were destroyed on the ground or in accidents
rather than to Allied air power.
| THE KIT |
Though I cannot prove it, it would seem to me that the most reissued kit in Hasegawa's line up has to be the Bf-109F/G series. The wing sprue for certain has been the same in almost every 1/48 109 Hasegawa has done since the 109F was released in the late 1980s. You still get basically an early F wing where you have to scribe in a panel line and remove the additional circular section of the outer wheel well. You also need to cut off the rudder trim tabs. The positionable flaps and cooler doors are the same as well.
Where the differences arise is in the option of tail planes,
fuselage halves, prop blades, wheels and many other smaller things that will
help to determine the version kitted. This is still a very good kit despite the
preference of the Eduard kit by the 'must have the newest and most detailed'
crowd. It is true that th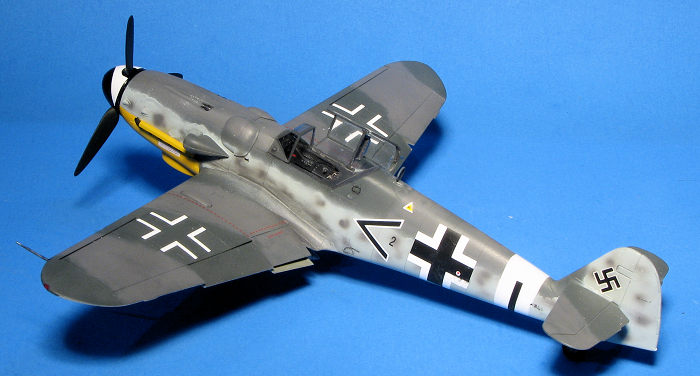 e Eduard kit is undoubtedly the most detailed, but you
pay for that detail by having a much more modular and fiddly kit. Certainly
any of the various resin sets for the Hasegawa 109G will be an improvement in
detail quality and crispness. Still, for those who are not comfortable with
resin or can't see the sense in putting for the additional effort, the kit
cockpit will do just nicely, thank you.
e Eduard kit is undoubtedly the most detailed, but you
pay for that detail by having a much more modular and fiddly kit. Certainly
any of the various resin sets for the Hasegawa 109G will be an improvement in
detail quality and crispness. Still, for those who are not comfortable with
resin or can't see the sense in putting for the additional effort, the kit
cockpit will do just nicely, thank you.
Hasegawa is loathe to provide more extra bits in a kit than are absolutely needed to build the variant being kitted and this one is no different. About the only 'spares' one gets are supercharger intakes, tail planes, upper engine cowling and underwing canon gondolas. Truth is that few G-14s if any actually carried these additional cannon and you'll have difficulty finding a photo to prove it. The kit provides two different canopies as the two markings options need different ones.
Instructions are with Gunze paints and any of you who have built a few of these kits will probably be able to do one in your sleep. Two markings options are provided. One is the box art plane in pretty much overall white as flown by JG 53's Erich Hartmann. The other is a JG7 plane in RLM 75/82/76 with large RLM 76 splotches on the fuselage side. Decals are well printed old style types with off-white white markings.
| CONSTRUCTION |
I have built quite a few Hasegawa 109s so they are a known item. Doesn't mean that I'll blindly start building, because that often leads to a glitch. So with this one, the first step was to break out the paint and do all the items that will be RLM 66. I used Mr. Color and a brush to deal with these items. When dry, I installed the lap belts from an Eduard set and then built up the interior parts. Once the paint was dry, the bits were drybrushed with white. This kit does not include instrument decals as it was developed before that became a standard thing.
 Fuselage halves were glued together, trapping the prop shaft. The seams were
then dealt with and lost detail rescribed. Then the instrument panel was
installed followed by the interior assembly. Meanwhile the upper wings had the
holes for the main tire clearance fairings opened. Be very careful to not open
the wrong holes as the ones for the large, K-4 fairings are partially opened
while the ones for the rest of the G models are simply small, raised circles.
With that done, the fairings were glued into place, the radiators painted and
installed, and the wings fully assembled. Note that Hasegawa gives you an F wing
and you have to open the main gear wells a bit and scribe a panel line in the
outer upper wings.
Fuselage halves were glued together, trapping the prop shaft. The seams were
then dealt with and lost detail rescribed. Then the instrument panel was
installed followed by the interior assembly. Meanwhile the upper wings had the
holes for the main tire clearance fairings opened. Be very careful to not open
the wrong holes as the ones for the large, K-4 fairings are partially opened
while the ones for the rest of the G models are simply small, raised circles.
With that done, the fairings were glued into place, the radiators painted and
installed, and the wings fully assembled. Note that Hasegawa gives you an F wing
and you have to open the main gear wells a bit and scribe a panel line in the
outer upper wings.
I attached the tailplanes and after I opened the holes for the centerline rack, the wing was installed. The scheme I was using had the short tail wheel so that was glued in place. Next was the windscreen and canopy after they had been masked. The canopy was just tacked in place as I still needed to install the head armor.
| COLORS & MARKINGS & THE REST |
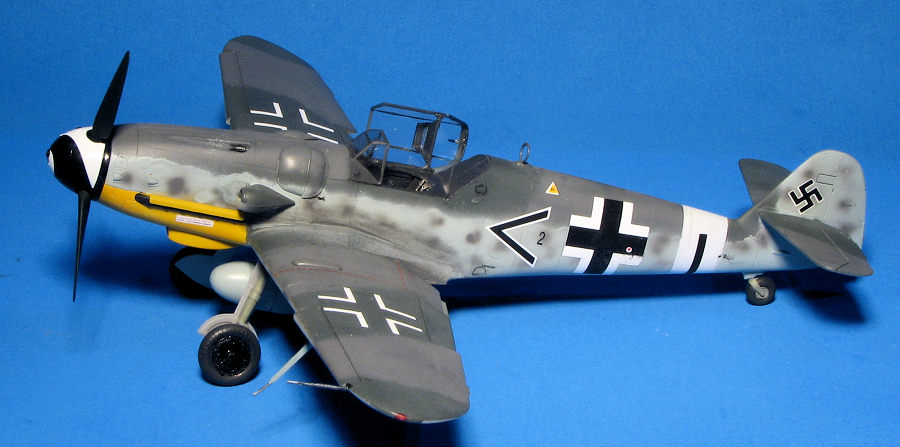
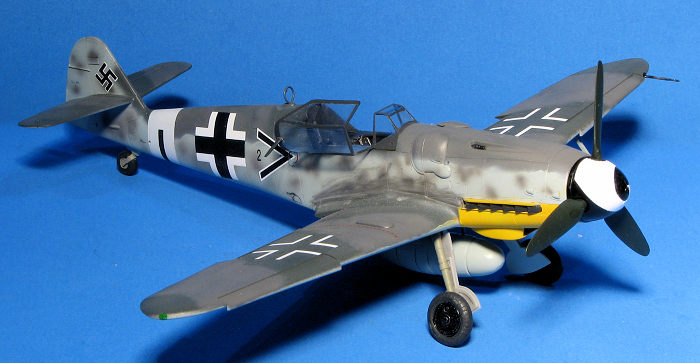
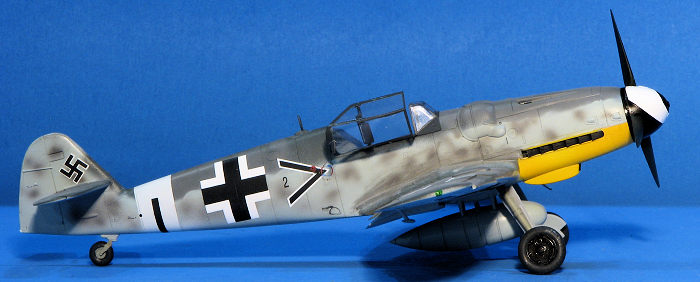
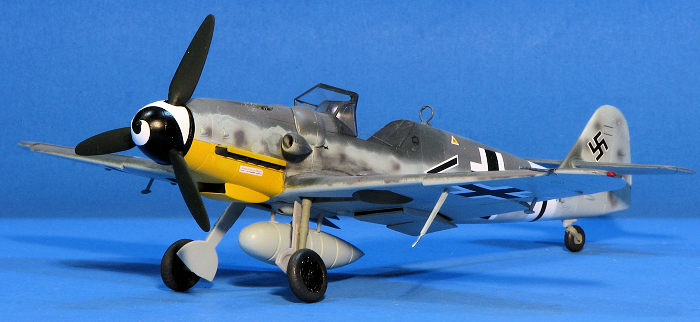
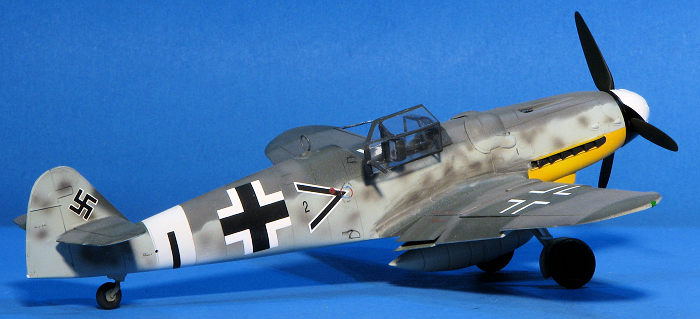
Aftermarket decals for the G-14 are not as prevalent as for other mid/late war 109s. I had few options in my stash and did not want to use the kit markings. I finally settled on an option from Aeromaster 48-055, Augsburd's Eagles part III, a sheet from 2001. The option I chose was a fairly straight-forward option with standard camouflage of RLM 74/75/76 with a white fuselage band. I added a yellow lower cowling as it was not uncommon to see this on late war 109s. The markings depict Fw. Henning's Stab III./JG 3 aircraft as landed in Switzerland in December 1944.
 I used
Mr.Color lacquers for all the shades. The aircraft has RLM 66 windscreen and
canopy frame so once the main colors were painted, this area was masked around
and the RLM 66 was then sprayed. A clear coat was then sprayed on and when dry,
the decals were applied. Despite their 25 year old age, the markings went on
without issue. I also used the data markings included with the sheet. I used
Microsol setting solution. After dry and cleaned off, a clear matte using Tamiya
paint, was then applied.
I used
Mr.Color lacquers for all the shades. The aircraft has RLM 66 windscreen and
canopy frame so once the main colors were painted, this area was masked around
and the RLM 66 was then sprayed. A clear coat was then sprayed on and when dry,
the decals were applied. Despite their 25 year old age, the markings went on
without issue. I also used the data markings included with the sheet. I used
Microsol setting solution. After dry and cleaned off, a clear matte using Tamiya
paint, was then applied.
Back at the bench, the gear wells were painted RLM 02 along with the landing gear struts. The gear struts were then installed and when dry, the wheels were attached. These parts have a fairly loose fit so one has to be careful to constantly adjust them until the glue sets. There are a number of smaller bits to be added which includes aileron balances, the prop, pitot tube, and after the masking was removed, a short antenna on the canopy (which needed the mounting hole drilled out). I then glued the canopy open using clear cement and after some pastel exhaust stain, that was pretty much it.
| CONCLUSIONS |
 Hasegawa
1/48 109s are a known product. They have pretty good fit, no fiddly bits, and if
you have built one 109F-K, you know what to expect. There are lots of
aftermarket decals and other bits for it if you so choose to add those and most
of the options are interesting.
Hasegawa
1/48 109s are a known product. They have pretty good fit, no fiddly bits, and if
you have built one 109F-K, you know what to expect. There are lots of
aftermarket decals and other bits for it if you so choose to add those and most
of the options are interesting.
17 April 2026
If you would like your product reviewed fairly and quickly, please contact the editor or see other details in the Note to Contributors.