| KIT #: | 7269 |
| PRICE: | ~$15-25.00 |
| DECALS: | Two options |
| REVIEWER: | Scott Van Aken |
| NOTES: |
2006 boxing |
| HISTORY |
Hopefully, most of you will know that the Ju-88 was probably one of the most widely adapted German twin engine medium bombers of WWII. One area where they were widely used in the last years of the conflict was as a night fighter.
All previous night fighter versions of the Ju 88 prior to this series used a modified A-series fuselage. The G-series fuselage was purpose-built for the special needs of a night fighter, with the A-series' Bola ventral under-nose defensive gun position omitted for lower aerodynamic drag and less weight. G-1 aircraft were fitted with the enlarged squared-off vertical fin/rudder tail unit of the Ju 188, more powerful armament and 1,700 PS BMW 801 G-2 radial engines plus additional FuG 350 Naxos or FuG 227 Flensburg homing devices as well as the now-standard FuG 220 Lichtenstein SN-2 90 MHz VHF radar.
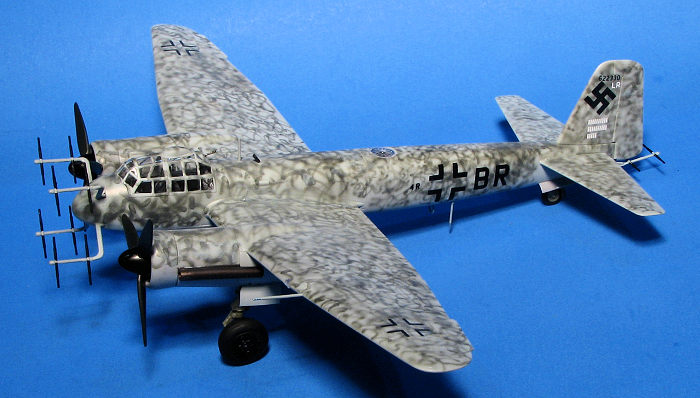 G-6 versions (and the subject of this kit) were equipped with 1,750 PS Jumo 213A
inline-V12 engines, enlarged fuel tanks and often one or two 20 mm MG 151/20
cannons in a Schräge Musik ("Jazz Music", i.e. slanted) installation. Guns were
firing obliquely upwards and forwards from the upper fuselage - usually at an
angle of 70°.
G-6 versions (and the subject of this kit) were equipped with 1,750 PS Jumo 213A
inline-V12 engines, enlarged fuel tanks and often one or two 20 mm MG 151/20
cannons in a Schräge Musik ("Jazz Music", i.e. slanted) installation. Guns were
firing obliquely upwards and forwards from the upper fuselage - usually at an
angle of 70°.
Some of the final G-series models received updates to the engine, a high-altitude Jumo 213E or to the radar, FuG 218 Neptun V/R or the even newer FuG 240 Berlin N-1 cavity magnetron based, 30 GHz-band (centimetric) radar. Only about 10-20 of those were completed before V-E Day.
Many Luftwaffe night fighter aces, such as Helmut Lent (110 victories) and Heinrich von und zu Sayn-Wittgenstein (87 victories) flew Ju 88s during their careers.
Those wanting to know more would be advised to click on the reference link.
| THE KIT |
Zvezda is one of those companies that I equate to Italeri in terms of their products. They are well done and not a pain to build. Their later efforts are always better than their earlier products, but then that is fairly standard when it comes to growing companies.
This is one of their many Ju-88 kits and pretty much relies on a standard set of sprues that can be switched around as needed. When compared to the Hasegawa kit, for instance, you will find a fairly 'dumbed down' version of the interior with things already molded in place instead of being separate. This includes the rudder pedals. You are provided crew members and from what I see, you get a standard radio fit and not the radar boxes that would be in the night fighter. A decal is provided for the instrument panel, which in this scale is pretty standard.
 Once the cockpit and tail wheel
is installed, the lower forward fuselage pieces are put in place. This includes
the belly gun pack. There are no nose windows so smooth inserts are provided
instead. The nose cap has notches to accept the antenna structure. The antennas
are really too thick, but there are aftermarket brass ones that would be quite
useful for this kit. The kit does have four wing pieces on each side and when I
built my Ju-88A-4 from these folks that did not seem to be a problem in terms of
the join seam.
Once the cockpit and tail wheel
is installed, the lower forward fuselage pieces are put in place. This includes
the belly gun pack. There are no nose windows so smooth inserts are provided
instead. The nose cap has notches to accept the antenna structure. The antennas
are really too thick, but there are aftermarket brass ones that would be quite
useful for this kit. The kit does have four wing pieces on each side and when I
built my Ju-88A-4 from these folks that did not seem to be a problem in terms of
the join seam.
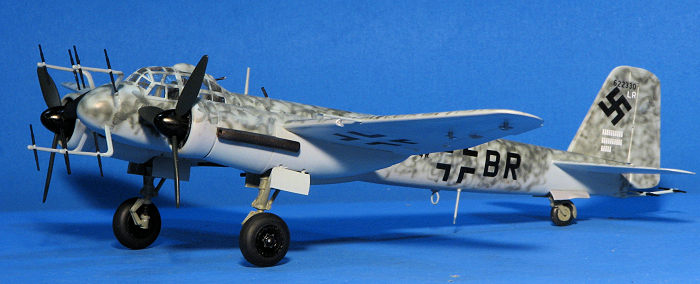
Instructions show you building up the engines and attaching the main gear prior to attaching the wings. I'd leave the gear off until after painting. Note that the engines all have flame dampers on the exhaust. Ju-88Gs all had two options for the shrage musik guns. Either side by side or fore and aft. Zvezda only provides the side by side option. Check your references to ensure that the markings options given are for this variety.
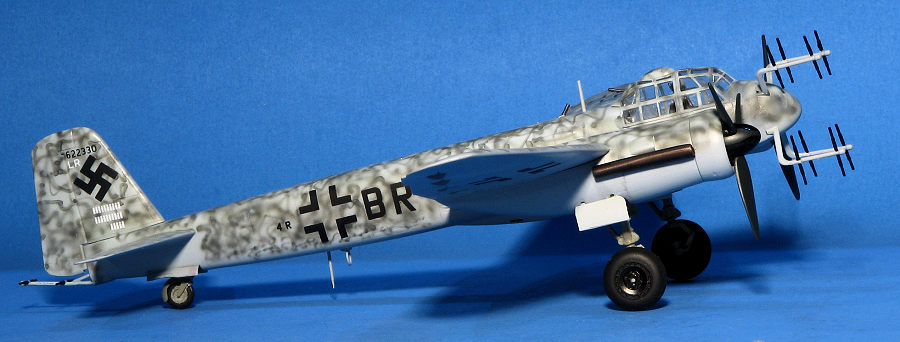
Instructions are well done and provide Model Master and general paint colors. Basically these planes are overall RLM 76 with a variety of mottling. One option is shown as a base white, which would be incorrect. It is probably RLM 77, a light grey used on some planes. Upper mottling or wave patterns were in either RLM 75 or one of the late war greens. No unit information is provided nor are there complete swastikas. The latter is provided by four separate segments per side. For those who have good references, the unit codes are 3C, 9W, and W7. Decals are well printed and my sample has already started to yellow so you may want to search out some aftermarket.
| CONSTRUCTION |
After thinking about building this kit a number of times and passing for something else, I figured I'd get it underway. I already had a set of masks for it which would take care of one of the more tedious parts of the build. I have to say I'm not a fan of the separate inner and outer wing, but it seemed to work out OK when I built their Ju-88A-5 kit.
So I got underway by cutting a lot of pieces from the sprue to make various subassemblies. This included all the wing bits, fin, and the wheels. I then painted all the interior parts and fuselage sidewalls with Tamiya XF-63 which is a good representation of RLM 66. I then built up the interior pieces. I should mention that you'd be well advised to ignore the paint references as they make some rather odd suggestions. For instance, they say to paint the interior, wheel wells, gear legs, inner gear doors, and wheel hubs with olive drab. Not even. Wheel hubs were black and the gear stuff was RLM 02.
 With the interior done, it was
placed in the fuselage halves along with the tail gear and the fuselage halves
were closed. Attention turned to the tail parts and after assembling them, they
were added to the fuselage. This included the belly gun pack. This fit fairly
well, but not perfect. The landing gear were assembled, followed by the wings.
Each wing is four parts per side. Then the main gear were attached to the gear
wells and the nacelles were glued in place. I did not attach the wheels at this
time.
With the interior done, it was
placed in the fuselage halves along with the tail gear and the fuselage halves
were closed. Attention turned to the tail parts and after assembling them, they
were added to the fuselage. This included the belly gun pack. This fit fairly
well, but not perfect. The landing gear were assembled, followed by the wings.
Each wing is four parts per side. Then the main gear were attached to the gear
wells and the nacelles were glued in place. I did not attach the wheels at this
time.
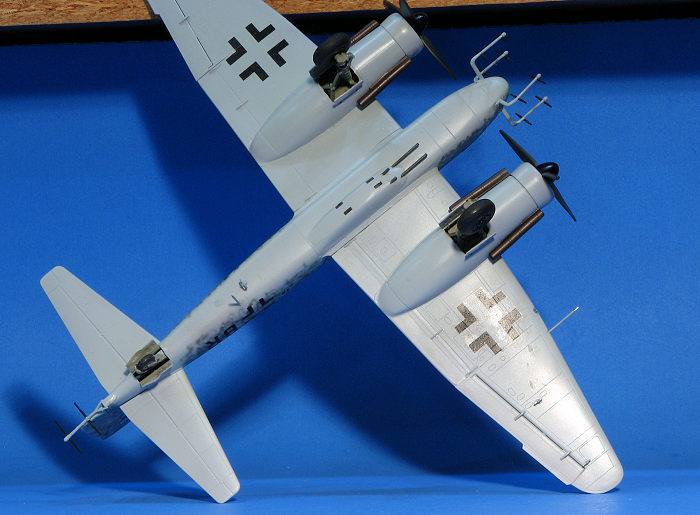
Moving along, the engine nacelles were assembled and attached. I left off the props and exhaust until after the airframe was painted. On the nose, the radar antenna base was glued in place and the nose glued on. Again, I left off the dipoles as those would be easy to break off when handling the model. I bought an Eduard mask set for the G-6 and after everything was covered, the clear parts were glued in place. It was then a good time for paint.
| COLORS & MARKINGS |
I first covered the exposed landing gear in tape. Then I gave the entire airframe a coat of Mr Color RLM 76, and when dry, I lost interest in the project and the kit sat for over five years within feet of my paint booth. A few days ago, I decided to finally finish the kit. This meant several fairly intense sessions with a fine needle in an Iwata Revolution and some considerably thinned Mr. Color RLM 74. In the last five years, my hand has become less steady than it was, but I managed to get the fairly complex squiggle scheme on the airframe.
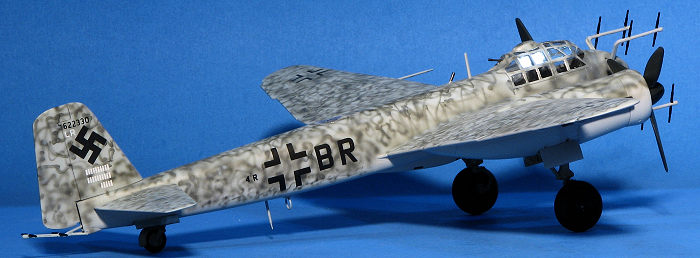 Because the paint is
semi-gloss, I did not use a clear coat prior to attaching the decals. For
markings I chose AIMS 72-002 'Ju-88G-6 Collection'. I picked the aircraft of
Oblt Walder Brieglich from 1945. The decals are quite thin and while the first
one I tried (an underwing insignia) worked fine, the other one broke apart.
Fortunately, the sheet includes two sets. Armed with that info, I gave the rest
of the markings I was going to use a coat of Microscale decal film. That did the
trick and the rest of the decals went on without issue. Normally the fuselage
codes are together on one carrier, but in this case they were all separate.
Because the paint is
semi-gloss, I did not use a clear coat prior to attaching the decals. For
markings I chose AIMS 72-002 'Ju-88G-6 Collection'. I picked the aircraft of
Oblt Walder Brieglich from 1945. The decals are quite thin and while the first
one I tried (an underwing insignia) worked fine, the other one broke apart.
Fortunately, the sheet includes two sets. Armed with that info, I gave the rest
of the markings I was going to use a coat of Microscale decal film. That did the
trick and the rest of the decals went on without issue. Normally the fuselage
codes are together on one carrier, but in this case they were all separate.
I then attached the already painted wheels and assembled the props. The forward portion of the engines was painted matte black and dry brushed with white to bring out detail. The rear radar assembly was also built up at this time. I then attached all the gear doors before giving the kit an overall semi-matte clear coat.
As often happens, the final steps were the fiddly parts. I had to drill some holes for a variety of antennas and those were installed. The nose and tail radar antennas were then attached. I'd feared issues with the nose antennas, but they were fairly trouble-free other than having to be careful to get them aligned. Masking was removed from the clear parts and a hole drilled for the single upward firing 20mm, for which I used part of an unused pitot tube. Stretches sprue was used for the radio mast as none was included with the kit (either that or I lost it). The props were attached and that was it.
| CONCLUSIONS |
Based on all the different Ju-88s I've built from Revell's ancient version to the Italeri kit that was reboxed by AMT/AMtech, to the Hasegawa kit, I'd put this one in between the Italeri and the Hasegawa kit. I've not built Revell's new tool Ju-88, but understand it is quite nice and should be my next 88. If you find the Hasegawa kits too expensive, then I'd recommend this one for your next 88G build.
| REFERENCES |
http://en.wikipedia.org/wiki/Ju88
4 July 2025
Copyright ModelingMadness.com. All rights reserved. No reproduction in any form without express permission from the editor.
If you would like your product reviewed fairly and fairly quickly, please contact the editor or see other details in the Note to Contributors.
Back to the Main Page Back to the Review Index Page Back to the Previews Index Page