|
KIT # |
72021 |
|
PRICE: |
$30.98 |
|
DECALS: |
Two aircraft; see review |
|
REVIEW & |
|
|
NOTES: |
Short run multimedia kit |
|
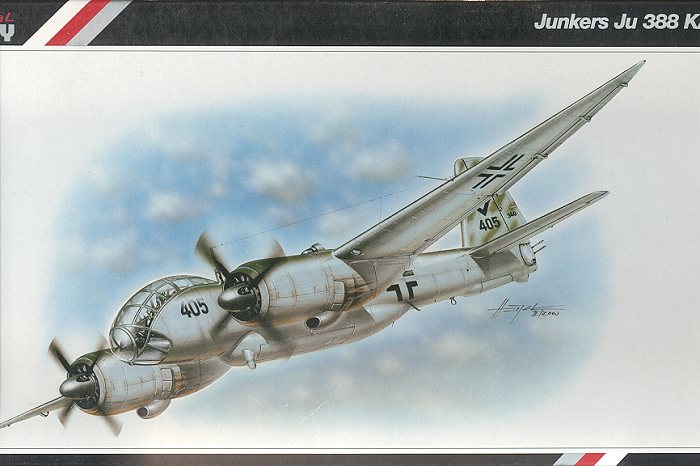
HISTORY & THE KIT |
Allow me to be lazy and refer you to the preview of this kit for all of that information.
|
CONSTRUCTION |
 Step one in doing kits like this is to begin removing
cockpit bits from their resin blocks. This took some time as there are quite a
few bits for the cockpit. Be especially careful when removing the resin from the
right sidewall. I cut too deeply and nearly lost the bottom section of it. Once
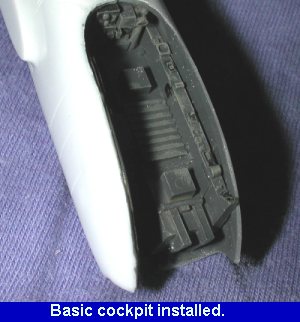
the main cockpit parts were cut out, they were painted RLM 66. The instructions
would have you do much of the cockpit in RLM 02, but I think that they are
mistaken as the official directives called for RLM 66 to be painted in all crew
areas.
Step one in doing kits like this is to begin removing
cockpit bits from their resin blocks. This took some time as there are quite a
few bits for the cockpit. Be especially careful when removing the resin from the
right sidewall. I cut too deeply and nearly lost the bottom section of it. Once
the main cockpit parts were cut out, they were painted RLM 66. The instructions
would have you do much of the cockpit in RLM 02, but I think that they are
mistaken as the official directives called for RLM 66 to be painted in all crew
areas.
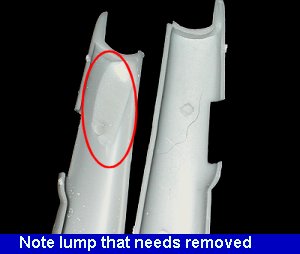
Meanwhile, I went to doing a few other things while paint was drying. The tail wheel well as cut out and I went to glue it in place. There is a huge plastic flow in the tail section of one of the fuselage halves. Normally not a problem, but it interferred with the tail wheel well. It was laboriously scraped away until the resin well fit in place. The well was glued in place with super glue. I used this for all the resin pieces.
Next, I skipped
over to the engine nacelles. There is little to put in them other than the
engine annular radiator and the engine fan. The fan is plastic and a bit crude,
compared to the resin radiator. They didn't fit well so some
 scraping was needed in both engine halves to get
them to fit well. I also had problems as one of the engine halves was a larger
diameter from the other. It took some work to get them to properly fit. Removing
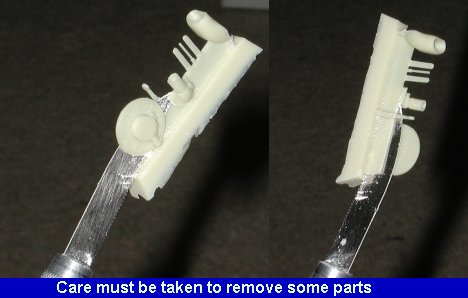
the radiators is not a super easy job. You need to saw them from the sprue in
the same way that the sidewall was removed. As you can see from the image, it
can be done, if you take your time.
scraping was needed in both engine halves to get
them to fit well. I also had problems as one of the engine halves was a larger
diameter from the other. It took some work to get them to properly fit. Removing
the radiators is not a super easy job. You need to saw them from the sprue in
the same way that the sidewall was removed. As you can see from the image, it
can be done, if you take your time.
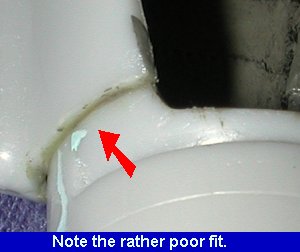
Then I wondered how they would fit on the wing. The wing has a resin wheel well insert. It wasn't really clear from the instructions how this was to mate together. Fortunately, the AJ Press books I had for reference came in very handy for this step. It took a lot of carving and test fitting to get things straightened out. The instructions would have you glue the well insert into the lower wing, then glue the wings together. After that, they have you put the engines on. This will probably result is much frustration if not disaster.
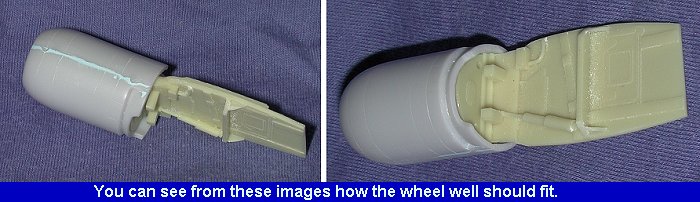
First of all, the wheel well doesn't fit well and needs a lot of fussing and trimming. Secondly, the insert needs to fit flush with the back of the engine, something the instructions show nothing about. What I did was to trim the insert to where it fit the engine first. Then I taped the wings together and by much dryfitting, got the insert to properly fit in the wing without being off center or misaligned. It took about 45 minutes to do one side. I do need to mention that the wheel wells are handed, so make sure you have them in the proper side. The images in the instructions show which goes where. These were then painted RLM 02 grey then washed with flat black and drybrushed with aluminum.
 It looked like I would be able to insert them into a
glued-together wing so the wings were glued together at this time. The engines
do fit, but one has to be careful. Actually using the word 'fit' is a bit of a
misnomer. The nacelle attachment point on the wing is actually larger than the
engine, so much filler was needed to get things to fit properly.
It looked like I would be able to insert them into a
glued-together wing so the wings were glued together at this time. The engines
do fit, but one has to be careful. Actually using the word 'fit' is a bit of a
misnomer. The nacelle attachment point on the wing is actually larger than the
engine, so much filler was needed to get things to fit properly.
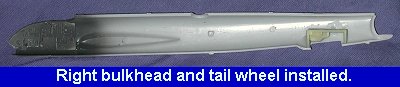 While waiting for things to dry, I
attached and painted the right bulkhead and tail wheel well insert. The interior
bulkhead was later detail painted and dry brushed. The tail well as painted in
RLM 02. Then the main part of the interior was detail painted and glued into the
other side.
While waiting for things to dry, I
attached and painted the right bulkhead and tail wheel well insert. The interior
bulkhead was later detail painted and dry brushed. The tail well as painted in
RLM 02. Then the main part of the interior was detail painted and glued into the
other side.
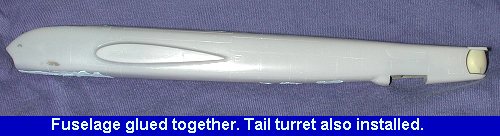
 Once
that was in nicely, the fuselage halves were glued together. There is a
direction finding antenna that needs to be glued in before the halves are glued
together. It needs some trimming to fit. As expected, the fit was OK, but not
really perfect. Like all other short run kits I build, this one needed quite a
bit of filler to close the seams and take care of alignment glitches, most of
which were probably self-induced. At this time the resin tail turret was removed
from the resin block and cleaned up. Then the upper turret mount was glued to
the back of the fuselage. When dry, the turret was glued in place and the upper
mount faired into place with filler.
Once
that was in nicely, the fuselage halves were glued together. There is a
direction finding antenna that needs to be glued in before the halves are glued
together. It needs some trimming to fit. As expected, the fit was OK, but not
really perfect. Like all other short run kits I build, this one needed quite a
bit of filler to close the seams and take care of alignment glitches, most of
which were probably self-induced. At this time the resin tail turret was removed
from the resin block and cleaned up. Then the upper turret mount was glued to
the back of the fuselage. When dry, the turret was glued in place and the upper
mount faired into place with filler.
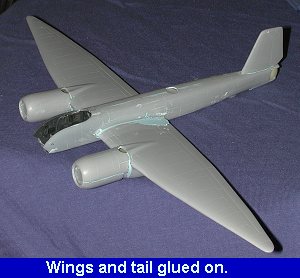 Once the fuselage was together
and smoothed out, it was time to glue on some of the major bits. This meant the
wings and tail. First the tail was glued on. Then the wings were glued in place.
This was done before the tail had dried so that all three components could be
'adjusted' to make sure they were aligned with each other. As suspected, I had
trouble with the wings. The butt fit as done would cause the wings to droop. As
a result, I had to install some Evergreen strip to the underside of the wings to
get the proper alignment. The result was a bit of a gap that needed filled. In
addition, though I thought all was cool when I left it to dry, one of the wings
slipped in the back and left me with quite a step. On top of that, the wing at
the root is a bit larger than the fuselage wing root. How typical!! Thank
goodness for filler, the modeler's (well at least my) best friend. Fortunately,
I learned years ago that when doing short run kits, leave off all but the basic
pieces from subassemblies until the whole airframe is done. Had I glued on all
the bits to the engines, I'd have knocked them off or damaged them by now.
Once the fuselage was together
and smoothed out, it was time to glue on some of the major bits. This meant the
wings and tail. First the tail was glued on. Then the wings were glued in place.
This was done before the tail had dried so that all three components could be
'adjusted' to make sure they were aligned with each other. As suspected, I had
trouble with the wings. The butt fit as done would cause the wings to droop. As
a result, I had to install some Evergreen strip to the underside of the wings to
get the proper alignment. The result was a bit of a gap that needed filled. In
addition, though I thought all was cool when I left it to dry, one of the wings
slipped in the back and left me with quite a step. On top of that, the wing at
the root is a bit larger than the fuselage wing root. How typical!! Thank
goodness for filler, the modeler's (well at least my) best friend. Fortunately,
I learned years ago that when doing short run kits, leave off all but the basic
pieces from subassemblies until the whole airframe is done. Had I glued on all
the bits to the engines, I'd have knocked them off or damaged them by now.
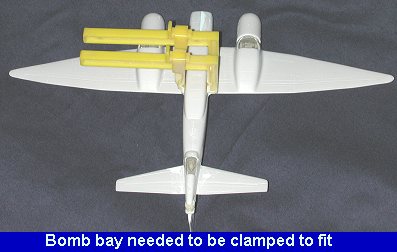 Once the wings were on, the
tailplanes were added. They also needed a bit of filler to take care of some
gaps. The next part to add was the enlarged bomb bay. I had test fit this item
before adding the wings, but felt that it would be best to wait until the
airframe was relatively complete. The bay itself is wider than the fuselage. So
much so that if left alone, there would be huge gaps on both sides. What I had
to do was to glue it in place at the front and the rear. When that dried, I did
a series of glue and clamp procedures starting at one end and working to the
other. This got the sides glued tightly. Then the remaining seam could be
smoothed out with filler. Now this section was removable, but I doubt if the fit
was as poor as the kit part would initially portray.
Once the wings were on, the
tailplanes were added. They also needed a bit of filler to take care of some
gaps. The next part to add was the enlarged bomb bay. I had test fit this item
before adding the wings, but felt that it would be best to wait until the
airframe was relatively complete. The bay itself is wider than the fuselage. So
much so that if left alone, there would be huge gaps on both sides. What I had
to do was to glue it in place at the front and the rear. When that dried, I did
a series of glue and clamp procedures starting at one end and working to the
other. This got the sides glued tightly. Then the remaining seam could be
smoothed out with filler. Now this section was removable, but I doubt if the fit
was as poor as the kit part would initially portray.
After much filler was applied to smooth out the bomb bay, I took a good look at the aircraft. Naturally the bomb bay was on a bit crooked. Why I have these problems I don't know. Things look nice and level when they are initially glued on and later it shows to be off kilter. I'd like to blame it on poltergeist, but the only ones in the house are furry with tails and not allowed in the modeling room! While feeling blue about the bomb bay, I took the time to clean up the wheel wells and make them even with the back of the engines. Took just a few minutes and a bit of carving to make them pretty. The next step was to install the resin engine intakes and turbocharger exhaust. The intakes fit on the bottom and were a great fit. Because I had decided to not install the exhaust, this required me to trim the heck out of the base to get them to fit into the holes. Superglue held them in place.
 Next it was time to tackle the canopy. Just getting up the motivation to do
it took about three weeks. First the interior had to be completed. This
was basically installing the seats, control stick and rudder pedals. The pedals
are etched brass while the other components are resin. My control column had
broken during shipment so it was repaired and glued in place as were the other
interior bits. They were then painted RLM 66 and the seats had the belts painted
sail with silver hardware.
Next it was time to tackle the canopy. Just getting up the motivation to do
it took about three weeks. First the interior had to be completed. This
was basically installing the seats, control stick and rudder pedals. The pedals
are etched brass while the other components are resin. My control column had
broken during shipment so it was repaired and glued in place as were the other
interior bits. They were then painted RLM 66 and the seats had the belts painted
sail with silver hardware.
Now for the part of the kit that I was dreading. The vacuformed canopy. Not only was it vacuformed, but it was also a two-piece assembly that had to mate at the front. Trusting that MPM had the size right, I trimmed both pieces and set them in place. (That last sentence took about an hour of actual work). They fit! Out came the non-fogging superglue and I carefully glued the two pieces down, starting with the upper canopy. I glued it in stages and used accelerator to hold the bits. Somehow the thing slipped or something as when I was done, I had a huge gap in the rear. AARGH! Well, nothing to do but try to fix it, so after many applications of superglue and accelerator, the gap here and in other places was filled.
 This left me with a very lumpy
seam, and one that was hard to see. Before tackling that, I masked the canopy to
protect the panes from the next step. What I then did was to take the Mr.
Surfacer and put down about 7 or 8 applications of it, one at a time. This
eventually filled most of the imperfections. These were then carefully sanded
down when all applications had dried. To check for any other gaps and to provide
a bit of a primer, the canopy area was sprayed with RLM 66 black grey. This made
those areas that needed repair much easier to see. Regular filler was then used
and when dry, sanded smooth. I now had the worst part (for me) of the kit
finished and could continue on to the next step.
This left me with a very lumpy
seam, and one that was hard to see. Before tackling that, I masked the canopy to
protect the panes from the next step. What I then did was to take the Mr.
Surfacer and put down about 7 or 8 applications of it, one at a time. This
eventually filled most of the imperfections. These were then carefully sanded
down when all applications had dried. To check for any other gaps and to provide
a bit of a primer, the canopy area was sprayed with RLM 66 black grey. This made
those areas that needed repair much easier to see. Regular filler was then used
and when dry, sanded smooth. I now had the worst part (for me) of the kit
finished and could continue on to the next step.
That next step was the installation of a number of small scoops and thing on the fuselage and engine nacelles. This went along rather well with no problems. There are two resin projections that stick up rather prominently. These are the sights for the gunner. Both will need to have their mating surfaces shaped prior to gluing in place. At the back, there is a fuel dump fairing with a small resin bit that fits inside. Again, care is needed to install it. Once all this was done, it was time to stuff tissue in the wheel wells and start painting.
|
PAINT |
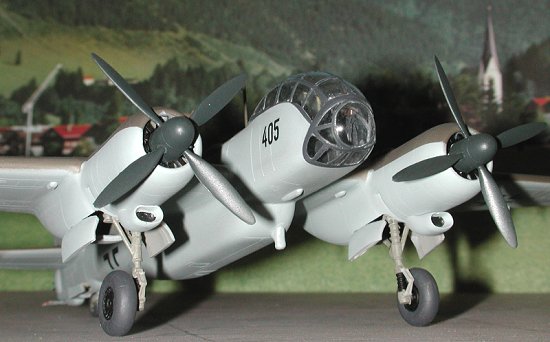
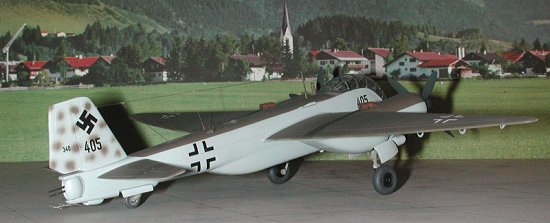 Since the aircraft has a lot of RLM 76 in the color, that is
what it was painted. At least most of the kit was painted that color. I left the
front alone as it needed another coat of RLM 66 to replace what was sanded off.
Then the canopy was remasked and the rest of the airframe shot with RLM 76. When
dry, much of the RLM 76 part was masked and the upper surfaces painted RLM 81.
Then the masking was taken off and I looked for overspray. Found it too. The RLM
81 was masked this time and the overspray areas were repainted in RLM 76. After
letting that dry, the tail was painted with RLM 81 mottling.
Since the aircraft has a lot of RLM 76 in the color, that is
what it was painted. At least most of the kit was painted that color. I left the
front alone as it needed another coat of RLM 66 to replace what was sanded off.
Then the canopy was remasked and the rest of the airframe shot with RLM 76. When
dry, much of the RLM 76 part was masked and the upper surfaces painted RLM 81.
Then the masking was taken off and I looked for overspray. Found it too. The RLM
81 was masked this time and the overspray areas were repainted in RLM 76. After
letting that dry, the tail was painted with RLM 81 mottling.
|
CONSTRUCTION CONTINUES |
Now I had a pretty well painted aircraft. It was time to go ahead and install the landing gear. Well, if you recall, the wheel wells are resin. The landing gear is styrene. This meant using superglue or epoxy to join the gear to the bay. The gear had to be glued onto these small pillars. Not sure who engineered this, but it is just asking for an easy-to-break-off landing gear. What I ended up doing, was to drill holes in both the small pillars in the wells and in the landing gear itself. Small sections of paper clip were installed in the gear and these were then inserted into the pillars in the wheel well. Makes for a MUCH stronger landing gear.
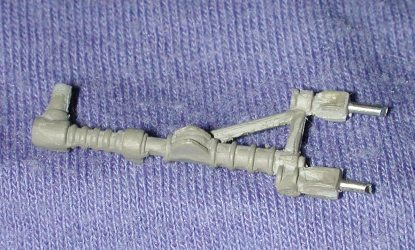 Main Gear with pins installed |
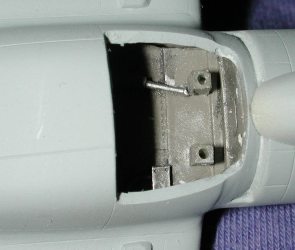 Holes drilled in pylons for the gear |
Need to drill out the wheels as well to accept the axle stubs as there is no pre-drilled hole. Before installing the wheels, there is a retraction mechanism to install. This is made up of two small resin parts which are to be butt joined to two 'A frame' mounts. This whole assembly then attaches to the gear on one end and the wheel well on the other. Again, there are several resin to styrene joins that have to be made. Not the best way to do this, in my opinion. It would have been much better off to have the parts either entirely in resin, or entirely in styrene. Preferably in styrene to make for a stronger join.
Once joined the struts were installed, again with superglue. Then the wheel well doors were cut apart and glued in place. There are no hinges or any other mechanism to insure proper placement. Again, best guess is what is needed for this installation. After the doors were one and touchup painting done, the wheels were installed on the axles. I now had a pretty complete aircraft.
 Next job was to make a clear cover for the ADF antenna that is half buried in
the fuselage. What I ended up using was a circle template and cut the cover out
of clear sheet plastic. Squadron's Thermoform works well for this. Naturally, it
wouldn't cooperate as to fitting well so I put it in as best as I could and
applied non-fogging superglue to keep it in place. When dry it was masked so I
could do touchups.
Next job was to make a clear cover for the ADF antenna that is half buried in
the fuselage. What I ended up using was a circle template and cut the cover out
of clear sheet plastic. Squadron's Thermoform works well for this. Naturally, it
wouldn't cooperate as to fitting well so I put it in as best as I could and
applied non-fogging superglue to keep it in place. When dry it was masked so I
could do touchups.
At this point, I looked at all the detritus is the bottom of the box I was using to see what was left over. At this time I found what turned out to be the main instrument panel. Oops. Well nothing to do about it now as there is no way I was going to get back into the interior to install it. The two resin gun barrels were cut off the block and installed with no trauma. Then the upper and mid-fuselage antennas were glued in place.
Now on to the photo etched bits. With much care, I removed the aileron hinges and got those glued in. Then the underwing radio altimeter antennas. Then the upper fuselage loop antenna. Hey, things were going well. Next was the two upper wing radar antennas. Got the mounts clear with no problem and the first antenna. The second one, however, went zinging off into the distance. After an exhaustive search, I gave up finding it. Not wanting to have the antenna go to waste, I installed it under the rear fuselage. This was a not-uncommon placement for rear radar warning antennas.
Back to the paint shop for touch-up painting of the new antennas and etched brass bits, and a reapplication of clear gloss for the decals.
|
DECALS & FINAL CONSTRUCTION |
Decals went on without a hitch. While there isn't much to them other than national insignia and serial numbers, they do add to the overall look of the aircraft. There really wasn't much left to do at this stage. The props were installed to the engine fans. During this procedure, I managed to knock one of the engine faces back into the nacelle. AARGH! It took a lot of coaxing and superglue to get it back to the face of the engine. The prop was then put back on and I am handling it very gently so there is no repeat of this problem! Then the tail wheel doors were cut in half and glued to the side of the tail wheel well.
 Some touchup painting was done at this time; gun
barrels painted gunmetal, rear antenna tips painted white with red stripes (to
keep the ground crew from stumbling over them), and the turbo-supercharger
exhaust painted with Rustall (which worked very well indeed). The exhaust
stains were then applied using pastels. German avgas of the period was terrible
and did not burn clean at all. It was not uncommon to see new aircraft
with large black exhaust stains aft of the exhaust.
Some touchup painting was done at this time; gun
barrels painted gunmetal, rear antenna tips painted white with red stripes (to
keep the ground crew from stumbling over them), and the turbo-supercharger
exhaust painted with Rustall (which worked very well indeed). The exhaust
stains were then applied using pastels. German avgas of the period was terrible
and did not burn clean at all. It was not uncommon to see new aircraft
with large black exhaust stains aft of the exhaust.
Once all that was done, the aircraft was given a coat of matte clear acrylic to seal in the decals. Then the masking was removed from the canopy so I could see how bad things really looked in there. Actually, not as horrid as I had feared. The last thing to do was to install the radio long wire. This was done by stretching clear sprue and attaching it with tiny bits of superglue.
|
CONCLUSIONS |
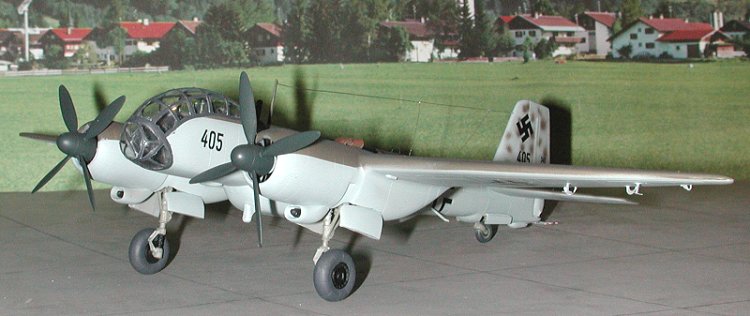
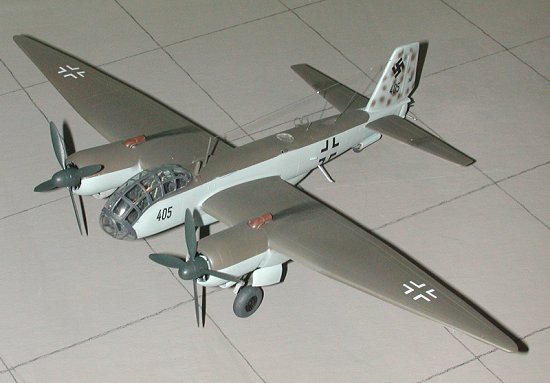
Overall, this is not a bad kit. Sure, it takes work to build,
but that is the nature of the beast. However, it doesn't take that much extra,
and anyone who considers themselves to be an intermediate modeler should be able
to build it without any major traumas. It isn't a shake and bake Tamigawa kit
nor is it a subject I would expect to see from them. The overall result is very
pleasing and well worth the effort put into it.

|
REFERENCES |
Ju-188/Ju388 Part 1 and 2, by Robert Michulec, AJ Press, 1998
If you would like your product reviewed fairly and fairly quickly, please contact the editor or see other details in the Note to Contributors.