|
KIT # |
? |
|
PRICE: |
$ |
|
DECALS: |
None |
|
REVIEWER: |
|
|
NOTES: |
Test shot. Kit includes resin cockpit |
|
HISTORY |
The Henschel Hs-123 was designed as the first dive bomber to
equip the new Luftwaffe. This was basically due to the impression that a Curtiss
Hawk dive bombing demonstration left on Ernst Udet, a high ranking Luftwaffe
officer and First World War Ace. It was first tested in 1935 and entered service
in the autumn of 1936. During the Spanish Civil War t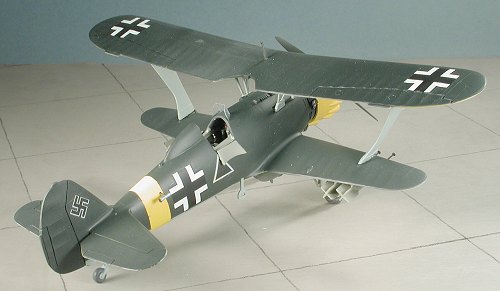 he
handful of Hs 123s sent to the Condor Legion were used with great success
in the close support role and gained great popularity for their reliability and
rugged construction. Of course, when the first Ju-87As arrived in Spain during
the last year of the war it was obvious that the 123 was obsolescent after only
a few years of service.
he
handful of Hs 123s sent to the Condor Legion were used with great success
in the close support role and gained great popularity for their reliability and
rugged construction. Of course, when the first Ju-87As arrived in Spain during
the last year of the war it was obvious that the 123 was obsolescent after only
a few years of service.
When the Second World War broke out the Hs 123 had been almost completely replaced by the Ju87B and only one group was available for the Polish campaign. These remaining aircraft were so effective that they were retained for use in the battles in Belgium and France.
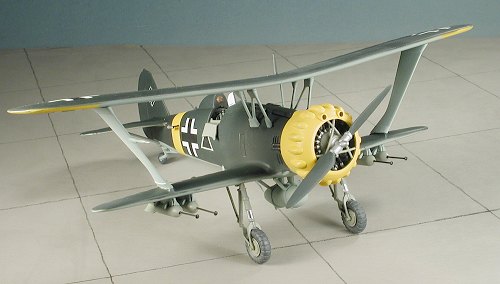
With the attack on Russia the elderly biplanes were again in action, often operating when conditions were so bad that more modern aircraft were grounded. Since the Germans were able to rather easily maintain local air superiority in the large and fluid Eastern front, the 123 was most effective. The type was also used at the Luftwaffe's dive bombing schools. The Henchel Hs-123 normally carried four 110lb bombs and two fixed machine guns. The 870 h.p. BMW engine gave a maximum speed of 212 m.p.h. Wing span was 34ft 5ins and length 27ft 4ins.
|
THE KIT |
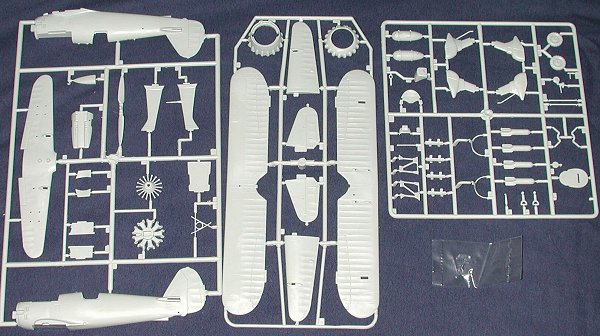
This is actually the older ESCI kit with upgraded parts. Before going into the
upgrades, you should know that in the ESCI catalogue this was kit 4001. Yes, it
was the first 1/48 kit done by ESCI, and like almost any first kit from a
company, it wasn't 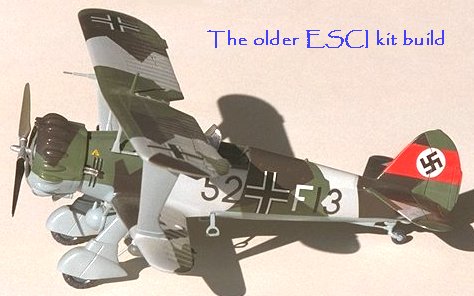 one of the best that they did. I built this beastie before
and can tell you that an easy build it isn't. You can even read
Drew Nix's review of his
efforts to conquer this kit.
one of the best that they did. I built this beastie before
and can tell you that an easy build it isn't. You can even read
Drew Nix's review of his
efforts to conquer this kit.
Having given this rather daunting background, I should also say that it isn't as terrible as it sounds. What you have is an older generation kit (raised detail) that has some fit problems, but nothing that cannot be overcome. I built one of the ESCI kits back about 10 years ago (see image to the right>>>) and it turned out quite nice.
Now this was a test shot, and as such, one expects there to be some flaws in the mold. Specifically, I found sink areas on the thicker parts of the mold. Areas affected were the thick parts of the interplane struts, the wing and tail attachment areas and opposite where guide pins were located on the fuselage. Simple filler will take care of these, though I didn't bother with the interplane struts.
|
CONSTRUCTION |
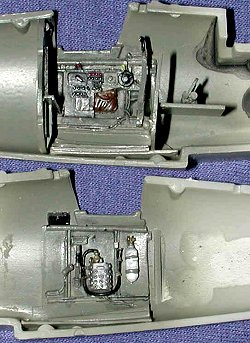 The kit includes an all new resin cockpit that is very well done. It has an
interesting interlocking floor that worked well, but was a bit more of a
challenge when it came to removing the resin blocks. I also broke the control
column and wish that the upper handgrip was integral with it. Unfortunately,
I didn't take a picture of the raw bits, but I did have no real trouble
installing the parts into the fuselage halves. One does need to remove the lower
cockpit alignment runners prior to putting in the resin cockpit, but that only
takes a few moments. Once the cockpit bits were pretty well in place, they were
painted RLM 02 and then details picked out . A wash with thinned black paint was
followed by drybrushing with aluminum. The instrument panel was then glued in
and the fuselage halves glued together. Then seat has a couple of small braces,
but I just couldn't get them to work. I also found the seat to be a touch too
wide. It has an adjustment handle that interfered with a black box on the
cockpit side. I removed that black box and got a good fit. Once the fuselage
halves were together, I installed the seat, aligning it at the top and gluing it
there. It tends to block out a LOT of the cockpit that was so carefully painted,
but I guess that is the way it really was.
The kit includes an all new resin cockpit that is very well done. It has an
interesting interlocking floor that worked well, but was a bit more of a
challenge when it came to removing the resin blocks. I also broke the control
column and wish that the upper handgrip was integral with it. Unfortunately,
I didn't take a picture of the raw bits, but I did have no real trouble
installing the parts into the fuselage halves. One does need to remove the lower
cockpit alignment runners prior to putting in the resin cockpit, but that only
takes a few moments. Once the cockpit bits were pretty well in place, they were
painted RLM 02 and then details picked out . A wash with thinned black paint was
followed by drybrushing with aluminum. The instrument panel was then glued in
and the fuselage halves glued together. Then seat has a couple of small braces,
but I just couldn't get them to work. I also found the seat to be a touch too
wide. It has an adjustment handle that interfered with a black box on the
cockpit side. I removed that black box and got a good fit. Once the fuselage
halves were together, I installed the seat, aligning it at the top and gluing it
there. It tends to block out a LOT of the cockpit that was so carefully painted,
but I guess that is the way it really was.
With the fuselage together, I attached the upper gun cowl section. Fit of this
is less than optimal. I also attached the head rest. Early 123s didn't have this
item, but I'm doing a Russian Front plane and they did have them by this time. I
also painted the engine in Alclad II bright aluminum (with no undercoat) and
when it was dry, gave it several washes to fill in the spaces between the
cylinders. The lower wing halves were glued together as were the upper wings.
These then were sanded and filled as needed. The lower wing does not fit well as
it is 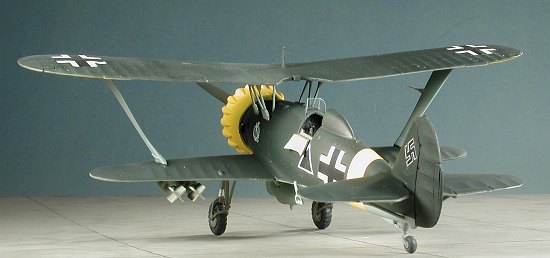 molded. I sanded down the fuselage wing roots until I could get a good
fit. Without doing this, the lower wing will have a decided 'gull' to it that is
most unwanted. I used Acrabond superglue to glue the upper wing roots and get
them to stay. This superglue is the strongest I've ever used and I've never had
a bond break under stress. I needed a lot of filler for this part and the upper
gun cowl.
molded. I sanded down the fuselage wing roots until I could get a good
fit. Without doing this, the lower wing will have a decided 'gull' to it that is
most unwanted. I used Acrabond superglue to glue the upper wing roots and get
them to stay. This superglue is the strongest I've ever used and I've never had
a bond break under stress. I needed a lot of filler for this part and the upper
gun cowl.
Once those parts had properly dried, I glued in the interplane struts. They fit into slots in the upper gun cowl. The lower fit is great, the upper is a bit sloppy and you can see light through this cowl piece even when done. I needed filler to take care of the join here as well. The tail planes were then glued in place and filler used on these as well. There are rather large sink areas on the tailplane roots that need to be filled. During this time, I also glued together the drop tank and the braces. Unfortunately, it seems I put the braces on in reverse, however, this was later 'cured' by some judicious sanding of the now 'too long' braces and the mount to get a good fit.
Well, it was looking like an aeroplane. My attention was turned to the engine
and cowling. First of all I glued the engine bits together and painted them
aluminum. When dry, I painted the push rod housings black as well as the upper
cam covers. Then I used a black wash to bring out details. This was then glued
in between the two cowling halves.
 You have to do this now as you can't fit the
engine in place once the cowling is glued. The cowling is split right down the
center of all the small cam cover 'bumps. This means a lot of sanding and
filling to get things nice and smoothed out. It took a while, I can tell you. I
also did a lot of test fitting when I initially glued the engine into the
cowling to make sure it fit on the nose with no trouble. Once that was done, I
masked off the engine and set it aside for painting.
You have to do this now as you can't fit the
engine in place once the cowling is glued. The cowling is split right down the
center of all the small cam cover 'bumps. This means a lot of sanding and
filling to get things nice and smoothed out. It took a while, I can tell you. I
also did a lot of test fitting when I initially glued the engine into the
cowling to make sure it fit on the nose with no trouble. Once that was done, I
masked off the engine and set it aside for painting.
I wanted to do an Eastern Front plane with the wheel spats removed. AMtech provides replacement 'open' landing gear frames so having these available, I carefully glued the gear together. The gear is well engineered and even without instructions, I had no trouble getting the parts together. To use this gear, it is necessary to remove a bump from the lower wing where the old spatted gear goes. One also has to bring the opening farther forward to get the gear to properly mate. On the next kit, I'll make sure that I open this hole before gluing the lower wings together. It will be MUCH easier to do. After sanding the lower wing and making sure the gear would fit, it was time to apply some paint. Before painting, I glue on the four lower wing bomb racks.
|
CAMOUFLAGE & MARKINGS |
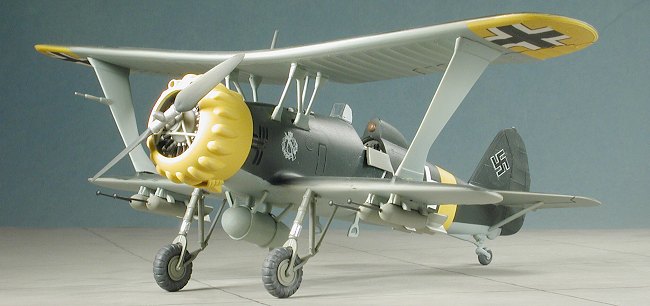
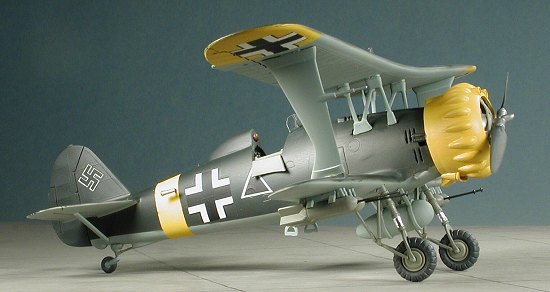
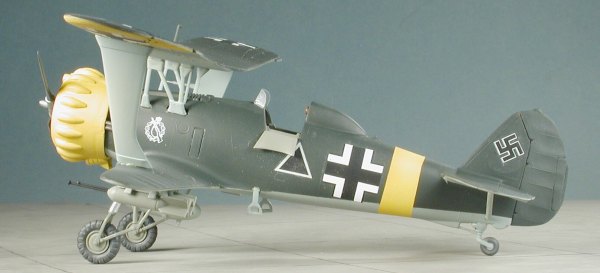
One of the really nice things about Eastern Front 123s is that they had a pretty
simple camo scheme. In this case it is RLM 70 over RLM 65. No splinter camo, no
mottling. First thing I did was to paint the lower upper wing tips, the rear
fuselage 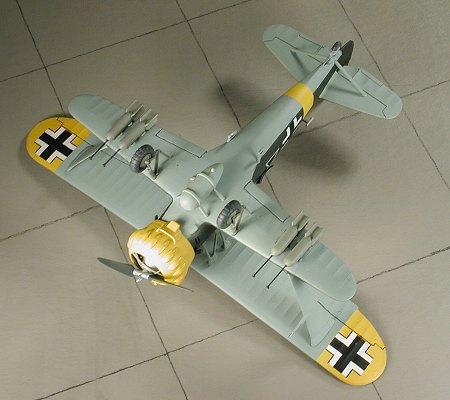 and the cowling white. When dry, these areas were painted yellow. The
fuselage and lower upper wings were then masked. Then I painted the RLM 65 lower
section. This also includes the tail plane struts, all the wing struts, and I
also did the drop tank. The interplane struts were then masked as was the
cockpit. I also masked a hard line between the upper and lower colors before
painting the rest of the plane RLM 70. This color was also used on the prop. The
gear assembly was painted RLM 02 as were the wheels and the bombs, though the
tires were done in RLM 66. When all that had dried, I sprayed the areas that
were going to accept decals with Future clear acrylic gloss.
and the cowling white. When dry, these areas were painted yellow. The
fuselage and lower upper wings were then masked. Then I painted the RLM 65 lower
section. This also includes the tail plane struts, all the wing struts, and I
also did the drop tank. The interplane struts were then masked as was the
cockpit. I also masked a hard line between the upper and lower colors before
painting the rest of the plane RLM 70. This color was also used on the prop. The
gear assembly was painted RLM 02 as were the wheels and the bombs, though the
tires were done in RLM 66. When all that had dried, I sprayed the areas that
were going to accept decals with Future clear acrylic gloss.
Now for the fun. Finding decals. The number of reference photos available for
the Hs-123 in Russia are really quite minimal. Guess the war took too much time
and the 123 wasn't exactly an 'ooh-ah' aircraft. However, I was able to scrounge
the basic insignia from several different decal sheets. The Schlact badge was
gleaned from an Hs-129 sheet and the ground attack triangle from a very old
Monogram 1/48 FW-190 sheet. I wasn't at all sure just what color the individual
aircraft letter would be. I had a choice of blue or red. Well finding blue 1/48
Luftwaffe letters turned out to be an exercise in futility.'
air
|
FINAL CONSTRUCTION |
 Once it was painted and decaled, I glued in the landing gear struts. At this
time I also glued on the top wing. To make darn sure it wouldn't come adrift. I
first glued the wing to the interplane struts and clamped this assembly for a
couple of days. After I was sure it wouldn't come off, I then slipped in the
outer wing struts. These are actually a bit too long and give the upper wing a
decided dihedral. However, there is little I was willing to do about it at this
time. I also fit in the tailplane struts. These apparently are not
interchangeable from side to side as I found out during gluing. Once the wing
had properly dried, the wheels were snapped into place on the gear. Be gentle
while doing this and you'll have no problems. I also put Bare Metal foil on the
oleos at this time.
Once it was painted and decaled, I glued in the landing gear struts. At this
time I also glued on the top wing. To make darn sure it wouldn't come adrift. I
first glued the wing to the interplane struts and clamped this assembly for a
couple of days. After I was sure it wouldn't come off, I then slipped in the
outer wing struts. These are actually a bit too long and give the upper wing a
decided dihedral. However, there is little I was willing to do about it at this
time. I also fit in the tailplane struts. These apparently are not
interchangeable from side to side as I found out during gluing. Once the wing
had properly dried, the wheels were snapped into place on the gear. Be gentle
while doing this and you'll have no problems. I also put Bare Metal foil on the
oleos at this time.
The exhaust were then glue to the inside of the engine cowling. You don't
want these sticking out too far so glue them to the forward side of the rather
wide lip that is provided. I then glued the cowling to the post on the front of
the fuselage. The cowling brace, which had previously been painted RLM 02, was
then glued in place and the prop inserted. It is a tight fit. The small headrest
was glued on and painted as was the venturi tube on the
 fuselage. I searched for the
windscreen, but seem to have lost it somewhere. Not sure how as it came in its
own small bag, but I did. The radio mast was glued to the top of the wing at
this time. I glued the cockpit doors open so you could see at least some of the
interior. Lastly, the ordnance was attached. I drilled holes in the front of the
bombs and inserted straight pins for fuse extenders. These were then glued to
the bomb racks. I then went around and took care of any last minute painting to
cover glitches and glue marks. The model was given a coat of clear matte to seal
in the decals. Now I should mention that I had somehow misplaced the windscreen.
I'd hoped that it would magically reappear just in the nick of time. It didn't.
As a result, I had a hole in the upper fuselage in front of the cockpit. A quick
dab or two of superglue, some sanding and polishing, a brush or two of RLM 70
and some deft scissor work with a piece of clear acetate produced a new
windscreen. Well, it isn't perfect and seems a touch too big and doesn't fit
well.... You get the idea. However, it is there. No doubt I will find it still
in its protective bag within days or hours of putting the kit on the shelf.
fuselage. I searched for the
windscreen, but seem to have lost it somewhere. Not sure how as it came in its
own small bag, but I did. The radio mast was glued to the top of the wing at
this time. I glued the cockpit doors open so you could see at least some of the
interior. Lastly, the ordnance was attached. I drilled holes in the front of the
bombs and inserted straight pins for fuse extenders. These were then glued to
the bomb racks. I then went around and took care of any last minute painting to
cover glitches and glue marks. The model was given a coat of clear matte to seal
in the decals. Now I should mention that I had somehow misplaced the windscreen.
I'd hoped that it would magically reappear just in the nick of time. It didn't.
As a result, I had a hole in the upper fuselage in front of the cockpit. A quick
dab or two of superglue, some sanding and polishing, a brush or two of RLM 70
and some deft scissor work with a piece of clear acetate produced a new
windscreen. Well, it isn't perfect and seems a touch too big and doesn't fit
well.... You get the idea. However, it is there. No doubt I will find it still
in its protective bag within days or hours of putting the kit on the shelf.
|
CONCLUSIONS |
AMtech has taken care of the most glaring deficiency of this kit and that is the cockpit. Having the uncovered landing gear is a real bonus and greatly increases the number of markings options that can be used on the kit. Yeah, it isn't an all brand new kit, but with the demise of ESCI in the late 1980s, it was doubtful if this kit would ever be reissued. Now collectors can bang their heads against the wall for having paid the usual inflated prices. The rest of us can loudly thank AMtech for bringing back and improving this kit by going out and adding it to your collection.
April 2003
#1262 in a series
Copyright ModelingMadness.com. All rights reserved. No reproduction in part or in whole without express permision from the editor.
If you would like your product reviewed fairly and fairly quickly, please contact the editor or see other details in the Note to Contributors.
Back to the Reviews Index Page2015