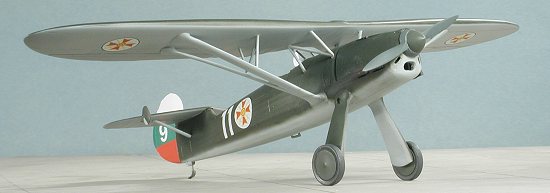
HiPM 1/48 FW-56 'Stosser'
|
KIT # |
48-011 |
|
PRICE: |
£ |
|
DECALS: |
4 options |
|
REVIEWER: |
|
|
NOTES: |
Short run with etched bits |
|
BACKGROUND |
Please have a look at the preview to
see what is in the box and get a brief history of the type.
|
CONSTRUCTION |
All hopes of this being an easy build were dashed as soon as I started taking bits off the sprues. It seems as if the mold must have shifted for all of the bits showed various levels of mold mismatch problems. This was particularly evident on the small round parts such as the cockpit framework. The one saving grace of this is that one side will be mounted up against the fuselage so only one side has to look good. This will also keep me from thinning out parts so much that they are structurally weak.
 So construction started with the interior. This is a
framework and floor into which the seat, stick, rudder pedals and
instrument panel are installed. The instrument panel is one of those deals
with an acetate dial section that glues to the back of an etched brass
panel. A full plastic one with minimal detailing is also provided. The seat
needs to be cut down as it is too tall and the instructions tell you how
much to remove. Not having much in the way of metric measuring devices
around, I trimmed it how much I thought it would be. This turned out to be
about right, but more on that a bit later.
So construction started with the interior. This is a
framework and floor into which the seat, stick, rudder pedals and
instrument panel are installed. The instrument panel is one of those deals
with an acetate dial section that glues to the back of an etched brass
panel. A full plastic one with minimal detailing is also provided. The seat
needs to be cut down as it is too tall and the instructions tell you how
much to remove. Not having much in the way of metric measuring devices
around, I trimmed it how much I thought it would be. This turned out to be
about right, but more on that a bit later.
The side framework glues to the edges of the floor into small slots. Then there is a brace in the back (that must also be trimmed) onto which the seat hangs. Before installing the seat I glued the brass harness to the seat sides and back. I didn't fold them in at this time. The control stick was then glued to the floor as were the rudder pedals. This seemingly simple construction took more than the usual time thanks to all the clean up needed due to the poor molding. When it was together (minus the instrument panel) I sprayed the whole thing RLM 02 and painted the seat belts with a linen color. These were then folded down into the seat.
During the time it took for the paint to dry, I assembled the wing halves. The fit here is not that good and I needed to do a lot of sanding to get a decent fit. Even then I had to do a lot of seam filling along the leading edge. I then turned to the front piece. Behind this is an etched brass box that basically prevents see-through. It was easy enough to fold but there is no dedicated attachment point behind the front piece. I placed it where it would not interfere with installation of the nose piece and dumped a lot of superglue on it to keep it in place.
 I
then returned to the interior and did a test fit in the fuselage. No way
would it fit. The instructions state that the original mounting area needed
to be trimmed back. I grabbed my motor-tool and started grinding. Things
got pretty thin and still, no good fit. I then started thinning down the
sides of the interior floor and that helped. I also had to sand down on the
upper portion of the seat. Finally I got things to where the fuselage
halves (which also need the mating surfaces sanded flat) to fit. With the
interior in the proper place, I taped the fuselage halves together and
glued in one side of the interior.
I
then returned to the interior and did a test fit in the fuselage. No way
would it fit. The instructions state that the original mounting area needed
to be trimmed back. I grabbed my motor-tool and started grinding. Things
got pretty thin and still, no good fit. I then started thinning down the
sides of the interior floor and that helped. I also had to sand down on the
upper portion of the seat. Finally I got things to where the fuselage
halves (which also need the mating surfaces sanded flat) to fit. With the
interior in the proper place, I taped the fuselage halves together and
glued in one side of the interior.
Though a bit unorthodox, it seemed to work just fine so I finished up the belts and added the instrument panel. Naturally, the panel interfered with the sides of the fuselage and had to be rather severely trimmed to get the halves to fit. You won't see anything in there unless you stick a flashlight in to peer around as the cockpit opening is quite small so you could even leave the panel out if you wished. I didn't as I'd already done all that work on it. I then glued the fuselage halves together. I should mention that I glued in the exhaust/backing plates prior to cementing the fuselage halves
After that had dried, I took the front piece and tried to glue it in place. Well this piece isn't exactly the same size as the nose (it is a bit larger) and the alignment section prevented a good fit. I cut/sanded off all of the alignment rim from the nose piece and got a pretty good fit. I then applied the usual ton of filler to the various seams. After sanding them, a second application was needed in a few spots. During this time, I also fit into place the tail plane, after cleaning it up. I found that I had to sand the mating surface on the fuselage to get even a cursory fit and then glued it in place. There were many gaps at the mating surface which were filled once the tail plane had dried.
 At this
time I also glued on the landing gear legs and cleaned up the wheels that
I'd previously glued together. Turning to the wing, I glued in place one of
the main struts after enlarging the attachment hole for it. I also glued in
the upper N strut. This was narrower than the attachment points made for it
so I glued it in stages and cut at the strut join areas to make it wide
enough to fit. With that dry, I glue in the cabane struts, making sure they
were a little narrow on the bottom so there wouldn't be any problems when I
came to attach them to the fuselage.
At this
time I also glued on the landing gear legs and cleaned up the wheels that
I'd previously glued together. Turning to the wing, I glued in place one of
the main struts after enlarging the attachment hole for it. I also glued in
the upper N strut. This was narrower than the attachment points made for it
so I glued it in stages and cut at the strut join areas to make it wide
enough to fit. With that dry, I glue in the cabane struts, making sure they
were a little narrow on the bottom so there wouldn't be any problems when I
came to attach them to the fuselage.
Back at the fuselage, I glued on the exhausts and the tail skid. I also glued on the nose guns, which were not well molded and ended up being a bit flat. They also did not conform to the back of the gun troughs. In hindsight, I'd recommend drilling out the back of the gun troughs and then installing the guns or substituting tubing for them. I then stuffed the cockpit with tissue and headed for the paint shop.
|
CAMOUFLAGE & MARKINGS |
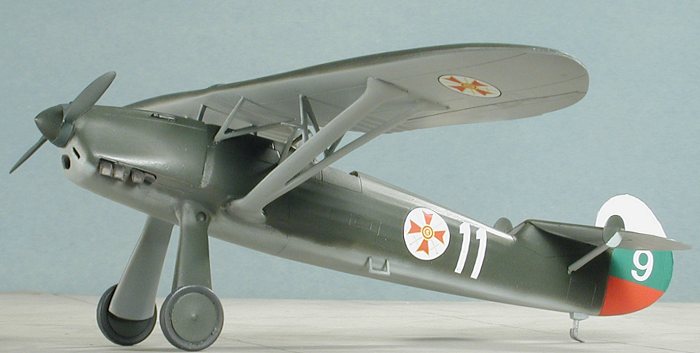
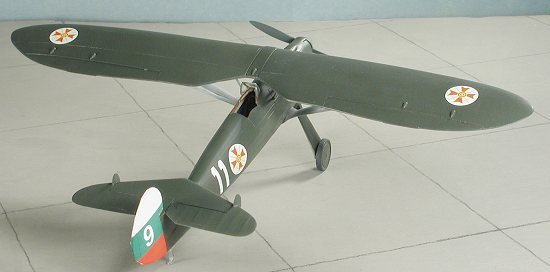
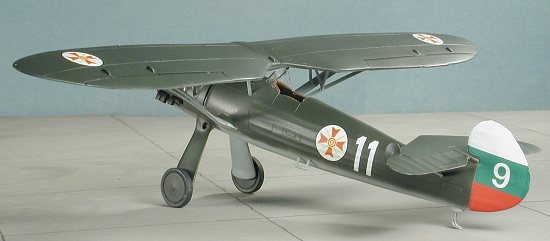
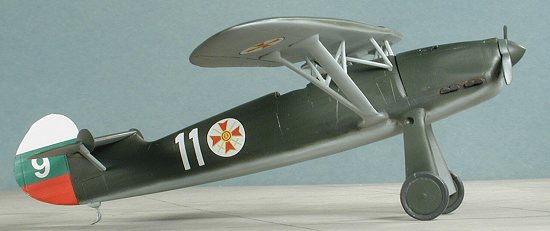
Looking over the decal options, I decided on what was probably the simplest of the four schemes; the Bulgarian Air Force version. Like the Luftwaffe trainer, it was basically RLM 71 over RLM 76 (though I guess RLM 65 could be used as well). The instructions just said dark green over light blue so those are close enough. I first did the rudder in white as I wanted a light base for the decal. Conversely, one could easily paint the rudder white, green and red, and I'd recommend it over using the decal. I painted the undersides RLM 76 and when dry, painted the upper wing and the rest of the upper surfaces RLM 71, after masking off the underside of the horizontal stab, inner landing gear and parts of the wing. The usual back and forth for touchup of overspray and then the model was taken back to the workbench.
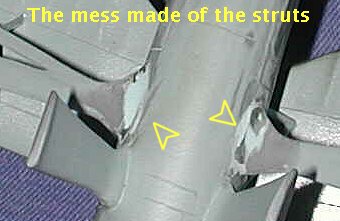 Here the wing was glued on. Though I'm not surprised, the attachment
point for the big wing struts were a bit off. I'm not sure if it is because
the wing bits are too far apart, or the cabane struts are too long, but the
end result is a poor fit. I glued it best I could and then filled the gaps
with superglue. Fortunately, the cabane struts were a strong attachment and
held the wing in place while all this gluing was going on. It did mean that
I had to do a lot of filling and sanding. While the end result is not good
enough for contests, it is for the display shelves.
Here the wing was glued on. Though I'm not surprised, the attachment
point for the big wing struts were a bit off. I'm not sure if it is because
the wing bits are too far apart, or the cabane struts are too long, but the
end result is a poor fit. I glued it best I could and then filled the gaps
with superglue. Fortunately, the cabane struts were a strong attachment and
held the wing in place while all this gluing was going on. It did mean that
I had to do a lot of filling and sanding. While the end result is not good
enough for contests, it is for the display shelves.
With that on, the kit was given a few light coats of Future to provide a gloss surface for the decals. When dry, I touched up the areas that I'd sanded.
I used the kit decals as nothing will ever be done for aftermarket for this kit. The decals are by Propagteam and went on with no trouble. I did find that the rudder stripe decals were not large enough and I had to paint a lot of the red and green stripes on the very back. I used the colors given in those small Testors bottles and they seemed to match up fairly well. To my eye, the wing decals are too small as they seemed to take up a lot more room on the drawings.
|
FINAL CONSTRUCTION |
 There really isn't much to
add to the final kit. The boarding step needed the holes drilled out a bit
more as did the main wheel attachment area. The tailplane struts are a
touch too short, but nothing horrible. I had no problem with the prop and
spinner. After cleanup, the prop was painted RLM 70 and the spinner RLM 71.
I glued in the prop shaft and had to trim that down in order to get the
spinner to fit properly. I also painted the guns with gunmetal; exhaust
with burnt iron; skid with aluminum and steel. The kit was then wiped down
to remove any decal glue residue and given a coat of semi-matte clear. Then
the exhaust stains were added with pastels and the windscreen glued in
place (it didn't fit as well as I'd hoped). In case you are wondering what
happened to the gun sight, well, I'd like to know as well as it disappeared
sometime during all of this.
There really isn't much to
add to the final kit. The boarding step needed the holes drilled out a bit
more as did the main wheel attachment area. The tailplane struts are a
touch too short, but nothing horrible. I had no problem with the prop and
spinner. After cleanup, the prop was painted RLM 70 and the spinner RLM 71.
I glued in the prop shaft and had to trim that down in order to get the
spinner to fit properly. I also painted the guns with gunmetal; exhaust
with burnt iron; skid with aluminum and steel. The kit was then wiped down
to remove any decal glue residue and given a coat of semi-matte clear. Then
the exhaust stains were added with pastels and the windscreen glued in
place (it didn't fit as well as I'd hoped). In case you are wondering what
happened to the gun sight, well, I'd like to know as well as it disappeared
sometime during all of this.
|
CONCLUSIONS |
It seems as if HiPM hasn't learned much over the years. This kit is just as big a PITA as the first one I did several years ago. While they have great instructions, the fit of the thing just isn't that good and you have to use a lot of that modeling skill you hear so much about to finish the kit. Once again, I'm left wondering if the people who design these kits actually build them after the molds are made. If you have to have a FW-56 in 1/48, then here it is. If you want a trouble-free build, then you need to look elsewhere.
November 2003
#1291 in a series
Copyright ModelingMadness.com. All rights reserved. No reproduction in part or in whole without express permission from the editor.
Kit courtesy of me and my credit card.
If you would like your product reviewed fairly and quickly, please contact the editor or see other details in the Note to Contributors.