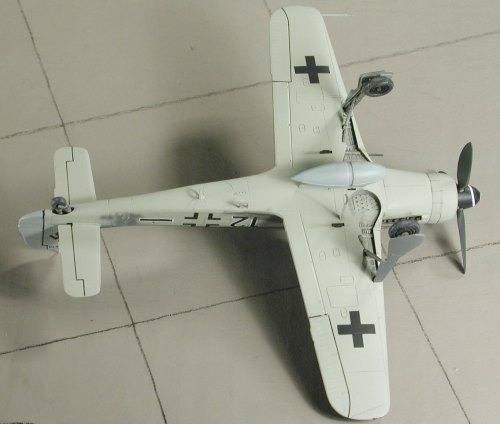
Tamiya 1/72 FW-190D-9
|
KIT # |
60751 |
|
PRICE: |
$16.50 MSRP |
|
DECALS: |
Two options |
|
REVIEWER: |
Scott Van Aken |
|
NOTES: |
|
BACKGROUND |
Please visit the preview for a look at
what is in the box and a brief history on the type.
|
CONSTRUCTION |
 I started with the wings on this one since they had
already been removed from the sprues. This was a swap meet kit that also
had a number of other bits cut from sprues. Once they were together, I sanded
the join areas to remove any of the glue that had oozed out. Setting it
aside, I then turned to the cockpit. This area consists of a tub, seat,
stick and instrument panel. I had a bit of trouble getting the seat to
properly fit into the tub. Not sure what the reason, but it was not a
simple task. Once all the bits (minus the instrument panel) were in
place, this assembly was painted RLM 66 dark grey as was the instrument
panel and the interior walls of the fuselage. The walls of the fuselage
had some ejector pin marks that had to be sanded down or would have been
visible. I used the decals from the kit for the instruments and the seat
belt, giving them a touch of Solvaset so they'd snuggle down. Frankly,
these items fit very well and I'd really like to see things like this on
every kit I buy. Decal seat belts are better than none, in my opinion.
When dry, the instrument panel was glued to the interior tub.
I started with the wings on this one since they had
already been removed from the sprues. This was a swap meet kit that also
had a number of other bits cut from sprues. Once they were together, I sanded
the join areas to remove any of the glue that had oozed out. Setting it
aside, I then turned to the cockpit. This area consists of a tub, seat,
stick and instrument panel. I had a bit of trouble getting the seat to
properly fit into the tub. Not sure what the reason, but it was not a
simple task. Once all the bits (minus the instrument panel) were in
place, this assembly was painted RLM 66 dark grey as was the instrument
panel and the interior walls of the fuselage. The walls of the fuselage
had some ejector pin marks that had to be sanded down or would have been
visible. I used the decals from the kit for the instruments and the seat
belt, giving them a touch of Solvaset so they'd snuggle down. Frankly,
these items fit very well and I'd really like to see things like this on
every kit I buy. Decal seat belts are better than none, in my opinion.
When dry, the instrument panel was glued to the interior tub.
When dry, I glued the interior into one fuselage half and glued the fuselage halves together. I also inserted the section behind the seat (which had already been painted RLM 66) and glued it down. It is important that these four parts be glued in at the same time to prevent any problems with misalignment. With the halves together, the wings were glued in place. Fit is really very good, though some may want to add a touch of filler at the forward and aft lower joins. I managed to sand down any problems and no filler was used on any of the joins.
 Tail planes were next. These have different size
tabs so getting them on the wrong side will be difficult at best! Next
the upper cowl was glued on as were the two parts to the forward
cowling. There is a plastic insert that has to be installed to hold the
prop at a later date. Only one cowl flap option is provided; the closed
position. I do wish that the 1/72 version had the droppable flaps and the
two cowl flap options of the 1/48 kit, but, typical of Tamiya's downsized
kits, they didn't.
Tail planes were next. These have different size
tabs so getting them on the wrong side will be difficult at best! Next
the upper cowl was glued on as were the two parts to the forward
cowling. There is a plastic insert that has to be installed to hold the
prop at a later date. Only one cowl flap option is provided; the closed
position. I do wish that the 1/72 version had the droppable flaps and the
two cowl flap options of the 1/48 kit, but, typical of Tamiya's downsized
kits, they didn't.
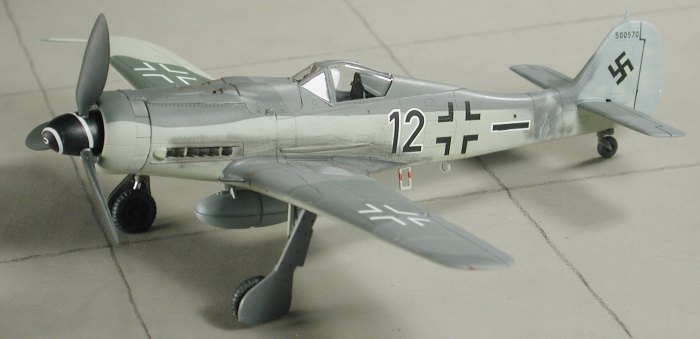
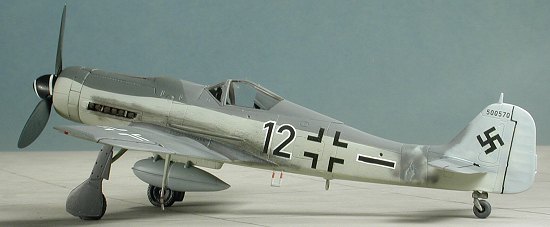
With those bits installed. I decided to paint the underside of the kit. I chose a scheme from Aeromaster 72-060, Reich Defense pt VI, which was apparently a plane which had some bits and pieces from others tacked onto it. The underside was RLM 84 and that was sprayed on using some now defunct Aeromaster enamels. With that on, I finished doing a bit of drybrushing to the interior and glued on the windscreen. I was doing a later 190D so went with the 'blown' canopy and the later head armor. Those were masked and it was time to get a bit more serious with the painting!
|
COLORS AND MARKINGS |
This endeavor will be an exercise in 'supposition' camouflage. Supposition camouflage is what you have when the publishers of the book or decal sheet can't really tell for sure just what the colors are so they 'suppose' that it was the way that they state it. You can take any of the experts in the field and they will tell you that judging colors from a black and white photos is difficult at best. Even more so when the image is not that good or if they are using some orthochromatic film. Sure, you can get darn close and come up with some great looking schemes, but until time travel becomes a reality, there is no way to be absolutely sure in many cases. Therefore, you have supposition camouflage. Late war Luftwaffe enthusiasts perform this exercise a LOT!
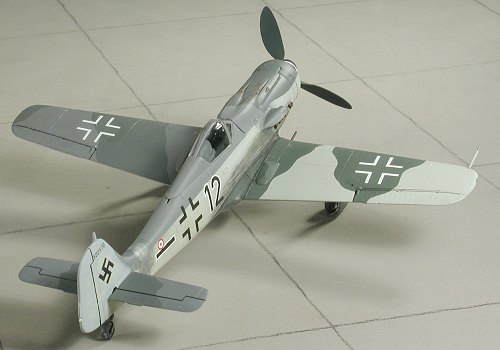
 What it means is that the 1994 decal sheet I'm using
may not be 100% accurate, but it does have a really neat scheme. This one
starts with the underside, sides and upper right wing of the plane being
painted in 'RLM 84', a color that does not appear on any official charts
and which most feel is just a poorly mixed or contaminated RLM 76. These
were masked as appropriate when dry. I used Aeromaster Enamel for this
color. Next was some RLM 75 from ModelMaster's enamel line. This was
applied to the upper surface of the fuselage, tail plane and left wing.
The instructions stated that the outside of the gear doors were painted
either RLM 75 or RLM 66 so I chose RLM 75. Those areas were masked (in
1/72, a hard edge demarcation line looks a lot better than a grossly
over-scale freehand airbrush job). Then the tailplane and upper fuselage
were painted RLM 74, also using ModelMaster enamel. This was then masked
to stop any overspray, and the upper wings were then painted RLM 82,
using, you guessed it, ModelMaster enamel. The rudder and fin were then
painted with ModelMaster's enamel RLM 76.
What it means is that the 1994 decal sheet I'm using
may not be 100% accurate, but it does have a really neat scheme. This one
starts with the underside, sides and upper right wing of the plane being
painted in 'RLM 84', a color that does not appear on any official charts
and which most feel is just a poorly mixed or contaminated RLM 76. These
were masked as appropriate when dry. I used Aeromaster Enamel for this
color. Next was some RLM 75 from ModelMaster's enamel line. This was
applied to the upper surface of the fuselage, tail plane and left wing.
The instructions stated that the outside of the gear doors were painted
either RLM 75 or RLM 66 so I chose RLM 75. Those areas were masked (in
1/72, a hard edge demarcation line looks a lot better than a grossly
over-scale freehand airbrush job). Then the tailplane and upper fuselage
were painted RLM 74, also using ModelMaster enamel. This was then masked
to stop any overspray, and the upper wings were then painted RLM 82,
using, you guessed it, ModelMaster enamel. The rudder and fin were then
painted with ModelMaster's enamel RLM 76.
By now, you can see that this is a rather interesting combination of colors, the main reason that I chose this scheme. However, it isn't over. While the majority of the fuselage has no mottling of any kind, this cannot be said for the tail section. On the fin and rudder, there is some RLM 84 mottling over the 76, while at the tail join area, RLM 75 was used, probably to help cover the often bare metal tail extension plug.
 Once the major painting stuff was done the model had
the step, pitot tube, and radio mast glued in place. Then the landing
gear were installed. I painted those RLM 02, though they could just as
easily have been done in the underside color or even in RLM 66. I also
painted the inside of the gear doors RLM 02 but left the wheel wells in
RLM '84'. Thing about late war Luftwaffe was all the different
combinations that one could find on an airframe. I also wrapped strips of
Bare Metal Foil chrome on the oleos. Then the model was given a coat of
Future in preparation for decals. The neat thing about adding the clear
gloss acrylic is that it actually helps to differentiate between colors
that are similar, such as the RLM 76 and '84'.
Once the major painting stuff was done the model had
the step, pitot tube, and radio mast glued in place. Then the landing
gear were installed. I painted those RLM 02, though they could just as
easily have been done in the underside color or even in RLM 66. I also
painted the inside of the gear doors RLM 02 but left the wheel wells in
RLM '84'. Thing about late war Luftwaffe was all the different
combinations that one could find on an airframe. I also wrapped strips of
Bare Metal Foil chrome on the oleos. Then the model was given a coat of
Future in preparation for decals. The neat thing about adding the clear
gloss acrylic is that it actually helps to differentiate between colors
that are similar, such as the RLM 76 and '84'.
With the plane nice and glossed, I applied the Aeromaster decals. They went on flawlessly, despite being 10 years old and succumbed to Solvaset quite nicely. Then the kit was given a coat of 'flattened Future' clear acrylic to seal in the decals.
|
FINAL CONSTRUCTION |
 Meanwhile, I started doing some final painting of some of the bits
that were left. This meant the wheels. Unfortunately, somewhere between
painting the hubs black and doing the tires in a very dark grey, one of
the wheels went missing. I'm going to blame cats, but they always look so
innocent when being interrogated that the answer must lie elsewhere.
After much (fruitless) searching, I came to realize that the wheel was
gone forever and so was able to pick up a set of True Details resin
wheels (#72031) as replacements. These not only have the overly flattened
tires, but they have an angle to the bottom that is opposite to how they
actually fit on the plane! A bit of sanding took care of that and some of
the overly done bulge.
Meanwhile, I started doing some final painting of some of the bits
that were left. This meant the wheels. Unfortunately, somewhere between
painting the hubs black and doing the tires in a very dark grey, one of
the wheels went missing. I'm going to blame cats, but they always look so
innocent when being interrogated that the answer must lie elsewhere.
After much (fruitless) searching, I came to realize that the wheel was
gone forever and so was able to pick up a set of True Details resin
wheels (#72031) as replacements. These not only have the overly flattened
tires, but they have an angle to the bottom that is opposite to how they
actually fit on the plane! A bit of sanding took care of that and some of
the overly done bulge.
With the wheels in place, the gear doors were attached as were the exhaust. I then gave the airplane a dose of pastels for the exhaust and a touch of gun stains. Dirty thinner was used to provide a wash for the gear wells and I thought of using it on the rest of the plane, but decided that I'd mess things up do didn't.
The prop assembly was pushed onto the nose, the drop tank and the wing guns glued in place. Then I had the usual final painting which included the red stripes on the step and lower antenna as well as painting on the wing and tail tip lights. The masking was removed from the clear bits and I was done. I decided not to screw up a good thing with a radio antenna, though most will want to add this bit to their model.
|
CONCLUSIONS |
The kit built as well as one would expect from Tamiya. Like all model kits, it isn't perfect, but it is about as close as one can come. Those who like pretty much hassle free modeling will be building a lot of these kinds of kits. For me, it adds yet another 1/72 FW-190 to my growing collection!
February 2004
#1303 in a series
Copyright ModelingMadness.com. All rights reserved. No reproduction in part or in whole without express permission from the editor.
If you would like your product reviewed fairly and quickly, please contact the editor or see other details in the Note to Contributors.