Trumpeter 1/24 FW-190D-9
| KIT #: | 02411 |
| PRICE: | $10.00 'used' |
| DECALS: | Two options |
| REVIEWER: | Scott Van Aken |
| NOTES: | 2004 tooling |
| HISTORY |
The Fw 190 D (nicknamed the Dora; or Long-Nose Dora, "Langnasen-Dora") was intended to improve on the high-altitude performance of the A-series enough to make it useful against the American heavy bombers of the era. In reality, the D series was rarely used against the heavy bomber raids, as the circumstances of the war in late 1944 meant that fighter-versus-fighter combat and ground attack missions took priority. A total of 1,805 D-9s were produced. Production started in August 1944.
The liquid-cooled 1,750 PS (1,726 hp, 1,287 kW) Jumo 213A could produce
2,100 PS (2,071 hp, 1,545 kW) of emergency power with MW 50 injection, improving
performance to 426 mph (686 km/h) at 21,650 ft (6,600 m). Early D-9s reached
service without the MW 50 installation, but in
 the meantime Junkers produced a
kit to increase manifold pressure (Ladedrucksteigerungs-Rüstsatz) that increased
engine output by 150 PS to 1,900 PS, and was effective up to 5,000 m (16,400 ft)
altitude. It was fitted immediately to D-9s delivered to the units from
September, or retrofitted in the field by TAM. By the end of December, all
operational Doras, 183 in total, were converted. From November 1944, a
simplified methanol water (MW 50) system (Oldenburg) was fitted, which boosted
output to 2,100 PS. By the end of 1944, 60 were delivered with the simplified MW
50 system or were at the point of entering service. The 115 L tank of
the Oldenburg system would hold the MW 50 booster liquid, which was single
purpose, while later systems were to be dual purpose, holding either MW 50 or
additional fuel.
the meantime Junkers produced a
kit to increase manifold pressure (Ladedrucksteigerungs-Rüstsatz) that increased
engine output by 150 PS to 1,900 PS, and was effective up to 5,000 m (16,400 ft)
altitude. It was fitted immediately to D-9s delivered to the units from
September, or retrofitted in the field by TAM. By the end of December, all
operational Doras, 183 in total, were converted. From November 1944, a
simplified methanol water (MW 50) system (Oldenburg) was fitted, which boosted
output to 2,100 PS. By the end of 1944, 60 were delivered with the simplified MW
50 system or were at the point of entering service. The 115 L tank of
the Oldenburg system would hold the MW 50 booster liquid, which was single
purpose, while later systems were to be dual purpose, holding either MW 50 or
additional fuel.
 The fighter lacked the high turn rate and higher rate of roll of its
close coupled radial-engined predecessor. It was a bit faster, however, with a
maximum speed of 680 km/h (422 mph) at 6,600 meters (21,650 ft). Its 2,240
horsepower with methanol-water injection (MW 50) gave it an excellent
acceleration in combat situations. It also climbed and dived more rapidly than
the Fw 190A, and so proved well suited to the dive-and-zoom ambush tactics
favored by the Schlageter pilots. Many of the early models were not equipped
with tanks for methanol, which was in very short supply in any event. At low
altitude, the top speed and acceleration of these examples were inferior to
those of Allied fighters. Hans Hartigs recalled that only one of the first batch
of Dora 9s received by the First Gruppe had methanol water injection, and the
rest had a top speed of only 590 km/h (360 mph).
The fighter lacked the high turn rate and higher rate of roll of its
close coupled radial-engined predecessor. It was a bit faster, however, with a
maximum speed of 680 km/h (422 mph) at 6,600 meters (21,650 ft). Its 2,240
horsepower with methanol-water injection (MW 50) gave it an excellent
acceleration in combat situations. It also climbed and dived more rapidly than
the Fw 190A, and so proved well suited to the dive-and-zoom ambush tactics
favored by the Schlageter pilots. Many of the early models were not equipped
with tanks for methanol, which was in very short supply in any event. At low
altitude, the top speed and acceleration of these examples were inferior to
those of Allied fighters. Hans Hartigs recalled that only one of the first batch
of Dora 9s received by the First Gruppe had methanol water injection, and the
rest had a top speed of only 590 km/h (360 mph).
Due to the failure of multiple attempts to create an effective next generation 190, as well as the comments of some Luftwaffe pilots, expectations of the Dora project were low. These impressions were not helped by the fact that Tank made it very clear that he intended the D-9 to be a stopgap until the Ta 152 arrived. These negative opinions existed for some time until positive pilot feedback began arriving at Focke-Wulf and the Luftwaffe command structure.
Sporting good handling and performance characteristics, the D-9 made an effective medium altitude, high speed interceptor, although its performance still fell away at altitudes above about 20,000 ft (6,100 m). When flown by capable pilots, the Fw 190D proved the equal of Allied types.
| THE KIT |
 A while back, at the local IPMS meeting, a friend of mine brought
in this kit and offered it to me for $10.00. He stated that the kit had been
started and that the owner of it wanted to get rid of all his big scale kits
as he knew it would never get completed. I did a cursory look through the
box and not seeing anything really horrible, bought the kit. On bringing it
home, I discovered that about 40% of the kit had been assembled. The
assembly was good though nothing had been prepainted. It included the
complete engine minus the accessory section, the interior, main wings, and
the tailplanes. He has started to build the forward cowling and had
assembled the open cowling option. Comparing what was left on the sprues,
the only thing I found missing was the gun sight. $10.00 well spent.
A while back, at the local IPMS meeting, a friend of mine brought
in this kit and offered it to me for $10.00. He stated that the kit had been
started and that the owner of it wanted to get rid of all his big scale kits
as he knew it would never get completed. I did a cursory look through the
box and not seeing anything really horrible, bought the kit. On bringing it
home, I discovered that about 40% of the kit had been assembled. The
assembly was good though nothing had been prepainted. It included the
complete engine minus the accessory section, the interior, main wings, and
the tailplanes. He has started to build the forward cowling and had
assembled the open cowling option. Comparing what was left on the sprues,
the only thing I found missing was the gun sight. $10.00 well spent. 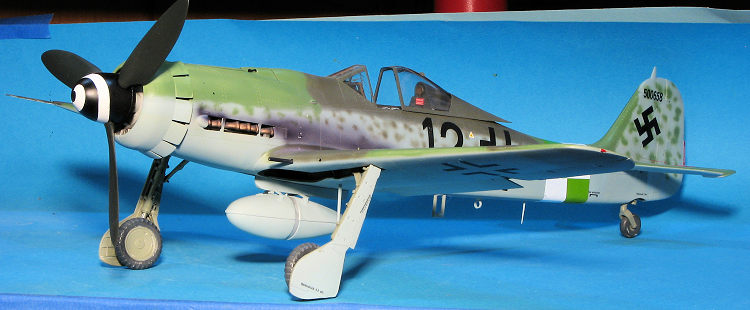 Next the guns are installed along with the area behind the cockpit.
Tailplanes are then built and attached. Then the wings are assembled after
installing the main gear legs, gear well and wing guns. The wing is attached
to the fuselage, the wheels assembled along with the forward cowling and the
drop tank. The cowl flaps can be posed open or closed. There are two canopy
styles provided, though there is no indication of what fits on which of the
markings options. The upper cowling pieces are installed (there are two
different gun cover pieces to choose from), the prop and supercharger intake
assembled and attached along with the clear bits and various antennas, and
you are done.
Next the guns are installed along with the area behind the cockpit.
Tailplanes are then built and attached. Then the wings are assembled after
installing the main gear legs, gear well and wing guns. The wing is attached
to the fuselage, the wheels assembled along with the forward cowling and the
drop tank. The cowl flaps can be posed open or closed. There are two canopy
styles provided, though there is no indication of what fits on which of the
markings options. The upper cowling pieces are installed (there are two
different gun cover pieces to choose from), the prop and supercharger intake
assembled and attached along with the clear bits and various antennas, and
you are done.| CONSTRUCTION |
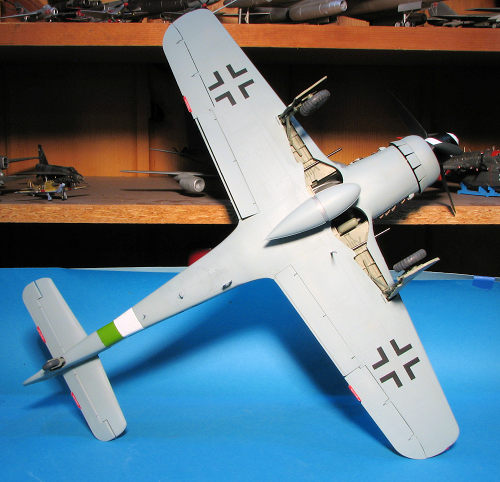
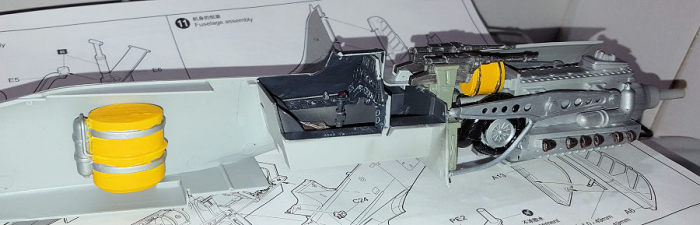 e answer is yes as much of it will be
seen when looking into the open wheel well. What won't be seen is the large
MW 50 tank that fits behind the cockpit. This tank and the
interior/engine assembly was then glued into one fuselage half. The tail
gear was also built up after painting and glued in place. Then the other
fuselage half was taped on to ensure all was properly aligned. When I was
sure all was good, the rudder was attached and the fuselage halves glued
together.
e answer is yes as much of it will be
seen when looking into the open wheel well. What won't be seen is the large
MW 50 tank that fits behind the cockpit. This tank and the
interior/engine assembly was then glued into one fuselage half. The tail
gear was also built up after painting and glued in place. Then the other
fuselage half was taped on to ensure all was properly aligned. When I was
sure all was good, the rudder was attached and the fuselage halves glued
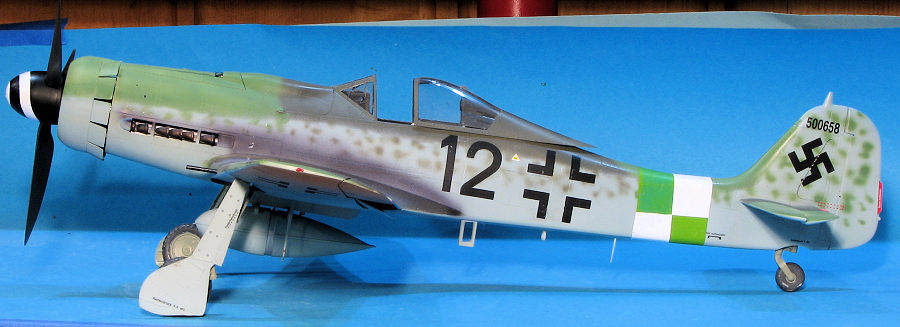
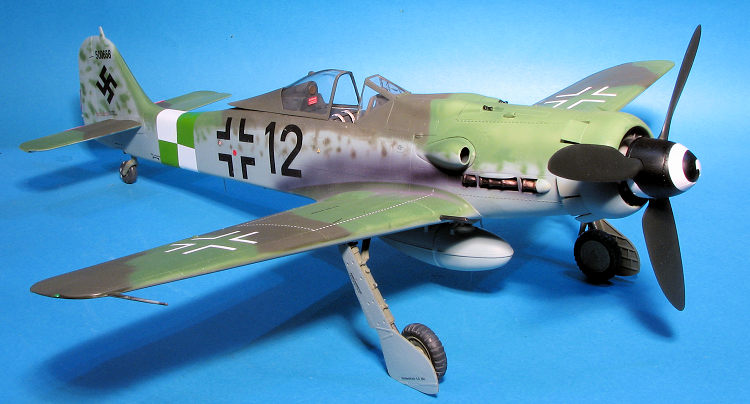
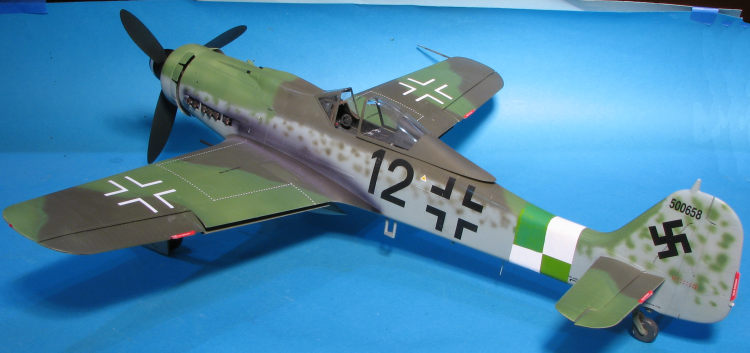
together. | COLORS & MARKINGS |
 o
some extent or another. Repeated applications of fairly strong solvent took
care of nearly all the issues. The biggest negative of the decals is that
the fuselage bands are too short and do not fit at all well. This resulted
in some additional painting to cover up the gaps. I also found large decals
like the band to be fairly brittle and this one cracked quite a bit where it
had to go over curves. I'd recommend painting on any bands you would use
with this kit.
o
some extent or another. Repeated applications of fairly strong solvent took
care of nearly all the issues. The biggest negative of the decals is that
the fuselage bands are too short and do not fit at all well. This resulted
in some additional painting to cover up the gaps. I also found large decals
like the band to be fairly brittle and this one cracked quite a bit where it
had to go over curves. I'd recommend painting on any bands you would use
with this kit. | CONCLUSIONS |
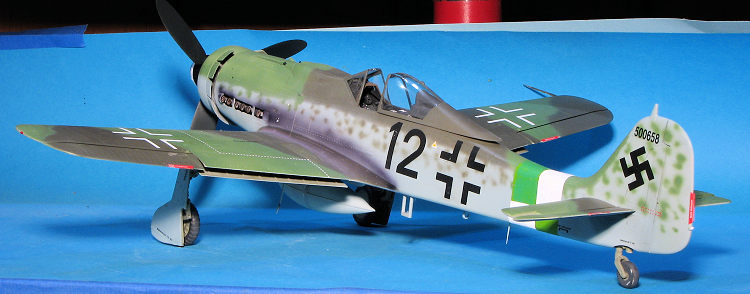
The kit wasn't a difficult build, but it did require some care in construction. Aside from the decal issues, the major down side is the landing gear. I highly recommend the various metal gear as not only is the kit's gear fairly wobbly, but as you can see, it is too short. Regardless, it makes into a very nice and very large model.
6 January 2023
Copyright ModelingMadness.com. All rights reserved. No reproduction in part or in whole without express permission from the editor.
If you would like your product reviewed fairly and fairly quickly, please contact the editor or see other details in the Note to Contributors.