| KIT #: | 61037 |
| PRICE: | $2.00 'used and started' |
| DECALS: | Three options |
| REVIEWER: | Scott Van Aken |
| NOTES: | Aeromaster decals 48-139 |
| HISTORY |
 The Fw 190 A-3 was equipped with the BMW 801 D-2 engine, which increased
power to 1,700 PS (1,700 hp; 1,300 kW) at takeoff by improving
the supercharger and raising the compression ratio. Because of these changes,
the A-3 model required a higher octane fuel—100 (C3) versus 87 (B4). The A-3
retained the same weaponry as the A-2. The A-3 also introduced the Umrüst-Bausätze factory
conversion sets. The Fw 190 A-3/U1 and U2 were single experimental Fw 190s: U1 (W.Nr
130270) was the first 190 to have the engine mount extended by 15 cm (5.9 in),
which would be standardized on the later production A-5 model. The U2 (W.Nr
130386) had RZ 65 73 mm (2.9 in) rocket launcher racks under the wings with
three rockets per wing. There were also a small number of U7 aircraft tested as
high-altitude fighters armed with only two 20 mm MG 151 cannon, but with reduced
overall weight. The A-3 variant was the first fairly reliable
version of the 190 as most of the issues with engine overheating had been cured.
The Fw 190 A-3 was equipped with the BMW 801 D-2 engine, which increased
power to 1,700 PS (1,700 hp; 1,300 kW) at takeoff by improving
the supercharger and raising the compression ratio. Because of these changes,
the A-3 model required a higher octane fuel—100 (C3) versus 87 (B4). The A-3
retained the same weaponry as the A-2. The A-3 also introduced the Umrüst-Bausätze factory
conversion sets. The Fw 190 A-3/U1 and U2 were single experimental Fw 190s: U1 (W.Nr
130270) was the first 190 to have the engine mount extended by 15 cm (5.9 in),
which would be standardized on the later production A-5 model. The U2 (W.Nr
130386) had RZ 65 73 mm (2.9 in) rocket launcher racks under the wings with
three rockets per wing. There were also a small number of U7 aircraft tested as
high-altitude fighters armed with only two 20 mm MG 151 cannon, but with reduced
overall weight. The A-3 variant was the first fairly reliable
version of the 190 as most of the issues with engine overheating had been cured.
In autumn 1942, a political decision diverted 72 new aircraft to Turkey in an effort to keep that country friendly to the Axis powers. These were designated Fw 190 A-3a (a=ausländisch (foreign), designation for export models) and delivered between October 1942 and March 1943. The Turkish aircraft had the same armament as the A-1: four 7.92 mm (.312 in) synchronized MG 17 machine guns and two 20 mm MG FF cannon. There was no FuG 25 IFF device in the radio equipment.
| THE KIT |
This was one of the earlier kits that Tamiya produced during their revival of doing aircraft kits back in the early 1990s. It is so very typical of Tamiya kits in that the engineering is excellent and the kit does not provide multiple little parts when one larger one will do just as well.
Once the cockpit is built, it can be installed from the underside into a completed fuselage. Decals are provided for the instrument panel and a pilot figure is also included. Note that the cockpit opening is quite small so little can actually be seen in there once done. The engine is two pieces with a front cylinder face and a front section. This latter item holds a polycap so one can simply push the prop in place after painting and decaling.
 The lower wing is a single piece and there is a separate main gear well
to be installed. Guns are molded on the leading edge of the upper and lower
wings so are fairly easily broken. Same for the pitot. Once the wing and
tailplanes are installed, construction moves to the main landing gear. The kit
provides the proper early wheel style. Some have stated that the wheels on
Tamiya 190s are undersize, but they look OK to me. Though the instructions show
the gear being installed at this point, most of us will hold off until after
painting.
The lower wing is a single piece and there is a separate main gear well
to be installed. Guns are molded on the leading edge of the upper and lower
wings so are fairly easily broken. Same for the pitot. Once the wing and
tailplanes are installed, construction moves to the main landing gear. The kit
provides the proper early wheel style. Some have stated that the wheels on
Tamiya 190s are undersize, but they look OK to me. Though the instructions show
the gear being installed at this point, most of us will hold off until after
painting.
Construction then moves to adding the cowling pieces and the area behind the cockpit. Then the head armor is built and installed and the prop with fan blades piece are assembled. These items are attached along with the windscreen and that is it. The lone option is having the canopy open or closed. None of the aircraft on the decal sheet had a drop tank so that item is not included.
Instructions are well done with detail images provided where needed. All three options are in RLM 74/75/76 with light mottling along with yellow lower cowling and rudder. Markings are for three aircraft; two are with JG 2 and one with JG 26. Decals are nicely done and despite their age, are probably still viable. A nice addition is the inclusion of full scale camouflage plans which can be cut out to use as masks.
| CONSTRUCTION |
This kit was one I purchased at the local IPMS swapnsell that the club holds every year. I was assured that there were enough parts for two complete kits and the seller was pretty close. Going through what was there, I was able to piece together enough bits for almost two complete kit. One was missing the tail gear and had several bits already assembled. These bits were the fuselage halves and the cockpit. Fortunately, I had a set of SAC metal gear for this kit and so that was my source for the tail gear.
 I finished building the cockpit and doing some painting in this area. This
was then installed into the cockpit with a bit of a struggle. The previous owner
had already installed the upper decking piece behind the cockpit and this
prevented the interior from sitting all the way. A bit of careful grunting,
straining, and bending got the cockpit installed. I then painted and assembled
the engine. You won't see much past the engine fan, but you will see something
so at least paint it.
I finished building the cockpit and doing some painting in this area. This
was then installed into the cockpit with a bit of a struggle. The previous owner
had already installed the upper decking piece behind the cockpit and this
prevented the interior from sitting all the way. A bit of careful grunting,
straining, and bending got the cockpit installed. I then painted and assembled
the engine. You won't see much past the engine fan, but you will see something
so at least paint it.
The gear well was built and painted then installed in the lower wing. It needed clamps for a snug fit. The upper wings were next. On this kit, one of the guns was missing so it will be replaced at a later date. Tamiya molds the pitot tube with the wing and I wish they didn't as keeping it from breaking will be a challenge. The engine was attached along with the wing and tail planes. I also installed the upper fuselage piece, which is not a good fit. Then the cowling was attached.
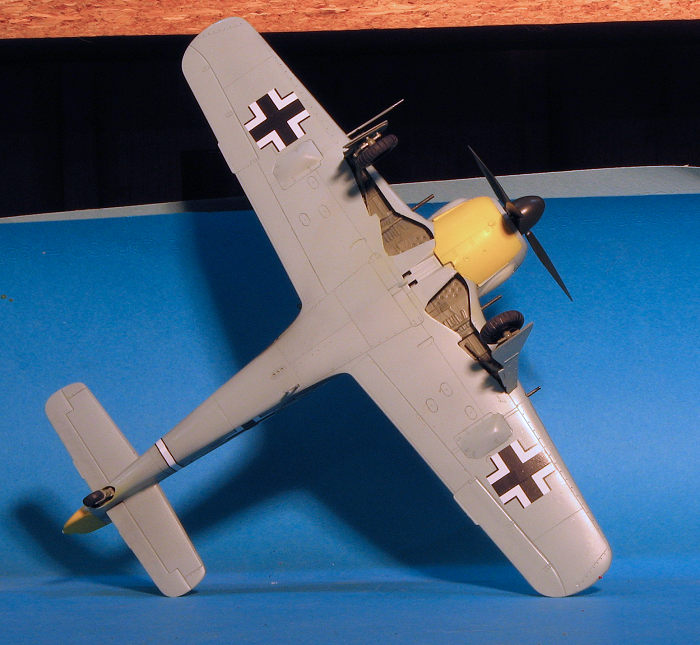
I left off the landing gear until after painting. Another note on the Tamiya kit is that the A-3 version had inner gear doors. Tamiya molded these closed, probably as it makes a more sturdy lower wing, but frankly, they were generally left down. Head armor was built up and installed in the canopy and I painted all the prop assembly bits. The canopy was masked and attached. I then stuffed the open engine and the gear wells with Silly Putty and headed for the paint shop.
| COLORS & MARKINGS |
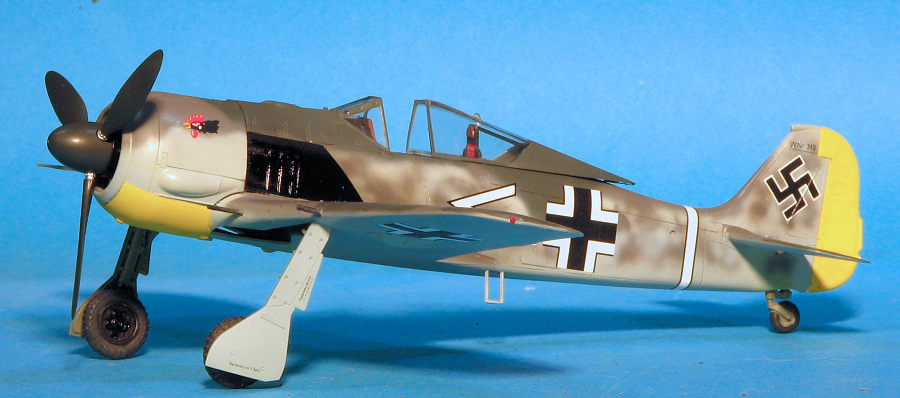
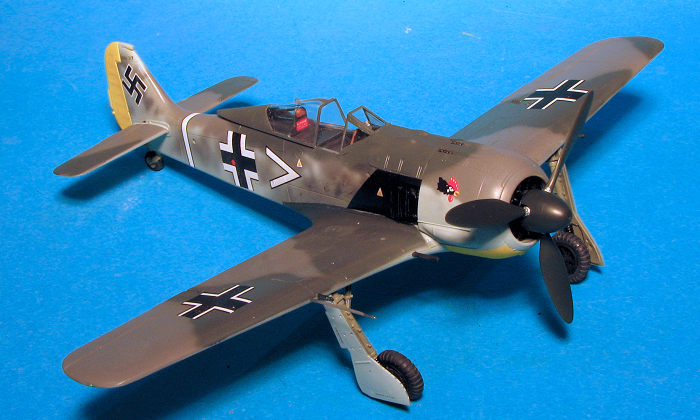
This one was going to be a standard RLM 74/75/76 scheme that was on most 190s. This one had a yellow rudder and lower cowling so those areas were painted matte white with Tamiya XF-2 followed by some yellow I already had mixed up. After that had dried, they were masked and the underside RLM 76 was painted. More masking and the upper RLM 75 was painted. This was followed by a free-hand painting of the RLM 74. All three of these shades are in the Mr.Color line of lacquers. Of course things didn't stop there as there was overspray to deal with so the wing roots and upper stabs were masked and more RLM 76 was sprayed on, ensuring that I got the upper demarcation line correct. This was followed by some fairly dense mottling using the lighter grey, except for the cowling which had no mottling. Once dry and all the masking removed, a gloss clear acrylic was sprayed on in anticipation of the decals.
 Before decaling, I attached the main landing gear and the tail gear. I then
started applying the decals from Aeromaster 48-139; Early FW-190s which has
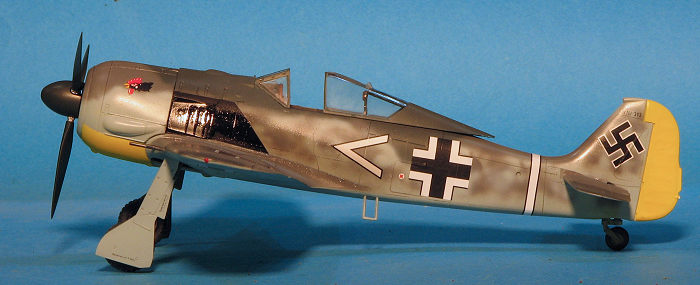
several A-3/4 options. I chose 190A-3 flown by Oberleutnant Arnim Fabel of
III/JG.2. Despite the fact that the sheet was printed in 1995, I had no issues
at all with them. Once all were on, a coat of semi-matte was sprayed on.
Before decaling, I attached the main landing gear and the tail gear. I then
started applying the decals from Aeromaster 48-139; Early FW-190s which has
several A-3/4 options. I chose 190A-3 flown by Oberleutnant Arnim Fabel of
III/JG.2. Despite the fact that the sheet was printed in 1995, I had no issues
at all with them. Once all were on, a coat of semi-matte was sprayed on.
Final bits were minimal. First I cut a piece of Contrail rod for the broken inner gun barrel. Then I attached the BarracudaCast resin wheels, which unfortunately dried crooked. Super glue is nearly impossible to adjust once dry and I didn't want to break the axle so left it as it was. The canopy was popped off and the head armor assemble glued in. Masking was removed from the clear bits, the prop and fan were assembled. Gear doors were attached as was the step. A bit of the usual touch-up painting was done along with the formation lights. Finally, some exhaust staining was added using Alclad II smoke and the kit was done.
| CONCLUSIONS |
 It has been a while since I built this kit and this
one was almost trouble free, which is why Tamiya sells so many kits. I found
that the main gear legs were not as positive an attachment as I'd hoped, but it
wasn't a major deal. One simply has to keep them aligned with each other until
the glue starts setting. I also wish that the inner gear doors had not been
molded closed as they were generally down when the plane was on the ground.
Finally, I found the fit of the cowling and upper fuselage piece were not
perfect and some work had to be done with these areas. One of these days I'll
build the Eduard version, but until then, I find the Tamiya kits to be fairly
trouble-free and make into very nice models.
It has been a while since I built this kit and this
one was almost trouble free, which is why Tamiya sells so many kits. I found
that the main gear legs were not as positive an attachment as I'd hoped, but it
wasn't a major deal. One simply has to keep them aligned with each other until
the glue starts setting. I also wish that the inner gear doors had not been
molded closed as they were generally down when the plane was on the ground.
Finally, I found the fit of the cowling and upper fuselage piece were not
perfect and some work had to be done with these areas. One of these days I'll
build the Eduard version, but until then, I find the Tamiya kits to be fairly
trouble-free and make into very nice models.
Copyright ModelingMadness.com. All rights reserved. No reproduction in part or in whole without express permission from the editor.
If you would like your product reviewed fairly and fairly quickly, please contact the editor or see other details in the Note to Contributors.