| KIT #: | 82146 |
| PRICE: | $49.99 SRP |
| DECALS: | Five options |
| REVIEWER: | Scott Van Aken |
| NOTES: | 2018 release. Profipack Edition |
| HISTORY |
 The introduction of the BMW 801 C-2 resulted in the Fw 190 A-2 model, first
introduced in October 1941. As part of this upgrade, a modification to the
exhaust system devised by III./JG 26's Technical Officer ("T.O.") Rolf
Schrödeter was added. There were 13 exhausts for the 14 cylinders; eight of
these were grouped to exit, four on each side, along the forward fuselage, just
above the leading edge of the wing; under the forward center section, between
the undercarriage bays were five exhaust stacks, with cylinders 9 and 10 sharing
a common pipe. To quickly implement the fix, it was found that the re-routing
could be done easily in Gruppe workshops. The reduction in temperature affecting
the bottom cylinder went a long way to solving the problem of overheating and
engine fires that plagued the initial production aircraft. The addition of new
ventilation slots on the side of the fuselage further aided cooling, and with
the widespread availability of the A-2 in the spring of 1942, the overheating
problems were greatly reduced.
The introduction of the BMW 801 C-2 resulted in the Fw 190 A-2 model, first
introduced in October 1941. As part of this upgrade, a modification to the
exhaust system devised by III./JG 26's Technical Officer ("T.O.") Rolf
Schrödeter was added. There were 13 exhausts for the 14 cylinders; eight of
these were grouped to exit, four on each side, along the forward fuselage, just
above the leading edge of the wing; under the forward center section, between
the undercarriage bays were five exhaust stacks, with cylinders 9 and 10 sharing
a common pipe. To quickly implement the fix, it was found that the re-routing
could be done easily in Gruppe workshops. The reduction in temperature affecting
the bottom cylinder went a long way to solving the problem of overheating and
engine fires that plagued the initial production aircraft. The addition of new
ventilation slots on the side of the fuselage further aided cooling, and with
the widespread availability of the A-2 in the spring of 1942, the overheating
problems were greatly reduced.
The A-2 wing weaponry was updated, with the two wing root-mounted 7.92 mm (.312 in) MG 17s being replaced by 20 mm MG 151/20E cannon. With the introduction of the new cannon, the Revi C12/C gunsight was upgraded to the new C12/D model. The introduction of the A-2 marked a shift in air supremacy from the British, with their Spitfire Mk V, to the Germans. German production records make no real distinction between A-2s and A-3s, which were very similar aircraft: the total combined production was 910 airframes between October 1941 and August 1942. In addition to Focke-Wulf and AGO, a new subcontractor, Arado, built A-2s and A-3s at Warnemünde.
| THE KIT |
It was only a matter of time before Eduard decided to produce a series of 'short nose' FW-190As and so they did, having done most of them save the A-1 and that may well just be a matter of time. This is the A-2 version that has the somewhat shorter fuselage of the early versions. It is free from all the fussy bits of the first round of 190A kits, which most of us appreciate. All the open panel bits not in these kits are available as aftermarket if you have to have them.
Apparently this kit is still a bit on the fiddly side and once can tell that when looking over the instructions. However, reports from those who have built this kit for the first time are positive in terms of fit so I picked this one up. It isn't like I don't have any other 190A-s in this scale, but I wanted to give this a go on my own. If you look at the sprue layout, there are multiples of many parts (props, wheel wells, drop tanks and so on), but this is standard Eduard where they include all the bits for all variants in each kit.
 This is a Profipack kit
which includes a color photo etch fret. Much of this photo etch is used for the interior. But the
190 is a plane with a very small cockpit and save for the seat, not really all
that much can be seen there. However, for the 190, the seat really needs belts and that is included. Also
included are nice color side consoles and instrument
panel. Flat plastic alternatives are included in the kit so you can use these
without having to grind away detail.
This is a Profipack kit
which includes a color photo etch fret. Much of this photo etch is used for the interior. But the
190 is a plane with a very small cockpit and save for the seat, not really all
that much can be seen there. However, for the 190, the seat really needs belts and that is included. Also
included are nice color side consoles and instrument
panel. Flat plastic alternatives are included in the kit so you can use these
without having to grind away detail.
The engine is just the front face, which is fine as once the prop and fan are installed you won't see it. Wheel wells and the rear well/wing spar are separate items with a considerable number of items to go in the well. Unfortunately, it is designed such that you have to install the inner wing guns prior to closing the wing halves, making it easy to snap off the barrels while cleaning the seams or installing the wing.
Just to add to fiddly, there are two upper and one lower cowling panel to install and this kit has a separate instrument panel anti-glare section. All the control surfaces are separate and shown modeled in the neutral position. Landing gear is well done with separate hubs and wheels to aid painting. Note that these 190s have inner gear doors and in fact, these were used into the A-6 production before they were removed. Some units removed them in the field so check photos. The lone resin bits included in this kit are for these doors. Since there are doors on the plastic sprues as well, I have to assume those on the A-2 were different from later models. Prop blades are one piece with the two piece hub. The back of the spinner is the engine fan. You are provided two canopies to use with one for the closed and one for the open option.
Instructions are the usual color booklet with well drawn construction steps and Gunze paint references. There are five markings options, all of them in RLM 74/75/76 with mottling of various densities. You can see these in the illustration below. Typical of aircraft on the Channel Front at the time, they all have yellow lower cowlings with most also having yellow rudders. Decals are nicely printed and you are provided a full stencil suite.
| CONSTRUCTION |
 As is often the case when I build a kit for the first time, and especially when
that is an Eduard kit, I followed the instructions. This meant beginning with
the kit's interior. I chose to use the big pieces of photo etch for things like
the instrument panels, side consoles and the seat harness. I did not use any of
the tiny levers and things in the more forward part of the cockpit. The 190
cockpit is quite small and much will not be seen, even with the canopy open.
As is often the case when I build a kit for the first time, and especially when
that is an Eduard kit, I followed the instructions. This meant beginning with
the kit's interior. I chose to use the big pieces of photo etch for things like
the instrument panels, side consoles and the seat harness. I did not use any of
the tiny levers and things in the more forward part of the cockpit. The 190
cockpit is quite small and much will not be seen, even with the canopy open.
I then built up the engine assembly, and installed the side exhaust pieces. The kit has to add the upper instrument panel during the time you close the fuselage halves. This gave me fits as I found it nearly impossible to get it to stay put. I deviated from the instructions by attaching the instrument panel anti-glare panel to it and using that to finally get it to stay in place. Getting the engine to fit snugly was also a bit of fiddling about, as was getting the interior to mate properly. I had to do some sanding near the back of the tub near the seats to get a smooth fit.
With that done, I moved to the wings. Eduard provides two sets of wings. One set
has large canon fairings and one has small. You need to choose which of the five
markings options you'll be building at this stage, also because one set of wings
won't have outer wing guns. At this time, you install upper wing wheel well
braces and also attach the exhaust to the lower cowling piece and the guns to
the upper aft cowling piece. The wing spar is next, followed by the lower wing
wheel well cross pieces and the large central well sectio n. Then the inner guns
are attached. Note that you will probably break the gun barrels off while
handling the kit (ask me how I know) so it would be wise to cut the barrels
after installation, leaving yourself a small depression so you can reinstall
them.
n. Then the inner guns
are attached. Note that you will probably break the gun barrels off while
handling the kit (ask me how I know) so it would be wise to cut the barrels
after installation, leaving yourself a small depression so you can reinstall
them.
Then the wing, upper and lower cowling pieces are attached to the fuselage. Fit of all these pieces is really very good. I was particularly impressed on how nice the wing fit. Tailplanes were added, and I left off the rudder as it was going to be painted yellow and easier to do when not on the airframe. I also glued on the resin inner gear doors. Fit on these was not good as there is no dedicated attachment point for them. You simply place them where they seem to fit. I then masked and attached the windscreen (which fit very well). Then the canopy was masked and temporarily attached. The gear wells and engine were filled with Silly Putty and it was off to the paint shop.
| COLORS & MARKINGS. |
This, and most other 190s until near the end of the war, were painted in the
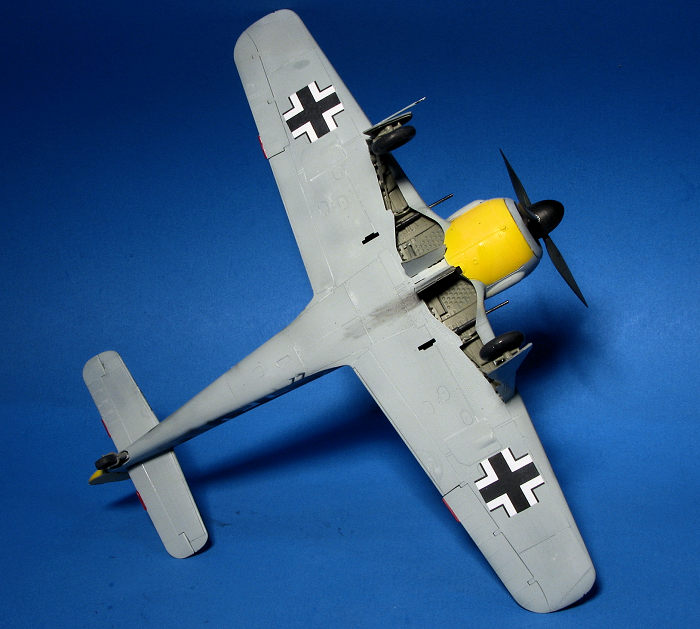
same basic pattern of RLM 74/75/76. I first painted the lower cowling in yellow
and masked it off. Then the underside with some masking of the tailplanes before
the upper colors were sprayed on. For all these colors I used Mr.Color lacquer
paints, which went on beautifully. I had to do a bunch of back and forth stuff,
but that is normal for me when it comes to schemes like this. I then attached
the landing gear before heading on to the decalling. These were probably the
poorest fit of the kit. In order to provide accuracy to the original, Eduard
does not utilize the no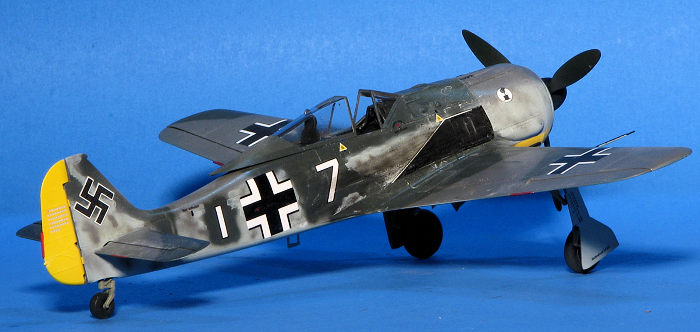 rmal
pin and socket attachment point. This results in a very wobbly assembly point,
making it quite difficult to get the proper angle/rake of the main gear legs. In
addition, the gear retraction struts, which on other 190 kits add some strength
to the gear are also not securely attached to the gear well. I also found that
the main gear doors were not a positive fit either. The main wheels were also
somewhat wobbly on the axles.
rmal
pin and socket attachment point. This results in a very wobbly assembly point,
making it quite difficult to get the proper angle/rake of the main gear legs. In
addition, the gear retraction struts, which on other 190 kits add some strength
to the gear are also not securely attached to the gear well. I also found that
the main gear doors were not a positive fit either. The main wheels were also
somewhat wobbly on the axles.
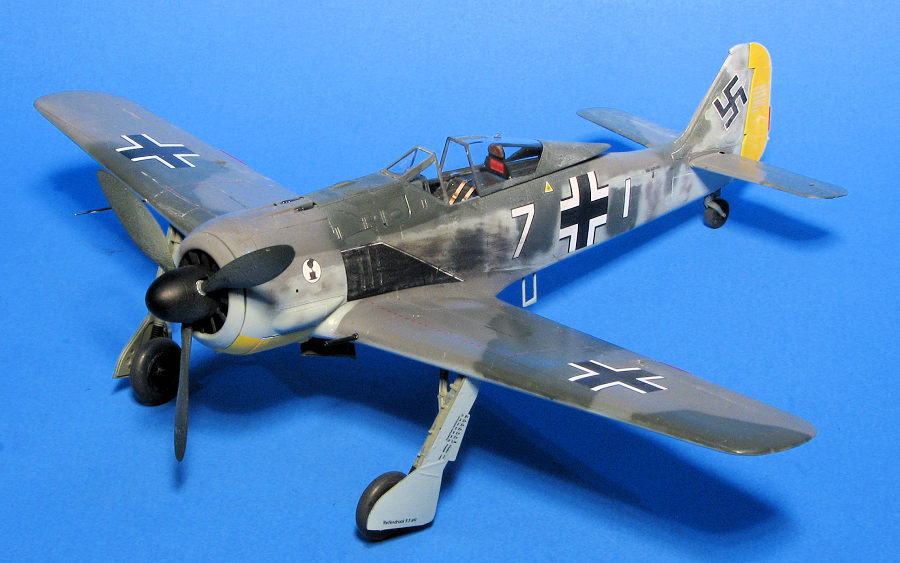
Eventually, all that was dealt with and it was on to decals. For the markings, I chose the last option provided, that of Oblt. Egon Mayer, who at the time was the CO of 7./JG2 based at Theville, France during the summer of 1942. Mayer finally succumbed to P-47s while attacking a bomber stream in March 1944. Decals went on without a fuss.
With all that taken care of, it was time for the final bits. This meant assembling the prop/spinner and then drilling out the holes for the broken inner wing guns. Fortunately, the kit has a lot of spare parts that were not used for this boxing, so finding replacement barrels wasn't difficult. I trimmed them a bit and glued them in place. Then the masking was removed and the canopy was placed in the open position. Finally, the pitot tube was attached, the prop pressed in place, and I was done.
| CONCLUSIONS |
Eduard fanboys all state that this makes other 190 kits obsolete. Well, maybe. For sure no one does an A-2 variant right from the box, though backdating an A-3 wouldn't be difficult. Eduard does provide a nice interior and I was really pleased with how well the wing attached to the fuselage. However, the landing gear situation was not exactly a plus and were I to do another Eduard 190 (probably), I'd trim off the gun barrels for later reinsertion. For a fairly hassle-free experience I'd recommend the Tamiya versions, though the Hasegawa/Dragon kits are nice as well.
| REFERENCES |
https://en.wikipedia.org/wiki/List_of_Focke-Wulf_Fw_190_variants
16 August 2024
Copyright ModelingMadness.com. All rights reserved. If you would like your product reviewed fairly and
fairly quickly, please
contact
the editor or see other details in the
Note to
Contributors. Back to the Main Page
Back to the Review
Index Page
Back to the Previews Index Page