Hasegawa 1/32 Fw-190D-9
|
KIT # |
8069 (ST 19) |
|
PRICE: |
$40.00 MSRP |
|
DECALS: |
Three aircraft |
|
REVIEWER: |
|
|
NOTES: |
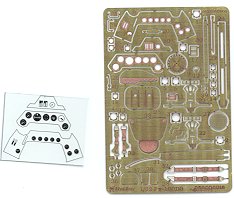
Kit included etched metal fret |
|
HISTORY |
I'll refer you to Tom Cleaver's preview for the background on this aircraft.
|
THE KIT |
 There is little to add to
Tom's description except that the US boxing includes an etched brass fret
made by Lion Roar Art Model Co, LTD of China. This fret does much to
improve the quality of the cockpit, which Tom had mentioned as being a bit
sparse. It includes rudder pedals, belts, instrument panels, full head
armor and some additional trim bits under the hood. Externally there is a
replacement flash shield, and intake screen and antennas. Instruments are
provided to go behind the brass panels just for that bit of extra detail.
Personally, I'll use the decal and plastic panel as I've had very good luck
with these things matching up in Hasegawa and Tamiya kits. Of course, this
shouldn't stop those that want to buy a nice resin aftermarket
cockpit as I'm sure it will have even more detail than the brass set adds,
but it is nice to know that there is less reason to spend the additional
$20 or so dollars. Spend the funds on a decal sheet instead!
und
There is little to add to
Tom's description except that the US boxing includes an etched brass fret
made by Lion Roar Art Model Co, LTD of China. This fret does much to
improve the quality of the cockpit, which Tom had mentioned as being a bit
sparse. It includes rudder pedals, belts, instrument panels, full head
armor and some additional trim bits under the hood. Externally there is a
replacement flash shield, and intake screen and antennas. Instruments are
provided to go behind the brass panels just for that bit of extra detail.
Personally, I'll use the decal and plastic panel as I've had very good luck
with these things matching up in Hasegawa and Tamiya kits. Of course, this
shouldn't stop those that want to buy a nice resin aftermarket
cockpit as I'm sure it will have even more detail than the brass set adds,
but it is nice to know that there is less reason to spend the additional
$20 or so dollars. Spend the funds on a decal sheet instead!
und
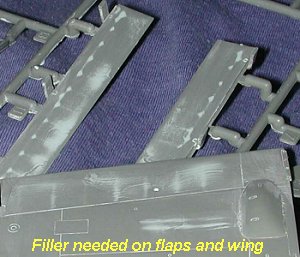
 I should also mention that my kit had more sink areas than I'd have
expected from a new tool Hasegawa kit. The wings and flaps are particularly
bad with all the little reinforcements clearly visible and easily felt on
the surface of these parts. Even areas where the ejector pins pushed out
the wings are visible on the upper surface. These sink marks are
found wherever the plastic is thicker than normal. Fortunately, many of
these sink areas will be hidden during construction. This won't be a filler
free kit if for nothing else than these areas. I can only assume it is a
problem with this kit and perhaps a few others as Tom didn't mention this
rather obvious glitch in his preview. I should also add that ejector pin
marks are noticeable in the wheel well (where it won't be easy to remove
them) , the gear legs, the inside of the oleo scissors, flaps, and the inside of
the gear doors (where it will).
I should also mention that my kit had more sink areas than I'd have
expected from a new tool Hasegawa kit. The wings and flaps are particularly
bad with all the little reinforcements clearly visible and easily felt on
the surface of these parts. Even areas where the ejector pins pushed out
the wings are visible on the upper surface. These sink marks are
found wherever the plastic is thicker than normal. Fortunately, many of
these sink areas will be hidden during construction. This won't be a filler
free kit if for nothing else than these areas. I can only assume it is a
problem with this kit and perhaps a few others as Tom didn't mention this
rather obvious glitch in his preview. I should also add that ejector pin
marks are noticeable in the wheel well (where it won't be easy to remove
them) , the gear legs, the inside of the oleo scissors, flaps, and the inside of
the gear doors (where it will).
|
CONSTRUCTION |
It all starts as my models generally do, with a good
look at the instructions and the gluing of subassemblies. In this case, it
meant the tail, horizontal stabilizers, wheels, drop tank and much of the
interior. The etched rudder pedals and seat belts were attached to the
interior and seat respectively. I also glued in the inserts to the lower
wing. These were not a 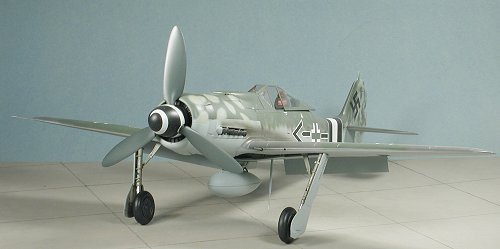 perfect fit so will have to be sanded down somewhat
when things get along farther. I stupidly didn't test fit them as I assumed
they'd be no problem. I was wrong. I also slathered filler over the worst
of the sink areas on the flaps and upper wings. The instructions would have
you fill in some upper cowling lines so that was done as well. I was going
to use the etched hatch behind the seat, but that was the wrong shape
(didn't fit) and too thin. The kit supplied part looks nearly as good and
it fit. A couple of other interior wall items were glued in place, again
foregoing the etched pieces as the plastic ones looked just as good if not
a bit better. The open rear engine section had a few pieces glued together
as well at this time.
perfect fit so will have to be sanded down somewhat
when things get along farther. I stupidly didn't test fit them as I assumed
they'd be no problem. I was wrong. I also slathered filler over the worst
of the sink areas on the flaps and upper wings. The instructions would have
you fill in some upper cowling lines so that was done as well. I was going
to use the etched hatch behind the seat, but that was the wrong shape
(didn't fit) and too thin. The kit supplied part looks nearly as good and
it fit. A couple of other interior wall items were glued in place, again
foregoing the etched pieces as the plastic ones looked just as good if not
a bit better. The open rear engine section had a few pieces glued together
as well at this time.
It was then on to preliminary painting. This was mostly using the RLM 02, RLM 66, Black and a few metallics, even though I knew that I'd be repainting some of these items prior to use. I do that as it is much easier to get all the nooks and crannies while the bits are still on the sprue. I wasn't too sure if all the wheel wells and such should be RLM 02 or bare metal. I'm positive the tail wheel well isn't RLM 66, as the instructions state, but RLM 02 if it was painted at all.
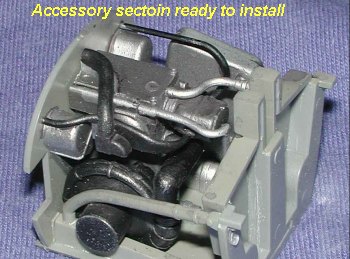 Once much of that was painted, I built up the accessory
section. This looks most effective and properly busy when it is
finished. It was given a wash to bring out a bit more detail and then
dry-brushed as well. Back at the cockpit, the instrument panel decals were
applied over the raised detail. I highly suggest cutting the main
instrument panel decal into an upper and lower section or I doubt if it
will properly fit. Solvaset was used to ensure a good snuggling down and
despite worrying about disasters, it didn't happen, much to my delight. I'd
thought about using the etched panel as it really is nicely done, but the
idea of painting, cutting, and applying all those separate instrument
bezels just didn't seem like a lot of fun.
Once much of that was painted, I built up the accessory
section. This looks most effective and properly busy when it is
finished. It was given a wash to bring out a bit more detail and then
dry-brushed as well. Back at the cockpit, the instrument panel decals were
applied over the raised detail. I highly suggest cutting the main
instrument panel decal into an upper and lower section or I doubt if it
will properly fit. Solvaset was used to ensure a good snuggling down and
despite worrying about disasters, it didn't happen, much to my delight. I'd
thought about using the etched panel as it really is nicely done, but the
idea of painting, cutting, and applying all those separate instrument
bezels just didn't seem like a lot of fun.
 With all
of that settling out, I went to the wings. As I mentioned earlier, the
flaps and upper wings were in bad need of some filler thanks to all the
sink areas on them. This was done and the parts sanded smooth. If you run
your finger over the 'finished' product, you can generally tell if more is
needed or not. There is a large wheel well and wing spar piece that was
glued to the lower wing. This has already been painted RLM 02 and no
attempt was made of removing the ejector pin marks in it as it would be
difficult at best. There are two small rubber 'boots' for the guns that
need to be put in at this time. I waited and it was a bit of a chore to
install them once the wing halves were glued together, so do it now. There
are many slots and guides for these parts and the fit is really excellent.
The upper wings were glued in place once the lower section was dry with no
problems. I did have to use some filler on the leading edge where I'd
gouged small pieces out of the wing when cutting the sprue attachment
points.
With all
of that settling out, I went to the wings. As I mentioned earlier, the
flaps and upper wings were in bad need of some filler thanks to all the
sink areas on them. This was done and the parts sanded smooth. If you run
your finger over the 'finished' product, you can generally tell if more is
needed or not. There is a large wheel well and wing spar piece that was
glued to the lower wing. This has already been painted RLM 02 and no
attempt was made of removing the ejector pin marks in it as it would be
difficult at best. There are two small rubber 'boots' for the guns that
need to be put in at this time. I waited and it was a bit of a chore to
install them once the wing halves were glued together, so do it now. There
are many slots and guides for these parts and the fit is really excellent.
The upper wings were glued in place once the lower section was dry with no
problems. I did have to use some filler on the leading edge where I'd
gouged small pieces out of the wing when cutting the sprue attachment
points.
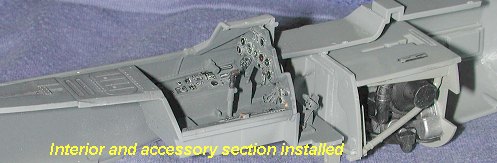 Meanwhile,
back at the cockpit, the instrument decals were sprayed with a clear matte
and when dry, the instrument faces were dabbed with clear gloss to simulate
glass. The whole thing was then washed and dry-brushed to bring out some
detail. It was then glued to one of the fuselage sides. Fit is superb. The
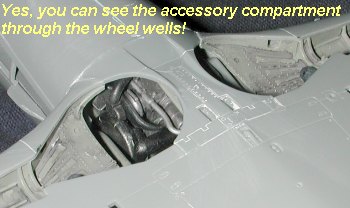
backings for the exhaust were glued in and then the accessory section. Fit
on this is fair but not as positive as the interior. As you can see, the
back of the accessory section will be visible to the penlight police so you
may want to paint that RLM 66 at a minimum if you plan on entering
contests. At this time, I test fit the other fuselage half and the wings
just to see what problems I might have. The pieces are a very close
tolerance and seem to 'click' into place without too much
Meanwhile,
back at the cockpit, the instrument decals were sprayed with a clear matte
and when dry, the instrument faces were dabbed with clear gloss to simulate
glass. The whole thing was then washed and dry-brushed to bring out some
detail. It was then glued to one of the fuselage sides. Fit is superb. The
backings for the exhaust were glued in and then the accessory section. Fit
on this is fair but not as positive as the interior. As you can see, the
back of the accessory section will be visible to the penlight police so you
may want to paint that RLM 66 at a minimum if you plan on entering
contests. At this time, I test fit the other fuselage half and the wings
just to see what problems I might have. The pieces are a very close
tolerance and seem to 'click' into place without too much
 trouble. One
thing I did notice is that if you don't remove all the sprue attachment
'stubble' from parts, even if they are hidden, it will impede your ability
to get a quality fit, so make sure you sand these areas down flush.
trouble. One
thing I did notice is that if you don't remove all the sprue attachment
'stubble' from parts, even if they are hidden, it will impede your ability
to get a quality fit, so make sure you sand these areas down flush.
While the interior bits were drying, I assembled the tail
section. This fit quite well, but I did need filler, especially on the top
fuselage section. Now some folks will glue each half to the fuselage half
prior to gluing them together. I've never had much luck in that regard so
have done as the kit instructions recommend (yes, I do read instructions).
Meanwhile, I'd glued the seat belts to the seat and painted both of them
prior to installation in the cockpit. Once they were installed, the other
fuselage half was glued in place. At the same time, the wings were
attached. It takes a bit of fiddling to get things to match up
 well, not as
easy a job as with the 109 kits. I needed to clamp a few parts such as the
forward section of the insert between the wheel wells and the aft portion
of the wing so they wouldn't stand proud of the area around them.
well, not as
easy a job as with the 109 kits. I needed to clamp a few parts such as the
forward section of the insert between the wheel wells and the aft portion
of the wing so they wouldn't stand proud of the area around them.
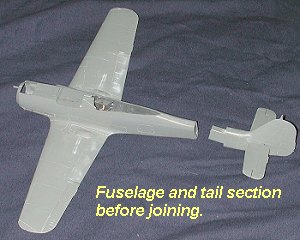
Once that was done I started applying the filler. I needed some at the very front and along the back section. I also needed a bit over the gun hatches on the upper wing and at the back of the lower wing insert. After sanding all these areas as well as the wing leading edges, the forward fuselage was pretty well done. The next step was to glue the tail section to the forward fuselage. I now had a semi-complete airframe and did some test flying to check out its handling characteristics.
Now it was time to do some preliminary exterior painting. At this stage of the game, I still didn't have any particular markings scheme in mind. I knew that I wasn't going to do either of the Papegei aircraft as those have been done to death. I also knew that not all 190D-9s had completely painted undersurfaces so I was in a quandary as to what exactly to do. As of this moment, aftermarket sheets had not yet hit the store shelves. The only thing to really do is either wait for the decals, or to paint it as if it were going to be a late war plane. I chose the latter.
|
CAMOUFLAGE & MARKINGS |
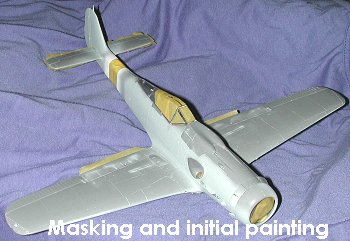 First thing to do was to mask off any areas that I didn't want painted and
that meant the wheel wells and interior. Then I sprayed Alclad's gloss
black prep to the underside of the wings and the flaps to provide a smooth
surface. I then noticed that I needed to apply another coat of filler on a
few areas as it showed that some more was needed. Despite that, I then
sprayed on the Alclad Aluminum after the undercoat had dried for a few
hours. This has to go on in several thin coats to get the proper look.
Then the kit sat for a week while I awaited a proper decal sheet.
First thing to do was to mask off any areas that I didn't want painted and
that meant the wheel wells and interior. Then I sprayed Alclad's gloss
black prep to the underside of the wings and the flaps to provide a smooth
surface. I then noticed that I needed to apply another coat of filler on a
few areas as it showed that some more was needed. Despite that, I then
sprayed on the Alclad Aluminum after the undercoat had dried for a few
hours. This has to go on in several thin coats to get the proper look.
Then the kit sat for a week while I awaited a proper decal sheet.
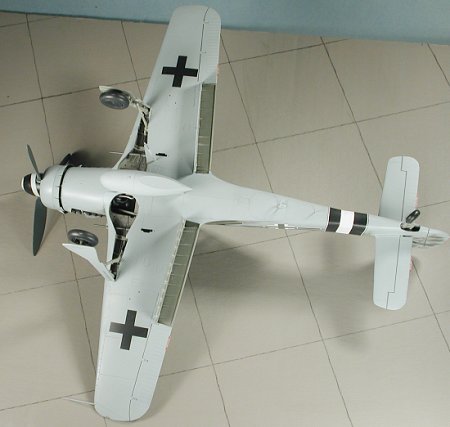
Once that sheet arrived, fate had it that I'd choose a plane that had a fully painted underside so I shot Testors ModelMaster RLM 76 over most of the underside, leaving a section clear to spray Floquil Reefer White for part of a fuselage band. Then the tailplane undersides were masked and I returned to the kit to the workbench to add some more plastic bits.
The upper cowling was glued in place and the nose section attached. You are
given a choice of open or closed cowl flaps. Use either one, as they are
both seen in pictures, but I think the open option is cooler looking. The
radiator section and forward cowl were then attached and the radiator piece
masked off. Returning to the cockpit section, the gunsight was glued in
place and the canopy and windshield were cut off the sprues and cleaned up.
The armor plating and canopy rail
 were used from the kit. There is an
etched metal replacement provided, but the difference in detail is minimal
while the plastic is much easier to work with. The two piece of clear
plastic were glued to the gunsight and a bit of touch-up painting was
applied. Interestingly, there appears to be no padding on the gunsight as
with earlier aircraft. Next the clear bits were masked. Windscreen was
glued in place with the canopy just tacked on.
were used from the kit. There is an
etched metal replacement provided, but the difference in detail is minimal
while the plastic is much easier to work with. The two piece of clear
plastic were glued to the gunsight and a bit of touch-up painting was
applied. Interestingly, there appears to be no padding on the gunsight as
with earlier aircraft. Next the clear bits were masked. Windscreen was
glued in place with the canopy just tacked on.
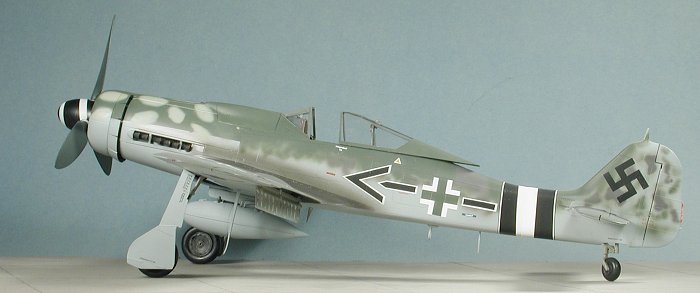
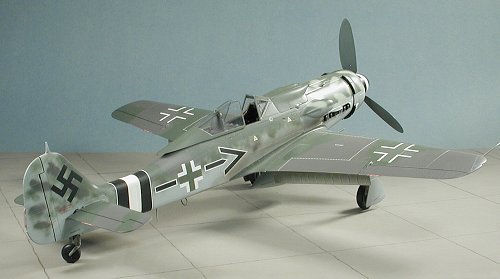
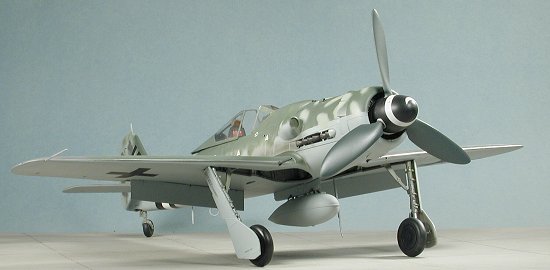
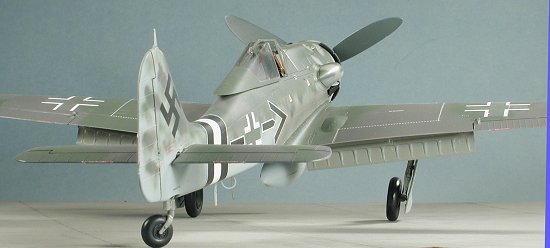
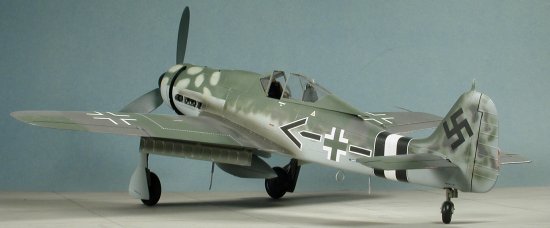
Upper camouflage colors on this one are RLM 75 and 83. That meant the last
(sniff...) of my Aeromaster RLM 75 enamel, which I lightened up a bit with
some Floquil Reefer White. The entire upper surface was sprayed with the
RLM 75 and Then for the next color. Now the instructions call for RLM 83,
but that in all my paints in the bright green. Now either the instructions
are incorrect or folks have changed their mind about the proper number of
the bright green or something, but it looked to me to be the darker of the
two greens judging from the color artwork, so that meant RLM 82 in the
Modelmaster line. This was also thinned with lacquer thinner and sprayed on
freehand. It resulted in a bit of overspray onto areas I didn't want the
paint to be on (like the RLM 76 areas), but that is 100% normal for me!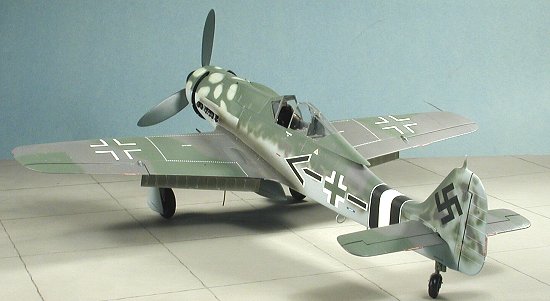
At this time, any areas I didn't want paint on I masked, which meant much of the upper surface of the wings and tail planes (I go through a lot of tape while doing camouflage). I also noted that I didn't get the RLM 82 low enough on the forward cowling, but that's not a big deal. I repainted a lot of areas with RLM 76 and then sprayed on the parts I wanted mottled with RLM 75. After that dried, I masked the RLM 76 on the nose area as that shows a hard edge in the instructions. The RLM 82 was then sprayed on the nose to go down to the taped area. I then did all the mottling and fuzzy stuff with the RLM 82 that was needed to make things look proper. The masking was removed from the nose and the final color a blue-green (which used up the last of my Aeromaster RLM 84 (boo-hooo......) was sprayed in large ellipses onto the nose. Any overspray on the RLM 82 section was touched up and for all intents and purposes, the majority of painting was done!
|
BACK TO THE BENCH |
 At this time, some more stuff' had to be tacked onto the
airframe before gloss coating and decals. Basically, that meant the landing
gear and some other 'fussy bits'. The gear had been prepainted RLM 02 as
had the retraction struts and oleo scissors. The oleos themselves were
wrapped with Chrome Bare Metal Foil, then the scissors were glued in place.
The gear were then inserted into the wing slots. They are a VERY tight fit
and I used glue as a sort of lubricant to get them into place. Fit is
perfect. Then the wheels were glued in place and when dry the gear doors.
The tail wheel assembly was then glued in and the plane could finally sit
on its gear. The control surface hinges were highlighted with a drafting
pen to make them stand out. I then took the kit to the paint shop
again and sprayed a couple of coats of Future (straight from the bottle) to
gloss things up for the decals.
At this time, some more stuff' had to be tacked onto the
airframe before gloss coating and decals. Basically, that meant the landing
gear and some other 'fussy bits'. The gear had been prepainted RLM 02 as
had the retraction struts and oleo scissors. The oleos themselves were
wrapped with Chrome Bare Metal Foil, then the scissors were glued in place.
The gear were then inserted into the wing slots. They are a VERY tight fit
and I used glue as a sort of lubricant to get them into place. Fit is
perfect. Then the wheels were glued in place and when dry the gear doors.
The tail wheel assembly was then glued in and the plane could finally sit
on its gear. The control surface hinges were highlighted with a drafting
pen to make them stand out. I then took the kit to the paint shop
again and sprayed a couple of coats of Future (straight from the bottle) to
gloss things up for the decals.
|
DECALS |
 I chose to use the JG 4 markings from
Eagle Cals 3258. The main
reason was that I liked the tail band and couldn't do the last scheme as I
didn't have a Ta-152 tail. These decals are printed by Microscale so I
didn't have the cracking problems I had with the set I used on my 1/32
Bf-109G. The decals went on beautifully with no real problems, though the
tail bands just didn't seem to match up properly, no matter which way I put
them on. I also found that the spinner spiral didn't conform well to the
spinner. As a bit of an aside to the spinner, I tacked the upper and lower
section together and applied the spiral before installing the blades. Makes
it MUCH easier to do it that way.
I chose to use the JG 4 markings from
Eagle Cals 3258. The main
reason was that I liked the tail band and couldn't do the last scheme as I
didn't have a Ta-152 tail. These decals are printed by Microscale so I
didn't have the cracking problems I had with the set I used on my 1/32
Bf-109G. The decals went on beautifully with no real problems, though the
tail bands just didn't seem to match up properly, no matter which way I put
them on. I also found that the spinner spiral didn't conform well to the
spinner. As a bit of an aside to the spinner, I tacked the upper and lower
section together and applied the spiral before installing the blades. Makes
it MUCH easier to do it that way.
It was during the decaling that I had THE DISASTER. Happens nearly every kit and in this case, I simply lost my grip and dropped it. Not smash into millions of pieces bad, but break all the landing gear off bad. After a few moments of quiet weeping, I picked up the kit and began to fix things as best I could. Naturally all that perfect alignment on the main gear went away. The only benefit is that I was able to position the tail wheel at something less than straight ahead.
I then continued to apply decals. There are a ton of them and you really need to make a choice as to what to put on. I used most of the applicable stencil decals including the wing walk ones. These are offered just as stripes and you have to lay them and cut them to the proper length. Not hard, just a bit time consuming, taking the better part of two days. I used the red trim tab decals from the Hasegawa sheet with no real problem. I also didn't use setting solution on them, but did on the rest. Once dry, the kit was wiped down and given a coat or two of clear matt. Then the exhaust stain was applied using Tamiya Smoke. I don't like the glossy look of this as all the exhaust staining I've seen is more like soot than oil, so gave it an overcoat of matt.
|
FINAL CONSTRUCTION |
There actually are a lot of other items to add to the kit in the final
construction stage. First of all, the various antennas and pitot tubes were
glued in place. I also fit in the cannon barrels into the wings. Fit is
very tight so no glue was needed. It was at this time when I noticed I'd
missed something. I had forgotten the green background to the fuselage
insignia. Well, I could either leave them alone or paint them in. I chose
the latter. 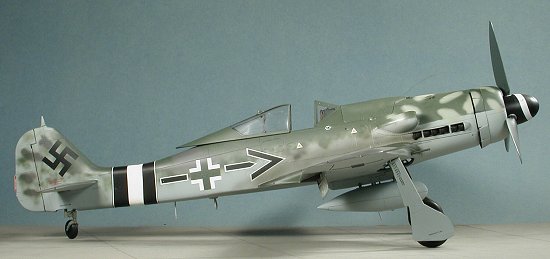 Since the decals were sealed in, I shouldn't have any problems
with pulling them up using Tamiya tape. I first taped the area I needed in
the vertical and when it had dried, did the horizontal part. No problems
with tape pulling up decals, but I was quite careful in application and
removal. I also painted the antenna and pitot tube at this time while they
were on the plane to get a good match.
Since the decals were sealed in, I shouldn't have any problems
with pulling them up using Tamiya tape. I first taped the area I needed in
the vertical and when it had dried, did the horizontal part. No problems
with tape pulling up decals, but I was quite careful in application and
removal. I also painted the antenna and pitot tube at this time while they
were on the plane to get a good match.
The masking was removed from the clear bits and the canopy popped loose. The area underneath was cleaned up and any touch-up painting done. The canopy was glued open to get a look at the interior. The flaps were glued in and these also fit extremely tightly on the sides. I glued the fuel lines into the drop tank and then glued the tank to the pylon. It thought I may have missed a part of the instructions that said to open the holes for the fuel lines in the lower wing, but there is no indication of them so they don't look quite right just sort of sitting there.
The exhaust stacks were then glued in place. Fit was fairly good with little problem though the forward ones gave me a bit of a tussle before settling in their locating areas. The small clear rods were then inserted into the wing tips to act as lights and any small touch-ups were done in the paint scheme. The final item to install was the prop. A simple matter of just pushing it onto the small shaft. I found it to be a be a bit of a loose fit and actually, the back of the prop blades hit the front of the cowling. I was going to add a radio antenna, but just ran out of time to install one.
|
CONCLUSIONS |
 It is a way cool model. The kit isn't as easy as the
previous 109 and I had a bit more trouble with parts on this one, but then
it seems the 190 is a more complicated mold than the the 109. Next one,
I'll definitely fill in and smooth the area where the tail fits as it left
a very noticeable break. Though I'm less than thrilled with the sink areas
and the very visible ejector pin marks on various parts of the kit,
overall, it is a kit I enjoyed and will probably build again in the future.
It is a way cool model. The kit isn't as easy as the
previous 109 and I had a bit more trouble with parts on this one, but then
it seems the 190 is a more complicated mold than the the 109. Next one,
I'll definitely fill in and smooth the area where the tail fits as it left
a very noticeable break. Though I'm less than thrilled with the sink areas
and the very visible ejector pin marks on various parts of the kit,
overall, it is a kit I enjoyed and will probably build again in the future.
I can't believe I actually paid retail!
June 2003
#1271 in a series
Copyright ModelingMadness.com. All rights reserved. No reproduction in part or in whole without express permission from the editor.
If you would like your product reviewed fairly and quickly, please contact the editor or see other details in the Note to Contributors.