| KIT #: | 193 |
| PRICE: | $75.00 MSRP |
| DECALS: | One option |
| REVIEWER: | Scott Van Aken |
| NOTES: | Resin kit with vacuformed canopy and plastic landing gear struts. |
| HISTORY |
In 1942, the RLM requested Focke-Wulf to build a high
altitude version of its FW-190. The FW-190B was the result, but found to be
unsuccessful, mostly due to the engine chosen. Designers then turned to the
newly developing DB 603 and Jumo 213 engines,
 which held
more promise. The DB 603 aircraft was the FW-190C and the Jumo 213 version was
the FW-190D.
which held
more promise. The DB 603 aircraft was the FW-190C and the Jumo 213 version was
the FW-190D.
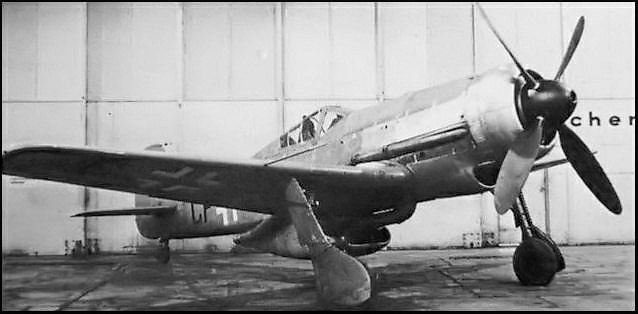
Several different prototypes were built to use the DB 603 engine and that included the v 13, 15,16, 18, 19 and 29 through 33. A considerable effort indeed. The main difference was in the version of the engine used and other equipment. One of the first with a turbocharger was derived from a FW-190A-0 airframe and used a four bladed prop. This turbocharger was driven by engine exhaust and mounted below the fuselage in a very large housing, giving the aircraft the nickname of 'Kangaroo'. This aircraft also had a pressurized cockpit requiring a reinforced canopy. The torque of the engine required an enlarged fin/rudder, looking very much like that of the late war Ta-152. Though the aircraft did reach a top speed of 608 KPH at 11,000 meters, continuing problems with the turbocharger and pressurization caused the project to be terminated.
| THE KIT |
This particular kit arrived in a sturdy cardboard box
with its contents packed in the now-standard multi-sectioned bag. Small bits
were in an additional bag within, adding additional protection. Detail is
excellent with lightly engraved panel lines and rivet detailing. I found none of
the usual molding glitches that are so common on other resin kits. Only a tiny
bit of flash and some sprue stubs will need to be removed to get the parts ready
for use. The kit includes strengthened undercarriage, molded in a bla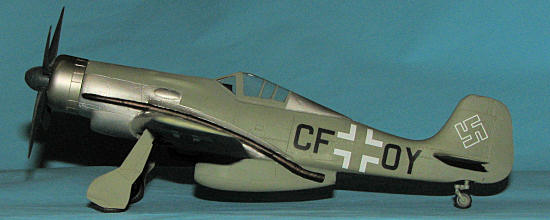 ck
material. I can't tell if this is wire reinforced resin or perhaps some other
sort of plastic, like standard polystyrene. Regardless, it is good to have some
less pliable material as the weight of the kit would cause distortion of normal
resin in a short time. Two well done vacuformed canopies are provided. A small
etched fret with rudder pedals, seat belts and oleo scissors, to name a few
items is included. No etched instrument panel, which would have been nice, but
really, little can be seen in the cockpit of a 190 anyway so additional
detailing would pretty well go unnoticed.
ck
material. I can't tell if this is wire reinforced resin or perhaps some other
sort of plastic, like standard polystyrene. Regardless, it is good to have some
less pliable material as the weight of the kit would cause distortion of normal
resin in a short time. Two well done vacuformed canopies are provided. A small
etched fret with rudder pedals, seat belts and oleo scissors, to name a few
items is included. No etched instrument panel, which would have been nice, but
really, little can be seen in the cockpit of a 190 anyway so additional
detailing would pretty well go unnoticed.
Instructions are a single sheet of paper with history
and parts list on one side. The other has three large photos with five smaller
inset photos of the kit. This approach works well with one has a lot of space,
but I found that the addition of the part numbers to make things rather busy and
somewhat difficult to follow. This might be a case where well done line drawings
would be preferred.
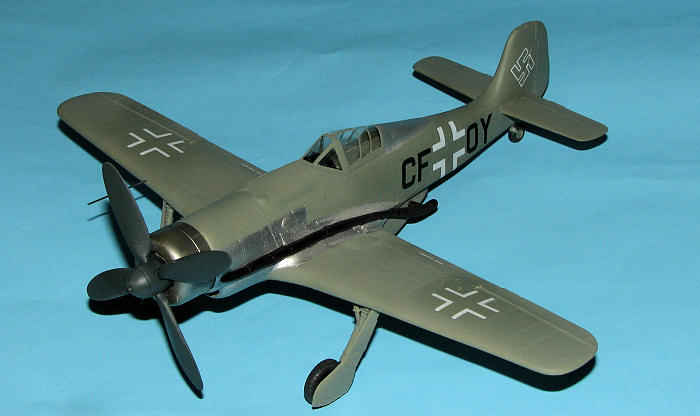
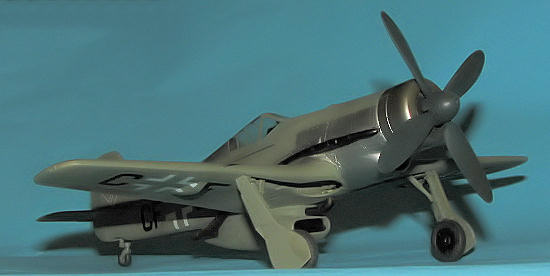
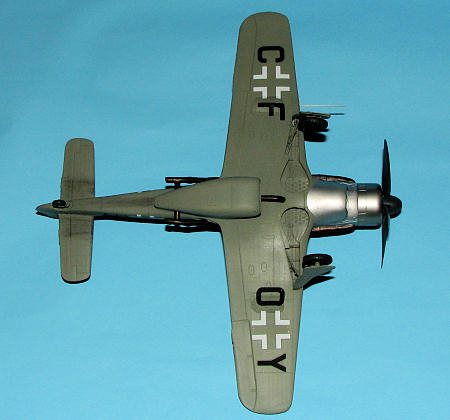
 Decals
are for the lone prototype and are well printed by AviPrint. The aircraft was
apparently in RLM02 over most of the airframe with the engine sections in
unpainted aluminum and some RLM 74 on the upper wings. The only photos I've seen
of the plane do not show the upper wings, so this cannot be verified by me. I
was also wondering about the various gun hatches being present on the wings. A
set of drawings I found (see reference link) shows them, but from the images, it
is not easy to determine if they were present or not (see photo). The box art
definitely shows no under wing cannon hatch.
Decals
are for the lone prototype and are well printed by AviPrint. The aircraft was
apparently in RLM02 over most of the airframe with the engine sections in
unpainted aluminum and some RLM 74 on the upper wings. The only photos I've seen
of the plane do not show the upper wings, so this cannot be verified by me. I
was also wondering about the various gun hatches being present on the wings. A
set of drawings I found (see reference link) shows them, but from the images, it
is not easy to determine if they were present or not (see photo). The box art
definitely shows no under wing cannon hatch.
| CONSTRUCTION |
As with most resin kits, the parts needed to be cleaned up and in
some cases, repair work was needed. I found little in the way of molding faults,
but there were a few. Construction of the cockpit was pretty much standard
stuff. Planet Models offers a number of photo etch bits to help spruce things
up, including the usual seat belts. Interior was painted RLM 02 Grey as this
aircraft was supposed to be from the FW-190A-0 batch, which was built prior to
RLM 66 being required as the interior paint. Test and prototype conversions
would not have a bunch of time wasted repainting the cockpit. Same for the
wings. These would have
 been
production based and from the look of it, the shorter span wings of the A-0
planes were replaced with those from a later variant.
been
production based and from the look of it, the shorter span wings of the A-0
planes were replaced with those from a later variant.
![]() Anyway,
No real problems with the interior except that it seems to sit a bit low in the
front. The instrument panel should be up against the underside of the anti-glare
panel, but is a considerable distance lower. This was something I didn't fully
realize until after the fuselage halves were together. Building up the wings was
not a problem as it was one big casting. Makes things quite easy in that regard.
What was a problem was two-fold. One was that it seems the fit to the fuselage
was less than sterling, second was that one wing was warped. I did the usual
near-boiling water deal on the wing and after multiple applications (thick
resin, you know), it finally turned out a lot straighter. At this time, I
puttied up all that was needed and also took the time to grind out the lower
forward intake as it needed to be reshaped a bit. Looking at where the poor wing
fuselage join was (near the back where all the exhaust plumbing was), I saw that
there was a huge hole to be filled and filled with dismay, I lost interest in
the build for about a year.
Anyway,
No real problems with the interior except that it seems to sit a bit low in the
front. The instrument panel should be up against the underside of the anti-glare
panel, but is a considerable distance lower. This was something I didn't fully
realize until after the fuselage halves were together. Building up the wings was
not a problem as it was one big casting. Makes things quite easy in that regard.
What was a problem was two-fold. One was that it seems the fit to the fuselage
was less than sterling, second was that one wing was warped. I did the usual
near-boiling water deal on the wing and after multiple applications (thick
resin, you know), it finally turned out a lot straighter. At this time, I
puttied up all that was needed and also took the time to grind out the lower
forward intake as it needed to be reshaped a bit. Looking at where the poor wing
fuselage join was (near the back where all the exhaust plumbing was), I saw that
there was a huge hole to be filled and filled with dismay, I lost interest in
the build for about a year.
 A
couple of months ago, I decided to start digging out partial builds and see what
I could do about completing some of these. After all, in some of these kits, a
considerable amount of work had already been done so finishing things up
shouldn't be that difficult.
A
couple of months ago, I decided to start digging out partial builds and see what
I could do about completing some of these. After all, in some of these kits, a
considerable amount of work had already been done so finishing things up
shouldn't be that difficult.
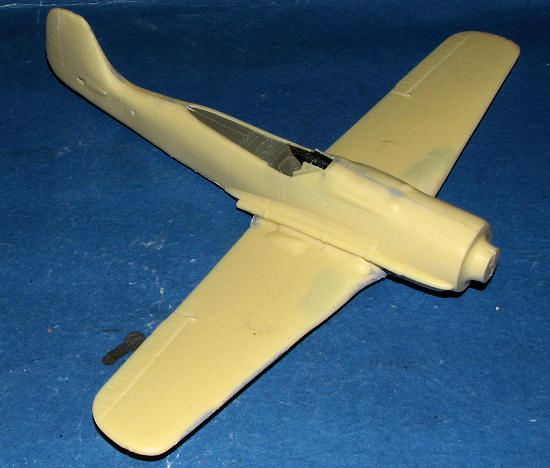
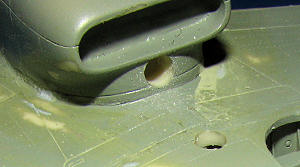
When it came to this one, I started where I left off (see photo to
the right) and applied many coats of filler, followed by some file work to see
about taking care of things. While not perfect, I got things to a level at which
I was somewhat satisfied and decided to move on. This meant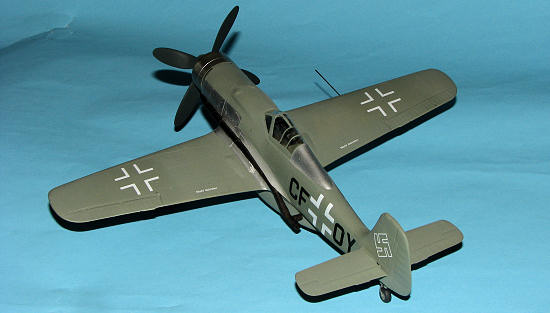 attaching the large lower scoop as well as the small piece in the forward wheel
well area. The fuselage has no 'glue here' markings on it for this item so I
figured out from the drawing just where it should go. Once it was cleaned up as
best I could, it was attached and super glue run around the edges to help seal
the gap. Usual filler and sanding followed.
attaching the large lower scoop as well as the small piece in the forward wheel
well area. The fuselage has no 'glue here' markings on it for this item so I
figured out from the drawing just where it should go. Once it was cleaned up as
best I could, it was attached and super glue run around the edges to help seal
the gap. Usual filler and sanding followed.
Then I attached the tailplanes, which offered no resistance and fit quite well. I also started clean-up on the engine front, cowling and the plastic landing gear. These and the retraction struts need considerable clean up of the sprue attachment area. Naturally, I snapped one of the retraction struts removing it from the sprue.
I then hunted around for the rest of the photo etch fret, but unfortunately, it seems to have disappeared during the intervening months. Means no shoulder harness or head armor or oleo scissors. I also cleaned up the prop blades and the spinner. This latter item needed to have some resin residue drilled out with a motor tool and grinder attachment.
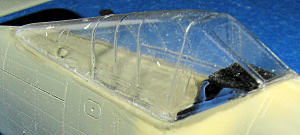 To
help see if there were any spots missed, I used some Agama RLM 02 enamel that I
had mixed up to spray most of the airframe (except for the cockpit area). Lucky
thing as I found several areas that needed attention. With that taken care of, I
carefully cut out one of the two canopies. This was then gently trimmed and
sanded to get the best fit I could. Not an easy task as it was a bit narrower
than the fuselage at this point. After an hour of work (doing this is not
something I can do quickly), I got the canopy to looking pretty good. It was
then attached using clear, gloss paint. I had some leak under the quarter
sections of the windscreen, as you can see from the image to the right before it
dried. Once dry it doesn't look too horrible.
To
help see if there were any spots missed, I used some Agama RLM 02 enamel that I
had mixed up to spray most of the airframe (except for the cockpit area). Lucky
thing as I found several areas that needed attention. With that taken care of, I
carefully cut out one of the two canopies. This was then gently trimmed and
sanded to get the best fit I could. Not an easy task as it was a bit narrower
than the fuselage at this point. After an hour of work (doing this is not
something I can do quickly), I got the canopy to looking pretty good. It was
then attached using clear, gloss paint. I had some leak under the quarter
sections of the windscreen, as you can see from the image to the right before it
dried. Once dry it doesn't look too horrible.
 During
this time, I trimmed the various pipes provided for exhaust and for air to enter
the huge intercooler. This latter item required the attachment hole for the
forward pipe to be drilled much deeper. At the same time, a hole was drilled in
the lower wig to accept the forward part of this pipe. Much test fitting and
considerable trimming was needed on the pipe itself. The aft ones fit fairly
well, but needed to be trimmed shorter as well. These exhaust pipes were then
drilled out.
During
this time, I trimmed the various pipes provided for exhaust and for air to enter
the huge intercooler. This latter item required the attachment hole for the
forward pipe to be drilled much deeper. At the same time, a hole was drilled in
the lower wig to accept the forward part of this pipe. Much test fitting and
considerable trimming was needed on the pipe itself. The aft ones fit fairly
well, but needed to be trimmed shorter as well. These exhaust pipes were then
drilled out.
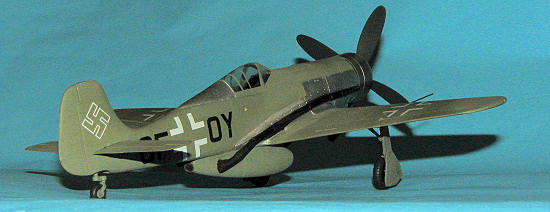
With those fit situations under control, I masked the canopy and glued on the landing gear. The main gear fit quite well into the slots provided. However, the weight of the model itself is enough to cause them to bow a bit. This is even with the additional support of the retraction struts. Just imagine how much they'd deform if made of resin and not injected plastic. Actually, cast metal would probably have worked even better.
OK, gear on, canopy masked so it was time for paint.
| COLORS & MARKINGS |
The instructions would have one paint portions of the upper wing with a
dark grey. Frankly, I asked a lot of questions on the forum and looked at a lot
of photos and couldn't really tell for sure if the upper surface of wings and
tailplanes were camouflaged. It would make sense that the plane was in overall
RLM 02 as that was prett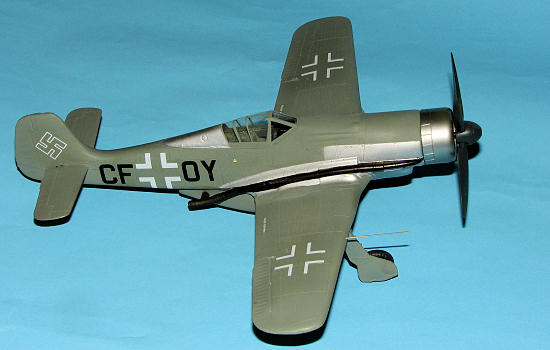 y
much standard for prototype aircraft. Until something more conclusive arises,
I'll stick with the overall RLM 02 theory. Again, using Agama's RLM 02 enamel,
the airframe was given a couple of coats. I also did the gear doors at this
time. I also painted the prop blades RLM 70 and the spinner with RLM 71 as
shown in the instructions.
y
much standard for prototype aircraft. Until something more conclusive arises,
I'll stick with the overall RLM 02 theory. Again, using Agama's RLM 02 enamel,
the airframe was given a couple of coats. I also did the gear doors at this
time. I also painted the prop blades RLM 70 and the spinner with RLM 71 as
shown in the instructions.
Once all was properly dry, I used several shade of Alclad II Aluminum for the cowling, engine face and the metal panels shown in the instructions. As usual, this took considerable masking to accomplish as one will always find overspray on areas not fully covered. The pipes I mentioned earlier were painted Model Master Burnt Metal using their Metalizer line. This also required a lot of masking as 80% of these pipes are molded into the fuselage. I did have the Tamiya tape pull up a small chunk of Alclad II, but it was an easy fix. Once the paint was fully cured, the areas that would see decals was sprayed with clear gloss acrylic (Future).
Planet Models' decals are super thin so require care when applying. I also found them to be a bit oversized when compared to the images in the instructions. Microsol was used as a setting solution and it worked perfectly.
| FINAL CONSTRUCTION |
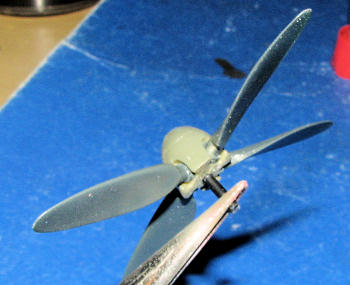 With
the markings in place, I turned to the final bits. This meant the wheels (which
need the axle holes drilled out to match the stubs), and assembling the prop.
Once the prop was together, it just did not look right with the RLM 71 spi
With
the markings in place, I turned to the final bits. This meant the wheels (which
need the axle holes drilled out to match the stubs), and assembling the prop.
Once the prop was together, it just did not look right with the RLM 71 spi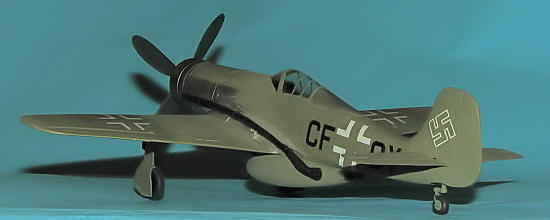 nner.
Normally prop spinners are RLM 70 or in some cases, black. I had to drill out
the back of the spinner to install a prop shaft anyway so once that shaft was
inserted (Contrail plastic rod), I repainted the entire spinner/blade assembly
with RLM 70 straight from the tinlet, again, using Agama enamels.
nner.
Normally prop spinners are RLM 70 or in some cases, black. I had to drill out
the back of the spinner to install a prop shaft anyway so once that shaft was
inserted (Contrail plastic rod), I repainted the entire spinner/blade assembly
with RLM 70 straight from the tinlet, again, using Agama enamels.
The various pipes/exhaust were glued in place (well actually, the forward pipe is a tight fit), and the intake/exhaust of the intercooler was painted black. I then painted the wheels and tires and glued them in place. Then the entire airframe was given a matte coat using a mixture of Future and Tamiya Flat Base. I was careful to keep this mixture away from the aluminum painted areas. Then the engine radiator was glued to the mount on the front of the fuselage, the cowling glued on, followed by the prop. I also glued on the gear doors, being sure to glue them to the lower wing and the gear legs to try to add some stiffness.
For the final step, I used a piece of stainless steel tubing for a pitot tube, drilling a hole in the leading edge of the wing and cementing it in place. The instructions don't mention or show this being done, but the decal placement drawings show it. I then peeled off the canopy masking and that was it.
| CONCLUSIONS |
 The
completion of this kit took me about five weeks of work, though I will confess I
wasn't really rushing through things. Overall, it is not one of the easiest
Planet Model builds, mostly due to the wing/fuselage join and those pipes.
However, Planet Models kits are in the upper 25% when it comes to mold quality
and engineering so they are ones that I do recommend to those having some
experience with the type. And the lower wing gun bulges? Well, I forgot about
removing them until after I'd painted it and put on half the decals. Besides,
whose gonna know...
The
completion of this kit took me about five weeks of work, though I will confess I
wasn't really rushing through things. Overall, it is not one of the easiest
Planet Model builds, mostly due to the wing/fuselage join and those pipes.
However, Planet Models kits are in the upper 25% when it comes to mold quality
and engineering so they are ones that I do recommend to those having some
experience with the type. And the lower wing gun bulges? Well, I forgot about
removing them until after I'd painted it and put on half the decals. Besides,
whose gonna know...
| REFERENCES |
Instruction sheet
http://www.airwar.ru/other/draw/fw190v18.html
June 2008
My thanks to
www.coopersmodels.com for the review kit. Check them out for other neat
goodies. If you would like your product reviewed fairly and fairly quickly, please
contact
the editor or see other details in the
Note to
Contributors.