
DML (Dragon) 1/48 FW-190A-4 "JG-1 Oesau"
| KIT #: | 5524 |
| PRICE: | $5.00 at a swap meet |
| DECALS: | Three options |
| REVIEWER: | Scott Van Aken |
| NOTES: | 1994 boxing |
| HISTORY |
Introduced in July 1942, the Fw 190 A-4 was equipped with the same
engine and basic armament as the A-3. Updated radio gear, the FuG 16Z, was
installed replacing the earlier FuG VIIa. A new, short "stub" vertical
aerial mount was fitted to the top of the tailfin, a configuration which was
kept through the rest of the production Fw 190s. In some instances,
pilot-controllable engine cooling vents were fitted to the fuselage sides in
place of the plain slots. Some A-4s were outfitted with a special
Rüstsatz field conversion kit,
 comprising the fitting of a pair of
under-wing Werfer-Granate 21 (BR 21) rocket mortars, and were
designated Fw 190 A-4/R6. However, the A-4's main improvement was the number
of Umrüst-Bausätze factory-refit package enhanced versions.
comprising the fitting of a pair of
under-wing Werfer-Granate 21 (BR 21) rocket mortars, and were
designated Fw 190 A-4/R6. However, the A-4's main improvement was the number
of Umrüst-Bausätze factory-refit package enhanced versions.
The U1 was outfitted with an ETC 501 rack under the fuselage. All armament except for the MG 151 cannon was removed. The U3 was very similar to the U1, and later served as the Fw 190 F-1 assault fighter. Some U3s used for night operations had a landing light mounted in the leading edge of the left wing-root. The U4 was a reconnaissance fighter, with two Rb 12.4 cameras in the rear fuselage and an EK 16 or Robot II gun camera. The U4 was equipped with fuselage-mounted 7.92 mm (.312 in) MG 17s and 20 mm MG 151 cannon. The U7 was a high-altitude fighter, easily identified by the compressor air intakes on either side of the cowling. Adolf Galland flew a U7 in the spring of 1943.
The A-4/U8 was the Jabo-Rei (Jagdbomber Reichweite, long-range fighter-bomber), adding a 300 L (80 US gal) drop tank under each wing, on VTr-Ju 87 racks with duralumin fairings produced by Weserflug, and a centreline bomb rack. The outer wing-mounted 20 mm MG FF/M cannon and the cowling-mounted 7.92 mm (.312 in) MG 17 were removed to save weight. The A-4/U8 served as the model for the Fw 190 G-1.
A new series of easier-to-install Rüstsatz field kits began to be produced in 1943. The first of these, the A-4/R1, was fitted with a FuG 16ZY radio set with a Morane "whip" aerial fitted under the port wing. These aircraft, called Leitjäger or Fighter Formation Leaders, could be tracked and directed from the ground via special R/T equipment called Y-Verfahren. More frequent use of this equipment was made from the A-5 onwards. The Fw 190A-4 could achieve 1,700 hp (2,100 with MW-50 boost). Its maximum speed was 416 mph (670 km/h) at 20,590 ft (6,250 m). Operational ceiling was 37,400 ft (11,400 m). Normal range was 497 miles (800 km). Normal takeoff weight was 8,378 lb (3,800 kg). A total of 976 A-4s were built between June 1942 and March 1943.
| THE KIT |
 This is of the
first properly done FW-190s in 1/48, the Trimaster/DML kit. The ancient Monogram
kit isn't bad, but it is a mish-mash of varients. After the initial
release of these kits by Trimaster with metal landing gear and a rather high
price, they were reissued without the metal gear under the DML label. Since
then, DML has been remarketed as Dragon. It
still has the photo etch and you get two frets of the stuff in this one. It is
mostly used for interior bits like the armored head rest, seat harness,
instrument panel, and side consoles. In fact, there is no plastic instrument
panel or head rest so you have to use p.e.
This is of the
first properly done FW-190s in 1/48, the Trimaster/DML kit. The ancient Monogram
kit isn't bad, but it is a mish-mash of varients. After the initial
release of these kits by Trimaster with metal landing gear and a rather high
price, they were reissued without the metal gear under the DML label. Since
then, DML has been remarketed as Dragon. It
still has the photo etch and you get two frets of the stuff in this one. It is
mostly used for interior bits like the armored head rest, seat harness,
instrument panel, and side consoles. In fact, there is no plastic instrument
panel or head rest so you have to use p.e.
This is the last of the 'short fuselage FW-190As and is similar to the earlier versions in several areas. Though some A-4 variants used the earlier wheels, this seems to have been changed during production. The kit comes with both styles. This one has the smaller upper cowling as it still uses the smaller cowl guns, but it does have the wing guns in the outer position so has the appropriate shell ejector chute insert. It also uses the later wheels.
Thanks to the p.e., the cockpit is well done and few
will want to replace it with aftermarket. The cowling is a bit complex with four
pieces making up the cowling itself and three inserts for the engine exhaust.
The A-4 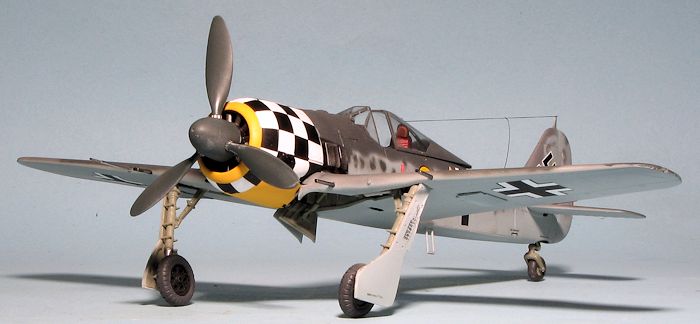 variant still used the small inner doors.
The prop is one of those deals with separate blades
that some of us dislike and while keyed, the keys are very shallow. The canopy can be posed open or
closed as one wishes.
variant still used the small inner doors.
The prop is one of those deals with separate blades
that some of us dislike and while keyed, the keys are very shallow. The canopy can be posed open or
closed as one wishes.
There are some neat unused options on the sprues for this one including a set of longer fuselage halves, upper cowling and other bits, however, since I bought this one 'used', the previous owner had already removed many of the parts from the sprues and that includes any of the unneeded bits. A bomb rack is also included. Not included is any sort of drop tank, which I thought was pretty standard stuff.
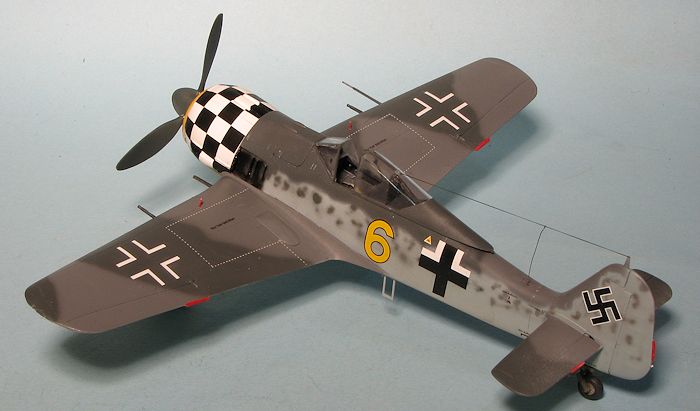
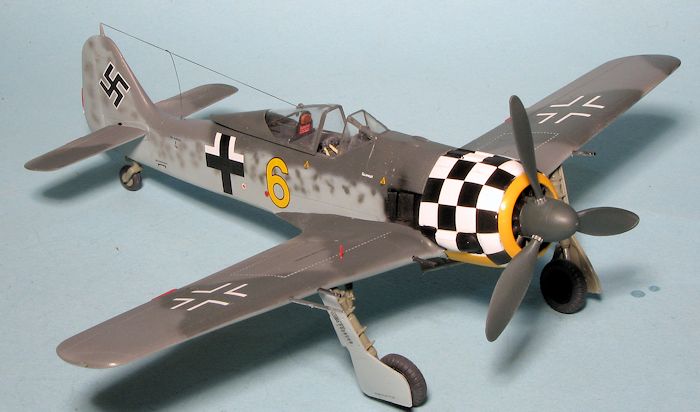
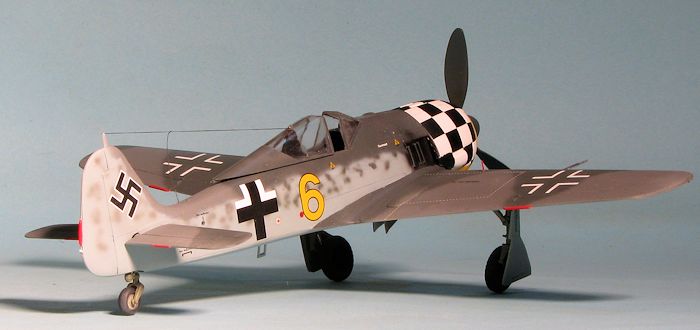
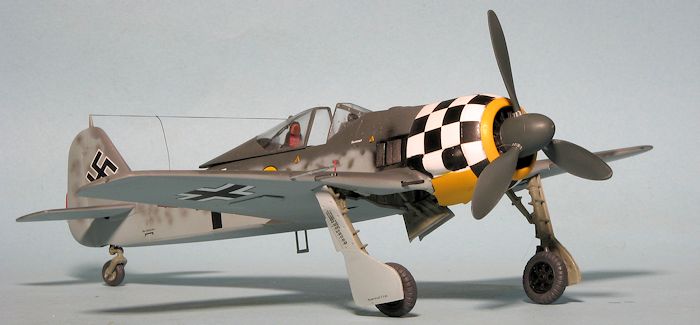
Instructions are well done and include Gunze and Italeri (Model Master) paint references. The decal sheet has seen better days, having dried and cracked in the twenty years since it was printed. Markings are for two RLM 74/75/76 aircraft an done in white. One is the box art plane from JG-1 with the white and black striped cowling. The second JG 1 plane has a yellow rudder and does not have the distinctive cowling. It was flown by Josef Wurmheller and has his score on the rudder. Perhaps the decals can be saved with a clear coat, but I'll be looking for aftermarket replacements. Fortunately, the FW-190A has been well represented in the aftermarket community.
| CONSTRUCTION |
As mentioned, the kit was purchased at a swap meet and
while many of the parts are gone from the sprues, what is in the box appears to
be complete enough to build the kit. In addition, the kit came with a Cooper's
Details resin cockpit set. Now to be honest, the kit bits are pretty much more
than adequate, as the 190 cockpit opening is small to say the least and not much
can be seen. But I decided to go ahead and use it anyway as I had it, so don't
send me e-mails about using unobtainable aftermarket. There are plenty of other
 nice resin cockpit sets for this plane that can be used. The set is universal
FW-190 and comes with several different instrument panels and side consoles. The
previous owner had already attached the side consoles to the cockpit tub.
nice resin cockpit sets for this plane that can be used. The set is universal
FW-190 and comes with several different instrument panels and side consoles. The
previous owner had already attached the side consoles to the cockpit tub.
I then completed installing all the other bits including the rudder pedals, control stick, seat, instrument panels and the throttle. Both the Dragon and Cooper's Details set came with etched belts and I used the latter after painting the interior with RLM 66 dark grey. I also attached the canopy opening crank to the inside of the fuselage. On the bottom of the resin cockpit, I removed about the first quarter of the pour stub to be sure it would not interfere with the wheel well insert.
Speaking of which, the lower wing had to have a section cut out of the middle of it to properly represent the version with inner gear doors. This will also require the lower main gear doors to be trimmed a bit later in constructions. It was here that I ran into the first down side of buying already opened kits, by this I mean kits where the previous owner had opened the bags and removed bits. This kit was missing one of the guns that goes in the wheel well. It can be replaced by rod or tubing, but it would have been nice to have the part. I also discovered that apparently, the previous owner had swapped out several of the sprues as some of the sprues were lighter in color and had quite a bit of flash on the parts.
I also assembled the cowling at this time. It is four
external pieces with three exhaust inserts. It is a rather fiddly assembly and
none of the cowling parts fit very tightly without either some tape or super
glue help. I also installed the louvers for engine cooling on the sides of the
fuselage. You are provided with later versions that do not have the louvers, but
just openings. However, the decals I planned on using show the louvered version.
The wheel well insert was then glued in place. I first glued just the back
section and clamped it in
 place. Attaching the upper wings should take care of
the forward section. The various holes for guns and pitot were opened in the
leading edge of both wing sections. None of the under wing holes need to be
opened. The small bulge under the outer wing gun openings needs to be sanded
flush as well.
place. Attaching the upper wings should take care of
the forward section. The various holes for guns and pitot were opened in the
leading edge of both wing sections. None of the under wing holes need to be
opened. The small bulge under the outer wing gun openings needs to be sanded
flush as well.
Eventually, the cockpit was completed and after joining the fuselage halves together, the cockpit was installed. I then attached the fin tip and the tail planes. Note that there are some sink areas in the rear of the fuselage and the fin tip that should be filled. The wing was then glued in place. I had some rather large gaps at the wing root which I should have gotten out by putting in a fuselage spreader bar, but their isn't enough room to get it all so I used several filler applications. I also sanded off the DF loop mount as that part was not germane to the early 190As. The trailing edge of the ailerons also needs to be sanded flush with the back of the rest of the wing as apparently the larger ailerons were not part of the A-4 fit either. The tail planes were glued on as were the photo etch aileron trim tabs and the small plates on the wing join.
The head armor pieces were glued together after much fussing, and this was glued into the canopy. The canopy and windscreen were then masked and after several tries, the canopy assembly was slid into place. For whatever reason, I could not get it to close all the way, so hoped I would not have many if any issues with paint getting to the interior.
| COLORS & MARKINGS |
First step on this one was to paint the cowling and oil
cooler ring with white and then mask the cowling and paint it and the ring in
yellow. With the rest of the airframe, the underside was painted RLM 76,
appropriate areas masked and then the upper RLM 74 and RLM 75 painted on. Some
of these areas were masked and more RLM 76 was applied. Then the mottling in RLM
74 and RLM 75 was applied along with some black at the
 exhaust area. The prop
spinner and blades were given a coat of RLM 70.
exhaust area. The prop
spinner and blades were given a coat of RLM 70.
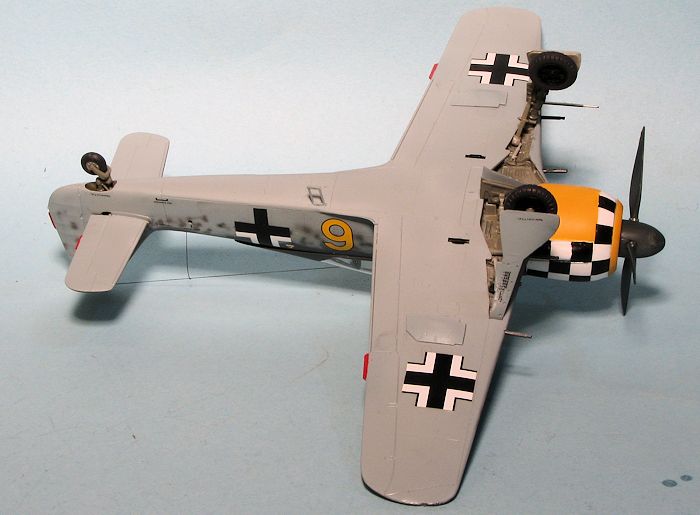
At this time, I installed the landing gear to get the kit up in the air for decal application. Dragon has, at times, been chastised for its loose landing gear, but I found that, once the gear legs and retraction struts were in place, it was quite solid and at the proper angle. With the kit on its main gear, the major decals from Eagle Strike sheet 48049 "Butcher Birds of JG1' were applied. I realize this is a scheme that many would say is 'done to death', but I've always wanted a checkered cowling 190A in my collection and now I have one. The worked superbly and succumbed nicely to Solvaset. One thing I discovered was that the stencils were not well marked as there was often no relationship between the decal number on the placement guide (which is tiny) and the decals on the sheet. I also discovered that I got several long sections of wing walk decal and had to cut them to size. Had the kit decals been usable, I would have used them for stencils.
| FINAL PIECES |
Once the decals had dried, I continued the build by
installing the inner gear doors and their retraction struts. These are not a
positive fit and there is no placement in the wheel well floor for the struts.
When dry I repainted the gear and well with RLM 02 to take care of any issues. I
should mention that the main landing gear should have leather boots over the
oleos, but Dragon seems to have misse d that feature. Another feature missed by
Dragon is that you have to trim
the lower portion of the main gear doors back to the lower line that is molded
in place. The kit supplied doors are designed for those variants that did not
have the inner gear doors. It just takes a few minutes with a sanding stick to
fix it.
d that feature. Another feature missed by
Dragon is that you have to trim
the lower portion of the main gear doors back to the lower line that is molded
in place. The kit supplied doors are designed for those variants that did not
have the inner gear doors. It just takes a few minutes with a sanding stick to
fix it.
I then moved on to the smaller bits like the machine guns and the pitot tube. The cowling and prop were installed as were the flap indicators. Not surprisingly, I lost one and had to make a new one from stretched sprue. I then glued on the boarding step. At this time, I discovered that I forgot to install the bulges under the wing for the cannon housings. These were painted RLM 76 and carefully glued in place. A coat of matte clear was added and once dry the masking removed from the canopy. I then attached the radio wire, drilling a small hole for the feed into the rear fuselage. The wing tip lights were installed and that was it.
| CONCLUSIONS |
 I have to
confess that this one took longer than I'd thought. Of course, working on
several kits at the same time tends to slow down the build on any one kit, but
this one seemed a bit more fiddly than the reworked Hasegawa kit. Not that this
is a bad kit for that is certainly not the case. It is just that the Hasegawa
kit is a bit better. Areas that gave me difficulty were the head armor piece,
and the cut forward wing, which never did sit quite right. Despite that, this is
a kit that I would recommend to those who see it on vendor's tables. It would
probably frustrate a beginner, but those who have the skills will find it well
worth picking up; especially if it is being sold for a song.
I have to
confess that this one took longer than I'd thought. Of course, working on
several kits at the same time tends to slow down the build on any one kit, but
this one seemed a bit more fiddly than the reworked Hasegawa kit. Not that this
is a bad kit for that is certainly not the case. It is just that the Hasegawa
kit is a bit better. Areas that gave me difficulty were the head armor piece,
and the cut forward wing, which never did sit quite right. Despite that, this is
a kit that I would recommend to those who see it on vendor's tables. It would
probably frustrate a beginner, but those who have the skills will find it well
worth picking up; especially if it is being sold for a song.
| REFERENCES |
http://en.wikipedia.org/wiki/Focke-Wulf_Fw_190
Focke-Wulf FW-190 Volume 1, 1938-1943, Smith and Creek, Classic Books, 2011.
April 2014 Thanks to a raffle long ago for this one. If you would like your product reviewed fairly and fairly quickly, please contact the editor or see other details in the
Note to
Contributors.