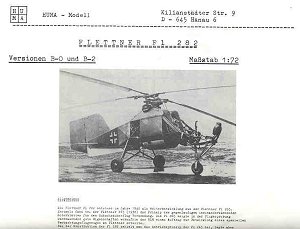
Huma 1/72 Flettner Fl-282 'Kolibri' (Hummingbird)
MSRP: around $20.00
Decals for two versions one in overall RLM 02 and the other in RLM 71 upper with RLM 65 lower.
Date of Review: April 1999
Review and photos by : Scott Van Aken
When one thinks about the first operational helicopter, one thinks of the Sikorsky R-4 that was used by the Coast Guard in the US and overseas in Burma and on Saipan. However, it is the Luftwaffe and the Flettner Fl-282 that were probably used first. First flying in 1940, the Fl-282 differed from the US helicopters by using twin intermeshing blades. This alleviated the need to use a tail rotor to overcome engine torque. The Air Ministry foresaw it's use as a spotter aircraft, both for the Army and for Naval Vessels. Having the BMW 314 7-cylindar radial engine amidships produced a very stable aerial platform in addition to providing good vision for the pilot and observer. The aircraft was tested both in the Baltic and Mediterranean aboard various ships during 1942/43 and found to be a superior aircraft for the task. An order for 1000 machines was placed. However the fortunes of war and the prolonged testing of the aircraft meant that only 24 machines were actually completed.
The aircraft was designed in three different versions, all basically the same but with minor modifications. The B-0 was a single seater with an open cockpit and internal fuel tanks. The B-1 had an enclosed cockpit with external tanks while the B-2 had an open cockpit and observers set with external tanks. Information on the operational use of the Kolibri is scant, but it was used operationally during the period of 1943/45, mostly in the Baltic. It is also supposed that the aircraft was used for various operations in mountainous areas where the ability to get into and out of small landing spots would best be done by a helicopter.
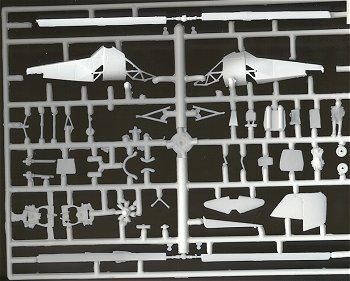
Huma's kit is very much what one would expect. Most of their earlier kits
come in a bag and this one is no exception. The parts are well detailed and
molded in Huma's particularly soft, white plastic. The mold marks on
the parts are rather prominent as is a bit of flash that needs to be cleaned
up prior to any construction. Care needs to be taken during cleanup due to
the softness of the plastic. Since there are no transparencies with this
kit, the chore of masking them is eliminated!
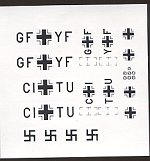 The decal
sheet provides markings for a B-0 and B-2; the decals themselves being quite
matte with lots of carrier film around them. The sheet also includes
swastikas; rather unusual for a German company. The decal sheet is basically
just insignia and code letters. Experience with past older Huma kits
has shown that the decals are less than ideal so having some sort of back
up source isn't a bad idea! Aside from the excellent choice of subjects,
what makes Huma kits so nice is their instruction sheet. While it is
basically just an exploded view of where the parts go, there are a selection
of photographs of the real aircraft to help with construction.
The decal
sheet provides markings for a B-0 and B-2; the decals themselves being quite
matte with lots of carrier film around them. The sheet also includes
swastikas; rather unusual for a German company. The decal sheet is basically
just insignia and code letters. Experience with past older Huma kits
has shown that the decals are less than ideal so having some sort of back
up source isn't a bad idea! Aside from the excellent choice of subjects,
what makes Huma kits so nice is their instruction sheet. While it is
basically just an exploded view of where the parts go, there are a selection
of photographs of the real aircraft to help with construction.
First step with this kit is the removal and clean up of the major parts. Again, cleanup is rather tedious, but needed. Once that is finished it is time to start construction. First thing I did assemble the small counterbalances on the rotor blades. Then the engine and exhaust collectors were assembled. The gearbox assembly was next with the rotors hafts placed in it. All these parts needed a huge amount of cleanup and fit was pretty poor. I broke off one of the rotor shafts after it was in the gearbox assembly. Don't even think about making the rotors spin as it isn't going to happen without some major rebuild and use of brass tubing. In addition, I used a lot of filler on all the assemblies. Once the gearbox assembly was finished, it was painted RLM 02. The engine was painted black and the exhaust, burnt iron. The parts were then glued together and the assembly was then trapped between the fuselage halves. It is a tight fit and gluing really isn't necessary.
 Since
I was doing a single-seater, the cover was used in place of the observer's
seat. This was carefully dry fitted before gluing as was the firewall. All
the engine compartment parts were prepainted RLM 02 with black and
silver details. Once the engine/gearbox assembly was in place, it was
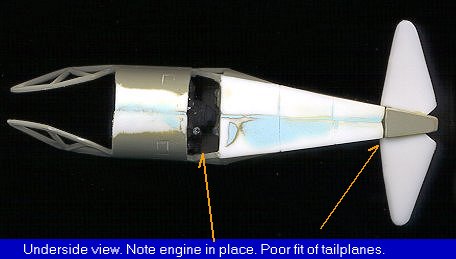
time to glue the fuselage halves together. Fit was poor. Lots of filler was
needed on the join. The panel lines do not match on each side and were off
by as much as 1/8 inch! Next the tailplane was fit in place. Fit here is
not good either. Filler to the rescue! Once all that was filled and filed
the upper and lower fins were attached. The lower fin needed some trimming
to fit near the aft section. Now on to the front of the kit!
Since
I was doing a single-seater, the cover was used in place of the observer's
seat. This was carefully dry fitted before gluing as was the firewall. All
the engine compartment parts were prepainted RLM 02 with black and
silver details. Once the engine/gearbox assembly was in place, it was
time to glue the fuselage halves together. Fit was poor. Lots of filler was
needed on the join. The panel lines do not match on each side and were off
by as much as 1/8 inch! Next the tailplane was fit in place. Fit here is
not good either. Filler to the rescue! Once all that was filled and filed
the upper and lower fins were attached. The lower fin needed some trimming
to fit near the aft section. Now on to the front of the kit!
The first part to be installed here was the front seat/bulkhead, but before that was done, I made a blanking plate from card and put weight behind it to help it sit on its nose gear. A lot of careful peering at the diagrams and photos will tell you how to fit the seat/bulkhead section. When that was dry, the instrument panel and rudder pedals were installed at the very front of the aircraft. If I haven't already mentioned it, the molding of this kit is not good. I broke almost all the thin bits while cleaning up the parts. Very frustrating! Once the instrument panel was firmly dry, it was time for the nose gear and braces. Naturally I broke the v-brace, and while cleaning up the nose gear mount (a tiny brace itself), the mount went flying off somewhere. Being white plastic, it disappeared somewhere in my white carpet. I made a new nose gear mount out of stretched sprue. Once this mess was glued in place and had dried, the attachments were reinforced with superglue, something I also did with the rear gear struts. For this kit, that is a requirement!
Before heading for the rear gear, what looks like a landing light was installed at the very front as was some sort of box or armrest looking thing on the left side near the seat. After removing the main gear parts from the tree, cleaning off the huge mold marks and repairing the struts I broke, it was time to glue them in place. First the small V strut is attached to the area aft of the engine opening. Then the shock struts are set in place and finally the landing leg is glued on. There is a small tab on the small v-strut and on the underside fin for attachment of the landing gear legs, so don't trim those off. Once the parts were sort of aligned, they were glued with liquid cement and when the glue dried, the area reinforced with superglue. This pretty well finishes the actual installation of parts, and the whole thing was taken to the paint shop for its overall RLM 02 paint scheme.
Once back from the paint shop, it was time to add the decals. Now the kit was properly glossed prior to adding the decals. Huma decals are very much like Revell of Germany's; flat, flat, flat. Not a real problem but they do need overcoated. Unlike the last Huma kit I did, these are quite usable and in register. There are two complete sets of markings on the sheet. Rather an oddity as there is only one kit, but nice in case you botch up some decals. As mentioned earlier, these come with swastikas; unusual in that it is a German-produced kit and swastikas are banned in Germany. All decals reacted well to Champ setting solution, which is good as it needs the extra strength to snuggle down. After the decals had dried and excess solution was wiped from the kit with a damp rag, it was then back to the paint shop for a coating of semi-matte clear to seal the decals.

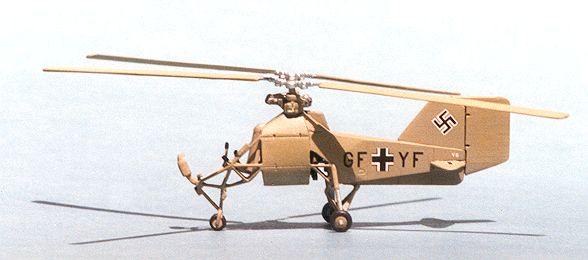
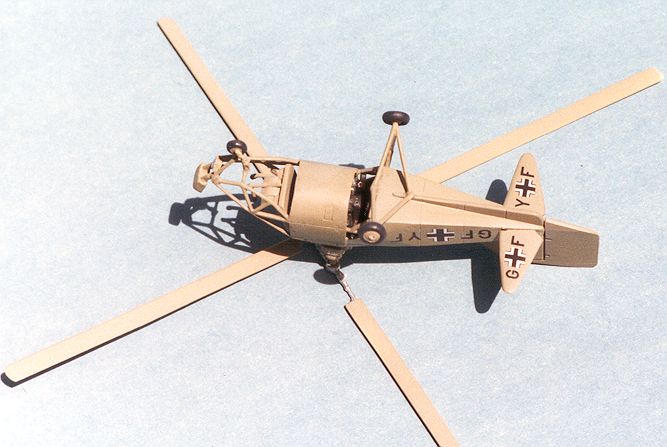
Final touches consisted of attaching the rotors and the wheels. In reality, this is a very simple kit in terms of parts and it is also quite small, looking almost tiny next to a Bf-109 in the same scale. Once you get by the need to do lots of cleanup and misaligned panel lines, it turns into a very nice little kit. For Luftwaffe fans, it makes a nice change from the usual. Recommended for those with experience building limited run kits.

Copyright ModelingMadness.com. All rights reserved. No reproduction in part or in whole without express permission from the editor.