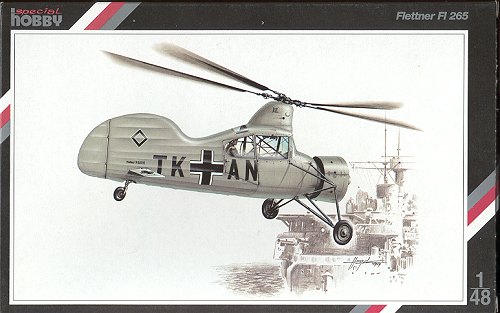
Special Hobby 1/48 Fl-265
|
KIT # |
48004 |
|
PRICE: |
$17.95 |
|
DECALS: |
One aircraft: TK+AN |
|
REVIEW: |
|
|
NOTES: |
Short run with resin and a vac canopy |
|
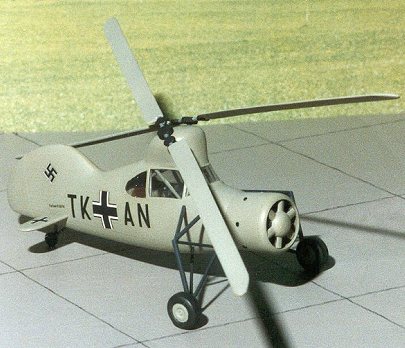
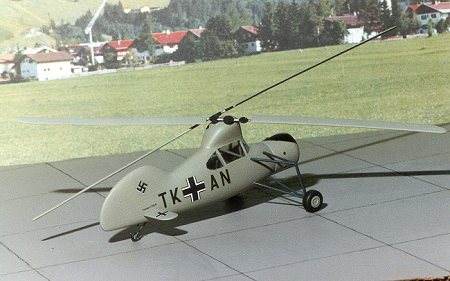
HISTORY |
Contrary to popular opinion, the first operational use of a
helicopter (as compared to an autogyro), was not the US with the Sikorsky R-4,
but the Luftwaffe with the Flettner Fl-265. The Germans had much success with
the Focke-Wulf Fw-61, a rather ungainly twin rotor helo, however it wasn't able
to carry any kind of useful payload. The Luftwaffe then turned to Flettner, who
had a novel design using counter rotating
 intermeshing rotors. All Flettner
helos had large tails for stability. Though it appears that this aircraft has a
normal nose, there is no propeller there but a rotating cooling fan in the
cowling of the 150 HP radial engine.
intermeshing rotors. All Flettner
helos had large tails for stability. Though it appears that this aircraft has a
normal nose, there is no propeller there but a rotating cooling fan in the
cowling of the 150 HP radial engine.
The 265 had a rather protracted development that is typical of highly experimental aircraft. Very few were built; only five airframes. However they were used for observation and anti-submarine work from the deck of cruisers in the Baltic during 1939 and 1940. Despite the ease of control, the design was quickly superceded by the much more advanced, but similarly designed Flettner Fl-282, a helo with an even greater payload capacity.
|
THE KIT |
 Special Hobby's
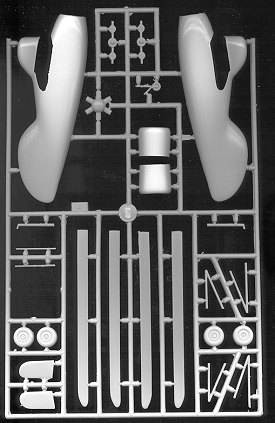
kit is typical of their short-run efforts. All the parts come in a one-piece box
with the decals and resin bits bagged separately. There is one large sprue of
medium grey plastic with very fine engraved detailing. Personally, I wish the
detailing was a bit heavier as any sanding needed (and it will be needed) will
destroy the surrounding detail. All the parts had some flash on them which is
typical of low-pressure injection molding. There is no problem with misaligned
molds which is good as there are a lot of tubular forms.
Special Hobby's
kit is typical of their short-run efforts. All the parts come in a one-piece box
with the decals and resin bits bagged separately. There is one large sprue of
medium grey plastic with very fine engraved detailing. Personally, I wish the
detailing was a bit heavier as any sanding needed (and it will be needed) will
destroy the surrounding detail. All the parts had some flash on them which is
typical of low-pressure injection molding. There is no problem with misaligned
molds which is good as there are a lot of tubular forms.
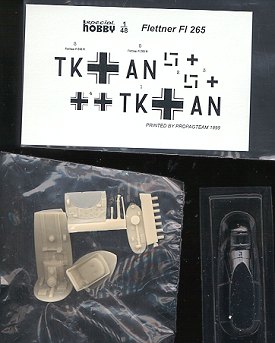 The resin pieces
are for the interior and the engine front. These parts look well molded with no
apparent air bubbles. There is one nice and thick vacuform canopy. The decals
are by Propagteam so promise to be opaque and stick well. They are for the first
prototype.
The resin pieces
are for the interior and the engine front. These parts look well molded with no
apparent air bubbles. There is one nice and thick vacuform canopy. The decals
are by Propagteam so promise to be opaque and stick well. They are for the first
prototype.
Instructions are again typical being 6 pages of which two are history, parts and color diagrams. There are four construction steps that are quite logical in sequence. Like other Special Hobby kits I have built, you have to do some scratchbuilding. In this case it is the interior framework. There are two color schemes for the same aircraft, the difference being in that one has two red bands around the fuselage. Both are in overall RLM 02 Green-grey.
|
CONSTRUCTION |
 "Construction starts
with the cockpit". An old, tired comment, but true. The first thing done
was to make sure the resin bits fit well. There is a section that fits in the
bottom of the roof pylon and just a small amount of sanding the edges to a bevel
allows for a good fit. Next, the interior floor and aft bulkhead were tacked
together and test fit into the fuselage. After a touch of sanding, there were
glued together. Then all the interior bits were painted RLM 02 Green using
Aeromaster Acrylics. There isn't any
reference for this aircraft that I could find that shows interior colors, so you
are on your own. I painted the seat cushion leather, the stick handles black,
the instrument panel RLM 66 and a few other bits and pieces either flat black or
aluminum, using Aeromaster and Model Master paints. Then the interior bits were
given a wash using filthy thinner. When dry, it was drybrushed with steel and
primer grey. Once the instrument panel was dry, the instrument faces were
painted white. When dry, Reheat instrument decals were installed. They really
liven up an otherwise boring panel.
"Construction starts
with the cockpit". An old, tired comment, but true. The first thing done
was to make sure the resin bits fit well. There is a section that fits in the
bottom of the roof pylon and just a small amount of sanding the edges to a bevel
allows for a good fit. Next, the interior floor and aft bulkhead were tacked
together and test fit into the fuselage. After a touch of sanding, there were
glued together. Then all the interior bits were painted RLM 02 Green using
Aeromaster Acrylics. There isn't any
reference for this aircraft that I could find that shows interior colors, so you
are on your own. I painted the seat cushion leather, the stick handles black,
the instrument panel RLM 66 and a few other bits and pieces either flat black or
aluminum, using Aeromaster and Model Master paints. Then the interior bits were
given a wash using filthy thinner. When dry, it was drybrushed with steel and
primer grey. Once the instrument panel was dry, the instrument faces were
painted white. When dry, Reheat instrument decals were installed. They really
liven up an otherwise boring panel.
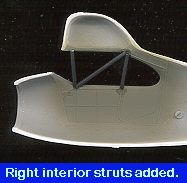 Now it was time to do the scratchbuilding thing.
In this case, I used Contrail strut material instead of stretching sprue as is
suggested in the instructions. Very exact lengths are given, but I found that
'cut, dry fit, sand as needed, and glue', worked just fine as many of the
measurements were either too short or too long. For the interior, there is a
forward and aft brace which is joined by another
Now it was time to do the scratchbuilding thing.
In this case, I used Contrail strut material instead of stretching sprue as is
suggested in the instructions. Very exact lengths are given, but I found that
'cut, dry fit, sand as needed, and glue', worked just fine as many of the
measurements were either too short or too long. For the interior, there is a
forward and aft brace which is joined by another
 brace going from front lower to
aft upper. The aft brace is even with the door front and the fore one joins a
molded brace on the inside of the fuselage. You can see from the image how these
run. There is also a cross brace that runs from about 1/4 way down the back
brace that you will have to get to fit in there. Once you get the braces the way
you want them, they are painted the same color as the interior. Note: you
must put these braces a bit inboard as the transparency needs to fit just
outside of these braces, so don't forget to leave room. I left the cross
brace off until after the fuselage halves were glued together. It is a tight
fit, but can be done. You also need to install a piece to represent the rotor
shaft, but that really isn't much of a problem.
brace going from front lower to
aft upper. The aft brace is even with the door front and the fore one joins a
molded brace on the inside of the fuselage. You can see from the image how these
run. There is also a cross brace that runs from about 1/4 way down the back
brace that you will have to get to fit in there. Once you get the braces the way
you want them, they are painted the same color as the interior. Note: you
must put these braces a bit inboard as the transparency needs to fit just
outside of these braces, so don't forget to leave room. I left the cross
brace off until after the fuselage halves were glued together. It is a tight
fit, but can be done. You also need to install a piece to represent the rotor
shaft, but that really isn't much of a problem.
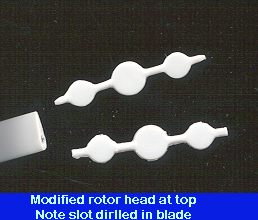 While all that was going on,
I looked at the instructions concerning the rotor blades. They are supposed to
be butt joined to the rotor heads. Right! No way will those heavy blades stay
glued in place. What I did was to drill holes in the ends of each of the blades
and then trim down the tips of the rotor heads to fit into the holes that were
drilled. This way, at least the rotors have a fighting chance. A better solution
may have been to drill out both head and blade and installed a section of steel
rod. Once the blades were glued into the heads, they seemed sturdy enough.
Only time will tell how well everything holds up.
While all that was going on,
I looked at the instructions concerning the rotor blades. They are supposed to
be butt joined to the rotor heads. Right! No way will those heavy blades stay
glued in place. What I did was to drill holes in the ends of each of the blades
and then trim down the tips of the rotor heads to fit into the holes that were
drilled. This way, at least the rotors have a fighting chance. A better solution
may have been to drill out both head and blade and installed a section of steel
rod. Once the blades were glued into the heads, they seemed sturdy enough.
Only time will tell how well everything holds up.
Then it was time for the moment of truth. Would the fuselage halves go together without much fuss? Well first, I had to install the instrument panel. This was a rather fussy procedure as it really didn't want to stay put. I managed to get it tacked to the left side and then brought the other half up to check for clearances. After being satisfactorily installed, the fuselage halves were carefully glued together starting at the rear. By the time I got to the front, there was a rather large gap on the underside of the fuselage. Once the fuselage was dry, the large gap was filled with superglue and the rest of the usual glitches filled with putty and sanded smooth. It was at this time that I noticed that the central control stick has somehow disappeared. Another was made from sprue and installed as was the cross brace near the back.
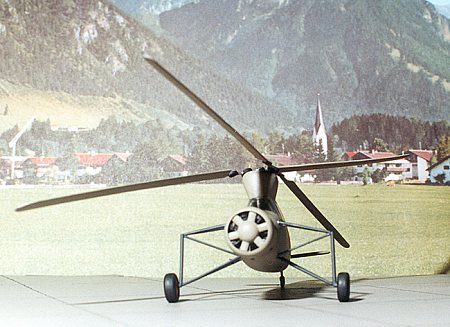
 Once the fuselage was together, the engine (which had been
painted black and drybrushed with aluminum) was glued into the cowl and the cowl
halves (which had been painted RLM 02 on the inside) glued together. This wasn't
that fussy, but took some fiddling to get straight. Then the fan for the front
was cut off the sprue and test fit. The blades are too long so were gradually
filed down bit by bit until the fan fit fully in the front of the engine. The
fan was then painted RLM 02 and set aside until final construction.
Once the fuselage was together, the engine (which had been
painted black and drybrushed with aluminum) was glued into the cowl and the cowl
halves (which had been painted RLM 02 on the inside) glued together. This wasn't
that fussy, but took some fiddling to get straight. Then the fan for the front
was cut off the sprue and test fit. The blades are too long so were gradually
filed down bit by bit until the fan fit fully in the front of the engine. The
fan was then painted RLM 02 and set aside until final construction.
Next on the list of 'things to do' is the landing gear. Each set of spindly legs is composed of four parts, all of them needing cleanup. I recommend doing as much of this cleanup as possible while the parts are still on the sprue as it prevents possible breakage later. Trust me on this. Assembly of the gear legs is rather daunting on first look. There are just small indentations where the gear legs fit and the kit instructions are pretty vague on what the finished gear looks like as there is no overhead view. I had to do a small amount of trimming of one of the lower V legs to get a good fit. Once all the pieces are in place, it is a very sturdy construct. The addition of the brace from the lower leg to the upper one really adds a lot of strength to it. The key is not to use superglue as regular glue gives one the long drying time needed to manipulate all the bits into place. Once there, another shot of glue will hopefully keep everything good and solid. There are undoubtedly some of you who will wish to shape all the attachment points, but I did not, letting the solvent take care of that for me.
 While that was drying, I drilled out the exhaust holes on the
engine cowling. Special Hobbies gives you seven small exhaust pipes in resin to
put into those holes. To prevent them from falling through, I drilled small
pilot holes with a #62 drill bit then took one of my needle files with a broken
tip and drilled about halfway through. That left a large enough hole for the
resin bit to fit into without falling through. Naturally I didn't cut the
resin stacks the same length, but some gentle filing evened them out. They
seemed to stick out quite a bit so I went searching for some photos of the
aircraft. Naturally, they were not easy to find at all. When I did locate an
image, it was obvious that the stacks were VERY short, so they were sanded
almost down to the cowling.
While that was drying, I drilled out the exhaust holes on the
engine cowling. Special Hobbies gives you seven small exhaust pipes in resin to
put into those holes. To prevent them from falling through, I drilled small
pilot holes with a #62 drill bit then took one of my needle files with a broken
tip and drilled about halfway through. That left a large enough hole for the
resin bit to fit into without falling through. Naturally I didn't cut the
resin stacks the same length, but some gentle filing evened them out. They
seemed to stick out quite a bit so I went searching for some photos of the
aircraft. Naturally, they were not easy to find at all. When I did locate an
image, it was obvious that the stacks were VERY short, so they were sanded
almost down to the cowling.
Then, through the open area of the cockpit, the missing control stick and the final brace were added. Looking at the instructions, a flat spot needed to be filed in the back under fuselage area to accept the tail wheel. This was done with a small file and the resulting seam filled in.
Then it was time to add in the transparency. I really do not like vacuform transparencies, but do understand that they are not cheap to produce so that is why these short run kits don't have them. I carefully trimmed the canopy and after much fussing around, got a fair fit. Unfortunately, the canopy is too short for the hole it has to fill so I have some rather large gaps in the back and in the front. These were filled with non-fogging superglue. Once that was done, the remaining gaps were filled with putty and smoothed out. As usual, no matter how much I tried, the canopy just wouldn't smooth into the surrounding area. Guess it is a gift!! Final add on were the tailplanes. There are small locating marks on the rear fuselage where these things go.
|
PAINT & DECALS |
 Once the canopy had been properly treated and masked, it was
time to do the painting. The engine was masked and the entire model was painted
Aeromaster RLM 02 Grey enamel. When dry, the tail wheel struts and main landing
gear struts were painted RLM 66 dark grey, again, an Aeromaster color, using a
brush. The kit was then sprayed with a gloss clear in preparation for the
decals.
Once the canopy had been properly treated and masked, it was
time to do the painting. The engine was masked and the entire model was painted
Aeromaster RLM 02 Grey enamel. When dry, the tail wheel struts and main landing
gear struts were painted RLM 66 dark grey, again, an Aeromaster color, using a
brush. The kit was then sprayed with a gloss clear in preparation for the
decals.
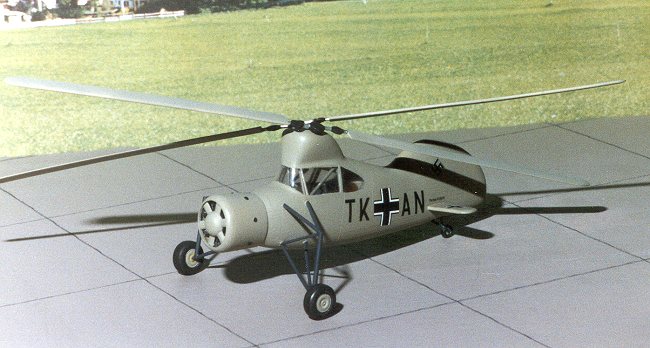
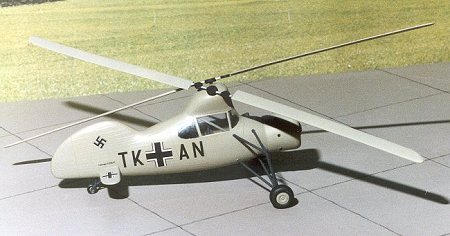
The decals are really quite basic, consisting of insignia, side code letters and a small 'Flettner FL-265v1' marking that goes just above the tailplanes. They are Propagteam decals so are very thin. They were also off register. The white had to be trimmed from the crosses and the swastika decals were unusable. I substituted some from the spares box. They only needed a bit of setting solution and they were done. When dry, the kit was wiped down and sprayed with a clear semi-matte. Then the masking was removed from the clear parts and the rotors were carefully glued into place in the holes that were drilled out for them. Final steps were the main wheels and the engine cooling fan.
|
CONCLUSIONS |
 Overall, the kit looks pretty neat. There were no real surprises
in construction as I had expected to do some work on it and I did. The resin
parts fit much better than I had expected, which was a treat, and the
construction of the landing gear wasn't the nightmare that I had originally
envisioned. Even the interior bracing was not that difficult, but it was time
consuming.
Overall, the kit looks pretty neat. There were no real surprises
in construction as I had expected to do some work on it and I did. The resin
parts fit much better than I had expected, which was a treat, and the
construction of the landing gear wasn't the nightmare that I had originally
envisioned. Even the interior bracing was not that difficult, but it was time
consuming.
The kit looks very cool and really belies all the work that had to go into it to make it look that way. It will make a very nice addition to my early helicopters collection and is a nice change from the toss-together Bf-109s that I had been making. Because of the nature of the kit and the semi-complicated interior and landing gear, I suggest that you have a few of these short run kits under your belt before tackling this one.
April 2000
If you would like your product reviewed fairly and fairly quicklyy, please contact the editor or see other details in the Note to Contributors.