Supermodel 1/72 BV-138C
|
KIT # |
0017 |
|
PRICE: |
$11.98 (in 1985) |
|
DECALS: |
Three aircraft |
|
REVIEW : |
|
|
NOTES: |
|
HISTORY |
The Bv-138 started off as the Ha-138 (for Hamburger Flugzeugbau, a company in Hamburg, Germany). Several prototypes were developed for several different engines, each in the 1,000 hp category. However, in 1935, such power was not easily available from an aero engine so a tri-motored configuration using 650hp Junkers Jumo 205C diesel engines was developed. The first prototype made its maiden flight in July of 1937 followed shortly by a second prototype. Trials showed instability both in the air and water so a redesign was initiated.
 The new design had a larger hull and tail surfaces to cure the
instability problems and five preproduction BV-138s (the company name had been
changed to Blohm und Voss) were built. These aircraft were in action during the
Norway invasion of 1940. These planes performed as required and so
production BV-138A-1 aircraft were built. The first unit to be so equipped was
up to strength by November 1940 operating in the long range reconnaissance role.
The new design had a larger hull and tail surfaces to cure the
instability problems and five preproduction BV-138s (the company name had been
changed to Blohm und Voss) were built. These aircraft were in action during the
Norway invasion of 1940. These planes performed as required and so
production BV-138A-1 aircraft were built. The first unit to be so equipped was
up to strength by November 1940 operating in the long range reconnaissance role.
General improvement of the aircraft occurred throughout its life with increases in armament and bomb load along with more powerful Jumo diesels. However, the aircraft was always structurally weaker than was hoped and was unable to handle hard water landings without succumbing to some damage.
The final version, the BV-138C finally had all the strengthening and power needed to become a truly effective flying boat. The majority of the 279 BV-138s built between 1939 and 1943 were the C version, some of which were equipped with rocket take off units and some even fit for catapult launching. Never really fast with a maximum speed of 170 mph, all were eventually destroyed and none survived the war.
|
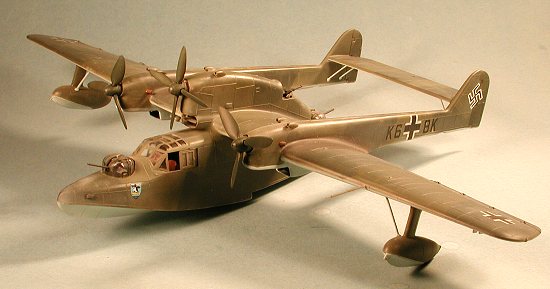
THE KIT |
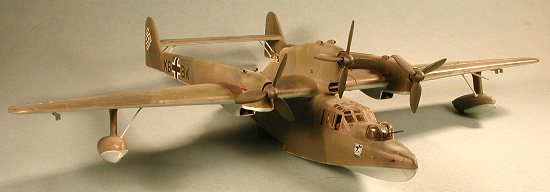
Supermodel has to be given lots of credit for having the guts to produce this kit. I'm sure it has not been exactly a huge seller, but those of us who like the more esoteric aircraft are grateful that they took the plunge. A new kit this is not, being from the initial batch of models molded in the late 1960's/early 1970's. As a result, it is of the raised detail school of model design. A part that I like is that the control surfaces are molded separately so they can be posed in different positions if you like. The cockpit detailing is minimal, but there are aftermarket etched brass sets for those who crave more detail.
 Being a seaplane, there is a beaching dolly included for you to place your model
upon. There are no real options other than the small bomb load and (if memory
serves) a large degaussing ring for the minesweeper variant. Many of the parts
have sink marks where the alignment pins and holes are located so those will
need to be filled. You may also want to tone down the fabric representation on
the control surfaces as they are a bit stark. Paint will fill in some of that.
Being a seaplane, there is a beaching dolly included for you to place your model
upon. There are no real options other than the small bomb load and (if memory
serves) a large degaussing ring for the minesweeper variant. Many of the parts
have sink marks where the alignment pins and holes are located so those will
need to be filled. You may also want to tone down the fabric representation on
the control surfaces as they are a bit stark. Paint will fill in some of that.
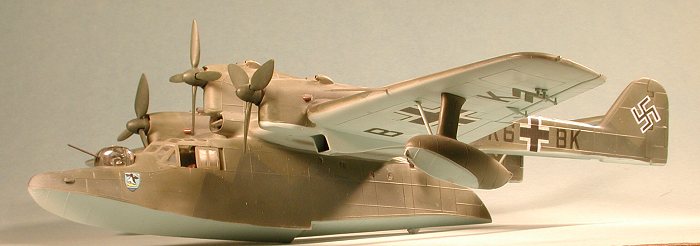
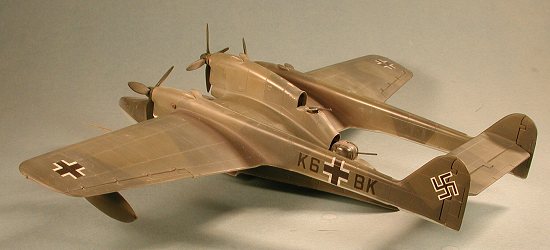
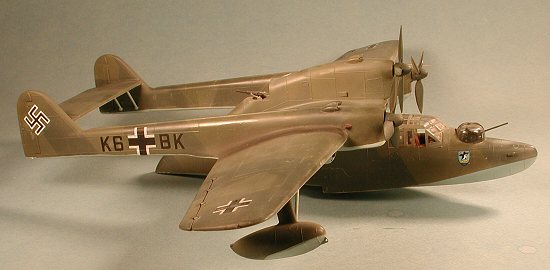
Instructions are adequate for building the kit. You should know that the aircraft should be painted in Maritime colors of RLM 72/73 over RLM 65, though when I built this kit I didn't know that so painted it in RLM 70/71 over RLM 65. There are decals for three aircraft. These work quite well though the carrier film is a bit much and I trimmed all of mine off.
|
CONSTRUCTION |
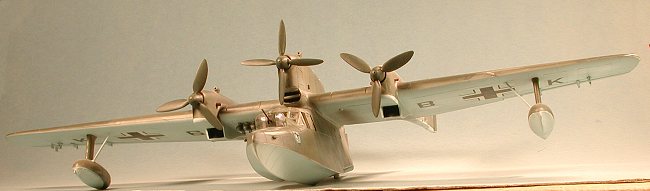
For such a large plane, construction is really relatively trouble-free. The biggest headache with this kit is the size of things. The wings are large and will require filler where they meet the fuselage. The hull also needed filler in several places on the upper side. Finally the tail booms. It seems that most kits that have this feature require special care when installing them and this is no different. I spent quite a bit of time with the filler getting a smooth join on the tail booms.
If you haven't figured it out already, most Supermodel kits are not the world's best fitting. Not really horrible, but constant dry-fitting is recommended to cut down on the assembly hassles. This is especially true when fitting the booms to make sure that they are even with each other. It is fortunate that the booms are a complete assembly unlike other 'twin-tailed' aircraft of this sort. They simply glue to the center section and then the wings glue onto the outside of them. I chose this time to glue in the tailplane to make sure that everything was properly aligned. It does get in the way of sanding, but it sure beats having it all out of whack when the kit is finished. The installation of the struts really helps to stabilize this area and make a strong construct, though I did wait until after the kit had been painted to install them. Same for the wing tip floats as it is much easier to paint them first and then glue them in place.
 When gluing the fuselage/hull
together, you need to take care to properly trap the fore and aft turrets. These
turrets will really challenge your ability to assemble clear parts as they are
in a right and left side. The seam in the middle will need to be filled so take
your time with it. Once the turrets are together, a bit of petroleum jelly will
enable them to turn without too much problem. It will also keep you from gluing
them solid!
When gluing the fuselage/hull
together, you need to take care to properly trap the fore and aft turrets. These
turrets will really challenge your ability to assemble clear parts as they are
in a right and left side. The seam in the middle will need to be filled so take
your time with it. Once the turrets are together, a bit of petroleum jelly will
enable them to turn without too much problem. It will also keep you from gluing
them solid!
The canopy section fits fairly well at the front, though the back will need some trimming and filling for a smooth fit. You can position the side windows open if you wish to show off the rather spartan interior. The props can be assembled outside of the engines and just pushed into place when done. Makes it much easier to paint. The open tub upper gun position was assembled after painting.
There are a number of bits that are glued onto the outside of the fuselage. Things like air intakes for the engines, the aforementioned gun tub, various cleats and antennas. Over the years, the radio antenna and DF loop antenna have managed to disappear. While easily replaced, laziness strikes quite frequently and patching up older kits just doesn't have the priority that building new ones does!
|
PAINT & DECALS |
As I mentioned earlier, this kit should have been painted in Maritime colors, but I chose to use RLM 70/71/65 using Gunze Sangyo acrylic paints. (I now realize that I should have used RLM 72/73, but 20 years ago when this kit was built, we just were not that well informed). The paints gave me no trouble and the amount of masking required for the splinter camouflage was prodigious, to say the least. Once all was painted, the plane was sprayed with a clear gloss coat and left to dry in preparation for decals.
 Aftermarket choices for the BV-138 are non-existent so kit decals are the only
options. I chose the one that had a nice unit badge on the nose. The only real
difference between the options were in codes and badges. The decals did need to
be trimmed, but went on well. It was at this time that I had my first use of
Tamiya flat base. I stupidly did not realize that it was meant to be used to
flatten out gloss paint. I thought it was a flat coat, so I dutifully thinned it
with alcohol and sprayed it on. Imagine my dismay when the plane got so flat
that it actually frosted. EEK!!! My model looked like I had just pulled it out
of the freezer! Scurrying for the gloss coat, I applied several coats in an
attempt to get rid of the frosting. While I did manage to tone it down a great
deal, it was still rather evident. The only thing I could do then was to repaint
the plane or bluff my way thorough it. I chose the latter. I also chose to paint
on heavy exhaust stains as diesels are not clean burning engines!
Aftermarket choices for the BV-138 are non-existent so kit decals are the only
options. I chose the one that had a nice unit badge on the nose. The only real
difference between the options were in codes and badges. The decals did need to
be trimmed, but went on well. It was at this time that I had my first use of
Tamiya flat base. I stupidly did not realize that it was meant to be used to
flatten out gloss paint. I thought it was a flat coat, so I dutifully thinned it
with alcohol and sprayed it on. Imagine my dismay when the plane got so flat
that it actually frosted. EEK!!! My model looked like I had just pulled it out
of the freezer! Scurrying for the gloss coat, I applied several coats in an
attempt to get rid of the frosting. While I did manage to tone it down a great
deal, it was still rather evident. The only thing I could do then was to repaint
the plane or bluff my way thorough it. I chose the latter. I also chose to paint
on heavy exhaust stains as diesels are not clean burning engines!
When taking it to the monthly IPMS contest, I brazenly showed everyone my 'salt-encrusted' BV-138. All were dutifully impressed at how I had managed to do such a superb job of 'weathering' the plane to make it look like it had spent a long time in a salt environment. My ego was saved and I didn't have to repaint the plane!
|
CONCLUSIONS |
This is a case of 'if you want a BV-138, this is it, take it or leave it'. The kit isn't difficult to build, but does require attention to construction. It isn't very detailed as compared to today's kits, but you can easily add the missing detail. If you like the unusual and have the skill to build it, I can recommend it to you.
November 2001
Copyright ModelingMadness.com. All rights reserved.
Review kit courtesy of me and my wallet!
If you would like your product reviewed fairly and quickly, please contact the editor or see other details in the Note to Contributors.
Back to Reviews Page 2020