Special Hobby 1/48 DFS-230
|
KIT # |
48014 |
|
PRICE: |
$30.00 MSRP |
|
DECALS: |
Two Aircraft |
|
REVIEWER: |
|
|
NOTES: |
Multimedia with resin and etched brass |
|
HISTORY |
Without a doubt, Germany's most successful glider, The DFS-230 was able
to handle nine fully armed combat troops or an equivalent weight in
cargo. Used with great success in the capture of the Belgian Fort of Eban
Emael, the 230s landed on the roof of this imposing structure, taking the
defenders completely by surprise. It was also used extensively in other
theaters for similar missions. Unlike the Allies, the Germans also used
gliders for general cargo hauling, often towing them behind a Ju-87 or
Bf-110. Frequently, German squadrons were hauled around from base to base
during the very fluid fighting on the Eastern Front. This way, they
bypassed the horrid road conditions that often left vehicles stuck in
muddy bogs during the wet season. As with most auxiliary aircraft,
remaining DFS-230 gliders were destroyed after the war, and to my
knowledge, not one of the over 1,000 built survives.
|
THE KIT |
The kit is very typical of new MPM-molded kits. The surface detail is very
good with the fabric surfaces properly subdued and what panel lines exist
are of the engraved variety. Resin is used for the rudder pedals, seat,
skid shocks and tow line attachments. Unfortunately, the small sprue is
just chucked into the bag with the rest of the parts and mine was
damaged with many parts broken off or missing. There was a hole in my bag
and so those missing are gone. The clear parts are very
There are no alternate bits, though the really lazy modeler may wish to
forego the installation of the seats and do just a cargo version. It will
cut construction time considerably by eliminating these parts. I should
mention that the interior bits will be visible through the clear windows.
Instructions are pretty well the same as they've always been, but I have
noticed to my dismay that MPM is now doing the 'Humbrol Numbers Only' deal
when it comes to non-RLM shades. How hard can it be to simply add the
name of the color? Markings are given for two gliders, both in RLM
70/71/65, the standard for bombers and assault gliders. Other than fuselage
codes, the only difference between the two is the degree of mottling. The
instructions give no information as to unit. If you have other photo
resources, you can find a wide variety of interesting schemes for these
aircraft.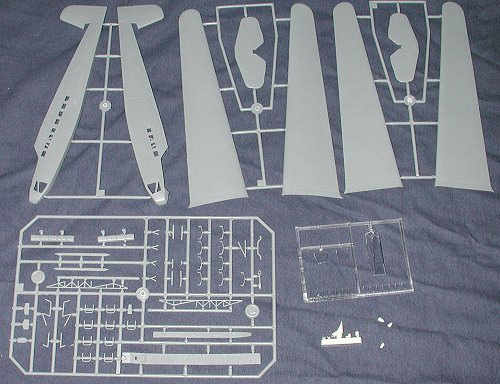
 well done, however,
my canopy was ripped where it came adrift of the sprue during shipment.
There is also a small etched metal fret for seat belts and instrument
panel.
well done, however,
my canopy was ripped where it came adrift of the sprue during shipment.
There is also a small etched metal fret for seat belts and instrument
panel.
|
CONSTRUCTION |
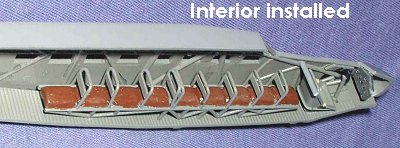
First thing is to build up the interior. In this case, it
means cutting and cleaning the framework for the troop seats. There are two
small indentations on the floor for the framework, so make sure you don't
trim off the posts on this framework too short. The seats cushions are next
and installation instructions are rather vague when it comes to these. I
thought that they fit atop the framework, but if you do that, then the seat
backs won't fit so the cushions have to go between the framework. It
is a rather fiddly construct, but not impossible. Next was the resin seat.
When you cut it off the resin block, angle the
Inside the fuselage are ejector pin towers that will need
removed. At least from the cockpit area as they are most easily seen. I'd
also suggest cleaning up the visible braces that go across window openings
as they are a bit rough. At this time, I installed the small side
instrument panel and the two forward braces. These were not the best fit,
but they eventually managed to make it in place.
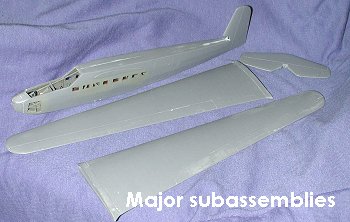
While this was drying, I glued the wing halves together and
the tail plane. Returning to the interior, I cleaned up all the seat backs
and glued them in place. One thing for sure, it was a rather cramped and
uncomfortable ride for the nine souls in the back. Then the interior bits
were painted RLM 02 green-grey using Testors ModelMaster enamels. Seat
cushions themselves were painted leather (though in reality, they were
probably cloth and the same grey as the rest of the interior). Seat belts
from the etched brass set were then installed on the pilot's seat. After a bit
of touchup, I started attaching the head restraints to the upper side of
the fuselage half as shown in the instructions. Once all were there, I did
a test fit. No way was everything going to fit. Either the attachments were
too low, the seat backs too high or I messed something up in a big way.
Only cure was to remove them as they would not be seen that much anyway (or
at least, that is what I convinced myself!)
Once that was done, I made sure all the seams were
filled on the wings and horizontal stabilizer as well. Then the stab was
glued in place. Now I know zilch about this glider other than a few bits
and pieces but it seems to me that there may be a real glitch on the tail
section. The stab sits on the upper fuselage on a pair of horizontal rails,
which jives with my few references. There is a large gap at the back and
top of the stabilizer. I don't think it is supposed to be there, but
failing any concrete info, I'm leaving it as is. Returning
to the rest of the airframe, I decided to install the windows. The kit is
designed so that these bits are installed from the outside and I'm quite
grateful for that as it makes things much easier. Regardless of which way I
tried to put in the side windows, the fit was very snug. I used a touch of
glue as a lubricant to get them into place. The forward pieces have a
slight, but definite curve to them, but don't fit at all in the
direction of the curve. It is as if they were made mirror image of where
they were to fit. It left me with a lot of tight fitting clear bits that
had pieces of them sticking out proud of the fuselage. Not good. I decided
to sand them all down level (or close to it) with the fuselage side. I
started with a coarse sanding stick to get them down to the surface, and
then used several increasingly finer grits, using an old chambray shirt as
the final polishing. Much better. These were then masked as doing so after
the wings and struts were applied would be most difficult. I also test fit
the canopy and after some sanding of it and the surrounding area, got it to
where it would fit.
Moving down to
the bottom of the plane, the tail skid bits were glued in. The alignment of
the various holes on the lower fuselage for the tail skid and forward skid
are such that they are off by half their diameter. The only option is to
open the holes just enough for the parts to fit in place. Fortunately, the
oval holes are covered up in the front section, leaving only the rear skid
attachment point to be a problem. I should also mention that there are
small indentations in the nose section for something, but there seem to be
no parts that fit there. These were filled and sanded smooth.
After attaching the tail skid parts, I gently sanded down the forward
braces to have them blend in more with the lower fuselage. Then I moved to
the forward skid. This is a simple construct and there are three resin
'shocks' that fit in holes in the large skid and the lower fuselage. Each
one of these is a slightly different length. Since mine had broken free of
the block, it took a bit of fiddling to get them in the right order. Once
that was determined, it was easy to glue them in place. Then the skid assy
was glued on. Over this go the various little struts for
the landing gear. Not an easy assembly as the attachment points are not
very helpful. A lot of fussing and adjustment needs done. In the very front
is another small brace for the forward skid and the tow line attachment (I
guess). It was as equally fussy as the main gear braces. The seat belts
were glued in and the canopy (which had already been masked) was
attached. Again, more light sanding and trimming was needed to get this to
fit properly. The rest of the windows were masked and it was time for
paint. I left off the wing struts until after painting. CAMOUFLAGE & MARKINGS
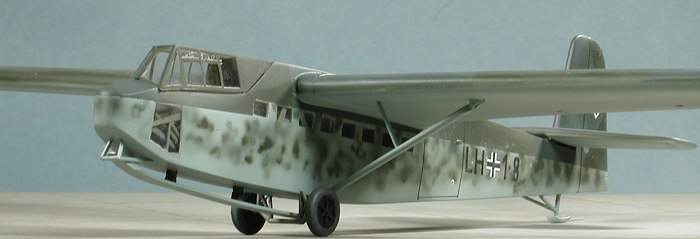
These gliders were your standard RLM 70/71/65 with varying levels of
mottling. Some had very hard upper/lower camo lines and others were quite
'soft'. I chose a harder line to make painting easy. First the lower RLM 65
light blue. Then the usual masking and the upper RLM 71 dark green was
sprayed on. This was followed by another longish session of masking in the
proper splinter pattern for the RLM 70. Then I lost power for four days so
it had plenty of time to dry!
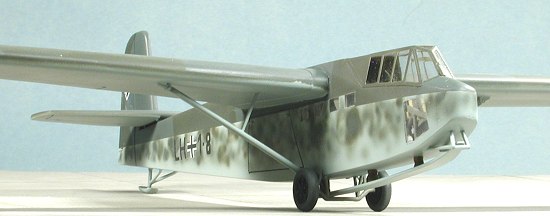
The decals are superb. Very opaque and very thin. Also a touch off
register, but you won't notice it until you apply them to the dark
background. I was able to carefully slice away the white bits that
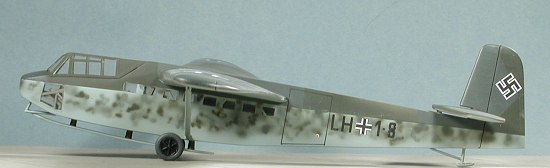
protruded from the national insignia so no real problem. The swastika decal
worked fairly well, but it is imperative that you have no wrinkles or any
other misalignment in the outer section or the inner bit won't line up
properly.
A coat of matte was then applied to the decalled glider. I should mention
that only two options are provided and both are pretty much the same other
than unit code letter/numbers on the side. If you have references with
other codes, you can substitute those from your decal spares box.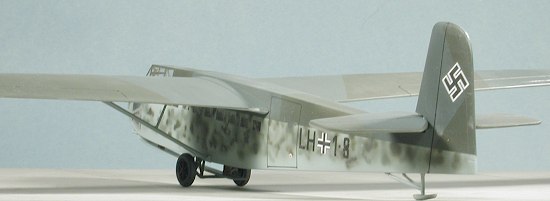 attachment post so that it
sits level when you glue it. The hole for the control column is too large
for the column mount so you'll have to just take a good shot at gluing it
in place. My rudder pedals were broken and had parts missing so I didn't
install them.
attachment post so that it
sits level when you glue it. The hole for the control column is too large
for the column mount so you'll have to just take a good shot at gluing it
in place. My rudder pedals were broken and had parts missing so I didn't
install them.
 Next the
instrument panel was glued in place as best as I could get it. It doesn't
fit well and some trimming is needed to get something decent. Then the
interior was glued into the left fuselage half and a small cross-brace
(which is too long and needs trimmed) was installed behind the pilot's
seat. Throughout all of these various steps, much dry-fitting was done to
make sure things would not cause problems later. Once all of that was
installed and dry, the fuselage halves were glued together. I did it in
stages from the back to the front and clamped each stage as it needed it.
It appears that the clamping was a bit much in the front as there was some
overlap when the clamps were removed. It shouldn't be much of a
Next the
instrument panel was glued in place as best as I could get it. It doesn't
fit well and some trimming is needed to get something decent. Then the
interior was glued into the left fuselage half and a small cross-brace
(which is too long and needs trimmed) was installed behind the pilot's
seat. Throughout all of these various steps, much dry-fitting was done to
make sure things would not cause problems later. Once all of that was
installed and dry, the fuselage halves were glued together. I did it in
stages from the back to the front and clamped each stage as it needed it.
It appears that the clamping was a bit much in the front as there was some
overlap when the clamps were removed. It shouldn't be much of a
 problem.
Then I took out a sanding stick and sanded on all the seams to get them as
flat a possible. Being a canvas/wood covered aircraft, no problems in
removing panel lines! I still needed filler but not as much as I'd have
thought.
problem.
Then I took out a sanding stick and sanded on all the seams to get them as
flat a possible. Being a canvas/wood covered aircraft, no problems in
removing panel lines! I still needed filler but not as much as I'd have
thought. 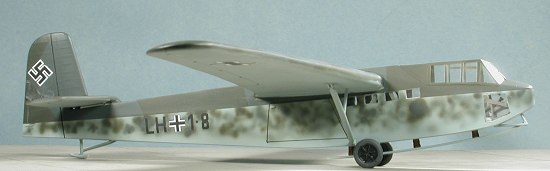 Then I started gluing on the wings. The
attachment points are not very positive and it seems to me that there is
insufficient dihedral in the first wing. Unfortunately, I was unable to
attach the struts as the attachment points are small resin mounts and I
hadn't installed those yet. While the first wing was drying, these items
were removed from the resin blocks and attached. If you recall, I received
this kit with a tear in the bag and resin pieces loose in the box.
Fortunately, all of the various resin bits survived without being lost,
which is a real miracle in itself. The locating points for the strut
supports are easy to see and a small drop of superglue was all that was
needed to get them in place. I test fit the struts to make sure they were
properly located and the fit was quite good.
Then I started gluing on the wings. The
attachment points are not very positive and it seems to me that there is
insufficient dihedral in the first wing. Unfortunately, I was unable to
attach the struts as the attachment points are small resin mounts and I
hadn't installed those yet. While the first wing was drying, these items
were removed from the resin blocks and attached. If you recall, I received
this kit with a tear in the bag and resin pieces loose in the box.
Fortunately, all of the various resin bits survived without being lost,
which is a real miracle in itself. The locating points for the strut
supports are easy to see and a small drop of superglue was all that was
needed to get them in place. I test fit the struts to make sure they were
properly located and the fit was quite good.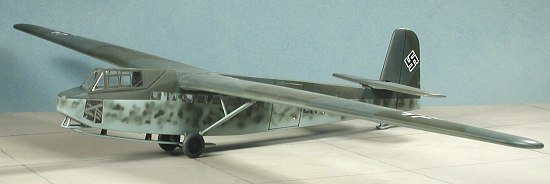
 Once the juice returned and the basement dried up enough to paint, I
sprayed RLM 70 and 71 in a mottle pattern on the fuselage sides. A nice
overcoat of clear acrylic gloss (Future) and it was time for decals.
Once the juice returned and the basement dried up enough to paint, I
sprayed RLM 70 and 71 in a mottle pattern on the fuselage sides. A nice
overcoat of clear acrylic gloss (Future) and it was time for decals.
|
FINAL CONSTRUCTION |
 Final construction is very simple. First, the wheels were painted and
then glued in place. They look just like early Bf-109 spoked wheels so if
you have some aftermarket ones or spares, I highly recommend replacing
them. The kit wheels have rough detail that just doesn't look right and are
quite hard to paint thanks to no strong wheel/tire border. Once those were
glued on, the masking taken off and the wing struts glued in place. I found
the two smaller struts to be too long so you'll need to trim them prior to
gluing them in place. No need for a bunch of soot, thrown up mud or other
dirtying up as that stuff just isn't that appropriate for most gliders. It
was not uncommon for some gliders that were operated from improved surfaces
to keep the wheels on all the time. Oh yes, and those rudder pedals that I
lost. I found them right after applying the decals!
Final construction is very simple. First, the wheels were painted and
then glued in place. They look just like early Bf-109 spoked wheels so if
you have some aftermarket ones or spares, I highly recommend replacing
them. The kit wheels have rough detail that just doesn't look right and are
quite hard to paint thanks to no strong wheel/tire border. Once those were
glued on, the masking taken off and the wing struts glued in place. I found
the two smaller struts to be too long so you'll need to trim them prior to
gluing them in place. No need for a bunch of soot, thrown up mud or other
dirtying up as that stuff just isn't that appropriate for most gliders. It
was not uncommon for some gliders that were operated from improved surfaces
to keep the wheels on all the time. Oh yes, and those rudder pedals that I
lost. I found them right after applying the decals!
|
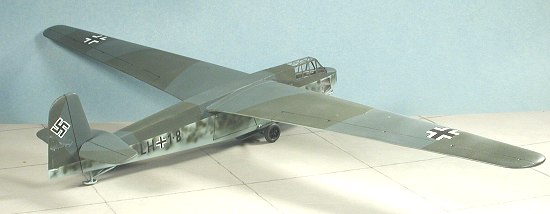
CONCLUSIONS |
I really liked this kit. Not too difficult with some interesting challenges to work on while building. The shake and bake crowd won't like it as it doesn't fall together, but it isn't so challenging as to incur the wrath of the builder. A very pleasant kit that will find favor with those who like things a bit different. It would be great if this kit does well so that a Waco CG-4 could be done in 1/48!
June 2003
#1272 in a series
If you would like your product reviewed fairly and fairly quickly, please contact the editor or see other details in the Note to Contributors.