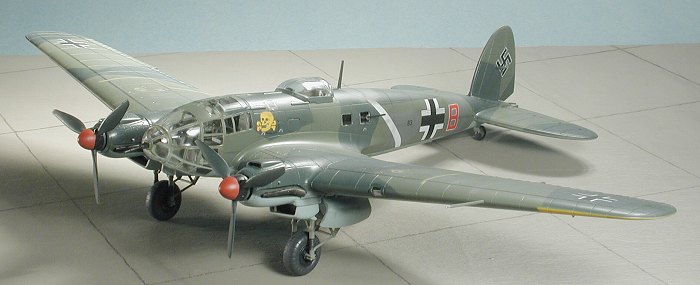
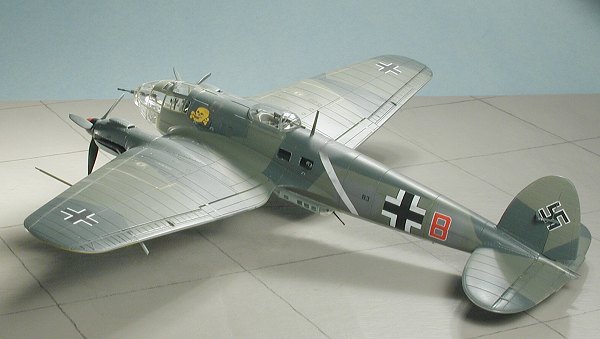
Hasegawa 1/72 He-111H-4
|
KIT # |
00551 (E 21) |
|
PRICE: |
¥3200 (about $30.00) from Hobby Link Japan |
|
DECALS: |
Three options |
|
REVIEWER: |
Scott Van Aken |
|
NOTES: |
|
BACKGROUND |
Please visit the preview for a short
history and a look at what is in the box. You know, I'm glad to see that
Hasegawa has started on some of the more important 1/72 twin-engined
bombers. They have done p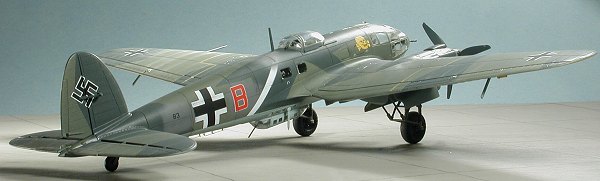 robably all the Japanese twins and a few of the
more important British aircraft (the Mosquito and the Beaufighter).
Though I'm surprised that no Beaufort or Blenheim has come to pass,
perhaps they have left that to MPM to cover.
robably all the Japanese twins and a few of the
more important British aircraft (the Mosquito and the Beaufighter).
Though I'm surprised that no Beaufort or Blenheim has come to pass,
perhaps they have left that to MPM to cover.
After doing an excellent late B-25, they have now decided to do a Luftwaffe aircraft and probably the most important bomber in their arsenal. I seriously doubt if they will do any of the early versions, as Roden has that covered and they'd need a new wing, but I can see at least an H-22 with the upper turret as being considered, thanks to the 'unused' parts and the way the sprues are laid out. Though Italeri has most of the Ju-88s in their inventory, I would be most pleased if Hasegawa decided to tackle these aircraft next! (which they did. Ed)
|
CONSTRUCTION |
 First thing I did was to carefully read over the instructions to see
if perhaps I could do a few subassemblies. There were a few so I glued
the horizontal stabilizers and the wheels together. Then I opened up the
fuel dump holes in the lower wing and sought out the wheel wells as those
had to be trapped in between the upper and lower wing halves. Most
unusually, these wells are glued to the upper wing half. I found that the
wings fit well, but on both of them had to reapply cement to the inner
trailing edge and the wing tips as I had not given those areas enough the
first time around.
First thing I did was to carefully read over the instructions to see
if perhaps I could do a few subassemblies. There were a few so I glued
the horizontal stabilizers and the wheels together. Then I opened up the
fuel dump holes in the lower wing and sought out the wheel wells as those
had to be trapped in between the upper and lower wing halves. Most
unusually, these wells are glued to the upper wing half. I found that the
wings fit well, but on both of them had to reapply cement to the inner
trailing edge and the wing tips as I had not given those areas enough the
first time around.
With the wings cleaned up and the leading edge panel lines rescribed, I assembled each of the two engines. I found the upper engine insert to be a bit smaller than the rest of the engine. Perhaps it was me, but both of them fit rather loosely. There was the usual sanding to take care of the small seams and the engines were then fit into their corresponding wings. Actually, I built one engine and then put it into the proper wing to make sure I wouldn't get them mixed up as it would be somewhat easy to do.
Meanwhile, I was building the interior. I glued in the seats, control
stick, rudder pedals and various boxes to the cockpit section. In the
back I installed the aft bulkhead. I then assembled the bomb racks and
its surrounding bulkheads. I should mention that these racks come full of
nice bombs and that once in place, you can see little but the sides of
the bomb canisters, so no need to fuss over the seams as they will be
invisible. By installing the bomb canisters, you are basically obviating
the use of the external bomb racks. The He-111 could ca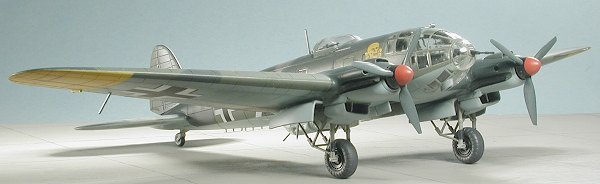 rry internal bombs
or external bombs, but not both. At least not full ones. You could
install one canister and an external rack on the opposite side as that
was done from time to time, but loading the 111 with heavy bombs severely
limited its range. From my reading, they almost never carried both
internal and external bombs. Anyway, this opted me out of external bombs.
The interior bits were all painted RLM 02, despite the instructions
stating RLM 66. I did this because the requirement for painting aircraft
cockpits in RLM 66 wasn't required until November of 1941 and all the H-4
versions were completed by early 1941. In fact, it was one of the major
variants that took part in the Battle for Britain.
After painting a few things black and adding a decal or two for
instruments, I trapped the interior bits between the fuselage halves and
glued them together. The fit is pretty tight so a bit of wiggling will be
needed to get everything in place. Fortunately for me, the side windows
are added from the outside so no need to get those in at this time.
rry internal bombs
or external bombs, but not both. At least not full ones. You could
install one canister and an external rack on the opposite side as that
was done from time to time, but loading the 111 with heavy bombs severely
limited its range. From my reading, they almost never carried both
internal and external bombs. Anyway, this opted me out of external bombs.
The interior bits were all painted RLM 02, despite the instructions
stating RLM 66. I did this because the requirement for painting aircraft
cockpits in RLM 66 wasn't required until November of 1941 and all the H-4
versions were completed by early 1941. In fact, it was one of the major
variants that took part in the Battle for Britain.
After painting a few things black and adding a decal or two for
instruments, I trapped the interior bits between the fuselage halves and
glued them together. The fit is pretty tight so a bit of wiggling will be
needed to get everything in place. Fortunately for me, the side windows
are added from the outside so no need to get those in at this time.
 With
the fuselage halves together, I then glued on the wings. BTW, you can
leave off the tail wheel until later should you choose. I did. The wings
fit onto short spars that jut out of the fuselage and help to make a nice
fit. I had little trouble with these though both left gaps adjacent to
the bomb bay on the underside. Some filler was needed. Then I glued on
the horizontal stabilizers. These mesh into each other so no worries on
the fit here at all. The fuselage did need sanding and some filler and in
the process I broke off all six of the small antenna mounts on the lower
fuselage. Oddly, there is n
With
the fuselage halves together, I then glued on the wings. BTW, you can
leave off the tail wheel until later should you choose. I did. The wings
fit onto short spars that jut out of the fuselage and help to make a nice
fit. I had little trouble with these though both left gaps adjacent to
the bomb bay on the underside. Some filler was needed. Then I glued on
the horizontal stabilizers. These mesh into each other so no worries on
the fit here at all. The fuselage did need sanding and some filler and in
the process I broke off all six of the small antenna mounts on the lower
fuselage. Oddly, there is n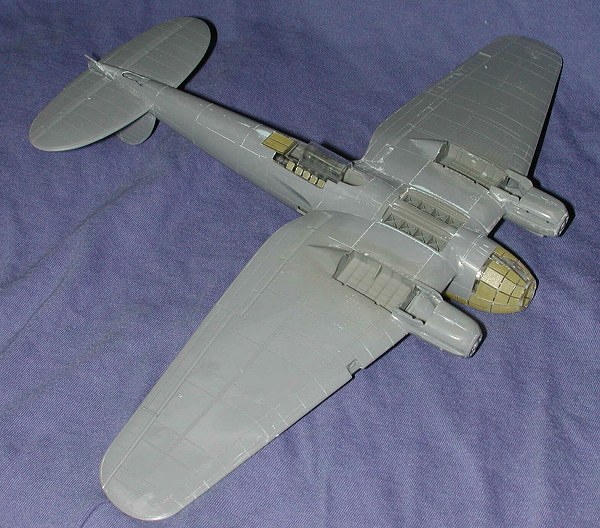 o
antenna provided to go on these small mounts even though this was a
common item on all wartime He-111s. I'll be replacing those with bits of
sprue prior to painting, so I drilled out the holes at this time so I'd
know where they'd go.
o
antenna provided to go on these small mounts even though this was a
common item on all wartime He-111s. I'll be replacing those with bits of
sprue prior to painting, so I drilled out the holes at this time so I'd
know where they'd go.
With the airframe looking more and more like a 111, I then started masking the canopy. Time consuming it was, but it also was made easy by excellent engraving on the panels. The nose transparency is actually five parts. One in the entrance hatch, one is the nose gun mount and the other three parts make up the majority of the nose. These actually fit quite well. I first glued the upper piece, then the lower piece then the small sliver section. A well engineered construct. I tacked on the nose gun mount with white glue so I could remove it again and install the gun. For the underside gondola, the front and rear pieces were glued in place and after the usual masking, the gondola was snapped temporarily into place. Same with the bomb bay doors, though the left side fits very tightly and may be difficult to remove. I then filled in some of the 'holes' with tissue to prevent overspray and headed for the paint shop
|
COLORS & MARKINGS |
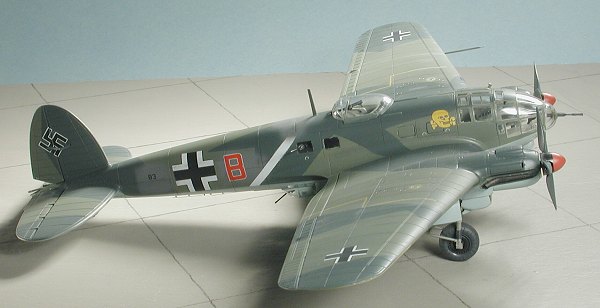
Pretty much a no-brainer on this one. The vast majority of He-111Hs
were painted in a splinter pattern of RLM 70/71 on the upper sides and
RLM 65 lowers. First color I sprayed was RLM 65 using Testors ModelMaster
enamels thinned with Floquil lacquer thinner. Though I've used lots of
other paints and generally like them all, I keep coming back to Testors.
Once the RLM 65 was dry, I masked it as much as I could and then painted
the entire upper surface with RLM 71, the lighter of the two upper
surface colors. The upper surface colors wrap around the wing leading
edge, making masking just that little bit more
 complicated. Again, I used
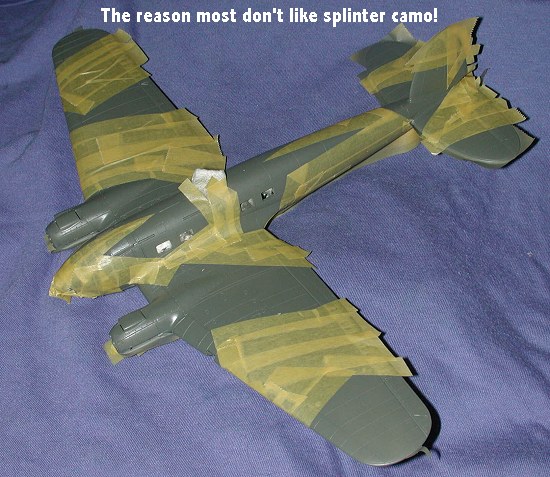
Testors ModelMaster enamel for this color. Then began a bit of a chore in
masking the beast with a splinter camo. I know why a lot of people don't
like doing splinter camo; it is because you spend an hour or two masking
and 5 minutes painting before you pull off the masking to see if you've
screwed anything up! Well, once the beast was masked, I sprayed on the
RLM 70, again using Testors ModelMaster enamels. When it had dried (which
thanks to the Floquil thinner meant I could handle it in about 4 hours),
I touched up the usual overspray after installing the under wing fuel
dump vents.
complicated. Again, I used
Testors ModelMaster enamel for this color. Then began a bit of a chore in
masking the beast with a splinter camo. I know why a lot of people don't
like doing splinter camo; it is because you spend an hour or two masking
and 5 minutes painting before you pull off the masking to see if you've
screwed anything up! Well, once the beast was masked, I sprayed on the
RLM 70, again using Testors ModelMaster enamels. When it had dried (which
thanks to the Floquil thinner meant I could handle it in about 4 hours),
I touched up the usual overspray after installing the under wing fuel
dump vents.
Then it was back to the work bench to have more bits added on prior to the decals. This generally means the landing gear as I'd rather have it on its gear before the gloss coat. Well, before putting on the landing gear, I had to finish up the engines. This was a simple matter of gluing in the lower radiator section, a probe of some sort and then the radiator cover. The lower radiator section is an extremely tight fit so take care when installing it so you don't break something. The landing gear itself is a bit fiddly, but when you finally get all the pieces in place, it makes a very strong construct. I suggest just taking your time to get it all properly aligned and in place. The tail wheel fit with no hassles at all.
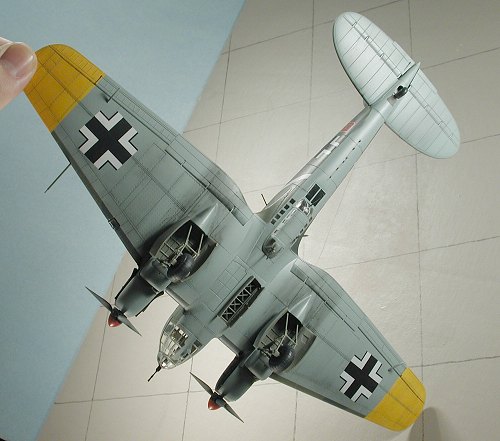 With it now on its landing gear, I took it to the paint shop and,
after masking off the wing tips, sprayed some white. When that was dry,
it was sprayed with RLM 04 Yellow using some of my old Aeromaster
Acrylics. I also sprayed the prop spinners white and later sprayed them
RLM 23 red using Gunze Sangyo Acrylics. Then the kit was given several
light gloss coats using Future acrylic clear.
With it now on its landing gear, I took it to the paint shop and,
after masking off the wing tips, sprayed some white. When that was dry,
it was sprayed with RLM 04 Yellow using some of my old Aeromaster
Acrylics. I also sprayed the prop spinners white and later sprayed them
RLM 23 red using Gunze Sangyo Acrylics. Then the kit was given several
light gloss coats using Future acrylic clear.
For decals, I decided to use Aeromaster 72-147 and picked the He-111H-4 from 8./KG 54 in 1943. This aircraft had the smaller unit codes and the previous markings had been painted over with some RLM 75. Now this would be a bit of a challenge to get things right. Mainly because the old codes were over-painted prior to the fuselage stripe being added so I had to put on the fuselage insignia first. Then after applying the insignia and painting the RLM 75 for the old codes, I had to apply the fuselage stripe and then paint some RLM 75 over the top of it on the upper portion of the airframe. It was interesting to say the least. You'll also note that this plane has the old swastika presentation that straddled the rudder hinge line. This means leaving off the rudder hinges until after the swastika is applied. In order to apply the unit's 'death head' the forward windows must be installed and painted over. If you are doing a plane where all the forward windows are painted, you could probably leave out the internal bomb canisters all together as there isn't much to see from inside the cockpit. Like so many Monogram 1/48 bombers that I've built, the detail is invisible, but "I know it is in there".
The rest of Aeromaster's decals went on without any real problem. I was unsure if I should bother with the stencils that are supplied with the Hasegawa kit (the Aeromaster sheet has none). I finally decided to add some of the more common ones as the plane looked a bit bare without them. Much to my delight, using the Microscale/Superscale setting solutions worked just fine with no problem.
|
FINAL CONSTRUCTION |
 With the decals on, I then added a few bits such as the rudder hinges,
radio mast, rear view mirror, upper gun position and two other forward
windows. These items all needed touch-up paint, including the two forward
windows. Unlike some other paints, I found that brush painting on the
Testors resulted in exactly the same shade as when it was airbrushed. I
glued on the gear doors, which fit very well, thanks to some good
engineering in this area. I also painted the exhaust using Testors Burnt Iron Metalizer
and the various guns (which are quite easy to break, btw), were painted
with Gunmetal, again using Testors. This stuff brush paints small areas
quite well and I use it all the time.
With the decals on, I then added a few bits such as the rudder hinges,
radio mast, rear view mirror, upper gun position and two other forward
windows. These items all needed touch-up paint, including the two forward
windows. Unlike some other paints, I found that brush painting on the
Testors resulted in exactly the same shade as when it was airbrushed. I
glued on the gear doors, which fit very well, thanks to some good
engineering in this area. I also painted the exhaust using Testors Burnt Iron Metalizer
and the various guns (which are quite easy to break, btw), were painted
with Gunmetal, again using Testors. This stuff brush paints small areas
quite well and I use it all the time.
Now that all these items were on and the paint was dry, I gave the entire airframe a coating of clear matte acrylic using my time-honored mixture of Future and Tamiya Flat Base. When dry, I got down to the task of adding yet more parts. First of all, I glued in the exhausts, then I removed any of the temporarily mounted clear bits and glue in the various machine guns. Then those bits were glued in place. I also installed the landing light and its cover. This cover sticks out just a teeny bit more than the surrounding wing. I can tell you that handling this model with all those guns and things sticking out of it isn't the easiest.
 Moving to the top, I glued in the upper gun position and its gun. Just
to warn you, if you use the cover as supplied in the kit, the gun will
have to be pointed off center, and that means mounting it on the side of
the bar. This is because the gun port is not on the centerline of the
canopy section, but off to the right. It was then time for the bomb bay
doors. One of them was in there so tightly that I couldn't get it loose!
No problem, as the other one was easy enough to take care of. It was
properly cut and glued in place. With the outer doors being in four
separate pieces when open, there is a bit more work to doing this kit
with the doors open than on your usual bomber. I then drilled a pair of
small holes to do the lower fuselage antenna out of stretched sprue. It
looks fair, but I'm seriously considering re-doing it with copper wire at
a later date as the sprue just doesn't look that good.
Moving to the top, I glued in the upper gun position and its gun. Just
to warn you, if you use the cover as supplied in the kit, the gun will
have to be pointed off center, and that means mounting it on the side of
the bar. This is because the gun port is not on the centerline of the
canopy section, but off to the right. It was then time for the bomb bay
doors. One of them was in there so tightly that I couldn't get it loose!
No problem, as the other one was easy enough to take care of. It was
properly cut and glued in place. With the outer doors being in four
separate pieces when open, there is a bit more work to doing this kit
with the doors open than on your usual bomber. I then drilled a pair of
small holes to do the lower fuselage antenna out of stretched sprue. It
looks fair, but I'm seriously considering re-doing it with copper wire at
a later date as the sprue just doesn't look that good.
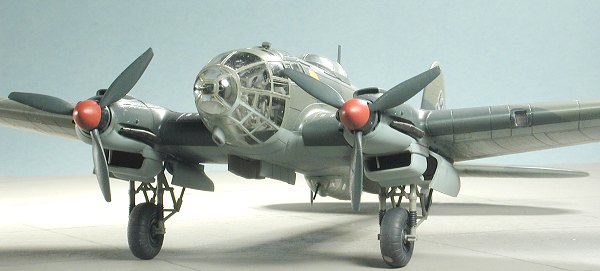
The final thing to do was to add some pastels for the very prominent exhaust staining that the He-111 often showed and then shoved on the props. When that was finished, I was done.
|
CONCLUSIONS |
I have to say that this is really a superb kit. The general fit is excellent, the subject is one that many of us have wanted for an updated kit in a long time, and I foresee a number additional boxing of other variants in the coming future. Though it isn't a real shake and bake kit due to all the parts and the rather hefty masking requirements, you'll be as pleased with the results as I know I am.
P.S. I know that on some of the pics the gear doors are too high. I was made aware of that and redid some photos.
August 2004
# 1327 in a series
Copyright ModelingMadness.com. All rights reserved. No reproduction in part or in whole without express permission from the editor.
If you would like your product reviewed fairly and quickly, please contact the editor or see other details in the Note to Contributors.